

Most new crocheters stall before the first stitch. You’ve got the yarn, the hook, and a tutorial queued up, and then there’s a tangle of loops that falls apart the second you touch it.

That tangle was supposed to be a slip knot. Here’s the reassuring part: it’s not hard. It’s just unfamiliar. Once your hands learn the motion, you’ll tie one without looking, every single project, for the rest of your crochet life.
This guide walks you through it slowly, shows you how to tell whether you’ve tied it the right way, and covers the small mistakes that trip people up.
Table of Contents
Key Takeaways
- A slip knot is an adjustable loop that attaches your yarn to the hook. Nearly every crochet project starts with one.
- The method is simple: make a loop, pull the working yarn through it, and tighten the new loop on your hook.
- Leave a tail of about 6 inches (15 cm) so you can weave it in neatly later.
- The loop should be snug but still slide easily along the hook. Too tight is the most common beginner mistake.
- Projects worked in the round, like amigurumi, often start with a magic ring instead.
What Is a Slip Knot, and Why Does It Matter?
A slip knot is exactly what it sounds like: a knot with a loop that slips. Pull one end and the loop gets smaller. That adjustability is the whole point.
In crochet, the slip knot is your anchor. It holds the yarn on the hook so you can start your foundation chain. It doesn’t count as a stitch, so when a pattern says “chain 20,” you don’t include the slip knot in that count.
It’s also the knot you’ll tie more than any other. Get comfortable with it now, and every project afterward starts a little faster and a little calmer.
Know Your Yarn: Tail End vs. Working Yarn
Before you tie anything, it helps to name the two ends of your yarn. Almost every crochet instruction refers to them.
- The tail end is the short, loose end. It stays out of the way and gets woven in when you finish.
- The working yarn is the end attached to the ball or skein. This is the yarn you’ll actually crochet with.
Keeping these two straight is what makes a slip knot behave properly, so take a second to identify them before you start.
How to Make a Slip Knot: Step by Step
You’ll need your yarn and a crochet hook. A medium-weight (worsted) yarn in a light, solid color and a 5 mm (H-8) hook are the easiest combination for learning, because you can clearly see what each strand is doing.
1. Measure your tail. Pull out about 6 inches (15 cm) of yarn from the end. That’s your tail. It’s long enough to weave in later but short enough to stay out of your way.
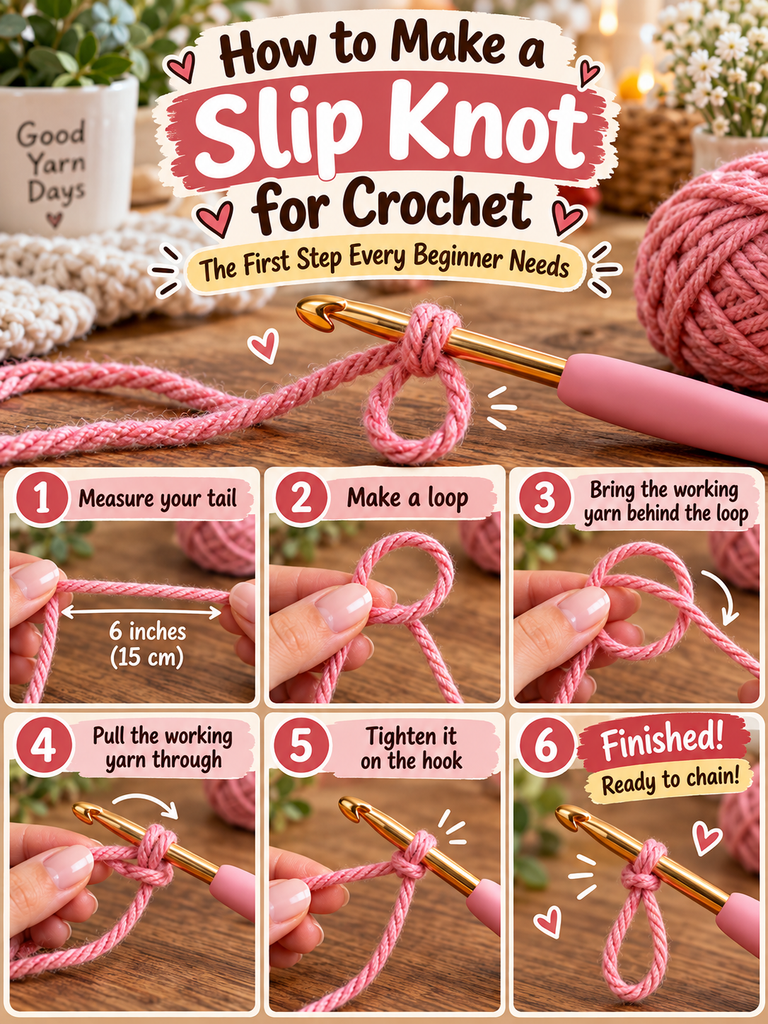
2. Make a loop. Cross the working yarn over the tail to form a loop, roughly the size of a coin. Pinch the spot where the two strands cross between your thumb and index finger.

3. Bring the working yarn behind the loop. Let the working yarn drape behind the loop so it sits across the opening, like a line drawn through a circle.

4. Pull the working yarn through. Insert your hook (or your fingers) through the front of the loop, catch the strand of working yarn behind it, and pull it through to the front. You now have a new loop sitting on your hook.

5. Tighten it on the hook. Gently pull both ends to close the knot, then tug the working yarn to shrink the loop until it fits the hook snugly. Stop when it hugs the hook but can still slide up and down the shaft.

That’s it. You’ve made your first slip knot, and you’re ready to chain.
How to Check You Tied It the Right Way
Here’s a quick test that saves a lot of confusion later. Pull gently on the working yarn. The loop on your hook should get smaller. Now pull on the tail. The knot itself should tighten, but the loop should stay about the same size.
If it works the other way around (the tail changes the loop size), the knot is reversed. It will still hold, but the loop can loosen while you work. The fix is easy: pull it out and start again, making sure it’s the working yarn you pull through the loop in step 4.
Common Slip Knot Mistakes (and Easy Fixes)
The loop is too tight. This is by far the most common one. If the loop is choking the hook, your first chain will be a struggle. Loosen it by pulling the loop open with your fingers. You want it snug, not strangled.
The knot falls apart. If everything unravels when you pull, the working yarn went around the loop instead of through it. Go back to step 4 and make sure you’re pulling a strand through the opening.
The tail is too short. A one-inch tail feels tidy at first but is almost impossible to weave in later. Six inches is a safe default.
Mixing up the ends. If you start chaining with the tail by accident, you’ll run out of yarn after a few stitches. Always crochet with the strand that leads back to the ball.
Alternative Ways to Start
The method above is the one most patterns assume, but it isn’t the only option.
The finger method. Some crocheters form the slip knot entirely by hand, then slide it onto the hook. It’s the same knot, just made off the hook first. Use whichever feels more natural to you.
The magic ring. Also called the magic circle or adjustable ring, this is the usual start for projects worked in the round, such as hats, coasters, and amigurumi. It lets you pull the center closed completely so there’s no hole. If your pattern says “start with a magic ring,” you won’t need a slip knot.
The knotless start. Some experienced crocheters skip the knot and simply twist a loop onto the hook. It leaves a slightly cleaner edge, but it can come loose easily, so it’s best saved for once you’re comfortable with the basics.
A Simple Practice Drill
Muscle memory is what turns this from a fiddly step into an automatic one. Try this: tie a slip knot, check it with the test above, pull it out, and repeat 10 times.
It takes about five minutes. By the tenth knot, you’ll notice your hands moving before you’ve finished thinking about the next step. That’s exactly the point.
Frequently Asked Questions
Does the slip knot count as a stitch?
No. The slip knot is not counted in your foundation chain. If a pattern asks for 20 chains, make the slip knot first and then count 20 chains after it.
Is a crochet slip knot the same as a knitting slip knot?
Yes. It’s the same knot. In knitting it goes on the needle as the first cast-on stitch, while in crochet it simply holds the yarn on the hook.
Is the slip knot different for left-handed crocheters?
The knot itself is identical. Left-handed crocheters simply hold the hook in the left hand and the yarn in the right, so the motions are mirrored.
How tight should a slip knot be?
Snug enough that it doesn’t fall off the hook, loose enough that it slides freely along the shaft. If you can’t easily move it, loosen it a little.
Do I always need a slip knot to start crocheting?
Not always. Most flat projects start with a slip knot and a chain, but many projects worked in the round begin with a magic ring instead. Your pattern will tell you which one to use.
Your First Knot Is Your First Win
That tangle of yarn from the beginning of this article? It’s not a sign that crochet isn’t for you. It’s just the part every crocheter goes through before the motion clicks.
Make a loop, pull the working yarn through, snug it onto the hook, and give it the quick pull test. Do that a handful of times, and the slip knot stops being a hurdle and becomes the small, familiar ritual that starts every project.
Next up is the foundation chain, where your slip knot finally gets to do its job.
Over to you: grab some yarn, tie your first slip knot, and let us know in the comments how it went. Did it click on the first try, or did it take a few attempts? And if you’ve got a trick that helped you learn, share it. It might be exactly what another beginner needs.



One Comment