Picture this. You’re at a café, your coffee is finally cool enough to drink, and then you smell it. You know exactly what’s happened. So you grab the giant diaper bag, carry it to a tiny restroom, balance it on a sink that’s barely big enough for soap, and start digging. Bottles. A spare onesie. Three toys. A receipt from last Tuesday. Somewhere at the bottom, one diaper.

We’ve all been there. And honestly? That moment is the whole reason I fell for the diaper pouch.
It’s a small fabric clutch that holds a few diapers and a pack of wipes, nothing more. You grab it, you go, you’re done. The Sewith Mia Diaper Pouch Sewing Pattern turns that idea into something you can sew yourself, and the result is so pretty that nobody will guess what’s inside.
Table of Contents
Key Takeaways
- A diaper pouch holds the essentials for one change: diapers and wipes, ready to grab.
- The Sewith Mia design has a built-in wipes lid on the front, so you can pull a wipe without opening anything.
- It closes with soft cotton ties instead of zippers or snaps, which keeps the sewing simple.
- It comes as a PDF pattern, so you can print it at home and start the same day.
- The construction is ten straightforward steps: two pockets, a framed lid window, one tie and a turn-and-topstitch finish.
- It makes a thoughtful, practical handmade baby shower gift.
Why a Diaper Pouch Beats Digging Through Your Bag
Here’s the thing about diaper bags: they’re built to carry everything. That’s great when you’re out for the whole day. It’s not great when you need one specific thing in about ten seconds.
A pouch fixes that by splitting the job in two. The big bag stays at your table or in the stroller basket. The pouch, small and flat, goes with you to the changing table. It also slips into a regular handbag or tote, which means on short trips you can skip the diaper bag entirely.
And because it’s fabric, you can make it look however you like. No more choosing between “practical” and “something I actually want to carry.”
What Makes the Sewith Mia Diaper Pouch Special
I’ve seen plenty of diaper clutch designs, and most of them are basically an envelope. This one has a few clever details that make it stand out.
A wipes lid you can use with one hand
The front of the pouch features a plastic pop-up wipes lid sewn right into the fabric. Slide your wipes pack inside, line it up with the opening, and you can flip the lid and pull out a wipe without unfolding the pouch. If you’ve ever tried to peel open a wipes packet with one hand while the other hand keeps a wriggling baby on the mat, you’ll understand why this matters.
A roomy pocket for diapers
Inside, there’s a deep pocket that holds a small stack of diapers. In the photo, it’s tucked behind a lined flap so everything stays neat and hidden. You could also slip a small tube of diaper cream in there, too.
Soft tie closures
Instead of zippers, magnetic snaps or Velcro, the pouch closes with cotton twill tape ties. Personally, I love this. Ties are quiet (no ripping Velcro next to a sleeping baby), they won’t scratch little hands, and they’re much easier to sew than a zipper. Plus, they add a lovely, slightly vintage look.
A clean, finished look
The sample shown is sewn in orange-and-white gingham with a deep rose lining, rounded corners and neat topstitching around the edges. Those rounded corners are a small detail, but they make the pouch look polished rather than homemade, and they wear better over time because there are no sharp points to fray.
Choosing Fabric: Where the Fun Really Starts
This is the part where I could happily spend an entire afternoon. Fabric choice changes everything about how the finished pouch looks and how well it holds up.
A few tips that have served me well:
- Pick a stable woven cotton for the outside. Quilting cotton, cotton poplin or a light canvas all work. Gingham, like the sample, is a great choice because the checks also act as a built-in guide for straight stitching.
- Think about the lining. The lining is what touches the diapers and wipes. A wipe-clean option, such as laminated cotton, makes life easier. Regular cotton works too, as long as you’re happy to throw the pouch in the wash.
- Prewash everything. Cotton shrinks. Wash and dry your fabric before cutting so your pouch doesn’t pucker after the first wash.
- Match the ties. Natural cream twill tape goes with almost anything, but a coordinating color can make the pouch pop.
Not sure what to go for? Ask yourself one question: who’s going to carry it? A busy parent who wants something neutral will love a soft linen look. A friend with a bold style might prefer a bright floral or a graphic print.
What You’ll Need
Before you start, gather everything in one place. Nothing kills sewing momentum like hunting for twill tape halfway through.
- Outer fabric: about half a yard (50 cm) of woven cotton, like the gingham in the photo
- Lining fabric: about half a yard (50 cm) of cotton or laminated cotton
- Medium-weight fusible interfacing: about half a yard (50 cm)
- Cotton twill tape: about 1 yard (90 cm), roughly 2 cm wide
- One reusable pop-up wipes lid (the kind sold for refill packs)
- Matching thread, a glass or cup for rounding corners, clips, scissors, a fabric marker and an iron
How to Sew a Diaper Pouch, Step by Step
The Sewith Mia pattern gives you exact printable pieces, so if you have it, follow its measurements. If you’d like to understand the process first (or you’re itching to start tonight), here’s how the construction works, with sizes that fit a stack of three to four diapers and a standard travel pack of wipes. All seam allowances are 1 cm (3/8 inch).
The idea is simple: one long rectangle that folds in half. The top half holds a diaper pocket, the bottom half holds a wipes pocket with the lid window, and a twill tape tie wraps around to close it.
Step 1: Prewash and cut your pieces
Wash and dry all your fabric first, then press it flat. Cut the following:
- Main body: 1 outer and 1 lining, each 28 x 46 cm (11 x 18 in)
- Diaper pocket: 1 outer and 1 lining, each 28 x 21 cm (11 x 8¼ in)
- Wipes pocket: 1 outer and 1 lining, each 28 x 19 cm (11 x 7½ in)
- Lid facing: 1 lining square, about 15 x 12 cm (6 x 4¾ in)
- Interfacing: 1 piece the size of the outer main body, plus 1 for the outer wipes pocket

One honest note: diapers and wipes packs vary a lot by brand and size. Lay yours on the fabric before cutting and add a couple of centimeters if they look snug.
Step 2: Fuse the interfacing
Iron interfacing onto the wrong side of the outer main body and the outer wipes pocket. This gives the pouch body and keeps the lid window from sagging. If you want a softer, padded feel, you can add a thin layer of cotton batting to the main body as well.

Step 3: Finish the top edges of both pockets
Place the outer and lining of the diaper pocket right sides together. Stitch along one long edge only (this becomes the pocket opening). Turn right side out, press, and topstitch 3 mm from the edge. Repeat with the wipes pocket.

Now you have two neat pockets, each with one clean finished edge and three raw edges.
Step 4: Cut the wipes lid window
Here’s the step that looks scary but really isn’t.
Take the plastic lid and trace its inner opening (not the outer frame) onto the outer side of the wipes pocket, centered side to side and about 6 cm below the finished edge. Place the lining facing square right side down over the tracing, pin or clip, and stitch exactly on the traced line all the way around.
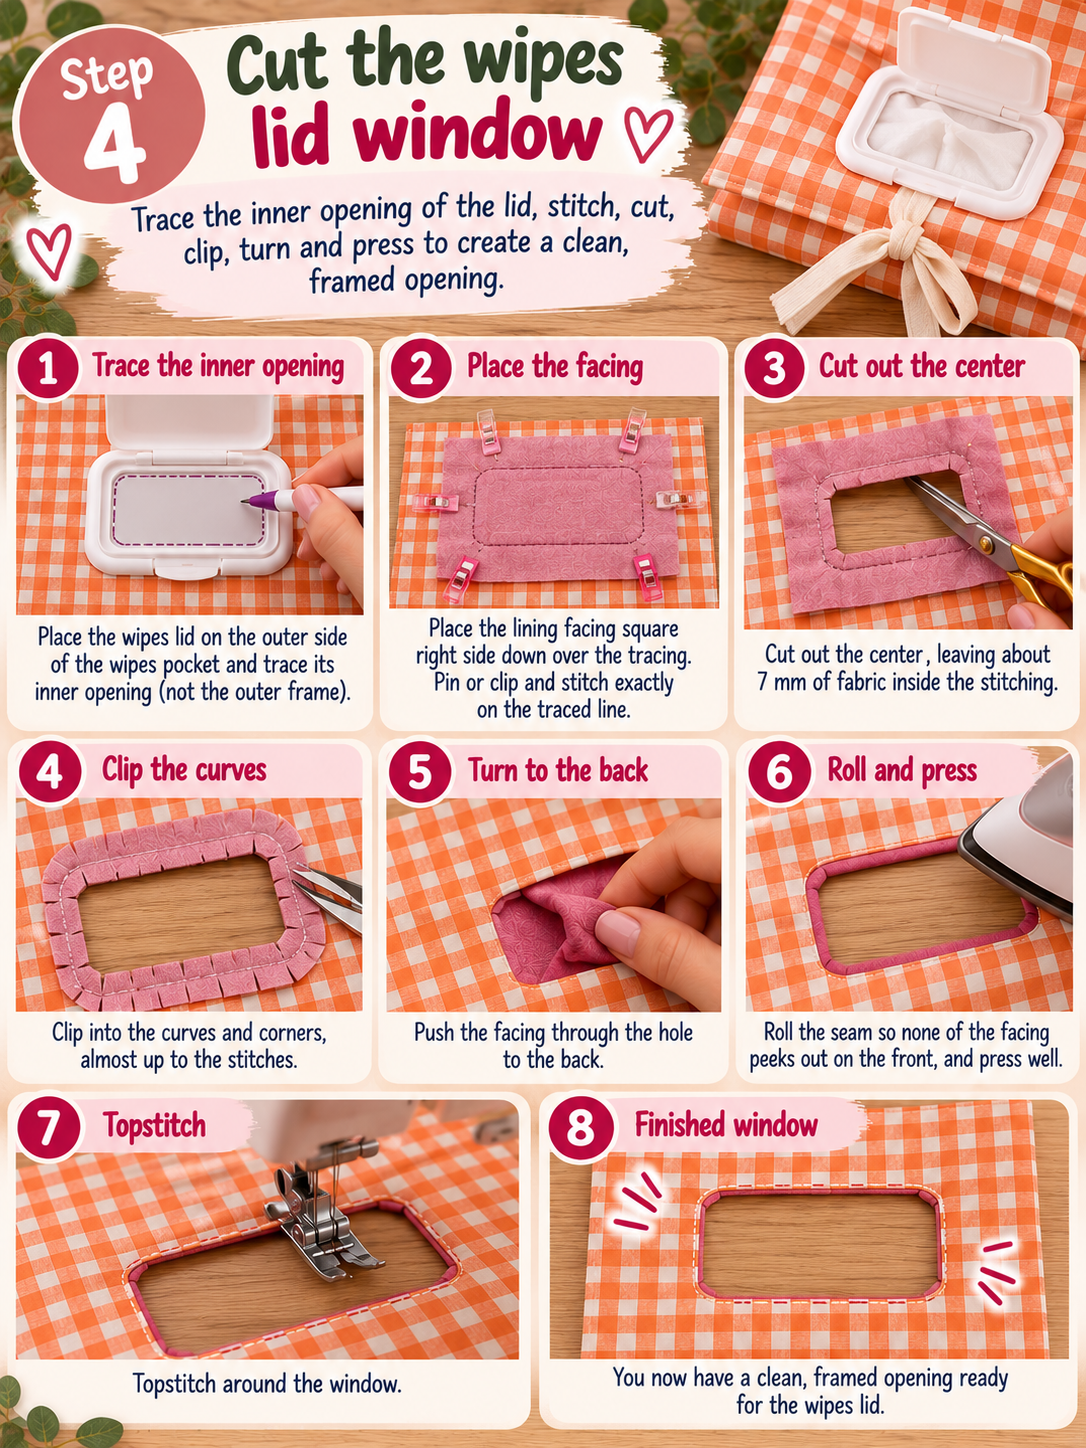
Cut out the center, leaving about 7 mm of fabric inside the stitching. Clip into the curves and corners, almost up to the stitches. Then push the facing through the hole to the back, roll the seam so none of the facing peeks out on the front, and press well. Topstitch around the window. You now have a clean, framed opening.
Step 5: Attach the wipes lid
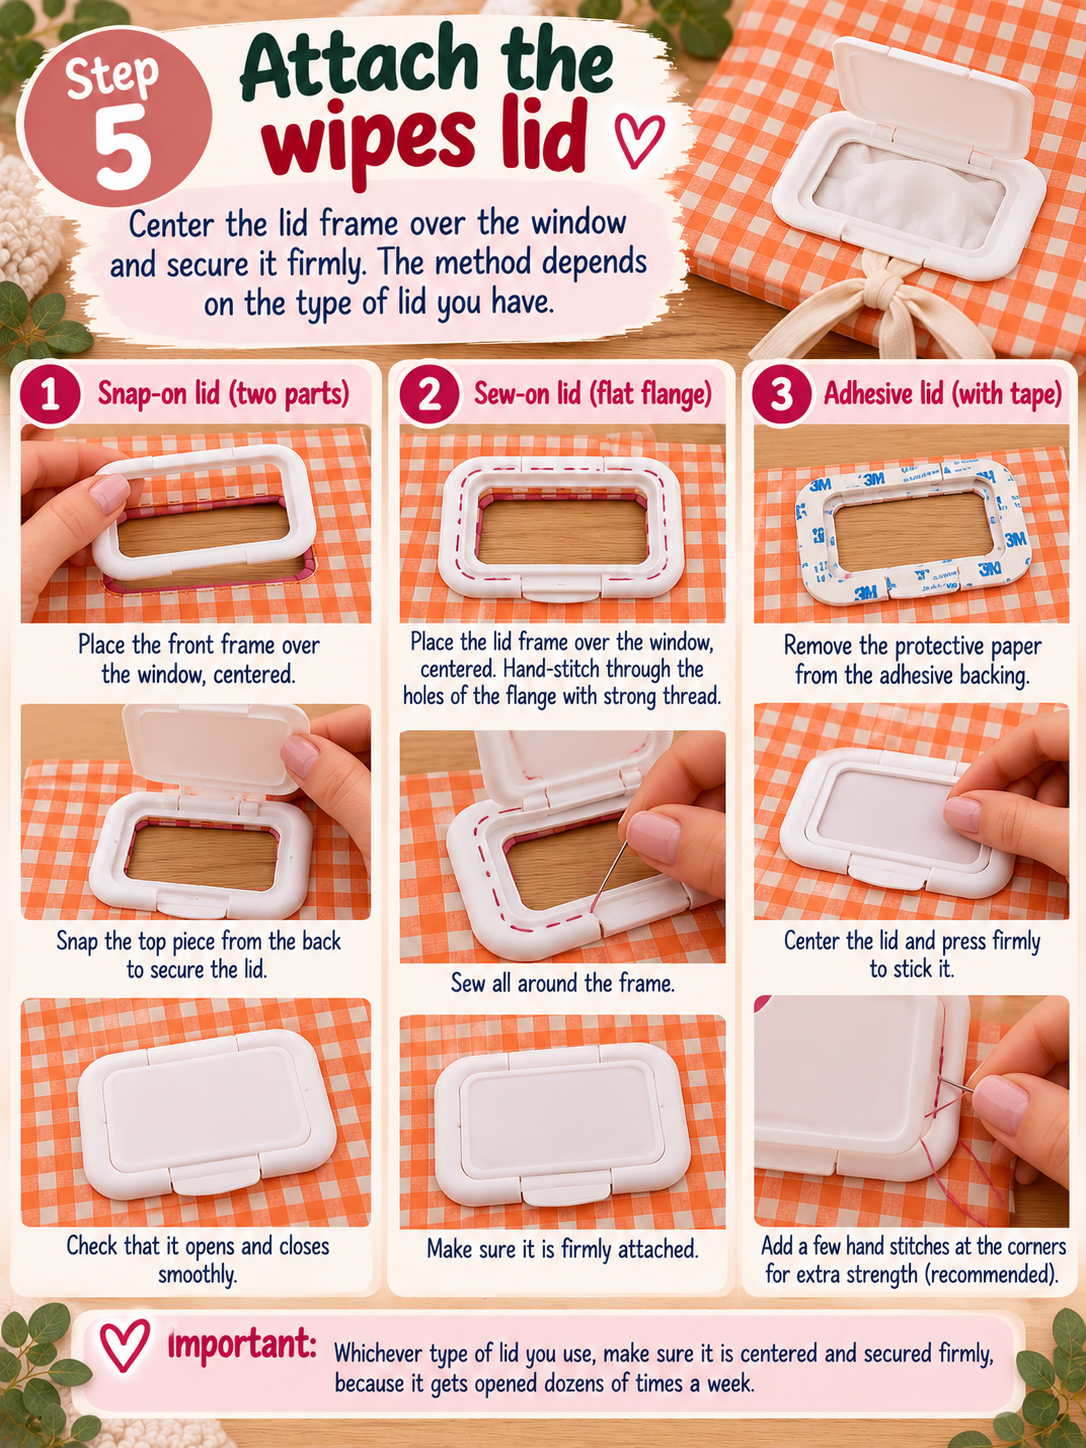
How you do this depends on your lid. Some lids come in two parts that snap together through the fabric. Others have a flat flange you can hand-stitch through with strong thread, or an adhesive back you can reinforce with a few hand stitches at the corners. Whichever you have, center the lid frame over the window and fix it firmly, because it gets opened dozens of times a week.
Step 6: Baste the pockets onto the lining
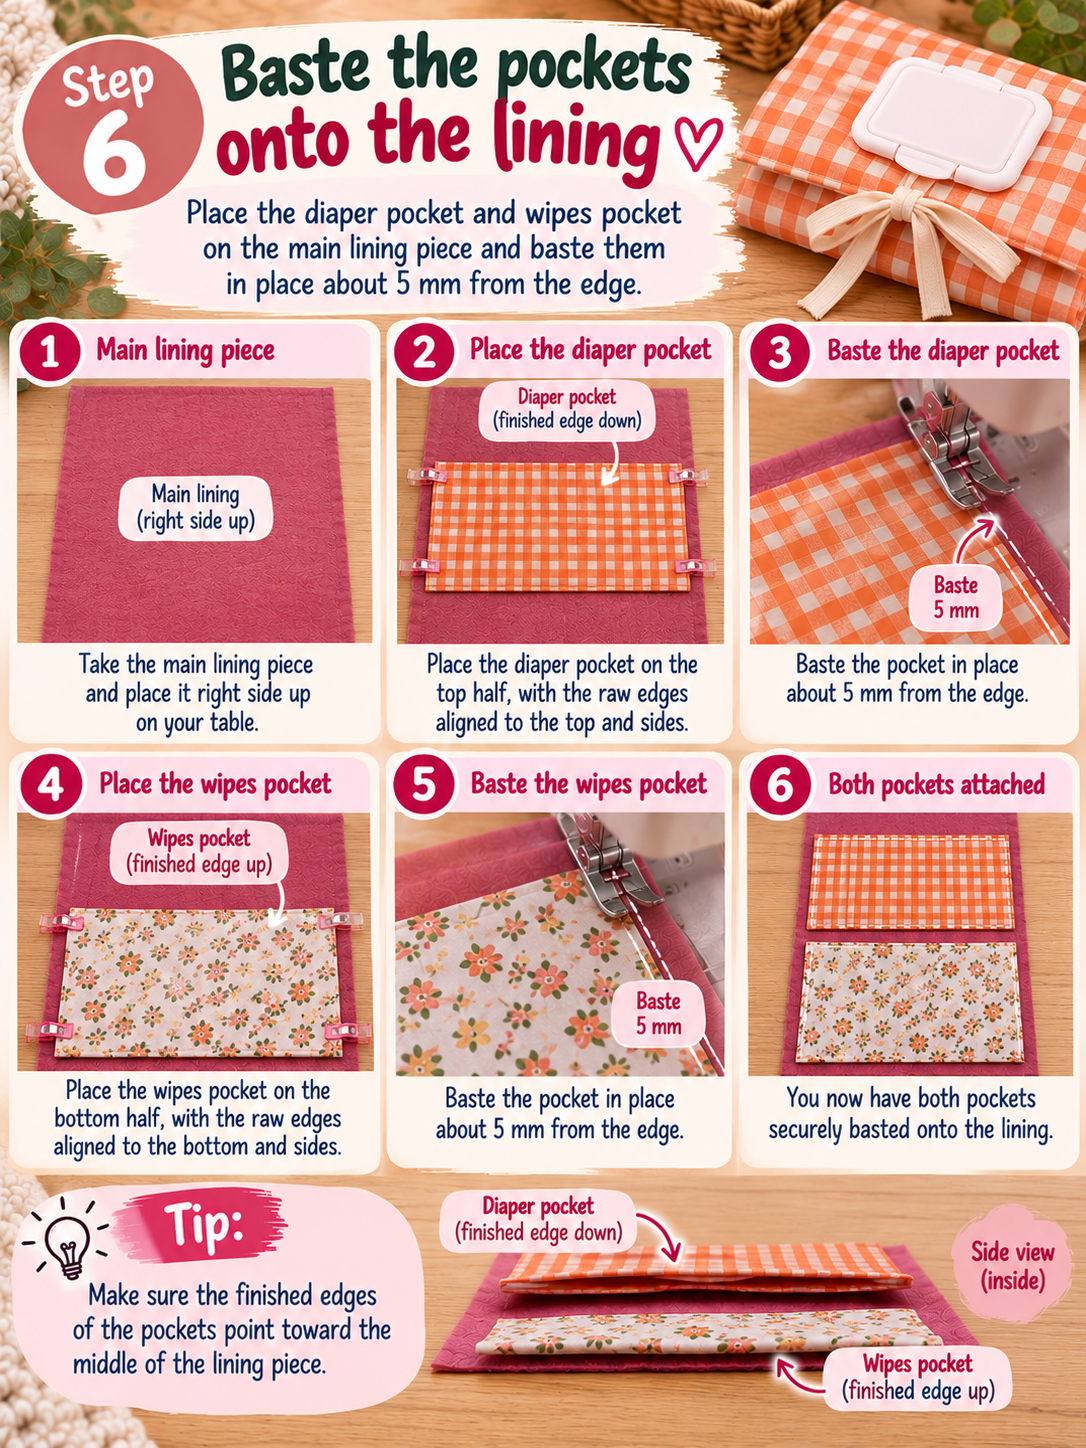
Lay the main lining piece right side up. Place the diaper pocket on the top half, lining up its raw edges with the top and sides, finished edge pointing toward the middle. Place the wipes pocket on the bottom half the same way, raw edges matching the bottom and sides. Baste both pockets in place about 5 mm from the edge.
Step 7: Round the corners
Stack the outer main body on top of the lining unit so all edges match. Put a glass or cup in each corner, trace the curve, and trim through all layers at once. This keeps all four corners identical.

Step 8: Prepare and place the tie
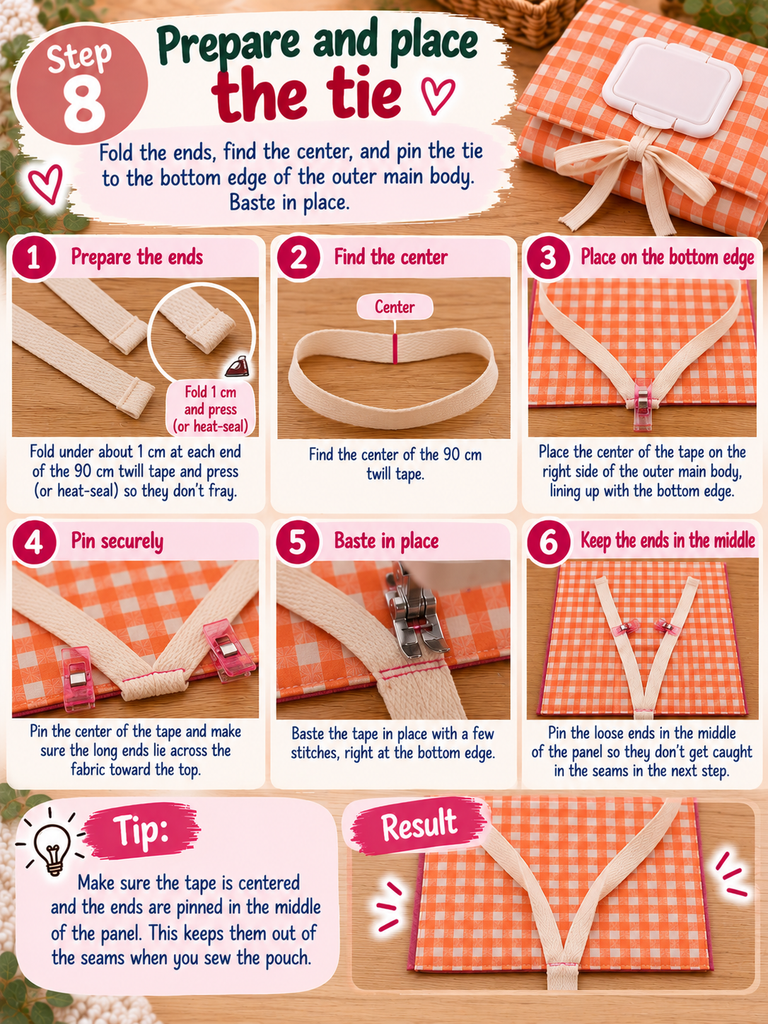
Fold under or heat-seal the ends of your 90 cm twill tape so they don’t fray. Find the center of the tape and pin it to the center of the bottom edge of the outer main body, on the right side, with the long ends lying across the fabric toward the top. Baste it in place. Tip: pin the loose ends in the middle of the panel so they don’t get caught in the seams in the next step.
Step 9: Sew the outer and lining together
Place the outer and the lining unit right sides together, with the tie sandwiched in between. Stitch all the way around with a 1 cm seam, leaving a 10 cm gap in the top edge for turning. Clip small notches into the curved corners, then turn the whole pouch right side out through the gap.
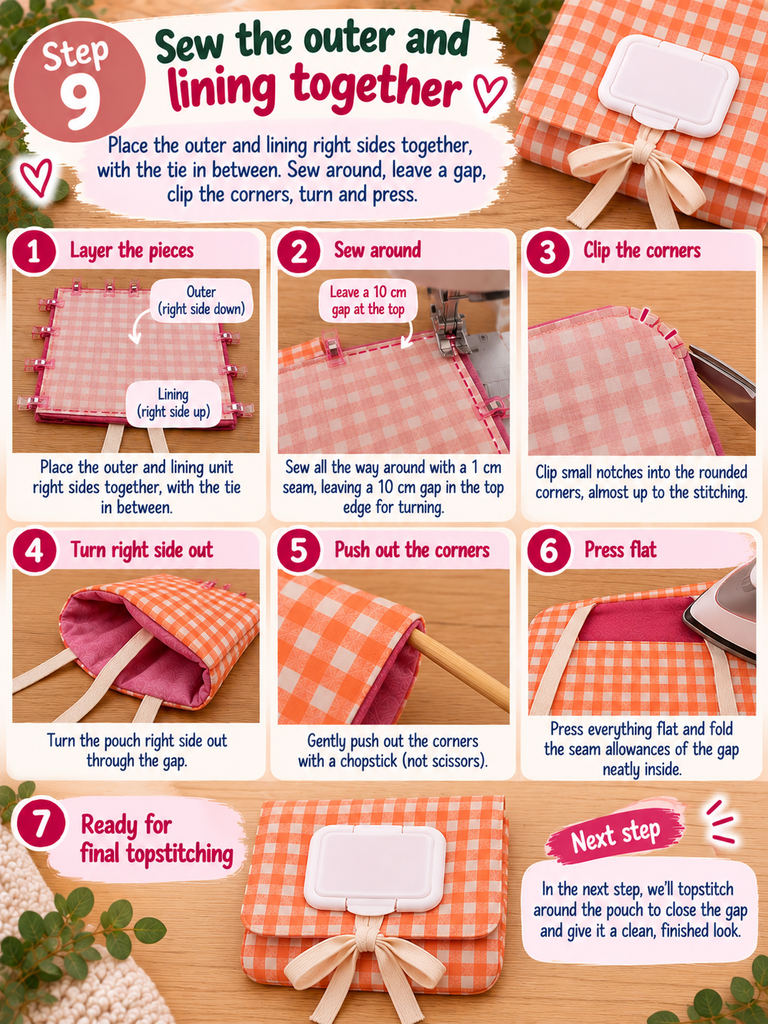
Push out the corners gently with a chopstick (not scissors, trust me) and press everything flat, folding the seam allowances of the gap neatly inside.
Step 10: Topstitch and finish
Topstitch around the entire pouch about 3 mm from the edge. This closes the turning gap and gives you that crisp, professional finish you see in the photo. For a sharper fold, you can also stitch a straight line across the middle of the pouch, between the two pockets.
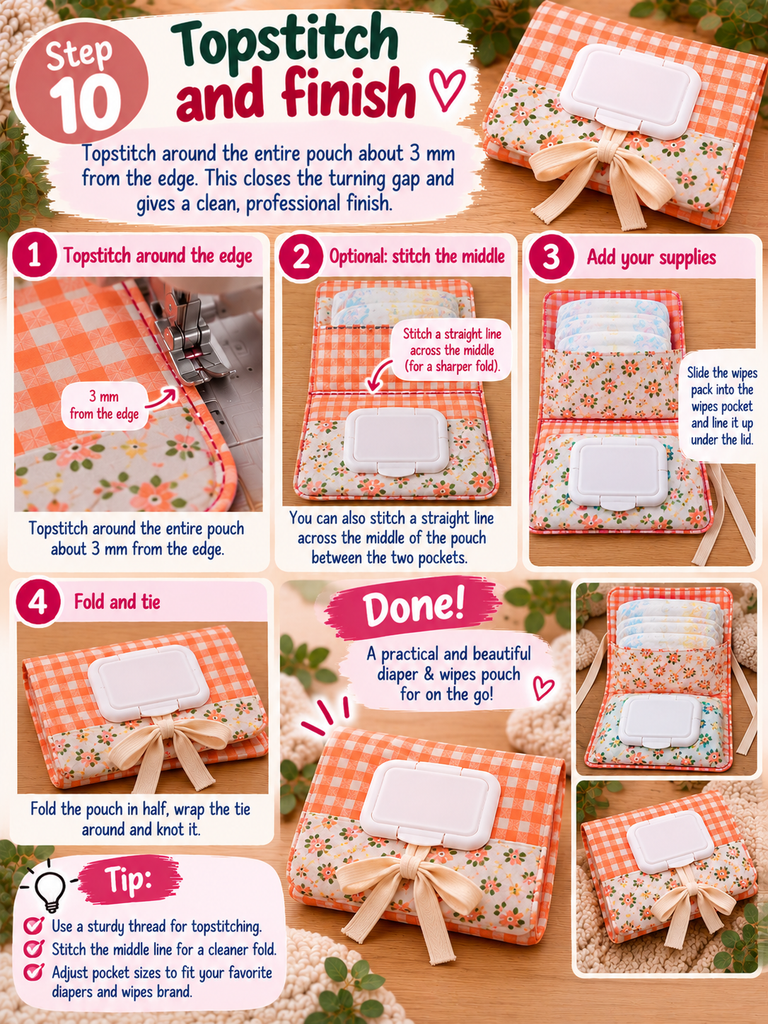
Slide the wipes pack into the wipes pocket and line it up under the lid, tuck your diapers into the top pocket, fold the pouch in half, wrap the tie around and knot it. Done. Stand back and admire it for a minute. You earned it.
Tips for Sewing Your Pouch Smoothly
Whether you’re following the steps above or the full pattern, these little lessons make the process smoother, whatever your skill level.
Measure your wipes lid before you cut. Wipes lids come in slightly different sizes. Check that the opening in the pattern matches the lid you’re using before you mark and cut it out. It’s a two-minute check that can save you a whole piece of fabric.
Use clips instead of pins on coated fabric. If your lining is laminated or waterproof, pins leave permanent holes. Wonder clips (or even small binder clips) hold layers together without any damage.
Notch your rounded corners. After stitching around the curves, clip small notches into the seam allowance before turning the pouch right side out. That’s the secret to smooth, round corners instead of lumpy ones.
Press as you go. I know, I know. Ironing feels like a detour. But a quick press after each seam makes your topstitching straighter and the finished pouch look far more professional. (Just keep the iron away from laminated fabric, or use a pressing cloth.)
Stitch the ties securely. The ties get pulled every single time the pouch opens. Backstitch a few times where they attach so they stay put for years.
The Handmade Baby Shower Gift Everyone Actually Uses
Let’s be honest: a lot of baby gifts end up in a drawer. Tiny shoes the baby never wears. Decorative items with no clear purpose. A diaper pouch is different. It gets used several times a day, every day, for a long time.
Want to make it extra special? Here are a few ideas:
- Fill it before you wrap it: a few newborn diapers, a travel pack of wipes and a small tube of diaper cream.
- Sew a matching burp cloth or changing mat from leftover fabric to create a little set.
- Add a small fabric label with the baby’s name or initials.
- Make two: one for the parents’ bag, one to keep in the car.
And if you sell handmade goods at markets or online, a pouch like this makes a great small-batch product. It uses modest amounts of fabric, sews up quickly once you know the steps, and people love seeing different prints side by side. Just check the pattern’s terms of use before selling finished items.
Frequently Asked Questions
Is this pattern a printed paper pattern?
No. It’s a digital PDF sewing pattern, so you download it, print it at home and start sewing whenever you’re ready.
Can I use any wipes lid?
Most reusable pop-up wipes lids will work, but sizes vary slightly. Measure yours against the pattern’s opening before cutting.
How do I wash the pouch?
That depends on your fabrics. A cotton pouch can usually go in the washing machine on a gentle cycle. If you used laminated lining, wipe it clean or hand wash, and let it air dry. Remove the plastic lid first if it’s detachable.
Do I need special equipment?
A standard home sewing machine is enough. Clips, a good pair of scissors and an iron will make the job easier.
Small Project, Big Difference
Remember that café restroom and the hunt for a single diaper at the bottom of a giant bag? With a pouch like this, that moment changes completely. You grab one pretty little clutch, pull a wipe with one hand, and get back to your coffee before it goes cold again.
That’s what I love most about sewing: sometimes the smallest projects make the biggest difference in someone’s day. The Sewith Mia Diaper Pouch is one of those projects. It’s practical, it’s charming, and it’s genuinely satisfying to make.
Ready to try it? Grab the Sewith Mia Diaper Pouch PDF sewing pattern, pick a fabric you love, and sew your first one this weekend. Then come back and tell me in the comments: which fabric did you choose, and who are you making it for? I’d love to see your version.