The first time I picked up a crochet hook, I spent twenty minutes on a single knot. Not a scarf. Not a granny square. One knot. I watched a video, paused it, rewound it, tied something that looked roughly right, and then watched it dissolve into a straight piece of yarn the second I tugged on it.
If that sounds familiar, you’re in good company. The slip knot is one of those things everyone assumes you already know, so nobody bothers to explain it properly. Here’s the good news: once it clicks, it really does take about five seconds. Let’s get you there.
Key Takeaways
- A slip knot is simply a loop that can tighten or loosen when you pull one end.
- It’s the first step for almost every knitting and crochet project, and it’s handy around the house too.
- The secret move is pulling a loop through, not the end of the yarn.
- If your knot falls apart, you almost certainly pulled the tail all the way through. Easy fix.
- Practice it ten times in a row and you’ll never need a tutorial again.
What Exactly Is a Slip Knot?
Think of it as a knot with a built-in adjuster. You end up with a loop on one side and two strands on the other. Pull one strand and the loop gets smaller. Push the knot along and the loop opens back up.
That adjustability is the whole point. In knitting, the slip knot becomes your very first stitch on the needle. In crochet, it’s the anchor that sits on your hook before you make a single chain. And outside the craft world? I use one to close bin bags, tie tomato plants to their stakes, and hang a tarp line when we go camping. It holds well enough under tension but comes undone in a second when you want it to.
Before You Start: Two Words Worth Knowing
Patterns and tutorials love jargon, so let’s clear up the only two terms you’ll need:
- Tail end – the short, loose end of your yarn or string.
- Working end – the long side, the part still attached to the ball or spool.
That’s it. No other vocabulary required.
Method 1: The Loop-and-Pull (My Go-To for Yarn)
This is the one I teach friends, and it’s the one I’d bet you’ll stick with.
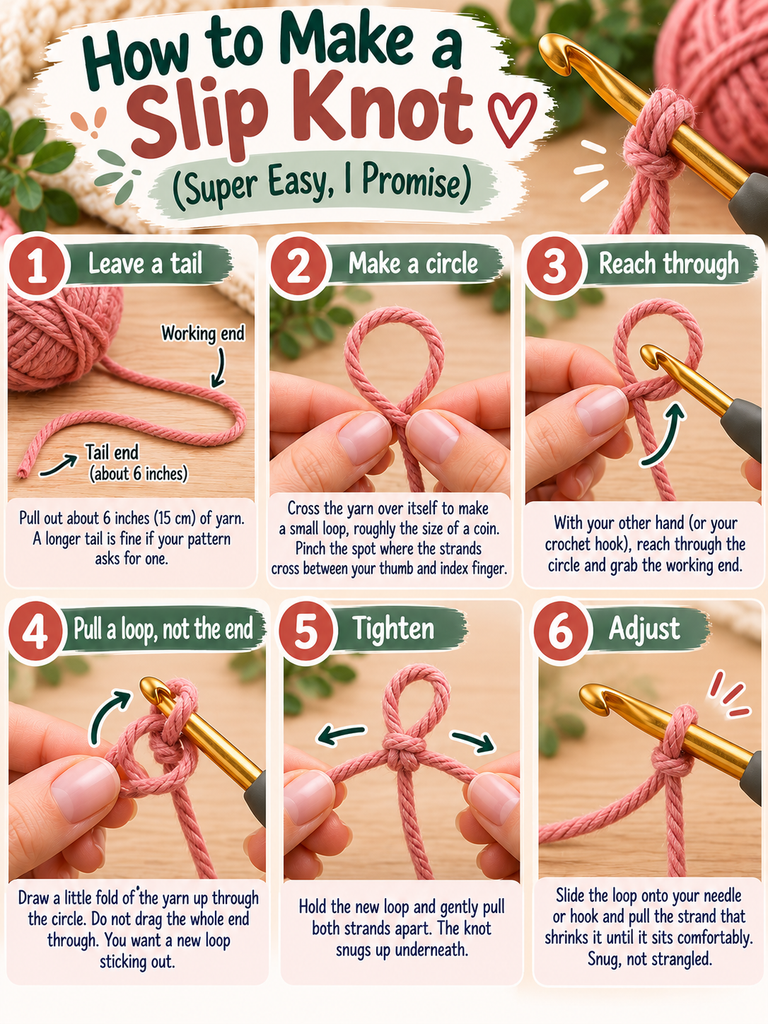
- Leave a tail. Pull out about 6 inches (15 cm) of yarn. A longer tail is fine if your pattern asks for one.
- Make a circle. Cross the yarn over itself so you’ve got a small loop, roughly the size of a coin. Pinch the spot where the strands cross between your thumb and index finger.
- Reach through. With your other hand (or your crochet hook), reach through the circle and grab the working end.
- Pull a loop, not the end. Draw a little fold of that yarn up through the circle. Do not drag the whole end through. You want a new loop sticking out.
- Tighten. Hold the new loop and gently pull both strands apart. The knot snugs up underneath.
- Adjust. Slide the loop onto your needle or hook and pull the strand that shrinks it until it sits comfortably. Snug, not strangled.
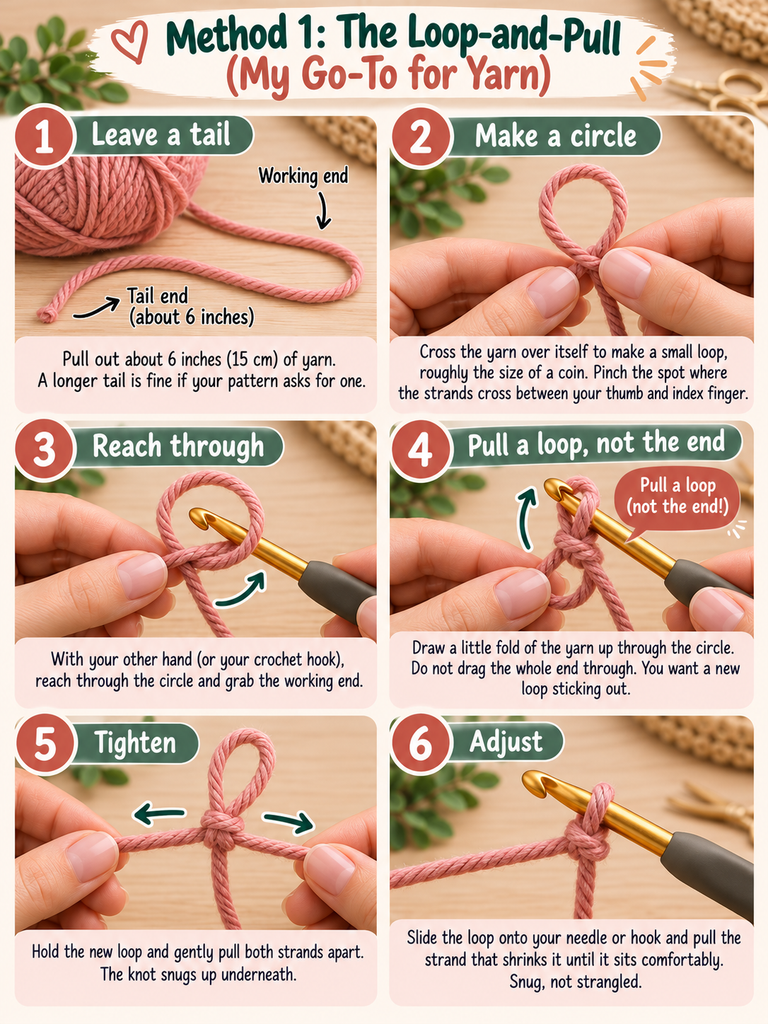
Honestly, step four is where 90% of beginners go wrong (myself included, all those years ago). Once that one detail lands, the rest is automatic.
Method 2: The Overhand Shortcut (Great for Rope and String)
If you already know how to tie a basic overhand knot, the one you’d tie at the end of a thread, you’re 95% of the way to a slip knot.
- Start tying an ordinary overhand knot: make a loop and bring the end around and through it.
- Right before you’d pull the end out the other side, stop. Fold the end back on itself so a loop goes through instead.
- Pull the knot snug while holding that loop.

Picture this: you’re out in the garden with a ball of twine and a floppy plant. Wrap the twine around the stake, tie this version, and you’ve got a tie you can tighten as the stem grows, or release by tugging the tail. Very satisfying.
Why Isn’t It Working? Quick Fixes
We’ve all been there. Here are the usual suspects:
The knot vanishes when I pull it. You pulled the tail all the way through, so there’s nothing holding the shape. Go back to step four and pull a loop through instead.
The loop won’t get smaller. You’re pulling the wrong strand. Try the other one. Which end does the adjusting depends on which side you pulled the loop from, and both versions work. Many knitters prefer the loop to tighten with the working end; follow your pattern if it specifies.
It’s so tight I can’t get my needle in. Wiggle the knot back along the loop to open it up. For knitting and crochet, aim for a loop that slides easily but doesn’t flop around.
I just made a regular knot. It happens. Untie it, breathe, start again. Nobody’s grading this.
Little Tricks That Make It Easier
- Practice with chunky yarn or a shoelace. Thin, slippery yarn hides what’s going on. Thick material lets you actually see the structure.
- Say it out loud. “Circle, reach, pull a loop, tighten.” Sounds silly, works wonders.
- Do ten in a row. Tie one, pull it out, tie another. Muscle memory kicks in faster than you’d expect.
- Don’t over-tighten for crafts. A too-tight slip knot makes the first row of knitting or crochet a real fight.
Frequently Asked Questions
Is a slip knot secure?
It holds well under steady pull, but it’s designed to release. For anything carrying real weight or keeping someone safe, use a proper load-bearing knot instead.
Is the slip knot the same in knitting and crochet?
Yes. Same knot, different job. Knitters cast on from it; crocheters chain from it.
Does the slip knot count as a stitch?
In knitting, it usually counts as your first cast-on stitch. In crochet, it generally doesn’t count as a chain. Check your pattern, because designers occasionally do things their own way.
You’ve Got This
Remember my twenty-minute battle with one stubborn knot? These days I tie a slip knot without looking, usually while chatting or half-watching TV. That’s not talent. It’s just repetition and finally understanding that one little move: pull a loop, not the end.
So grab whatever’s nearby, a bit of yarn, a phone charger cable, a shoelace, and tie one right now. Then tie it again. By the third try, you’ll wonder why it ever felt tricky.
Over to you: what are you starting with that first slip knot? A scarf, a first crochet chain, or just a tidier garden? Tell me in the comments, and if you got stuck on a particular step, describe what happened. I’m happy to help you troubleshoot.