Every October, the same thing happens in my house. The evenings get shorter, the tea gets stronger, and my yarn basket mysteriously fills up with purple, black, and orange. I don’t plan it. It just happens.
Last year I wanted a Halloween project that wasn’t a giant blanket I’d abandon by mid-November. Something small. Something I could finish while a scary movie played in the background and still feel like I’d made something real by the end credits.

That’s how this little Haunted House Square was born: a classic granny square for the night sky, a slightly crooked house (because haunted houses are never quite level), glowing yellow windows, and a full moon keeping watch in the corner. And today I’m sharing the whole pattern with you, completely free.
Table of Contents
Key Takeaways
- Skill level: Easy. If you can make a granny square and work single crochet in rows, you’ve got this.
- Time: About 1.5 to 2 hours for one finished square.
- Size: Roughly 6 to 6.5 inches (15–16.5 cm) with worsted weight yarn and a 5 mm hook.
- Great for scraps: Every appliqué piece uses only a few yards of yarn.
- Endlessly useful: Make one for a coaster or wall hanging, nine for a pillow, or a few dozen for a full Halloween blanket.
Why a Haunted House Square Is the Perfect October Project
Here’s the thing about seasonal crochet: the window is short. Start a huge Halloween throw in late September and, honestly, you’ll probably be weaving in ends while everyone else is pulling out the Christmas lights. (Ask me how I know.)
Squares solve that problem beautifully. Each one is a tiny win. You finish it, you set it on the arm of the couch, and you get that little hit of satisfaction that keeps you coming back to the hook tomorrow night.
The appliqué approach also makes this pattern far friendlier than it looks. There’s no tapestry crochet, no carrying three colors at once, and no squinting at a 40-row color chart. You make a plain granny square, crochet a few simple shapes, and sew them on. That’s it. The “wow” comes from the layering, not from difficult technique.
What You’ll Need
You probably have most of this already. That’s half the fun.
- Yarn: Worsted weight (#4) acrylic or cotton in these colors:
- Deep purple – for the night sky (the main granny square)
- Black – for the roof, door, and an outer round
- Charcoal grey – for the house and chimney
- Orange – for the border
- Yellow or cream – for the windows and moon
- Hook: 5 mm (H-8 US) for the granny square; 4 mm (G-6 US) for the appliqués so they stay firm and neat
- Yarn needle
- Scissors
- A few pins or stitch markers to hold pieces while you sew
A small tip from experience: going down a hook size for the appliqués makes a real difference. Tighter stitches mean crisper edges, and crisp edges are what make a tiny house read as a house instead of a grey blob.
Abbreviations (US Terms)
- ch – chain
- sl st – slip stitch
- sc – single crochet
- sc2tog – single crochet two stitches together (a decrease)
- dc – double crochet
- sp – space
- st(s) – stitch(es)
Pattern Notes Before You Begin
- The ch 3 at the start of each granny round counts as your first dc.
- Each round is joined with a sl st to the top of the beginning ch 3.
- The appliqué pieces are worked flat in rows. “Ch 1, turn” at the start of each row does not count as a stitch.
- Leave a long tail (about 12 inches / 30 cm) when you fasten off each appliqué. You’ll use it for sewing, and it saves you threading new yarn later.
- Exact measurements will vary with your tension and yarn. That’s completely normal, and for a decorative piece like this, a little variation is part of the charm.
Part 1: The Night Sky Granny Square
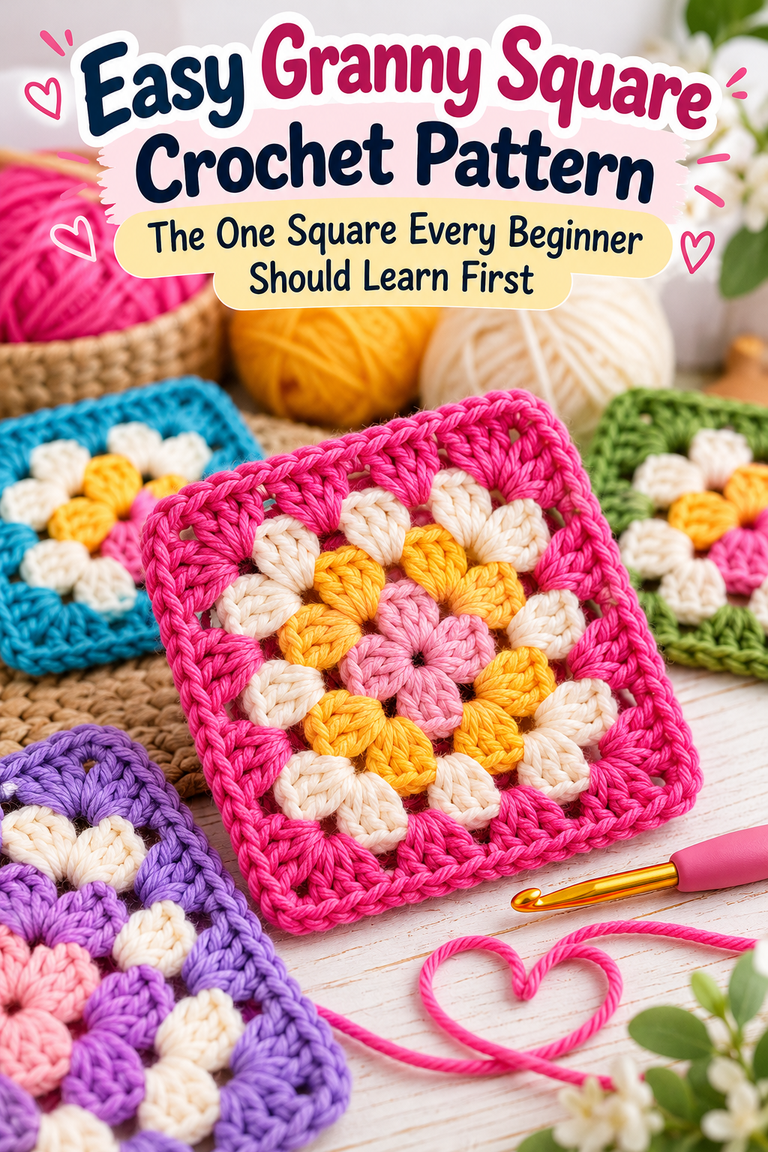
We start with the backdrop. A classic granny square is the perfect “night sky” because its little gaps catch the light and give the background some texture, almost like stars peeking through.
With deep purple and a 5 mm hook:
Round 1: Make a magic ring. Ch 3, 2 dc into the ring, ch 2. *3 dc into the ring, ch 2* three times. Pull the ring closed and sl st to the top of the beginning ch 3. (4 groups of 3 dc, 4 corner spaces)
Round 2: Sl st across the next 2 dc and into the ch-2 corner space. Ch 3, (2 dc, ch 2, 3 dc) in the same space, ch 1. *(3 dc, ch 2, 3 dc) in the next corner space, ch 1* three times. Sl st to join.

Round 3: Sl st across to the first corner space. Ch 3, (2 dc, ch 2, 3 dc) in the same space, ch 1. *3 dc in the next ch-1 space, ch 1, (3 dc, ch 2, 3 dc) in the next corner space, ch 1* repeat around, ending with 3 dc in the last ch-1 space, ch 1. Sl st to join.
Round 4: Repeat Round 3, working 3 dc into every ch-1 space along each side and (3 dc, ch 2, 3 dc) into each corner. Fasten off purple.
Round 5: Join black in any corner space and repeat Round 3 the same way. Fasten off black.
Round 6: Join orange in any corner space and repeat Round 3 one last time. Fasten off and weave in all ends.
Now pause and look at it. That deep purple center fading into a black ring and a pop of orange? It already feels like Halloween, and we haven’t even built the house yet.
Part 2: Building the Haunted House
Switch to your 4 mm hook. These pieces are small and quick, so it’s worth making them all in one sitting while you’re in the rhythm.
The House Body (Charcoal Grey)
Ch 11.
Row 1: Sc in the 2nd ch from the hook and in each ch across. (10 sc)
Rows 2–9: Ch 1, turn. Sc in each st across. (10 sc)
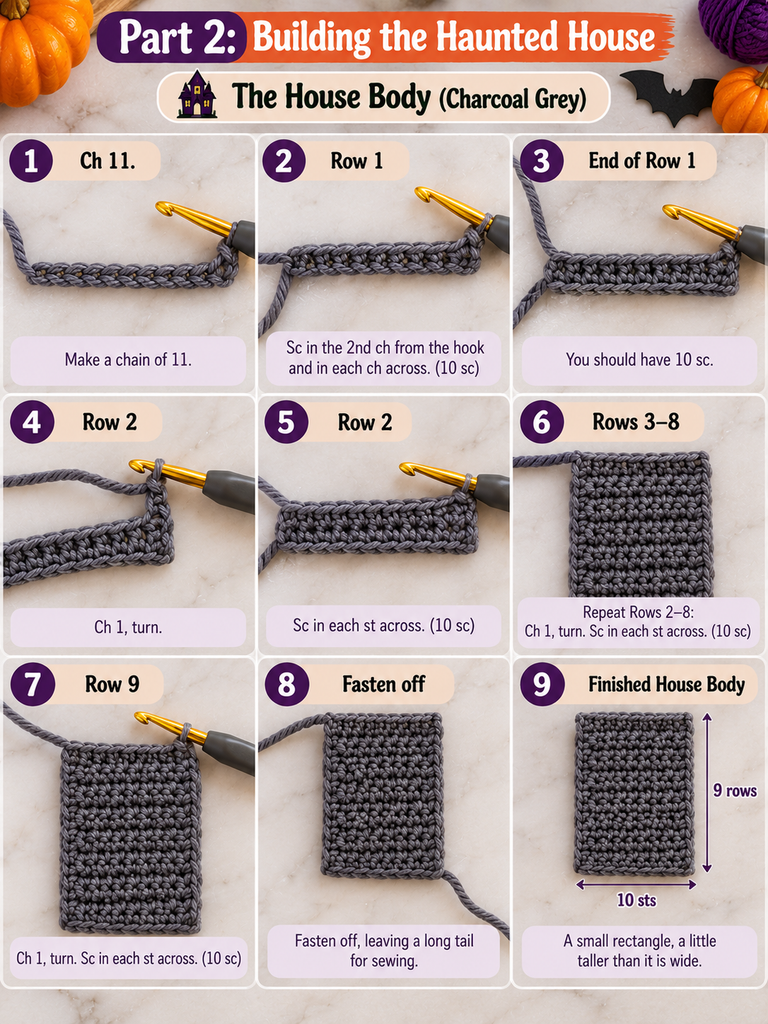
Fasten off, leaving a long tail. You’ll have a small rectangle, a little taller than it is wide.
The Roof (Black)
The roof is worked a bit wider than the house so it overhangs the walls, which instantly makes it look more like a real (and slightly sinister) home.
Ch 13.
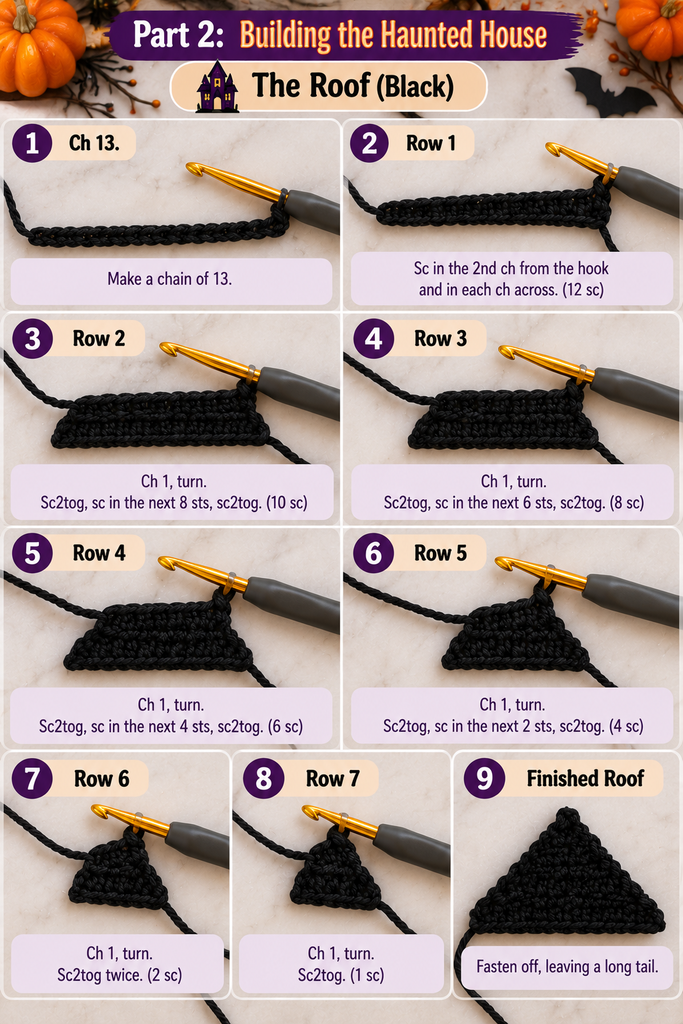
Row 1: Sc in the 2nd ch from the hook and in each ch across. (12 sc)
Row 2: Ch 1, turn. Sc2tog, sc in the next 8 sts, sc2tog. (10 sc)
Row 3: Ch 1, turn. Sc2tog, sc in the next 6 sts, sc2tog. (8 sc)
Row 4: Ch 1, turn. Sc2tog, sc in the next 4 sts, sc2tog. (6 sc)
Row 5: Ch 1, turn. Sc2tog, sc in the next 2 sts, sc2tog. (4 sc)
Row 6: Ch 1, turn. Sc2tog twice. (2 sc)
Row 7: Ch 1, turn. Sc2tog. (1 sc)
Fasten off, leaving a long tail.
The Chimney (Charcoal Grey)
Ch 3.
Row 1: Sc in the 2nd ch from the hook and in the next ch. (2 sc)
Rows 2–3: Ch 1, turn. Sc in each st across. (2 sc)
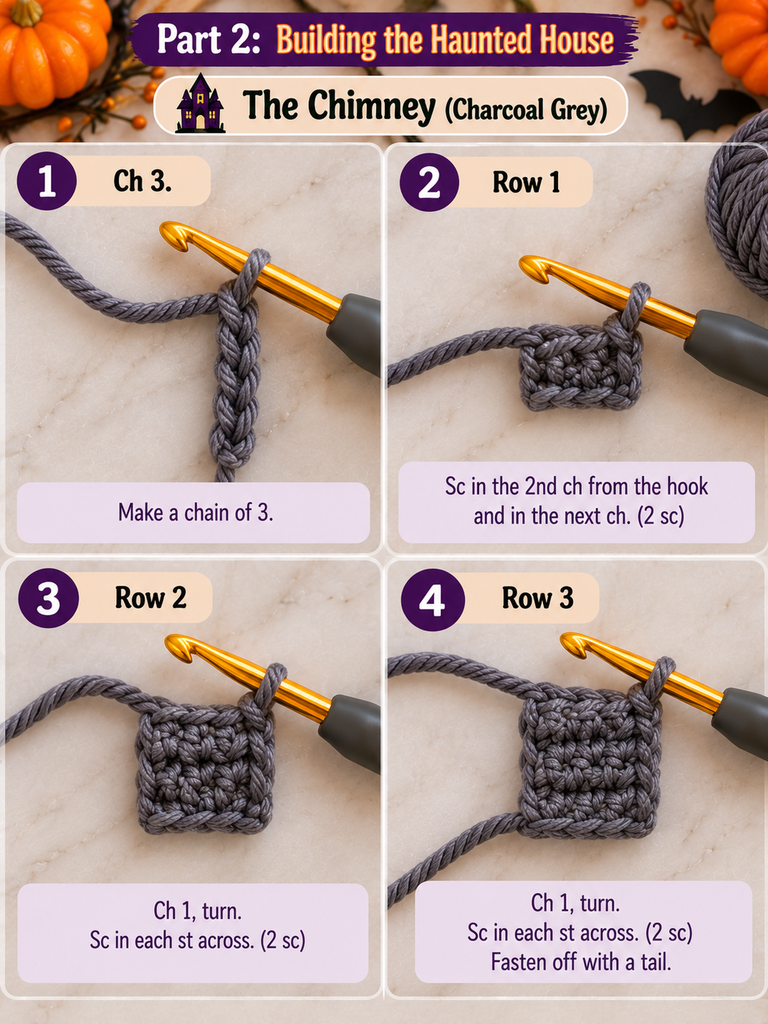
Fasten off with a tail.
The Door (Black)
Ch 4.

Row 1: Sc in the 2nd ch from the hook and in each ch across. (3 sc)
Rows 2–4: Ch 1, turn. Sc in each st across. (3 sc)
Fasten off with a tail.
The Glowing Windows (Yellow) – Make 2 or 3
Ch 3.
Row 1: Sc in the 2nd ch from the hook and in the next ch. (2 sc)
Row 2: Ch 1, turn. Sc in each st across. (2 sc)

Fasten off with a tail.
Shortcut: If tiny squares feel fiddly, you can embroider the windows directly onto the house instead. A few satin stitches in yellow yarn work just as well, and nobody will know the difference.
The Full Moon (Yellow or Cream)
Round 1: Make a magic ring. Work 6 sc into the ring. Sl st to the first sc to join. (6 sc)
Round 2: Ch 1, 2 sc in each st around. Sl st to join. (12 sc)
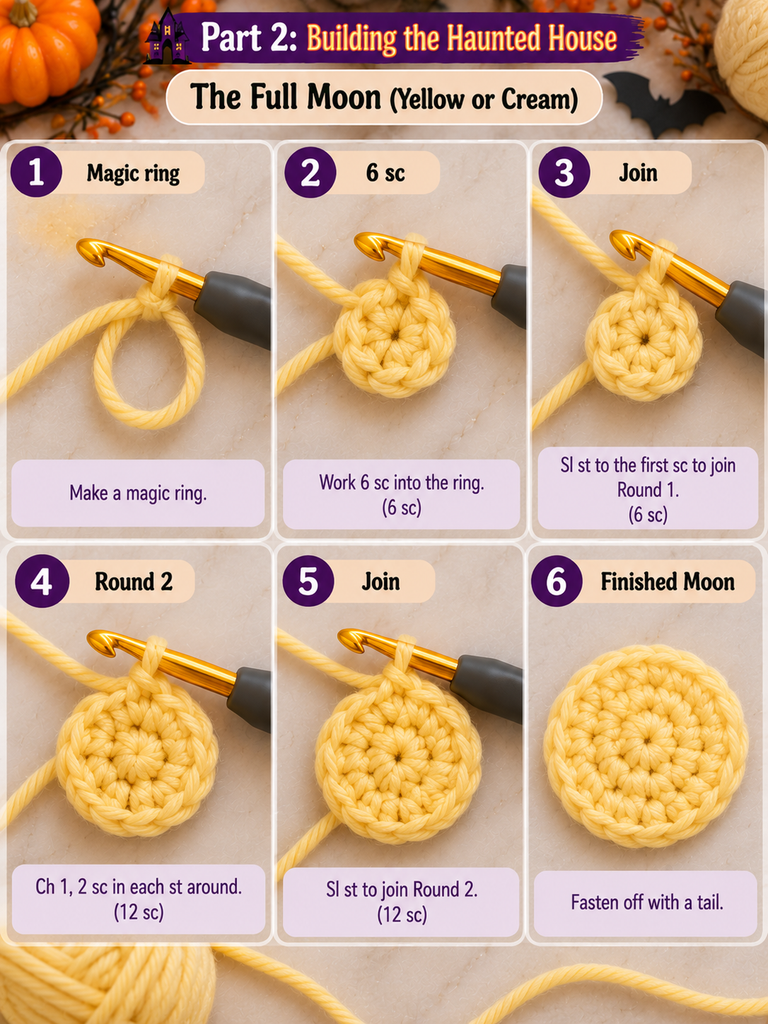
Fasten off with a tail.
Part 3: Putting It All Together
This is my favorite part. It’s where a pile of little scraps suddenly turns into a scene.
- Lay everything out first. Place the house body slightly below center on the granny square. Set the roof on top so its base overlaps the top edge of the house by one row. Tuck the chimney behind one side of the roof.
- Tilt it a little. Seriously. Rotate the roof just a few degrees off straight. That tiny lean is what turns “cute cottage” into “haunted house.”
- Pin everything in place before you sew a single stitch. Step back and look at it from across the room.
- Sew from the back of the stack forward: chimney first, then the house body, then the roof, then the door at the bottom center of the house, then the windows above it.
- Add the moon to an upper corner of the purple center, opposite the chimney, so the design feels balanced.
- Use small whip stitches around the edges with each piece’s own tail. Go into the purple background, not through the holes of the granny clusters, so your stitches stay hidden.
- Weave in all remaining ends on the back.

Optional spooky extras: With a strand of black yarn, embroider two or three tiny bats in the sky. A simple stretched “m” shape with a straight stitch in the middle reads as a bat from a surprisingly short distance. You can also add a small white stitch “ghost” peeking out of one window if you’re feeling playful.
Common Problems (and How to Fix Them)
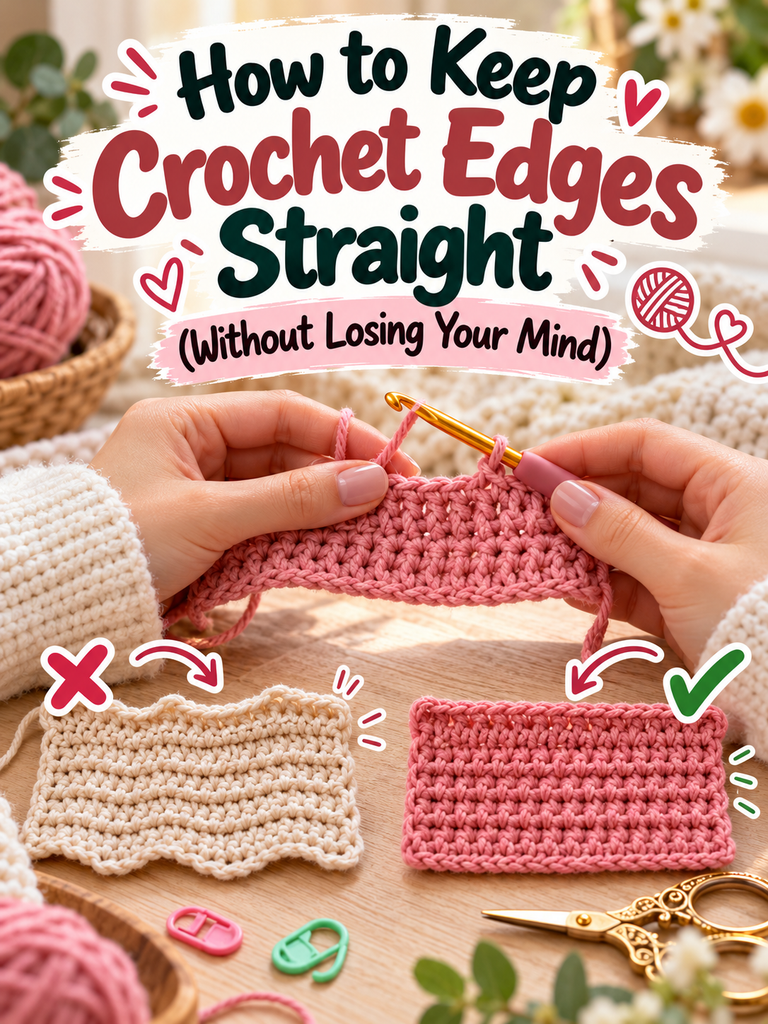
“My granny square is curling or ruffling.” Curling usually means your tension is tight; ruffling usually means it’s loose or you’ve added extra stitches. Count your clusters on each side. Every round should add exactly one 3-dc group per side.
“My roof doesn’t look like a triangle.” Make sure you’re working the sc2tog at both ends of every decrease row. If you only decrease on one side, you’ll get a slanted shape instead of a peak.
“The appliqués look floppy.” Go down another half or full hook size. Appliqués should feel a little stiff in your hand.
“I can see my sewing stitches.” Use the same color as the piece you’re attaching, and keep your stitches small and close to the edge. Sewing on a flat surface, rather than in your lap, helps a lot too.
Ways to Use Your Haunted House Square
Once you’ve made one, I’ll warn you now: you’ll want to make more. Here are a few ideas to get your imagination going:
- A single square makes a sweet coaster, a mug rug, or a mini wall hanging on a small wooden dowel.
- Two squares sewn back to back become a festive potholder or the front of a trick-or-treat bag.
- Four squares make a great pillow cover for a reading nook.
- Mix with plain squares in orange, black, and purple to build a full Halloween throw without making every block an appliqué.
- Make it a neighborhood: change the house color for each square (green, mustard, dusty blue) and give each one a different number of windows. Together they look like a whole spooky street.
Frequently Asked Questions
Is this pattern good for beginners?
Yes. If you’ve made at least one granny square before, you’ll be comfortable. The appliqués use only single crochet and simple decreases, which are among the first stitches most people learn.
Can I use a different yarn weight?
Absolutely. Just keep all your yarns the same weight and adjust your hook to match. DK yarn with a 4 mm hook makes a smaller, daintier square; bulky yarn makes a chunky one that’s perfect for a quick pillow.
How many squares do I need for a blanket?
For a lap-size throw (around 40 x 50 inches), plan on roughly 6 squares across and 8 down, so about 48 squares, depending on your finished size. You don’t need every one to be a haunted house; alternating with plain squares looks great and saves time.
Can I sell items made from this pattern?
You’re welcome to sell finished items you make from this pattern. I just kindly ask that you credit this blog as the source of the design and share a link rather than copying the written instructions.
Final Thoughts: Small Squares, Big Cozy Energy
I started this project wanting something small enough to finish before Halloween actually arrived. What I didn’t expect was how much joy one little crooked house would bring. Mine sits on the side table by the door right now, and every time someone walks in, they smile at it.
That’s the magic of seasonal crochet, isn’t it? It’s not about making something perfect. It’s about slowing down for an evening, letting the yarn run through your fingers, and making something that makes your home feel a little more like you this time of year.
So grab your scraps, put the kettle on, and build yourself a haunted house tonight. The moon will be waiting.
I’d Love to See Your Haunted House!
If you make this square, please share it with me. Tell me in the comments what you’re turning yours into: a pillow, a blanket, a whole haunted neighborhood? And if you switched up the colors or added your own spooky details, I really want to hear about it. Some of my favorite ideas have come straight from readers.
Don’t forget to save this pattern for later, and if you know a crochet friend who lives for October, send it their way. Happy hooking, and happy haunting!