The first blanket I ever crocheted started out as a rectangle. Twenty rows later, it was a trapezoid. By row forty, it had developed a gentle curve on one side that my sister kindly described as “organic.”

I hadn’t dropped a dozen stitches in one go. I’d lost one here, gained one there, and never noticed. That’s the sneaky thing about crooked edges: they’re almost never caused by one big mistake. They come from tiny, repeatable habits at the very beginning and very end of each row.
The good news? Once you know where to look, straight edges stop being a matter of luck. Let’s fix this for good.
Table of Contents
Key Takeaways
- Most crooked edges start at the ends of rows, not in the middle. That’s where stitches get skipped or added.
- Know whether your turning chain counts as a stitch. This single rule causes more wonky edges than anything else.
- Mark the first and last stitch of every row with stitch markers until it becomes second nature.
- Count your stitches regularly, especially in the first ten rows.
- Tension and blocking handle the final polish once your stitch count is right.
Why Crochet Edges Go Wavy in the First Place
Now let’s look at what’s actually going on when edges misbehave. Crooked edges usually show up in one of three ways, and each one is a clue.
The edge slants inward and your piece gets narrower. You’re losing stitches. Usually the culprit is skipping the last stitch of the row, which hides tucked under the turning chain.
The edge flares outward and your piece gets wider. You’re gaining stitches. Most often you’ve worked into the first stitch and counted the turning chain as a stitch, giving yourself a bonus stitch every row.
The edge is the right width but looks bumpy or loopy. Your stitch count is fine, but your turning chains are too loose or too tight compared to the rest of the fabric.
Here’s the counterintuitive part: a lost stitch on one row and a gained stitch on the next can cancel out your count while still leaving a zigzag edge. That’s why “my count looks fine” doesn’t always mean everything’s fine.
The Step-by-Step Method for Perfectly Straight Edges
If you just want the routine, here it is. This is the exact method I follow for every flat, row-by-row project, from the foundation chain to the final border. Further down, I’ll explain the “why” behind each step, so you can troubleshoot when something goes wrong.
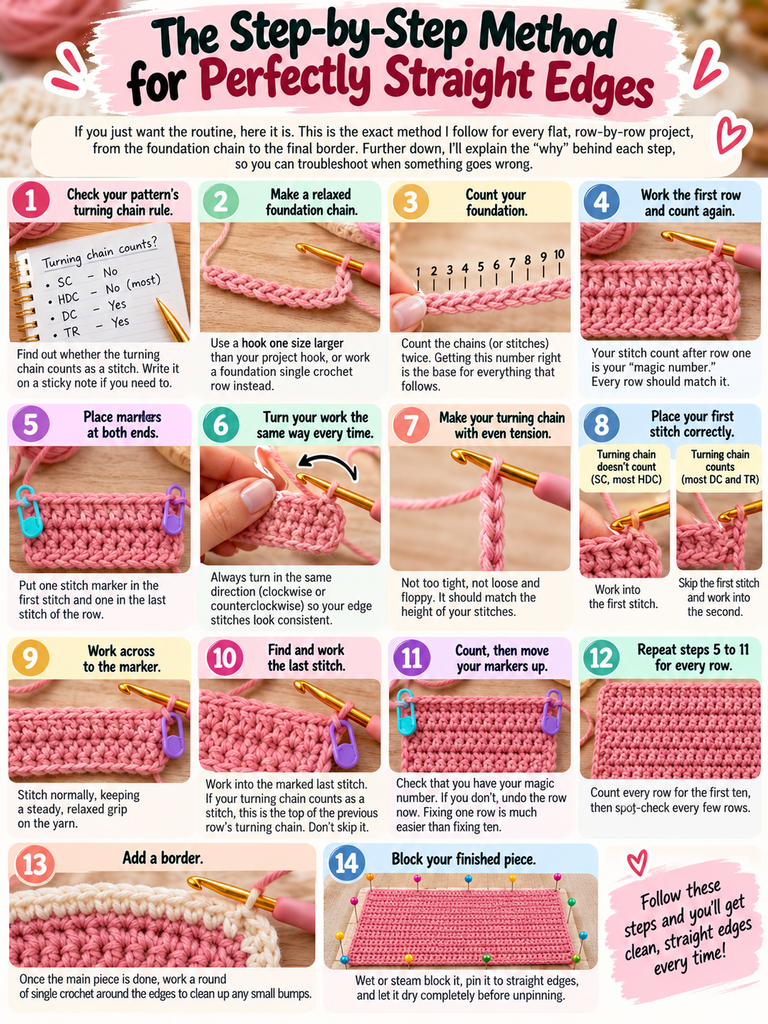
- Check your pattern’s turning chain rule. Before you make a single chain, find out whether the turning chain counts as a stitch. Write it on a sticky note if you need to.
- Make a relaxed foundation chain. Use a hook one size larger than your project hook, or work a foundation single crochet row instead.
- Count your foundation. Count the chains (or stitches) twice. Getting this number right is the base for everything that follows.
- Work the first row and count again. Your stitch count after row one is your “magic number.” Every row should match it.
- Place markers at both ends. Put one stitch marker in the first stitch and one in the last stitch of the row.
- Turn your work the same way every time. Always turn in the same direction (clockwise or counterclockwise) so your edge stitches look consistent.
- Make your turning chain with even tension. Not too tight, not loose and floppy. It should match the height of your stitches.
- Place your first stitch correctly.
- If the turning chain doesn’t count (single crochet, most half double crochet): work into the first stitch.
- If it does count (most double and treble crochet): skip the first stitch and work into the second.
- Work across to the marker. Stitch normally, keeping a steady, relaxed grip on the yarn.
- Find and work the last stitch. Work into the marked last stitch. If your turning chain counts as a stitch, this is the top of the previous row’s turning chain. Don’t skip it.
- Count, then move your markers up. Check that you have your magic number. If you don’t, undo the row now. Fixing one row is much easier than fixing ten.
- Repeat steps 5 to 11 for every row. Count every row for the first ten, then spot-check every few rows.
- Add a border. Once the main piece is done, work a round of single crochet around the edges to clean up any small bumps.
- Block your finished piece. Wet or steam block it, pin it to straight edges, and let it dry completely before unpinning.
It looks like a lot written out, but after one or two projects, steps 5 through 11 take just a few seconds per row. That small habit is what separates a rectangle from a trapezoid.
Master the Turning Chain (This Fixes Most Problems)
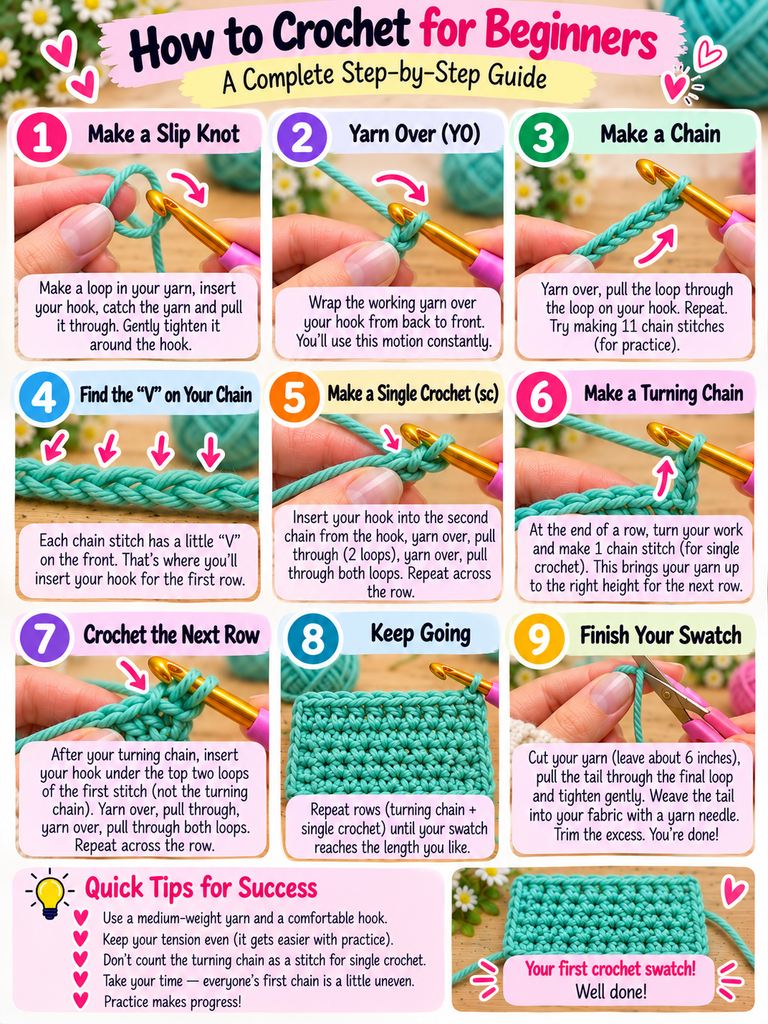
If I could go back and tell beginner-me only one thing, it would be this. The turning chain is the little stack of chains you make at the start of a row to bring your hook up to the height of the next stitches. Whether it counts as a stitch changes where you put your first and last stitches.
Here’s the general convention most patterns follow:
- Single crochet: chain 1. It does not count as a stitch. Work your first stitch into the very first stitch of the row.
- Half double crochet: chain 2. Usually does not count, but patterns vary, so check yours.
- Double crochet: chain 3. Usually does count as a stitch. Skip the first stitch, then at the end of the next row, work your last stitch into the top of that chain-3.
- Treble crochet: chain 4. Usually counts as a stitch, handled the same way as double crochet.

That last detail about double crochet is where so many people go wrong. The top of the previous row’s turning chain is easy to miss, especially when it’s sitting slightly sideways. Skip it, and you lose a stitch every other row. Hello, trapezoid.
My advice? Read your pattern’s notes before you start. Good designers always say whether the turning chain counts. If they don’t, pick one method, write it down, and stick to it for the whole project.
Use Stitch Markers Like Training Wheels
Stitch markers are cheap, and they’re the fastest way to stop guessing.
Place one marker in the first stitch of a row and another in the last stitch. When you come back on the next row, you’ll know exactly where that end stitch is hiding. Move the markers up as you go.
Don’t have markers? A safety pin, a bobby pin or a short loop of contrasting yarn works just as well. I used paper clips for an entire scarf once. It wasn’t elegant, but the edges were perfect.
You won’t need them forever. After a few projects, your eyes learn what that end stitch looks like, and the markers become optional.
Count Your Stitches (Yes, Really)
I know. Counting feels tedious when you just want to get into the rhythm. But think of it like checking your mirrors while driving: it takes a second and saves you from a much bigger problem.
Count every row for the first five to ten rows. That’s when habits form and when mistakes are cheapest to fix. Once things look steady, spot-check every few rows.
A quick trick for wide pieces: place a marker every 10 or 20 stitches. Then you count in chunks instead of starting from scratch each time.
Try a Chainless or Stacked Turn for Taller Stitches
Let’s be honest: the chain-3 turning chain for double crochet often looks thinner and gappier than a real double crochet. It can make your edge look a little “holey,” even when your count is perfect.
Many crocheters swap it out for an alternative:
- Stacked single crochet: Make a single crochet in the first stitch, then work a second single crochet into the side of that first one. The stack reaches roughly double crochet height and looks much more solid.
- Chainless starting double crochet: Pull up your loop until it’s about as tall as a double crochet, then use it to build the stitch without any chains. It takes a little practice, but the result looks nearly identical to a real stitch.
If you use one of these, it counts as your first stitch. Keep that in mind when you reach the end of the next row.
Don’t Ignore Your Foundation Chain
Sometimes the edge problem isn’t on the sides at all. It’s at the bottom.
Most of us chain tighter than we stitch. That tight foundation chain pulls the bottom edge in, making it look pinched while the rest of the piece flares out above it.
Two easy fixes. First, try making your foundation chain with a hook one size larger, then switch back for the rest of the project. Second, look into foundation single crochet (often abbreviated FSC), which builds the chain and the first row at the same time. It’s stretchier and much more even.
Keep Your Tension Consistent
Even with a perfect stitch count, uneven tension makes edges look wobbly. And tension tends to change at the ends of rows, because that’s where you stop, turn your work and adjust your grip.
A few things that help:
- Give the yarn a gentle, steady pull after turning, not a hard yank.
- Don’t let the turning chain get loose and floppy while you turn the work.
- Try to finish a row before putting the project down. Picking up mid-row often means a tighter or looser stitch right where you stopped.
You’re not alone if your tension changes with your mood. Mine is noticeably tighter when I’m stressed. Sometimes the best fix is just to relax your hands.
Finish Strong: Borders and Blocking
Once your rows are consistent, two finishing touches take your edges from “pretty good” to “did you buy this?”
Add a border. A simple round of single crochet around the whole piece hides small bumps and gives the edge a clean, defined line. When working along the sides of rows, a common guideline is about one single crochet per single crochet row and two per double crochet row. Adjust if the edge starts rippling or pulling.
Block your work. Blocking means wetting or steaming your finished piece, then pinning it to shape while it dries. It relaxes the stitches and evens out minor wobbles. It’s especially effective on natural fibers like wool and cotton. Acrylic responds better to gentle steam, but keep the iron from touching the yarn directly.
One honest caveat: blocking is polish, not a rescue mission. It can straighten a slightly uneven edge, but it won’t fix a piece that lost ten stitches along the way.
A Quick Troubleshooting Checklist
When your edges start misbehaving, run through this in order:
- Count the stitches in your current row. Is it the right number?
- If it’s fewer, check whether you’re skipping the last stitch or the top of the turning chain.
- If it’s more, check whether you’re working into the first stitch when the turning chain already counts.
- If the count is right but the edge looks bumpy, look at your turning chain tension.
- If the bottom is pinched, rethink your foundation chain.
Straight Edges Are a Habit, Not a Talent
That trapezoid blanket is still in my closet. I keep it as a reminder that the crafters with perfect, crisp edges aren’t more gifted than the rest of us. They’ve simply built a few small habits: they know their turning chain rules, they mark their stitches, and they count before things drift.
Pick just one tip from this post and use it on your next project. I’d start with stitch markers on the first and last stitch. Within a few rows, you’ll see the difference, and that first straight edge feels incredibly satisfying.
Now I’d love to hear from you: what’s the project that taught you the most about wonky edges? Share it in the comments, and if you’ve got a trick I didn’t mention, pass it along. Someone out there is mid-trapezoid right now and could use your help.