Every October, the same thing happens to me. I tell myself I’m going to be sensible, finish the blanket that’s been sitting in my project bag since spring, and not start anything new. Then a cold evening rolls in, someone puts a horror movie on, and suddenly I’m digging through my stash for black, white and that slightly-too-bright green yarn I swore I’d never use.
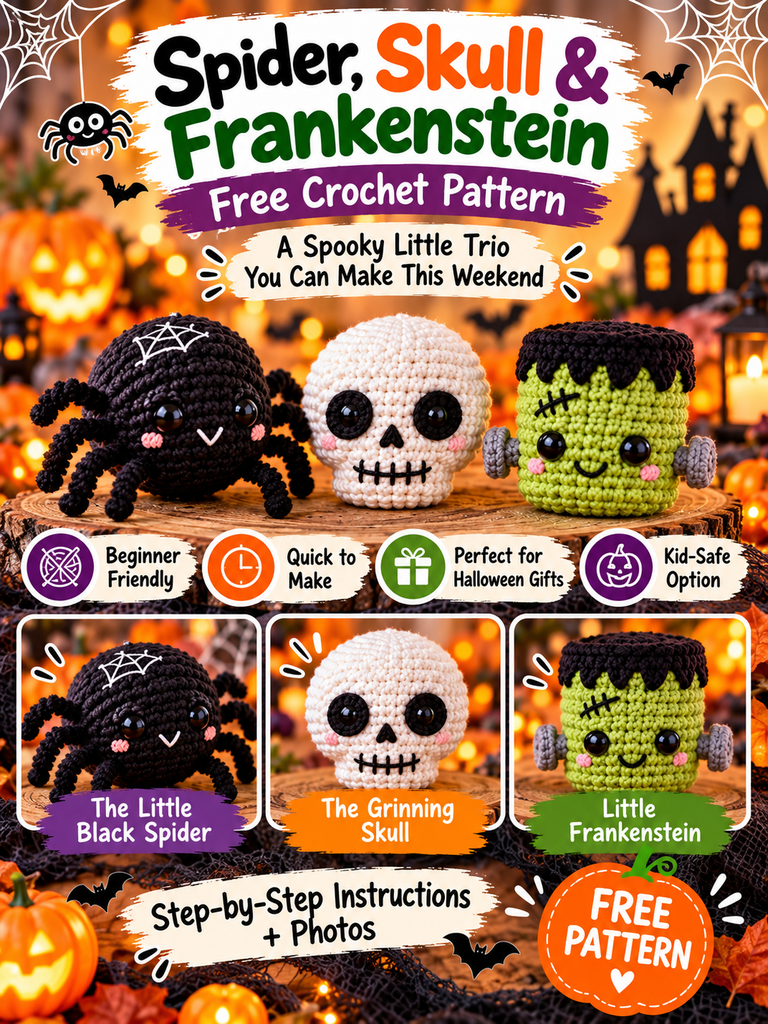
That’s exactly how this trio was born. A fuzzy spider, a grinning little skull and a stitched-together monster with bolts in his neck. Three tiny characters, one free pattern, and honestly? They’re some of the most fun I’ve had with a hook all year.
If you can crochet in a round, you can make all three. Let’s get spooky.
Table of Contents
Key Takeaways
- Three patterns, one base: the spider, skull and Frankenstein all start from the same simple ball shape, so once you’ve made one, the other two feel easy.
- Beginner-friendly: you only need magic ring, single crochet, increases and decreases.
- Quick to make: each piece works up in roughly an hour or two, which makes them perfect for last-minute Halloween gifts or market stock.
- Small details do the heavy lifting: embroidered stitches, bolts and posable legs turn a plain ball into a character.
- Kid-safe option included: swap safety eyes for embroidered ones if little hands will be grabbing them.
Why These Three Work So Well Together
Here’s the thing about Halloween crochet: it’s easy to go too big. A life-size pumpkin or a giant ghost sounds fun until you’re forty rounds in and the holiday is next week.
Small amigurumi solve that problem. Each of these finishes at roughly 2.5 to 3 inches (6 to 8 cm) tall in worsted weight yarn. That’s small enough to sit on a bookshelf, hang from a doorknob or tuck into a trick-or-treat bag, but big enough to show off all the little details.
And because they share a basic construction, you’re not learning three patterns. You’re learning one, then dressing it up three different ways. (That’s my favorite kind of pattern, if I’m being honest.)
What You’ll Need
- Worsted weight (#4) acrylic or cotton yarn in black, white, green and grey
- 3.5 mm (E/4) crochet hook, a size smaller than the label suggests, so stuffing doesn’t peek through
- Safety eyes, 8 mm (or black yarn to embroider them)
- Polyester fiberfill
- Stitch marker
- Tapestry needle
- 4 black pipe cleaners (chenille stems) for the spider’s legs
- Scissors
Got a bag of leftover scraps? Perfect. None of these use more than a few yards of any color.
Abbreviations (US Terms)
- MR – magic ring
- ch – chain
- sl st – slip stitch
- sc – single crochet
- hdc – half double crochet
- inc – 2 sc in the same stitch
- dec – single crochet decrease (invisible decrease recommended)
- BLO – back loop only
- (…) x6 – repeat the instructions in brackets 6 times
- (24) – total stitch count at the end of the round
All pieces are worked in continuous spiral rounds. Pop your stitch marker in the first stitch of every round so you don’t lose your place. Trust me, you will want it.
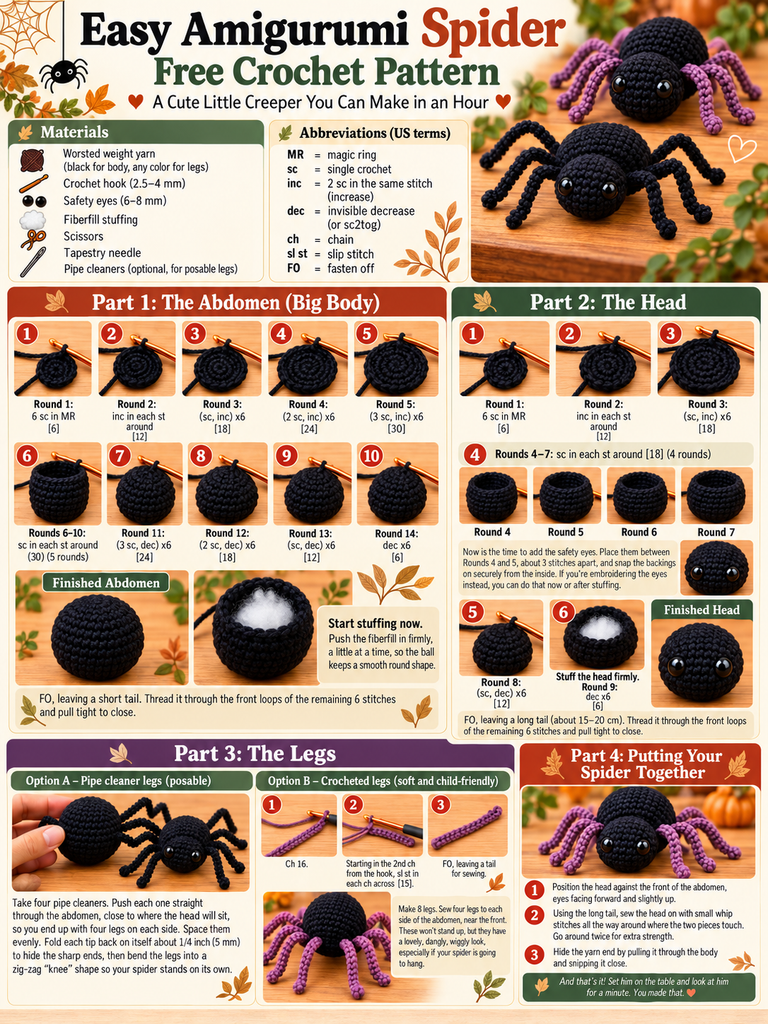
Pattern 1: The Little Black Spider
I always start with the spider because it’s the simplest, and it’s the one that gets the biggest reaction. There’s something about eight wiggly legs that makes people squeal, even when the spider is soft and smiling.
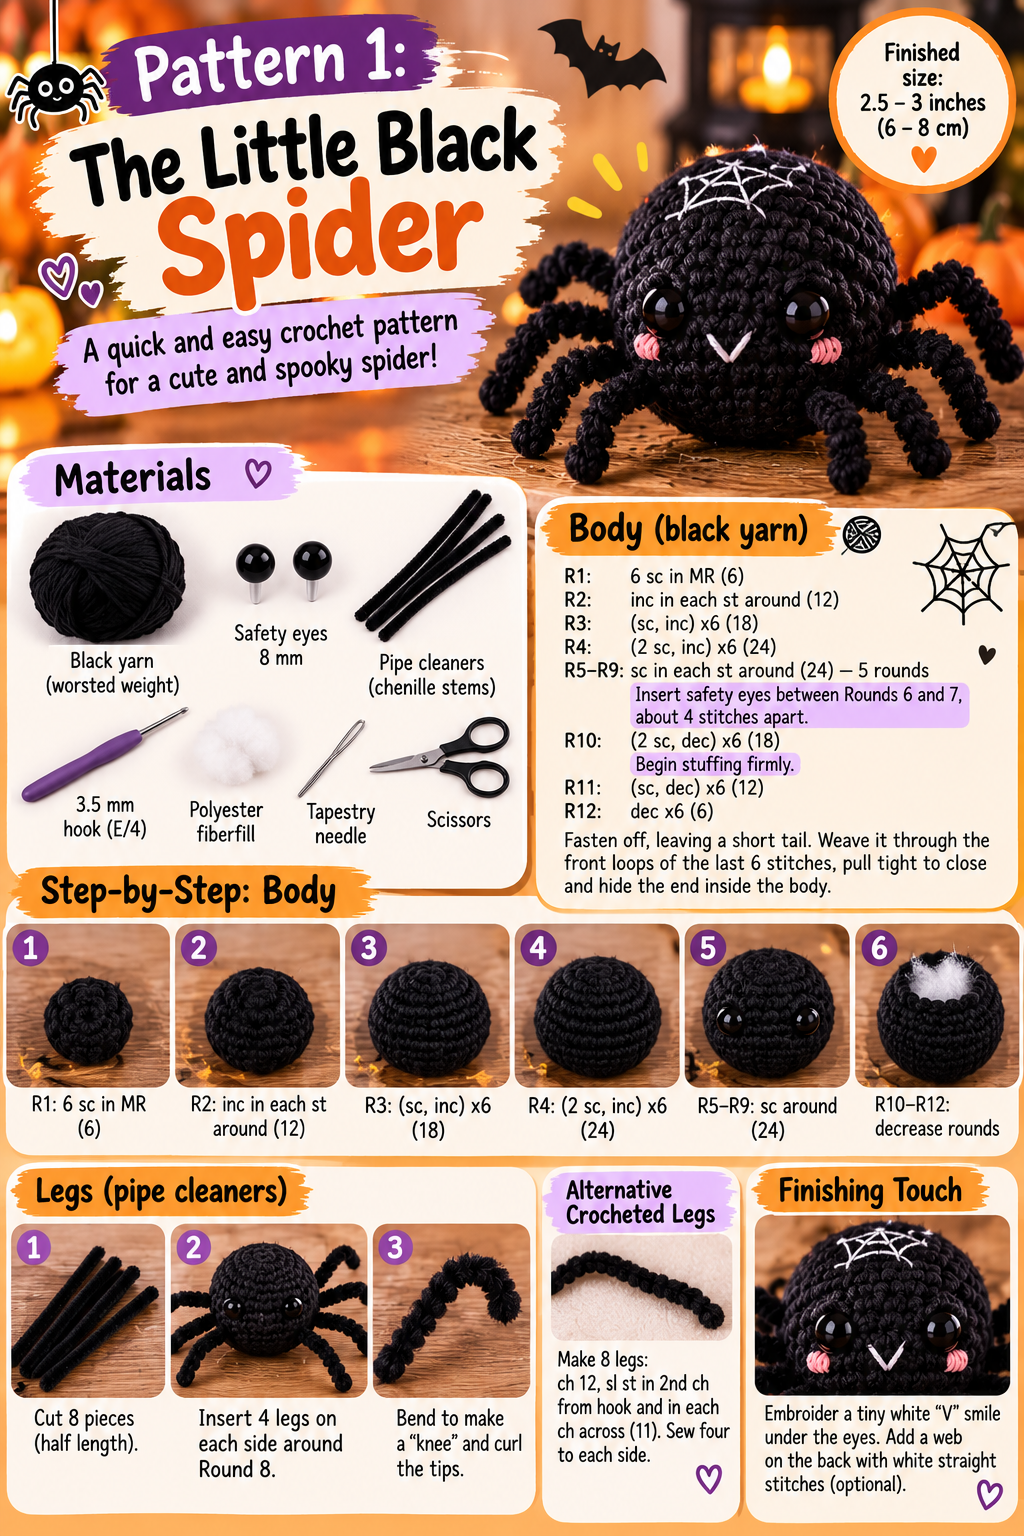
Body (black yarn)
R1: 6 sc in MR (6)
R2: inc in each st around (12)
R3: (sc, inc) x6 (18)
R4: (2 sc, inc) x6 (24)
R5–R9: sc in each st around (24) — 5 rounds
Insert safety eyes between Rounds 6 and 7, about 4 stitches apart.
R10: (2 sc, dec) x6 (18)
Begin stuffing firmly.
R11: (sc, dec) x6 (12)
R12: dec x6 (6)
Fasten off, leaving a short tail. Weave it through the front loops of the last 6 stitches, pull tight to close and hide the end inside the body.
Legs
Cut each pipe cleaner in half so you have 8 pieces. Push each one straight through the body around Round 8, four on each side, so the ends poke out evenly. Bend each leg about halfway along to give it a “knee,” then curl the tips slightly.
No pipe cleaners? Make 8 crocheted legs instead: ch 12, sl st in 2nd ch from hook and in each ch across (11). Sew four to each side. They won’t be posable, but they’re softer and better for babies.
Finishing touch
Embroider a tiny white “V” smile under the eyes, or skip the mouth altogether for a more mysterious look. A few white straight stitches on the back make a cute little web pattern, too.
Pattern 2: The Grinning Skull
Skulls are the backbone (sorry, I had to) of any Halloween display. This one is wider at the top and narrows into a little jaw, so it actually reads as a skull from across the room, not just a white ball with eyes.
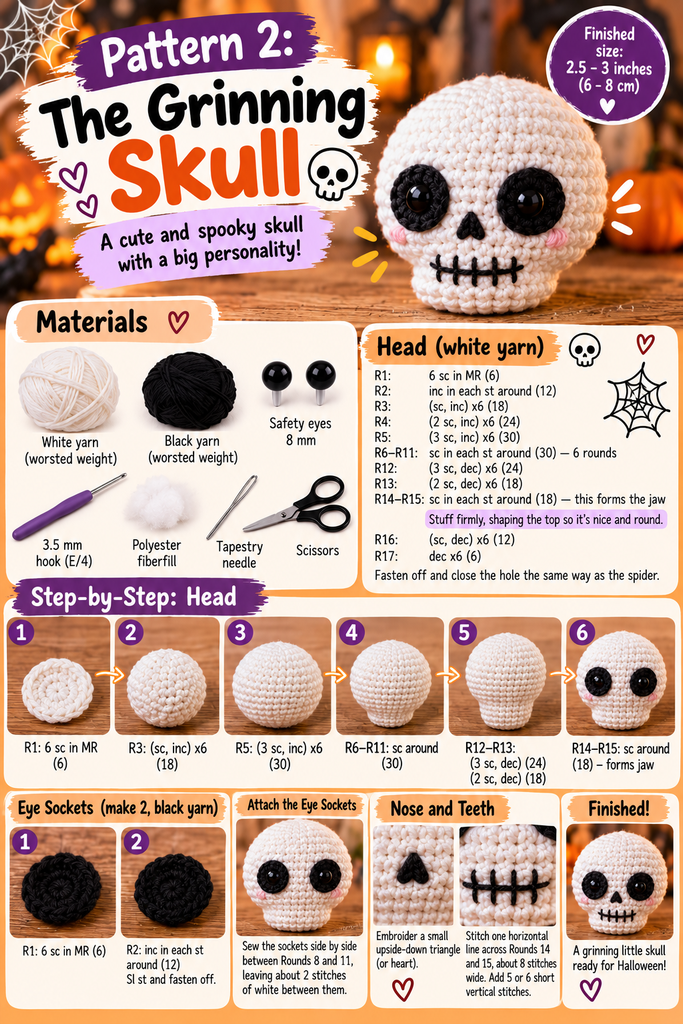
Head (white yarn)
R1: 6 sc in MR (6)
R2: inc in each st around (12)
R3: (sc, inc) x6 (18)
R4: (2 sc, inc) x6 (24)
R5: (3 sc, inc) x6 (30)
R6–R11: sc in each st around (30) — 6 rounds
R12: (3 sc, dec) x6 (24)
R13: (2 sc, dec) x6 (18)
R14–R15: sc in each st around (18) — this forms the jaw
Stuff firmly, shaping the top so it’s nice and round.
R16: (sc, dec) x6 (12)
R17: dec x6 (6)
Fasten off and close the hole the same way as the spider.
Eye sockets (make 2, black yarn)
R1: 6 sc in MR (6)
R2: inc in each st around (12)
Sl st to the first stitch and fasten off, leaving a tail for sewing.
Sew the sockets side by side between Rounds 8 and 11, leaving about 2 stitches of white between them.
Nose and teeth
With black yarn, embroider a small upside-down triangle (or heart, if you want it extra cute) just below and between the eye sockets.
For the teeth, stitch one horizontal line across Rounds 14 and 15, about 8 stitches wide. Then add 5 or 6 short vertical stitches crossing it. That’s it. That’s the whole grin. It’s ridiculous how much personality those few stitches add.
Pattern 3: The Frankenstein Monster
This little guy is my favorite, and I think he’ll be yours too. Quick bit of trivia while we stitch: in Mary Shelley’s 1818 novel, Frankenstein is actually the name of the scientist, not the creature. But let’s be real, nobody at a Halloween party is going to call this guy “Frankenstein’s Monster.” He’s Frankie now.
The secret to his classic shape is a flat top. We get that by working one round in the back loops only, which creates a sharp edge and turns a round ball into a blocky head.
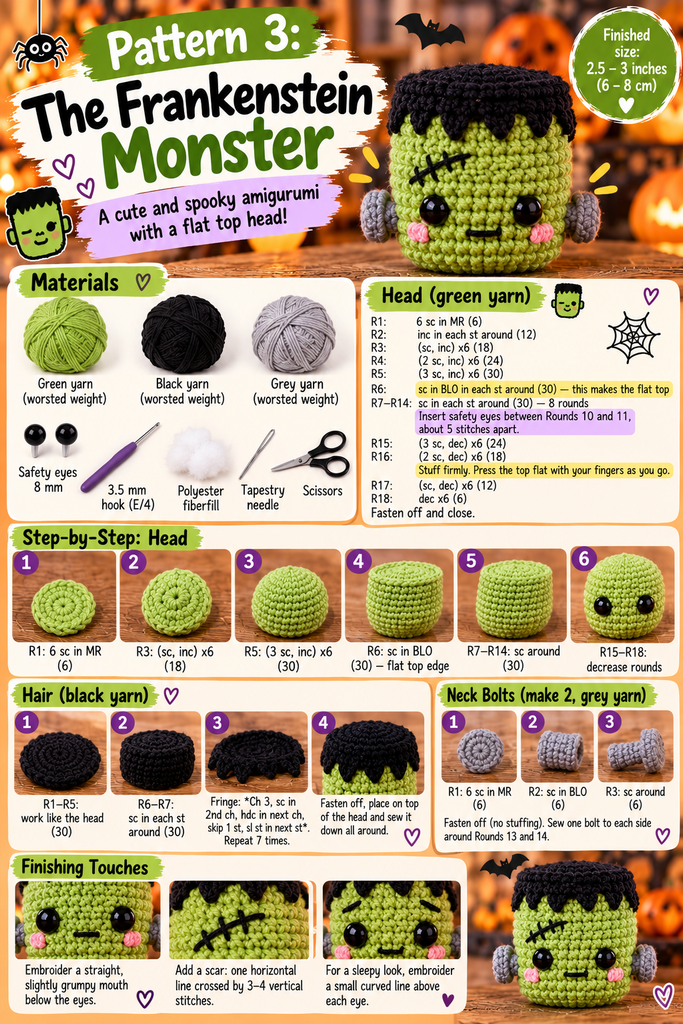
Head (green yarn)
R1: 6 sc in MR (6)
R2: inc in each st around (12)
R3: (sc, inc) x6 (18)
R4: (2 sc, inc) x6 (24)
R5: (3 sc, inc) x6 (30)
R6: sc in BLO in each st around (30) — this makes the flat top
R7–R14: sc in each st around (30) — 8 rounds
Insert safety eyes between Rounds 10 and 11, about 5 stitches apart.
R15: (3 sc, dec) x6 (24)
R16: (2 sc, dec) x6 (18)
Stuff firmly. Press the top flat with your fingers as you go.
R17: (sc, dec) x6 (12)
R18: dec x6 (6)
Fasten off and close.
Hair (black yarn)
R1–R5: work exactly like the head (30)
R6–R7: sc in each st around (30)
Fringe: sl st in the next st. *Ch 3, sc in 2nd ch from hook, hdc in next ch, skip 1 st, sl st in next st*. Repeat from * 7 times. Sl st in the remaining stitches to finish the round.
Fasten off, leaving a long tail. Place the hair cap on top of the head with the jagged fringe sitting over the forehead, then sew it down all the way around.
Neck bolts (make 2, grey yarn)
R1: 6 sc in MR (6)
R2: sc in BLO in each st around (6)
R3: sc in each st around (6)
Fasten off with a tail. No need to stuff; they’re tiny. Sew one bolt to each side of the head around Rounds 13 and 14.
Stitches and expression
Use black yarn to embroider a straight, slightly grumpy mouth below the eyes. Then add his famous scar: one short horizontal line on the forehead (or cheek) crossed by three or four little vertical stitches. Want him extra sleepy-looking? Embroider a small curved line above each eye for heavy eyelids.
My Best Tips for Clean, Professional-Looking Amigurumi
After making more of these than I’d like to admit, here’s what actually makes the difference:
- Use the invisible decrease. Working into the front loops only of the next two stitches gives you a smooth surface with no little gaps. It’s a game changer.
- Stuff more than you think. Underfilled amigurumi look saggy and sad. Keep adding fiberfill until the piece feels firm but not stretched.
- Place features before you close up. Safety eyes can’t be added once the head is stuffed and sealed. Pin them first, step back, and check the face before snapping on the washers.
- Watch your yarn-over direction. Yarning over (instead of under) gives you neat “V” stitches. If your pieces look like rows of little “X”s, that’s why.
- Let the details be imperfect. A slightly wonky smile or a lopsided scar often looks more charming. These are monsters, after all.
Fun Ways to Use Your Spooky Trio
Once you’ve got all three, what do you actually do with them? A few ideas that have worked for me and my crochet friends:
- Halloween garland: make several of each, add a yarn loop to the tops and string them across a mantel or window.
- Keychains and bag charms: sew a keyring to the top before closing. Teens love these.
- Trick-or-treat alternatives: a handmade mini monster is a great candy-free treat for kids with allergies.
- Craft fair stock: small, fast, seasonal items sell well. Bundle all three as a set.
- Table decor: scatter them around a candy bowl or across a party table. Instant conversation starters.
Frequently Asked Questions
Is this pattern good for beginners?
Yes. If you can make a magic ring and work single crochet in a spiral, you’re ready. The spider is the easiest place to start, and the Frankenstein monster is the most detailed.
Can I use a different yarn weight?
Absolutely. The pattern works the same with any weight; only the finished size changes. Just pick a hook a little smaller than the yarn label suggests so the fabric stays tight.
Are these safe for babies and toddlers?
Safety eyes and pipe cleaners are not recommended for children under 3. For little ones, embroider the eyes with black yarn and use the crocheted spider legs instead.
Can I sell items I make from this pattern?
Yes, you’re welcome to sell finished pieces you make yourself. A little credit and a link back to this post is always appreciated. Please don’t resell or repost the written pattern itself.
Final Thoughts: Small Stitches, Big Halloween Spirit
Remember that cold October evening I mentioned at the start? By the end of that movie, I had a spider sitting on the arm of the couch. By the end of the weekend, the skull and Frankie had joined him. They’ve lived on my bookshelf every fall since, and they still make me smile every time I walk past.
That’s the magic of small projects. You don’t need weeks or a mountain of yarn to make something with real personality. You just need a hook, a few scraps and a couple of hours.
So grab your black, white and green yarn, and give this little trio a try.
Your Turn!
I’d love to see your spooky squad! Which one are you making first: the spider, the skull or Frankie? Drop a comment below and let me know. If you get stuck on any round, ask away and I’ll help you out.
And if you share your finished pieces on social media, tag me so I can cheer you on. Don’t forget to save this pattern on Pinterest so it’s ready for next Halloween, and subscribe for more free crochet patterns all year round. Happy hooking, and happy haunting!