Here’s something that surprises almost everyone I tell: in Mary Shelley’s original novel, Frankenstein’s creature was never green. No flat head. No bolts in his neck. That whole look came more than a century later, from the movies and somehow it became the most recognizable Halloween face on the planet.
And honestly? I’m glad it did. Because a little green guy with a square head, a jagged black fringe, and two tiny silver bolts is just begging to be turned into a plushie.

This pattern is my answer to the question I get every October: “What’s a Halloween project I can actually finish before Halloween?” This one works up in an evening or two, uses basic stitches, and ends up more huggable than horrifying. Grab your scrap bin. Let’s make a monster.
Table of Contents
Key Takeaways
- Skill level: Easy / advanced beginner — if you can work in the round, you can make this.
- Finished size: About 7 inches (18 cm) tall using worsted weight yarn and a 3.5 mm hook.
- Time: Roughly 3–4 hours, including assembly.
- The secret to the iconic flat head: one round worked in the back loop only, plus a little circle of plastic canvas (more on that below).
- Making it for a little one? Swap safety eyes for embroidered eyes so it’s safe for children under 3.
Why This Little Monster Belongs on Your Hook
Picture this: it’s the last week of October, the house smells like cinnamon, and you’ve got a basket of Halloween décor that looks exactly like last year’s. Now imagine a tiny Frankenstein sitting on your mantel, grinning his crooked stitched grin at everyone who walks by.
That’s the magic of amigurumi. A few small balls of yarn turn into something with personality. And unlike a lot of Halloween crochet patterns that lean spooky, this one leans sweet — which makes it perfect for kids’ rooms, classroom gifts, or a trick-or-treat surprise for the neighbor kid who always compliments your pumpkins.
It’s also a fantastic scrap-buster. The bolts take maybe three yards of yarn. The hair? Barely more. If you’ve been hoarding leftover green and black from past projects (we all have that bag), this is its moment.
Materials You’ll Need
Nothing fancy here. Most of this is probably already in your craft stash.
Yarn (worsted weight / #4)
- Green – about 25 yards (head and hands)
- Black – about 20 yards (hair and shoes)
- Purple – about 25 yards (jacket) — or charcoal, if you want a classic look
- Dark gray – about 15 yards (pants)
- Silver or light gray – about 3 yards (neck bolts)
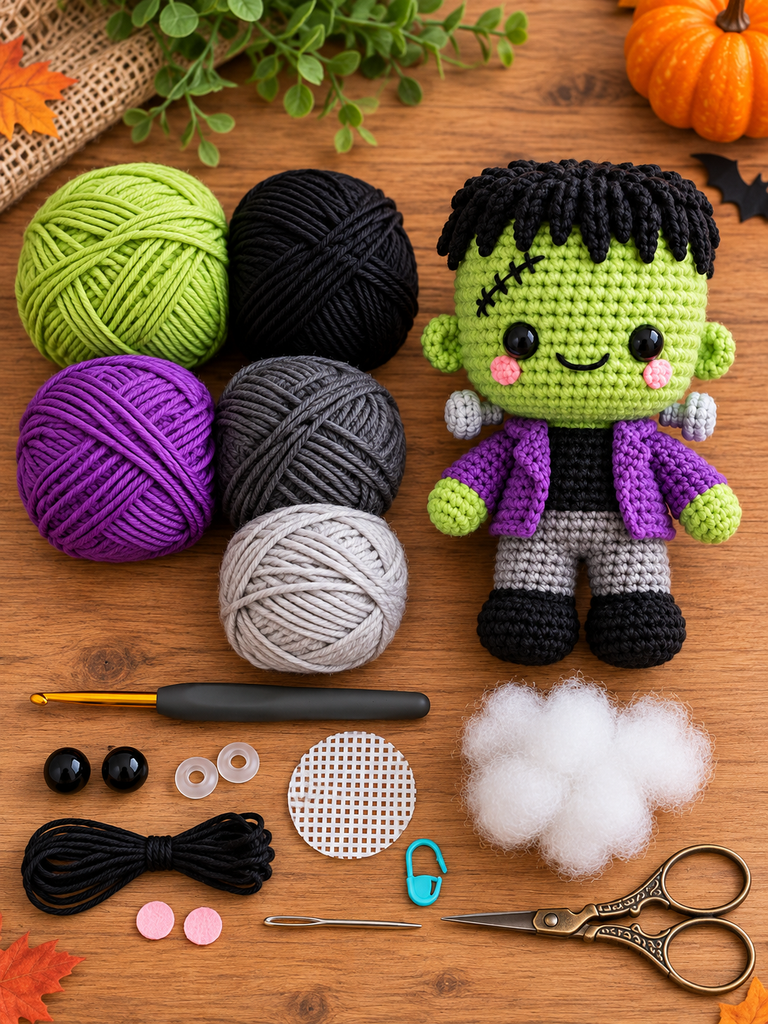
Cotton or acrylic both work. Acrylic is softer and more forgiving; cotton gives crisper stitch definition, which really shows off that boxy head.
Tools and Notions
- 3.5 mm (E-4) crochet hook
- 9 mm black safety eyes (or black embroidery floss for a child-safe version)
- Black embroidery floss for the mouth and scar
- Polyester fiberfill
- A small circle of plastic canvas or thin cardboard, about 2.25 inches (5.5 cm) across — optional but highly recommended
- Stitch marker
- Tapestry needle and scissors
- Pink blush, chalk pastel, or a tiny felt circle for cheeks (optional, but so cute)
A note on hook size: yes, 3.5 mm is smaller than what your yarn label recommends. That’s on purpose. Amigurumi needs a tight fabric so the stuffing doesn’t peek through. Gauge isn’t critical here — just make sure your stitches are snug.
Abbreviations (US Terms)
- MR – magic ring
- ch – chain
- sl st – slip stitch
- sc – single crochet
- hdc – half double crochet
- dc – double crochet
- inc – 2 sc in the same stitch
- dec – single crochet 2 together (invisible decrease recommended)
- BLO – back loop only
- FO – fasten off
- (…) x6 – repeat the instructions in parentheses 6 times
- (24) – total stitch count at the end of the round
Everything is worked in continuous spirals unless noted. Place your marker in the first stitch of each round and move it up as you go. Trust me, you’ll thank yourself around round 15.
The Head: Where the Personality Lives
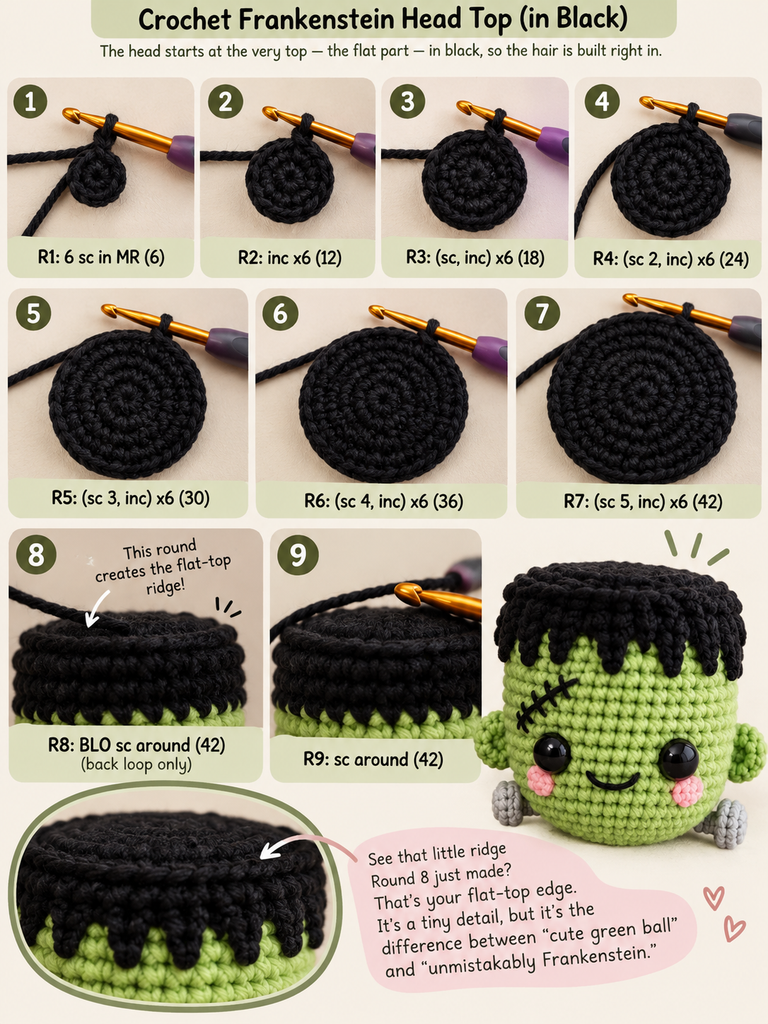
The head starts at the very top the flat part in black, so the hair is built right in. Then we switch to green for the face.
With black:
- R1: 6 sc in MR (6)
- R2: inc x6 (12)
- R3: (sc, inc) x6 (18)
- R4: (sc 2, inc) x6 (24)
- R5: (sc 3, inc) x6 (30)
- R6: (sc 4, inc) x6 (36)
- R7: (sc 5, inc) x6 (42)
- R8: BLO sc around (42)
- R9: sc around (42)
See that little ridge Round 8 just made? That’s your flat-top edge. It’s a tiny detail, but it’s the difference between “cute green ball” and “unmistakably Frankenstein.”
Switch to green:
- R10–R20: sc around (42) — 11 rounds
Pause here and add the face before closing (instructions in the assembly section below). It’s so much easier to place eyes when you can still reach inside.
- R21: (sc 5, dec) x6 (36)
- R22: (sc 4, dec) x6 (30)
- R23: (sc 3, dec) x6 (24)
Now for my favorite trick. Slip your plastic canvas circle inside, pressing it flat against the top of the head. Then stuff firmly below it. The canvas keeps the top crisp and square instead of puffing up into a dome. Without it, your monster still looks great — he’s just a bit rounder up top.
- R24: (sc 2, dec) x6 (18)
- R25: (sc, dec) x6 (12) — top up the stuffing
- R26: dec x6 (6)
FO, weave the tail through the front loops of the last round, and pull it closed.
The Spiky Fringe
Every good monster needs a bad haircut. This little strip gives him that jagged fringe across the forehead.
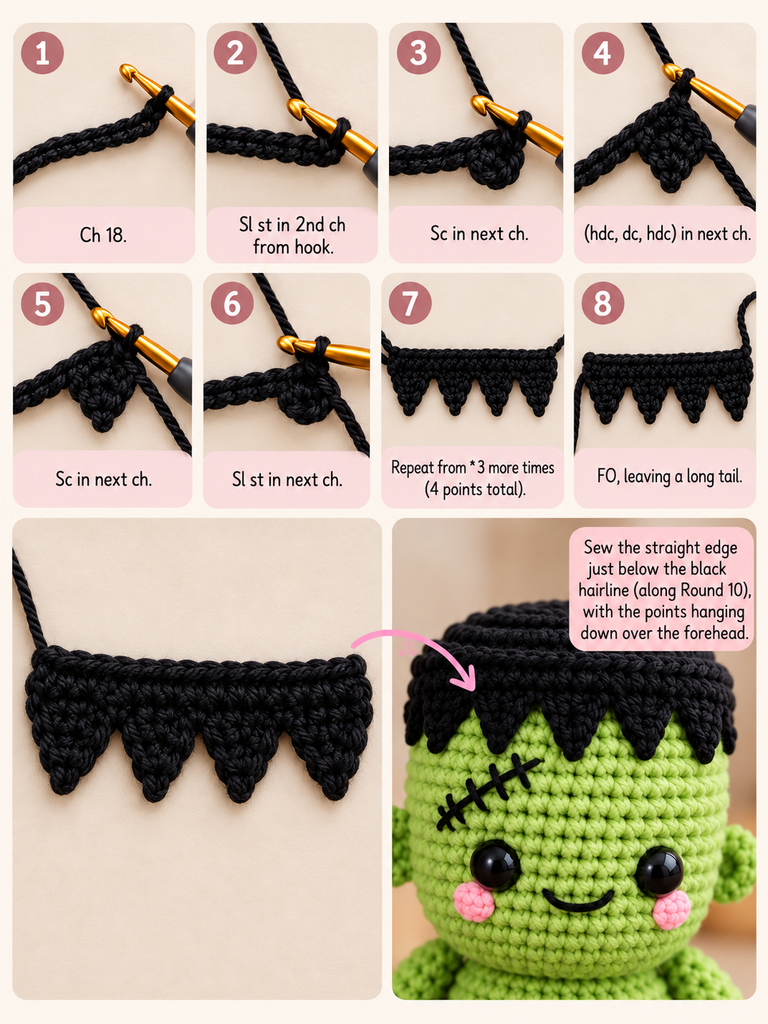
With black: ch 18.
- Sl st in 2nd ch from hook, then *sc in next ch, (hdc, dc, hdc) in next ch, sc in next ch, sl st in next ch*. Repeat from * 3 more times (4 points total).
FO, leaving a long tail. Sew the straight edge just below the black hairline (along Round 10), with the points hanging down over the forehead. A slightly uneven fringe looks better here, so don’t stress about perfection.
Neck Bolts (Make 2)
With silver or light gray:
- R1: 6 sc in MR (6)
- R2: BLO sc around (6)
- R3: sc around (6)

FO with a tail for sewing. Add a tiny pinch of stuffing so they stand up straight.
The Legs and Body
We start with the shoes and work all the way up to the shoulders in one piece. No sewing legs on later — which, let’s be honest, is everyone’s least favorite part of amigurumi.
Legs (Make 2)
With black:
- R1: 6 sc in MR (6)
- R2: inc x6 (12)
- R3: BLO sc around (12)
- R4: sc around (12)
Switch to dark gray:
- R5–R9: sc around (12)
FO the first leg. On the second leg, don’t fasten off — you’ll use it to join the two. Stuff the shoes and lower legs lightly as you go.
Body
Continuing in dark gray from the second leg:
- R10 (join): ch 3, sc into any stitch on the first leg, sc 11 more around leg 1, sc 3 along the chain, sc 12 around leg 2, sc 3 along the other side of the chain (30)
- R11–R13: sc around (30)

Switch to purple:
- R14: BLO sc around (30)
- R15–R18: sc around (30)
- R19: (sc 3, dec) x6 (24)
- R20–R21: sc around (24)
- R22: (sc 2, dec) x6 (18)
- R23: sc around (18)
Stuff firmly, paying extra attention to the join between the legs — that’s where floppy dolls are born.
- R24: (sc, dec) x6 (12)
FO, leaving a long tail to sew on the head.
Optional jacket hem: remember the BLO round where you switched to purple? It left a row of free front loops. Slip stitch around them in purple and suddenly he’s wearing a proper little jacket. Small effort, big payoff.
Arms (Make 2)
With green:
- R1: 6 sc in MR (6)
- R2: (sc, inc) x3 (9)
- R3–R4: sc around (9)

Lightly stuff the hand.
Switch to purple:
- R5–R12: sc around (9)
Don’t stuff the sleeves — floppy arms make for better hugs. Flatten the opening and sc 4 through both layers to close. FO, leaving a tail for sewing.
Bringing Him to Life: Face and Assembly
This is the part where your pile of pieces suddenly looks back at you. It gets me every single time.

The Face
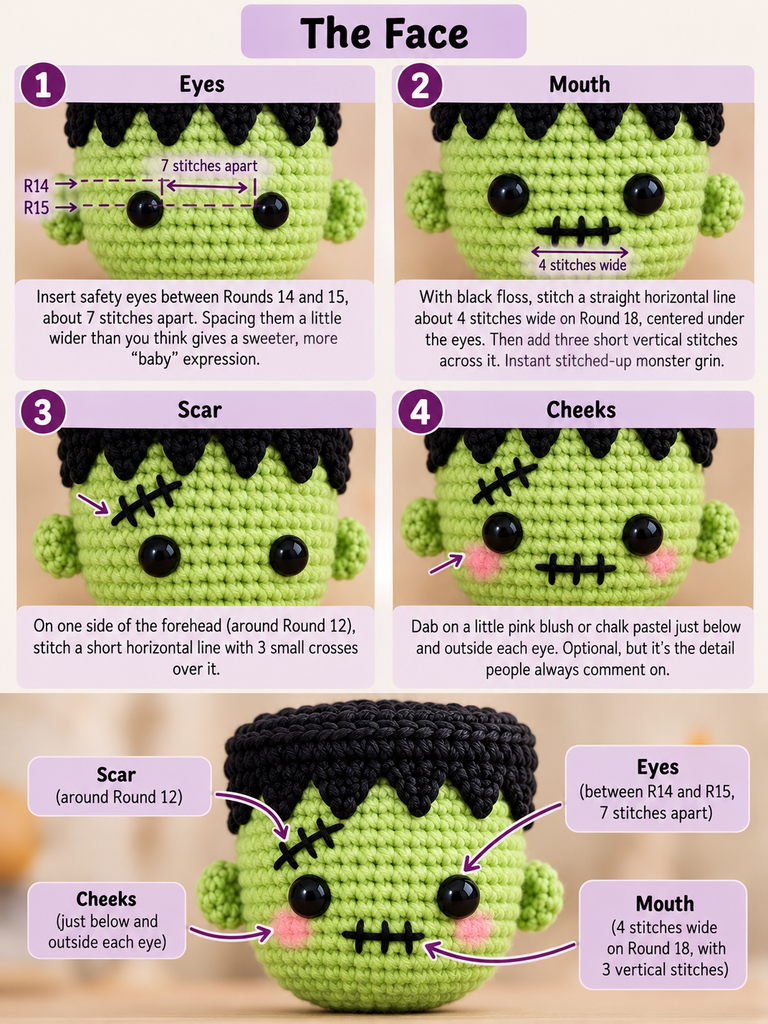
- Eyes: Insert safety eyes between Rounds 14 and 15, about 7 stitches apart. Spacing them a little wider than you think gives a sweeter, more “baby” expression.
- Mouth: With black floss, stitch a straight horizontal line about 4 stitches wide on Round 18, centered under the eyes. Then add three short vertical stitches across it. Instant stitched-up monster grin.
- Scar: On one side of the forehead (around Round 12), stitch a short horizontal line with 3 small crosses over it.
- Cheeks: Dab on a little pink blush or chalk pastel just below and outside each eye. Optional, but it’s the detail people always comment on.
Putting It Together
- Sew the head to the body using the body’s long tail. Sew around twice for a sturdy neck — a wobbly head is the number one complaint with amigurumi.
- Sew one bolt to each side of the head, around Round 16, lined up with the eyes.
- Sew the arms to the sides of the body, just below the neck (around Round 22).
- Weave in all your ends, pull them inside the body, and trim.

And that’s it. You just made a monster. Mary Shelley would be proud — or at least mildly amused.
Tips I Wish Someone Had Told Me Sooner
- Use the yarn-under method for single crochet if your stitches look like little x’s instead of v’s. It tightens the fabric and gives amigurumi that neat, polished look.
- Carry the black yarn loosely or cut it at color changes — don’t pull it tight across the inside, or your head will pucker.
- Stuff in small tufts, not one big wad. Lumpy stuffing is the fastest way to a lumpy monster.
- Make the face before you close anything. I’ve said it already. I’m saying it again because I’ve learned it the hard way more than once.
- Make a family. Swap the green for pale gray-blue and add a tall black beehive and you’ve got his bride. Pair them up for a Halloween display that steals the show.
Frequently Asked Questions
Is this pattern good for absolute beginners?
If you’ve never crocheted in the round, try a simple ball first to get comfortable with the magic ring and decreases. If you have, you’re ready. Every stitch here is basic — the hdc and dc only show up in the fringe.
Can I make him bigger?
Absolutely. Use chunky (#5) yarn with a 5 mm hook and he’ll grow to around 10 inches with no changes to the pattern. Just buy a bit more of each color.
Is it safe for babies and toddlers?
Yes, with one change: skip the safety eyes and embroider them with black yarn instead. Also stitch the bolts and arms on very securely, and check them now and then for wear.
Can I sell plushies made from this pattern?
Go for it — just please credit this blog as the pattern source. Small makers supporting small makers is what keeps this community going.
Your Turn to Make a Monster
Remember that green guy with the bolts? He didn’t come from the book. He came from people reimagining a story and making it their own. That’s exactly what you’re doing with every stitch here.
Maybe your Frankenstein ends up with a purple jacket. Maybe orange. Maybe his fringe is wild and his scar is crooked and he’s a little lopsided on one side. Good. That’s what makes him yours.
I’d genuinely love to see what you make. Share a photo of your finished Frankenstein in the comments or tag me on social media — I’m always amazed by the color combinations you all come up with. And if you hit a snag on any round, drop your question below. I read every one.
Happy hooking, and happy haunting! 🧟♂️🧶