Here’s a secret nobody told me when I started crocheting: a sweater is just four rectangles.
That’s it. Two for the body, two for the sleeves. Sew them together, and you’re wearing something you made with your own hands.
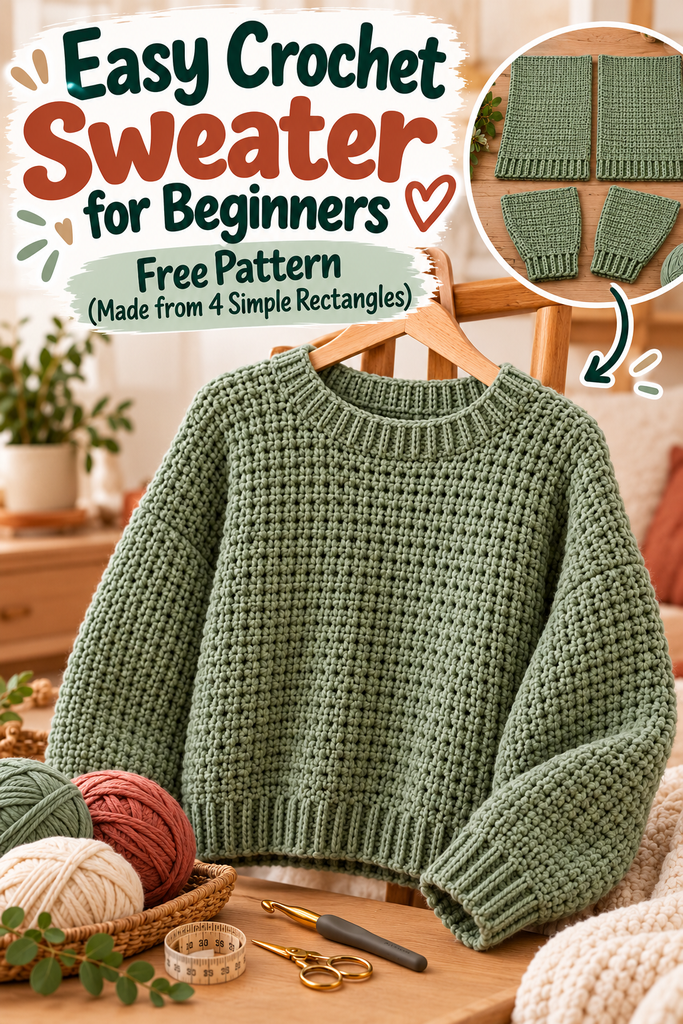
For years I avoided sweaters. I’d make scarves, then blankets, then more scarves, telling myself I’d “work up to” garments one day. Sweaters felt like the final boss of crochet, full of shaping, confusing charts, and sizing math that made my head spin. Sound familiar?
Then a friend handed me a cozy drop-shoulder pullover she’d made in three weekends and said, “It’s rectangles. Honestly.” I didn’t believe her until I made one myself. This pattern is the one I wish I’d had back then.
Table of Contents
Key Takeaways
- Only one main stitch: the whole body and sleeves use half double crochet (hdc). The ribbing uses single crochet in the back loop.
- No complicated shaping: the front and back are identical rectangles, and the neckline is created simply by where you sew the shoulders.
- Gauge matters more than talent: spend 15 minutes on a swatch and you’ll save yourself hours of frustration.
- Sizes S to 2XL with a relaxed, oversized fit that’s very forgiving for first-timers.
- Realistic timeline: most beginners finish in two to four weekends of relaxed crocheting.
Why This Is the Perfect First Sweater
Picture this: you’re halfway through a “beginner” sweater pattern and you hit a line like “decrease 1 st at neck edge every alt row 4 times while AT THE SAME TIME continuing armhole shaping.” You put it down. It goes in a bag. The bag goes in a closet. We’ve all been there.
This design skips all of that. The drop-shoulder construction means there’s no armhole shaping at all; the sleeves simply attach to the straight sides of the body. The boat neckline comes from leaving the middle of the top edge unsewn. And because the fit is relaxed, small inconsistencies in your tension won’t ruin the result.
What I love most is that you learn real garment skills here: reading a size chart, matching gauge, seaming, and picking up stitches. Those skills carry straight into every sweater you’ll make after this one.
What You’ll Need
Before you buy anything, have a quick look at this list. Nothing on it is fancy.
- Yarn: worsted weight (category #4) yarn, approximately 1,200 (1,350, 1,500, 1,700, 1,900) yards. A soft acrylic, a wool blend, or a cotton blend all work well. Buy one extra skein from the same dye lot, just in case.
- Hooks: 6 mm (US J-10) for the body and sleeves, and 5 mm (US H-8) for the ribbing.
- Tapestry needle for seaming and weaving in ends.
- Stitch markers (or safety pins, or scraps of contrasting yarn).
- Measuring tape and scissors.
A quick word on yarn choice: if this is your first sweater, pick a smooth, light-colored yarn. Fuzzy, dark, or highly textured yarns hide your stitches, which makes counting and fixing mistakes much harder. Save the mohair for sweater number two.
Abbreviations (US Terms)
- ch – chain
- sc – single crochet
- hdc – half double crochet
- blo – back loop only
- st(s) – stitch(es)
- RS / WS – right side / wrong side
Turning chains do not count as a stitch in this pattern. Always work your first stitch into the very first stitch of the row.
Gauge: The 15 Minutes That Decide Everything
I know. Nobody wants to make a swatch. I skipped it on my first garment, and I ended up with a “sweater” that would have fit a small bear.
Gauge: 13 hdc and 10 rows = 4 inches (10 cm) with a 6 mm hook.
To check it, chain 22, hdc in the 3rd chain from the hook and in each chain across (20 hdc). Work about 14 rows, then measure across the middle of your swatch, not the edges.
- More than 13 stitches in 4 inches? Your stitches are too small. Go up a hook size.
- Fewer than 13 stitches? Your stitches are too big. Go down a hook size.
Think of gauge like the scale on a map. If the scale is off, every distance on the map is wrong, no matter how carefully you follow the roads.
Sizing and Finished Measurements
This sweater is designed with about 6 to 8 inches of positive ease, which gives it that cozy, slightly oversized look. Choose your size by your actual bust measurement.
- Sizes: S (M, L, XL, 2XL)
- Fits bust: 32–34 (36–38, 40–42, 44–46, 48–50) in
- Finished chest: 40 (44, 48, 52, 56) in
- Body length: 22 (23, 24, 25, 26) in, including ribbing
- Neck opening: 10 in across
Between sizes? Lay your favorite sweatshirt flat, measure across the chest, and double it. Pick the size closest to that number. Your closet already knows what you like to wear.
Step 1: The Ribbing Strip (Make 2)
We start with ribbing because it gives the bottom edge that stretchy, store-bought look. You’ll make a narrow strip worked sideways, then build the body straight off its long edge.

With the 5 mm hook, ch 9.
Row 1: Sc in the 2nd ch from hook and in each ch across. Turn. (8 sc)
Row 2: Ch 1, sc blo in each st across. Turn. (8 sc)
Repeat Row 2 until the strip measures 20 (22, 24, 26, 28) inches long, measured without stretching. Don’t fasten off.
You’ll see those lovely vertical ridges forming as you go. That’s the back loop doing its job.
Step 2: Front and Back Panels (Make 2)
Switch to the 6 mm hook. Turn the strip so you’re working along one long edge (the row ends).
Foundation row: Ch 2, work 65 (72, 78, 85, 91) hdc evenly spaced along the long edge of the ribbing. Turn.
“Evenly spaced” scares a lot of beginners, so here’s a trick: place a marker at the halfway point and at the quarter points of the strip. Then aim for about 16 (18, 19 or 20, 21, 23) stitches in each quarter. Close enough is good enough here, as long as your final count is right.
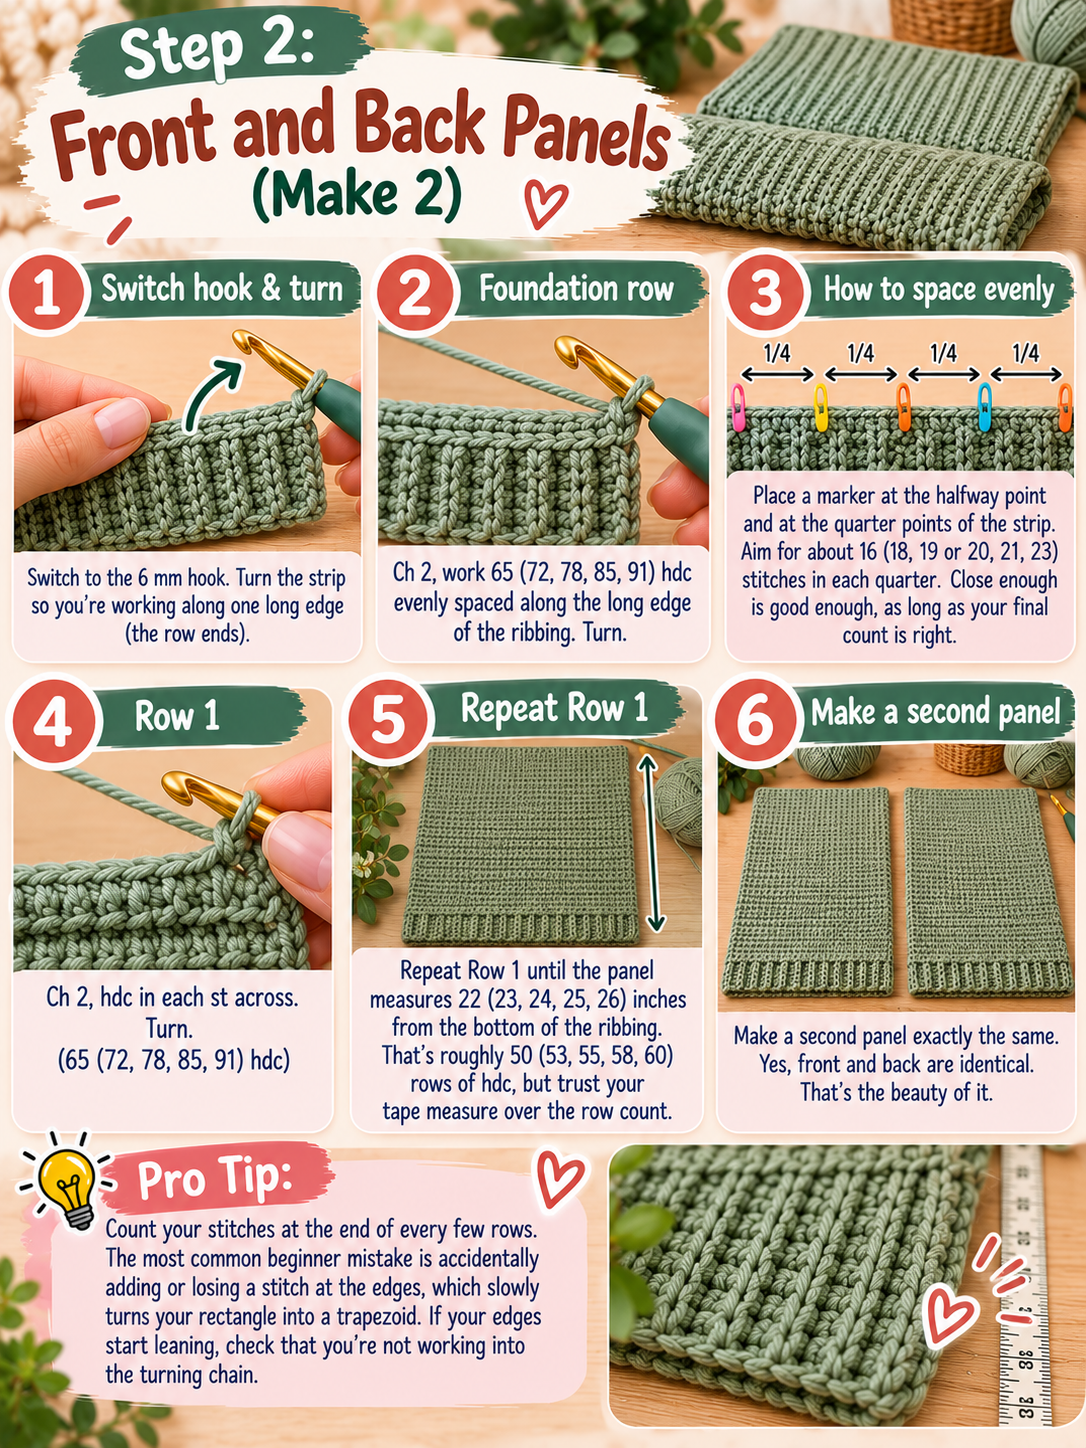
Row 1: Ch 2, hdc in each st across. Turn. (65 (72, 78, 85, 91) hdc)
Repeat Row 1 until the panel measures 22 (23, 24, 25, 26) inches from the bottom of the ribbing. That’s roughly 50 (53, 55, 58, 60) rows of hdc, but trust your tape measure over the row count. Fasten off.
Make a second panel exactly the same. Yes, front and back are identical. That’s the beauty of it.
Pro tip: count your stitches at the end of every few rows. The most common beginner mistake is accidentally adding or losing a stitch at the edges, which slowly turns your rectangle into a trapezoid. If your edges start leaning, check that you’re not working into the turning chain.
Step 3: The Sleeves (Make 2)
Sleeves are where most people expect things to get hard. They don’t. We’ll add a few stitches at the edges every few rows so the sleeve widens gently from cuff to shoulder.
Cuff: With the 5 mm hook, ch 7. Sc in the 2nd ch from hook and across (6 sc). Then work rows of ch 1, sc blo in each st, until the cuff measures 8 (8, 8.5, 9, 9) inches. Don’t fasten off.
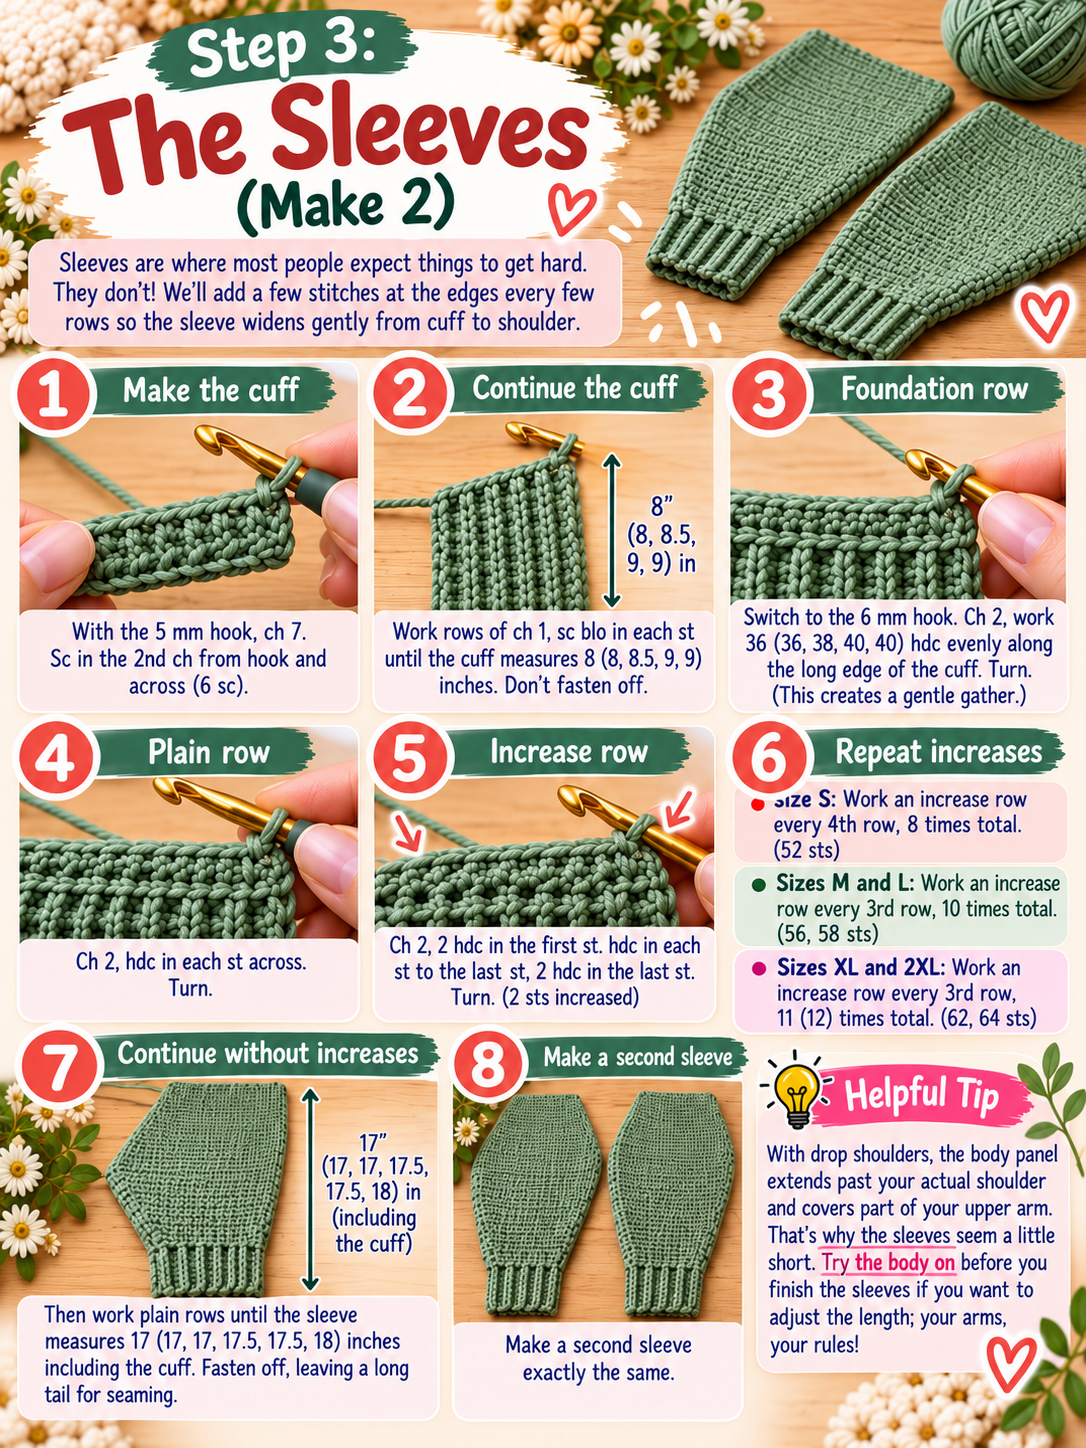
Foundation row: Switch to the 6 mm hook. Ch 2, work 36 (36, 38, 40, 40) hdc evenly along the long edge of the cuff. Turn.
You’re putting more stitches along the cuff than its length would normally hold. That’s on purpose. It creates a gentle gather at the wrist, which looks great and stops the cuff from sliding over your hand.
Plain row: Ch 2, hdc in each st across. Turn.
Increase row: Ch 2, 2 hdc in the first st, hdc in each st to the last st, 2 hdc in the last st. Turn. (2 sts increased)
- Size S: Work an increase row every 4th row, 8 times total. (52 sts)
- Sizes M and L: Work an increase row every 3rd row, 10 times total. (56, 58 sts)
- Sizes XL and 2XL: Work an increase row every 3rd row, 11 (12) times total. (62, 64 sts)
Then work plain rows until the sleeve measures 17 (17, 17.5, 17.5, 18) inches including the cuff. Fasten off, leaving a long tail for seaming.
Wondering why the sleeves seem a little short? With drop shoulders, the body panel extends past your actual shoulder and covers part of your upper arm. The sleeve picks up from there. Try the body on before you finish the sleeves if you want to adjust the length; your arms, your rules.
Step 4: Putting It All Together
This is the moment rectangles become a sweater. Take your time, put on some music, and work on a flat surface.

Shoulders: Lay the front and back panels on top of each other, right sides facing in. Along the top edge, measure 5 (6, 7, 8, 9) inches in from each side and place a marker. Sew from each outer edge to its marker using a whip stitch or mattress stitch. The unsewn 10 inches in the middle is your neckline.
Armhole markers: Open the body flat. On each side edge, measure down 8 (8.5, 9, 9.5, 10) inches from the shoulder seam on both the front and the back, and place a marker. The space between those markers is where each sleeve attaches.
Attach the sleeves: Fold a sleeve in half lengthwise to find the center of its top edge. Pin that center to the shoulder seam, then pin the sleeve’s top corners to the armhole markers. Sew it in place. Repeat for the other sleeve.
Side and sleeve seams: Fold the sweater with right sides together. Starting at the bottom of the ribbing, sew up the side, across the underarm, and down the sleeve to the cuff, all in one continuous seam. Repeat on the other side.
Turn it right side out. Take a breath. You just made a sweater.
Step 5: Finishing Touches That Make It Look Professional
These last steps separate “I made this” from “where did you buy that?”

- Neckline: Join yarn at a shoulder seam with the 5 mm hook and work one round of sc around the neck opening, then one round of slip stitches. This stops the neckline from stretching out over time.
- Weave in ends properly: weave each tail through at least 2 inches of stitches, then change direction and go back a little. It’s tedious, but loose ends are the number one reason handmade garments start to come apart.
- Block it: wet or steam-block according to your yarn label. Blocking evens out your stitches and helps the seams relax. With acrylic, use gentle steam and don’t press the iron down on the fabric.
Common Beginner Mistakes (and How to Avoid Them)
“My panels are different sizes.” This usually comes from tension changing between sessions. Crocheting when you’re stressed often makes tighter stitches. Measure each panel as you go, and compare it with the first one before you fasten off.
“My edges are wavy.” You’re probably adding or skipping stitches at the ends of rows. Place a stitch marker in the first and last stitch of each row until you get the hang of it.
“I ran out of yarn.” Weigh your first finished panel. Multiply by two for the body and you’ll have a good sense of whether you need more for the sleeves, long before it becomes a problem.
“The sweater feels heavy.” Half double crochet makes a solid, warm fabric. If you want more drape, try a wool blend, or go up half a hook size and redo your swatch.
Easy Ways to Make It Your Own
Once you understand the rectangle formula, you can play with it endlessly.
- Add stripes: change colors every 4 or 6 rows for a retro look.
- Crop it: shorten the body panels to 17 or 18 inches for a cropped pullover to wear over high-waisted jeans.
- Color-block it: make the sleeves in a contrasting color. It’s simple, and it looks very intentional.
- Change the texture: work the body in hdc through the back loop only for a knit-like ribbed look (redo your gauge swatch first).
Frequently Asked Questions
How long does it take to crochet a sweater as a beginner?
Most beginners finish this pattern in roughly 20 to 30 hours. Spread over evenings and weekends, that’s usually two to four weekends.
Can I use a bulky yarn to finish faster?
You can, but the stitch counts here are written for worsted weight. With bulky yarn you’d need to recalculate using your new gauge: multiply the stitches per inch by the width you want.
Is this pattern truly beginner friendly?
If you can chain, single crochet, and half double crochet, you can make this sweater. Everything else is counting, measuring, and sewing.
Can I make it for a man or a teenager?
Absolutely. The relaxed, unisex shape works for anyone. Just choose the size by chest measurement and adjust the body and sleeve lengths to suit.
Final Thoughts: Your First Sweater Is Closer Than You Think
Remember those four rectangles? That’s all that stands between you and a sweater you’ll actually reach for on cold mornings.
Your first one won’t be perfect. Mine had one sleeve slightly longer than the other, and I still wore it until the elbows thinned. That’s the funny thing about handmade clothes: the little imperfections stop looking like mistakes and start looking like proof you made it.
So grab your hook, make that swatch (really, make the swatch), and start your first rectangle tonight.
I’d love to see what you make! Leave a comment below and tell me which size and yarn you picked, or share a photo of your finished sweater. And if you get stuck on any step, ask away in the comments. Chances are someone else is wondering the same thing, and I’m always happy to help.