

The first thing I ever crocheted was supposed to be a scarf. It ended up as a lopsided trapezoid that grew wider every row, and after three weeks I quietly shoved it into a drawer. Sound familiar?

Here’s what I wish someone had told me back then: start with a cowl. It’s short, it’s forgiving, and you get to wear it before your motivation runs out. That’s exactly why I put together this easy crochet cowl pattern for beginners. One stitch, one hook, chunky yarn, and a finished piece in a weekend.
Table of Contents
Key Takeaways
- This cowl uses only one stitch, the half double crochet (hdc), worked in simple rows.
- Bulky yarn and a large hook mean it works up fast, usually in 3 to 5 hours.
- You make a flat rectangle, then sew the short ends together. No working in the round.
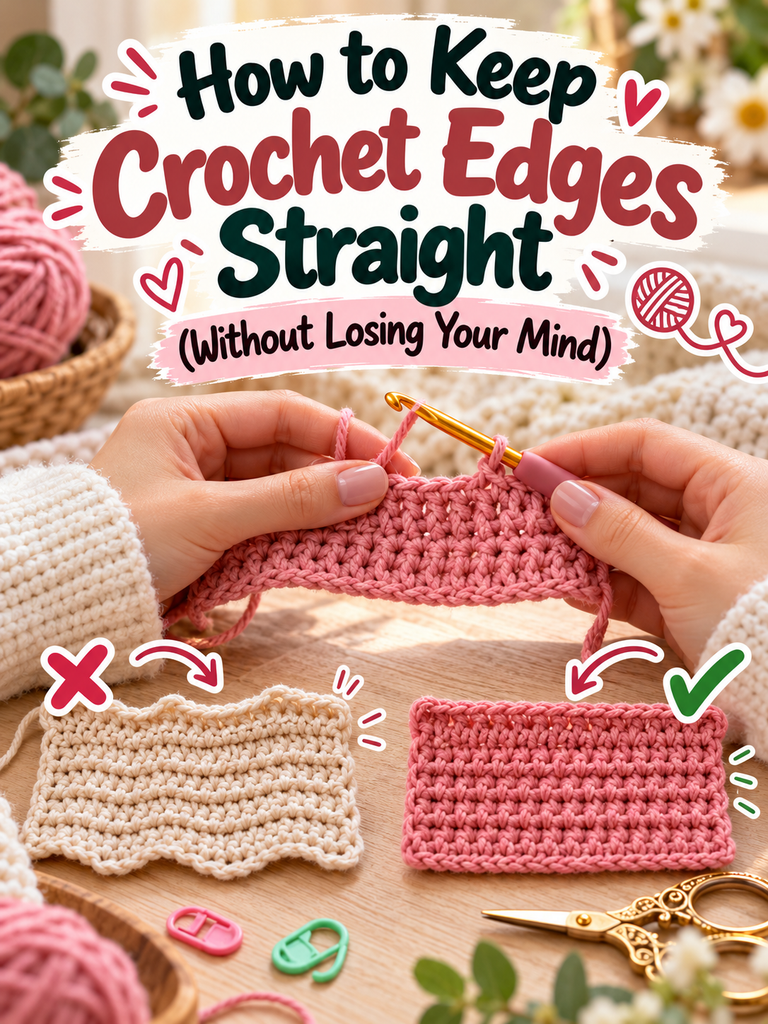
- Counting your stitches at the end of every row is the single habit that keeps your edges straight.
- Add a twist before seaming and you’ve got an infinity-style cowl with zero extra effort.
Why a Cowl Is the Perfect First Crochet Project
Let’s be honest, beginner projects live or die on one thing: do you actually finish them? A full-length scarf can take 150+ rows. A blanket? Ambitious. A cowl sits in that sweet spot where it’s big enough to feel like a real accomplishment but small enough that you’ll reach the end while you’re still excited.
It also hides mistakes beautifully. Once it’s around your neck, nobody is counting stitches. (I promise. I’ve worn my wonkiest early cowls in public and lived to tell the tale.)
And because this pattern repeats the same row over and over, you build muscle memory fast. By row ten, your hands start moving without you thinking about every step. That’s the moment crochet goes from frustrating to relaxing.
What You’ll Need
Nothing fancy here. If you’ve already got a hook and some yarn, you might be ready to go.
- Yarn: About 200–250 yards (183–229 m) of bulky weight yarn (category #5). Most bulky skeins run 100–130 yards, so plan on two skeins.
- Hook: 6.5 mm (US K-10.5) or 8 mm (US L-11). Check your yarn label for the recommended size.
- Yarn needle: A large, blunt tapestry needle for seaming and weaving in ends.
- Scissors
- Optional: A stitch marker to mark the first stitch of each row.
A quick word on yarn choice, because it matters more than most beginners realize. Pick a smooth, light-colored yarn. Fuzzy, dark, or textured yarns look gorgeous on the shelf, but they make it really hard to see where your stitches are. Save the boucle for project number three.
Gauge and Finished Size
Gauge: About 11 hdc and 8 rows = 4 inches (10 cm).
Finished size: Roughly 9 inches (23 cm) tall and 24 inches (61 cm) around.
Now, you might be wondering whether gauge really matters for a cowl. Honestly? Not much. If yours comes out a little bigger or smaller, it’ll still fit. The only real risk is running short on yarn if your stitches are much looser than mine, which is why I recommend that second skein.
Abbreviations (US Terms)
- ch – chain
- hdc – half double crochet
- st(s) – stitch(es)
- sl st – slip stitch
If you learned crochet from a UK source, hdc is called a “half treble” (htr) there. Same stitch, different name.
How to Half Double Crochet (A Quick Refresher)
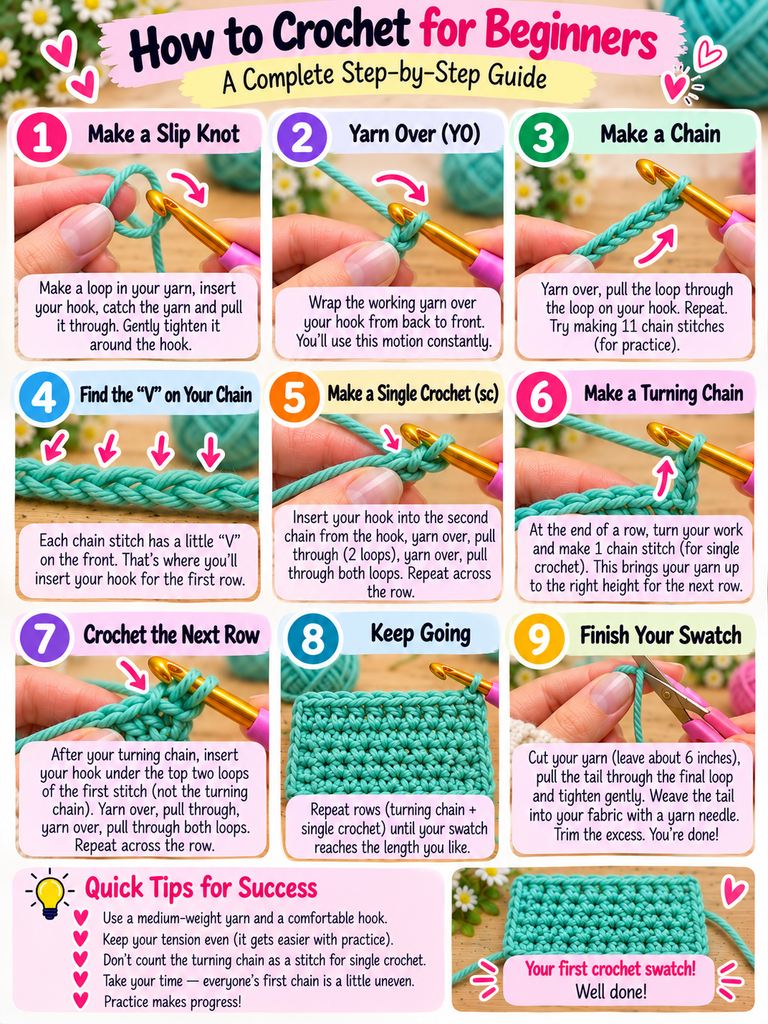
If the hdc is new to you, here’s the whole thing in four moves:
- Yarn over (wrap the yarn over your hook once).
- Insert your hook into the stitch.
- Yarn over again and pull up a loop. You’ll now have 3 loops on your hook.
- Yarn over one more time and pull through all 3 loops.

That’s it. Practice it on a few chains before you start the real thing. It feels clumsy for the first dozen tries, and then suddenly it doesn’t.
The Easy Crochet Cowl Pattern
Notes before you start: The cowl is worked flat in rows, then the two short ends are sewn together. The ch 2 at the beginning of each row does not count as a stitch. You’ll have 25 stitches in every row.

Foundation: Ch 27.
Row 1: Hdc in the 3rd ch from your hook and in each ch across. Turn. (25 hdc)
Row 2: Ch 2 (does not count as a stitch), hdc in the first st and in each st across. Turn. (25 hdc)
Rows 3 and onward: Repeat Row 2 until the piece measures about 24 inches (61 cm) long. That’s around 48 rows at my gauge, but go by the tape measure, not the row count.
Fasten off, leaving a long tail of about 20 inches (50 cm) for seaming.
Seaming the Cowl
Lay your rectangle flat. Bring the two short ends together so they line up stitch for stitch, and make sure the piece isn’t twisted (unless you want it to be, more on that below).
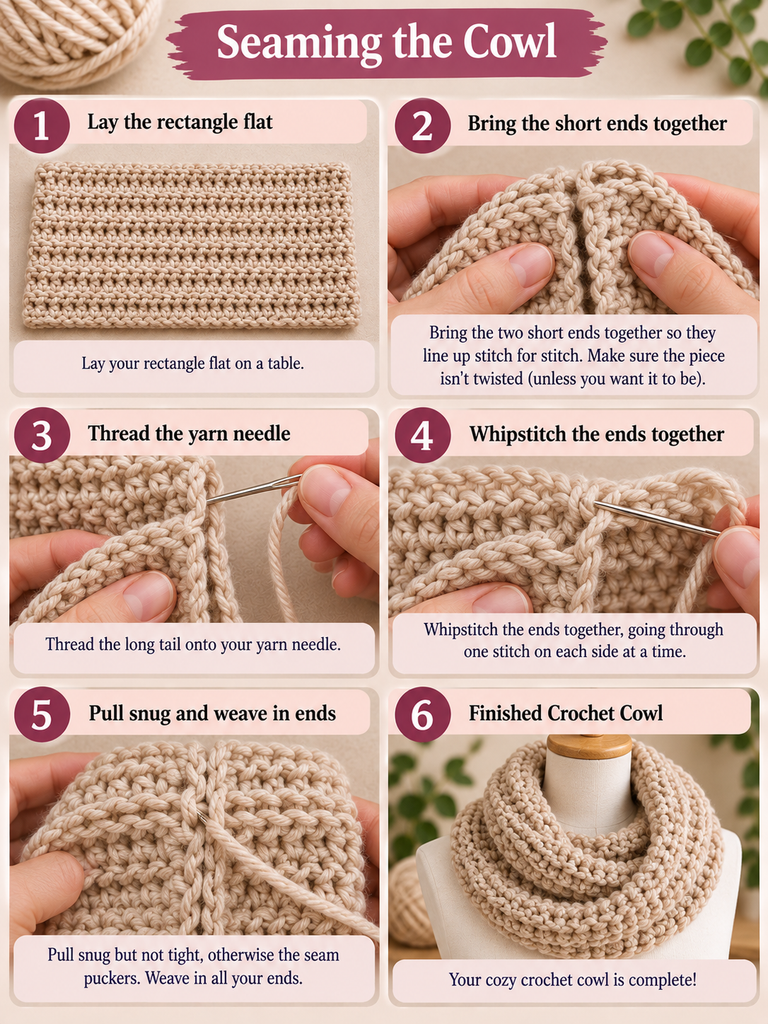
Thread the long tail onto your yarn needle and whipstitch the ends together, going through one stitch on each side at a time. Pull snug but not tight, otherwise the seam puckers. Weave in all your ends, and you’re done.
Picture this: Saturday morning you chain 27, and by Sunday evening you’re pulling a warm, squishy cowl over your head that you made. That feeling never gets old.
Three Easy Ways to Make It Your Own
Once you’ve made the basic version, it’s tempting to tweak it. Good. That’s how you grow.
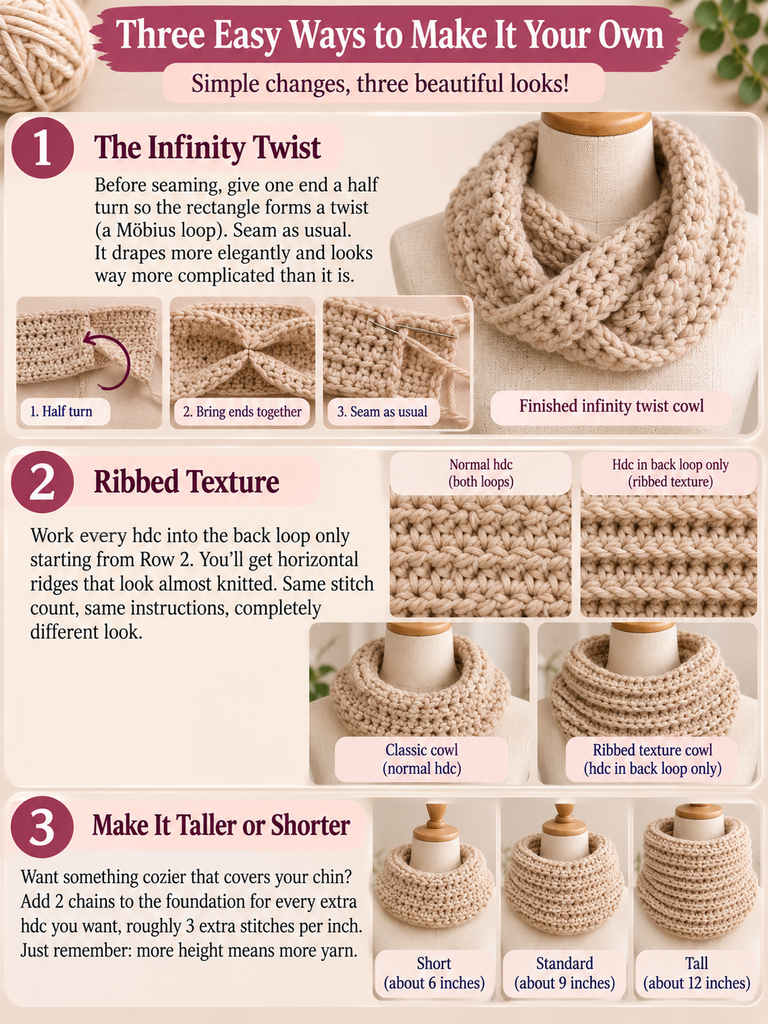
1. The infinity twist. Before seaming, give one end a half turn so the rectangle forms a twist (a Möbius loop). Seam as usual. It drapes more elegantly and looks way more complicated than it is.
2. Ribbed texture. Work every hdc into the back loop only starting from Row 2. You’ll get horizontal ridges that look almost knitted. Same stitch count, same instructions, completely different look.
3. Make it taller or shorter. Want something cozier that covers your chin? Add 2 chains to the foundation for every extra hdc you want, roughly 3 extra stitches per inch. Just remember: more height means more yarn.
Common Beginner Mistakes (and How to Fix Them)
We’ve all been there. Here are the problems I see most often, and what’s actually going on.
“My cowl is getting wider (or narrower).” This is the classic one. You’re either adding a stitch at the start of the row by working into the turning chain, or skipping the last stitch at the end. Fix: count to 25 at the end of every row, and put a stitch marker in the first and last stitch so you can’t miss them.
“My foundation chain is super tight.” Very common, and it makes Row 1 a misery. Try making your chain with a hook one size larger than the rest of the project, then switch back.
“I can’t tell where to put my hook.” Look for the little “V” on top of each stitch. Your hook goes under both legs of that V. Good lighting and a light-colored yarn make a huge difference here.
“My edges look messy.” Totally normal for a first project. Your tension evens out with practice. And here’s the secret: once the cowl is seamed and worn, the side edges become the top and bottom edges and scrunch up naturally. Nobody will notice.
Frequently Asked Questions
How long does it take to crochet a cowl as a beginner?
Most beginners finish this pattern in 3 to 5 hours of crochet time. Spread over a weekend, it’s very doable.
Can I use worsted weight yarn instead of bulky?
Yes, but you’ll need more stitches and rows to reach the same size. Use a 5.5 mm (US I-9) hook, chain about 37, and keep going until it measures 24 inches. It’ll take longer and feel lighter.
Is this cowl a good gift?
Absolutely. It’s one of the most-gifted handmade items for a reason: it fits nearly everyone, so you don’t need to know anyone’s size.
How do I wash my cowl?
Follow the care instructions on your yarn label. Acrylic blends can usually go in the machine on a gentle cycle; wool should be hand washed and dried flat.
Your First Cowl Is Waiting
Remember that lopsided trapezoid I told you about? It’s still in that drawer. I keep it as a reminder that every crocheter starts somewhere messy. What changed wasn’t talent. It was picking a project small enough to actually finish.
This cowl is that project. One stitch, 25 stitches a row, and a little patience. By the time you sew that final seam, you won’t just have something warm to wear. You’ll have proof that you can do this.
So grab your hook and tell me: what color are you making yours in? Drop a comment below, and if you finish it, share a photo. I’d genuinely love to see it. And if you get stuck on any row, ask me in the comments. Chances are someone else is wondering the same thing.

One Comment