The first thing I ever finished with a crochet hook was supposed to be a scarf. It was supposed to be long and cozy. Instead, it was about 30 centimeters of wobbly rows that got wider on one side and narrower on the other, and I quietly stuffed it in a drawer.
A year later, I tried again with something smaller: an ear warmer. I finished it in one evening, wore it the next morning, and a friend asked where I’d bought it. That moment did more for my crochet confidence than any tutorial ever had.
So if you’re new to crochet and you want a project you’ll actually finish, this is the one I’d hand you. It uses a single stitch, it’s worked in straight rows, and it looks far more impressive than the effort it takes.
Table of Contents
Key Takeaways
- One stitch only: the whole ear warmer is half double crochet worked in the back loop, which creates a stretchy, ribbed look.
- Small and fast: about 100 yards (90 m) of bulky yarn and two to three hours of crocheting.
- No shaping: you make a simple rectangle, then seam the ends together.
- Easy to size: make it 1 to 2 inches (2.5–5 cm) smaller than the head it’s for, since the ribbing stretches.
- Optional upgrade: a cinched front turns a plain band into a “boutique” style in about five minutes.
Why an Ear Warmer Is the Perfect First Crochet Project
Here’s the thing most beginners don’t hear often enough: your first project shouldn’t be a test of endurance. It should be a quick win.
An ear warmer gives you that. You practice the same motion over and over (turn, chain, stitch, repeat) until your hands start to remember it. Small mistakes don’t matter much, because the ribbing hides a lot. And you finish before you lose interest, which, let’s be honest, is where most first scarves go to die.
It’s also genuinely useful. Ear warmers keep your ears warm without flattening your hair the way a hat does, and they make great handmade gifts when the weather turns cold.
What You’ll Need
- Yarn: about 100 yards (90 m) of bulky weight yarn (category #5). A soft acrylic or wool blend in a light, solid color is easiest to work with because you can see your stitches clearly.
- Crochet hook: 6.5 mm (US K-10½). If you only have worsted weight yarn (#4), hold two strands together and use the same hook.
- Tapestry needle: a large, blunt needle for seaming and weaving in ends.
- Scissors
- Measuring tape
A quick tip from experience: skip very dark yarn, fuzzy mohair, and anything “eyelash” for your first try. They look lovely in the shop, but they hide your stitches and make it hard to see where to put your hook.
Stitches and Abbreviations (US Terms)
- ch – chain
- st(s) – stitch(es)
- hdc – half double crochet: yarn over, insert hook, yarn over and pull up a loop (3 loops on hook), yarn over and pull through all 3 loops
- BLO – back loop only: insert your hook under just the loop farthest from you, instead of under both loops
Working in the back loop only is the “secret” behind this pattern. It leaves the front loop sitting on the surface as a little ridge, and row after row, those ridges stack up into a ribbed texture that looks knitted. It also makes the fabric much stretchier, which is exactly what you want around your head.
If you’re using UK patterns, US half double crochet is called a “half treble” (htr). Same stitch, different name.
Gauge and Finished Size
Gauge isn’t critical here, because you’ll measure the band against a real head. Roughly, though: 12 stitches across gives a band about 4½ inches (11 cm) wide, and 4 rows of BLO hdc measure about 1 inch (2.5 cm) in length when the fabric is relaxed.
Use this table to decide how long to make your band before seaming:
| Size | Approx. head circumference | Unstretched band length |
|---|---|---|
| Child (3–10 years) | 19–20 in (48–51 cm) | 17–18 in (43–46 cm) |
| Teen / Adult small | 20–21 in (51–53 cm) | 18–19 in (46–48 cm) |
| Adult medium / large | 21½–23 in (55–58 cm) | 19½–21 in (50–53 cm) |
Head sizes vary a lot, so if you can, measure the person you’re making it for around the forehead and over the ears. Then subtract 1 to 2 inches. A snug ear warmer stays put. A loose one ends up around your neck by lunchtime.
The Pattern, Step by Step
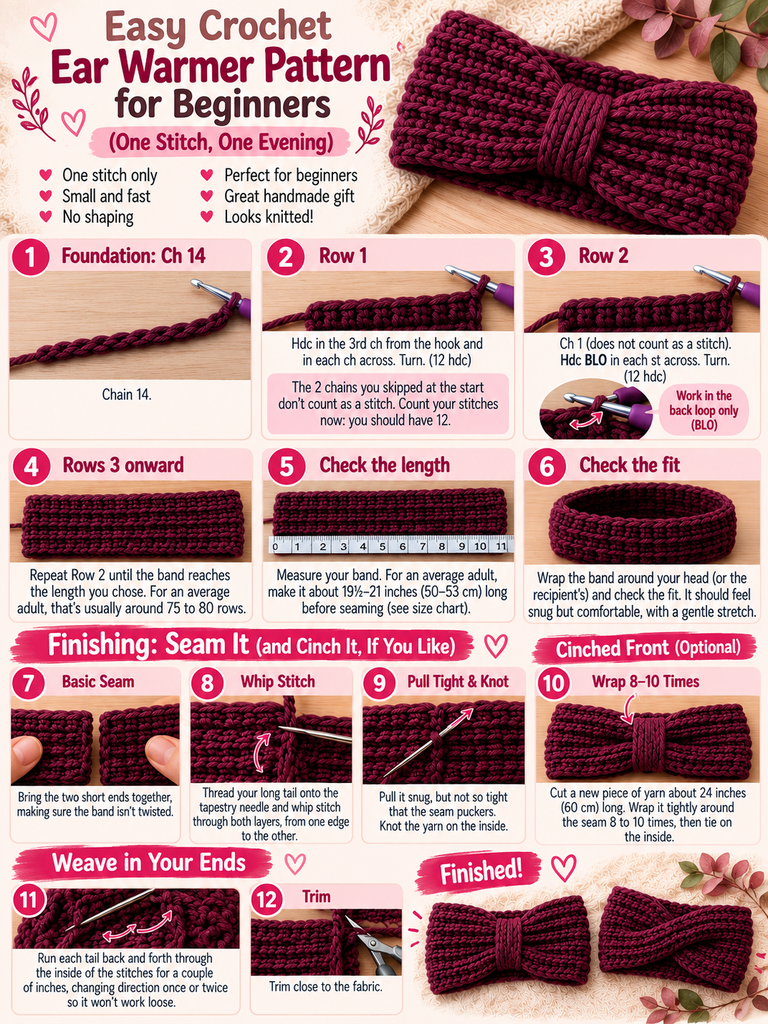
Foundation: Ch 14.
Row 1: Hdc in the 3rd ch from the hook and in each ch across. Turn. (12 hdc)
The 2 chains you skipped at the start don’t count as a stitch. Count your stitches now: you should have 12. This is the single most useful habit you can build as a beginner.
Row 2: Ch 1 (does not count as a stitch). Hdc BLO in each st across. Turn. (12 hdc)
Rows 3 onward: Repeat Row 2 until the band reaches the length you chose from the table above. For an average adult, that’s usually somewhere around 75 to 80 rows.
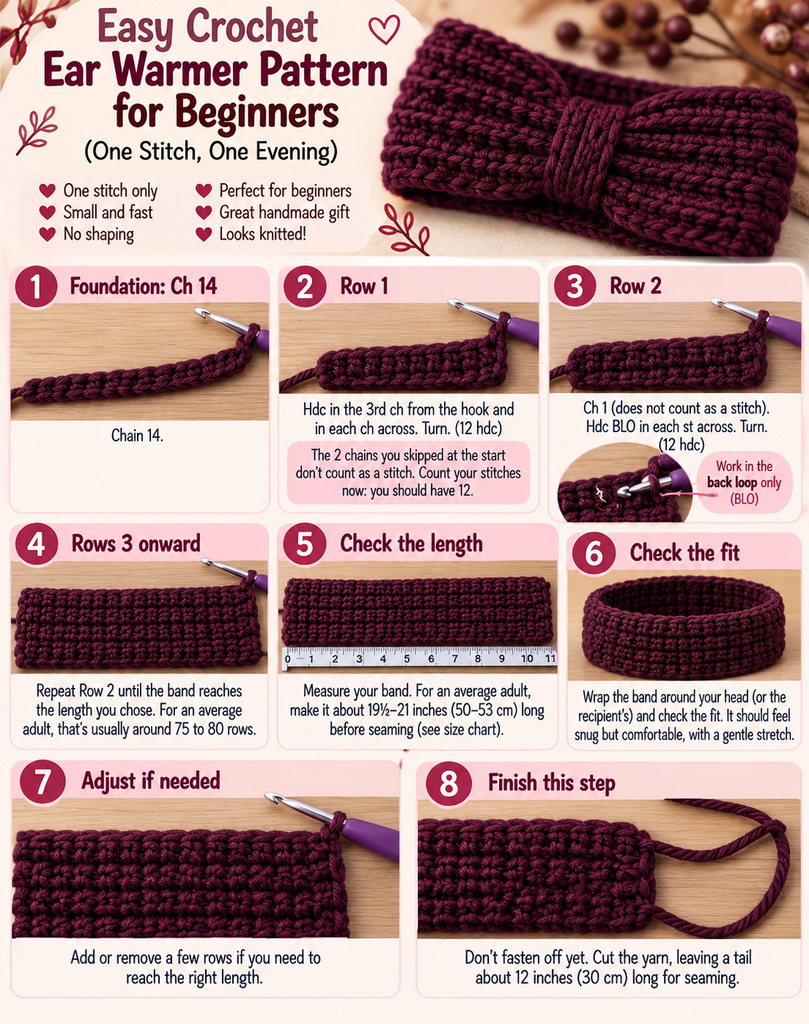
Don’t fasten off yet. Wrap the band around your head (or the recipient’s) and check the fit. It should feel snug but comfortable, with a gentle stretch. Add or remove a few rows if you need to, then cut the yarn, leaving a tail about 12 inches (30 cm) long for seaming.
Finishing: Seam It (and Cinch It, If You Like)
Basic seam: Bring the two short ends of the band together, making sure the band isn’t twisted. Thread your long tail onto the tapestry needle and whip stitch through both layers, from one edge to the other. Pull it snug, but not so tight that the seam puckers. Knot it on the inside.
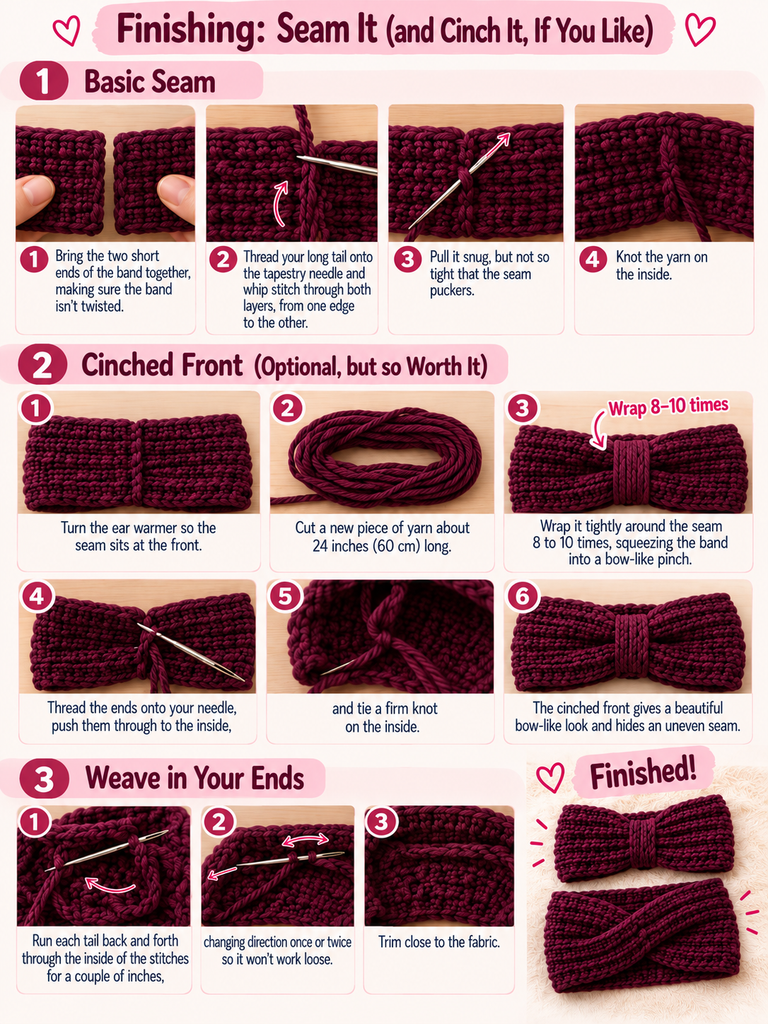
Cinched front (optional, but so worth it): Turn the ear warmer so the seam sits at the front. Cut a new piece of yarn about 24 inches (60 cm) long. Wrap it tightly around the seam 8 to 10 times, squeezing the band into a bow-like pinch. Thread the ends onto your needle, push them through to the inside, and tie a firm knot.
That little cinch is what makes people ask, “Did you buy that?” It hides an uneven seam, too, which is a nice bonus when you’re still learning.
Weave in your ends: Run each tail back and forth through the inside of the stitches for a couple of inches, changing direction once or twice so it won’t work loose. Trim close to the fabric.
Common Beginner Mistakes (and How to Fix Them)
“My band is getting narrower (or wider).” This is the classic one, and you’re not alone. It almost always means a stitch was skipped or added at the end of a row. The first stitch of each row sits right at the base of your turning chain, and the last stitch is easy to miss. Count to 12 every few rows. It feels tedious, but it saves you from unraveling later.
“My edges look wavy.” Usually your tension is tighter at the start of the row than at the end, or vice versa. Relax your grip on the yarn. Consistency comes with practice, and by row 30 you’ll probably notice your stitches evening out on their own.
“It’s too loose once I put it on.” Ribbing stretches more than you’d expect. Take out a few rows and re-seam. Honestly, I’d rather make it slightly too small than slightly too big.
“I can’t tell which loop is the back loop.” Hold your work with the row you’re about to crochet into running along the top. Look down at the top of a stitch: you’ll see a little “V” shape. The back loop is the leg of the V farthest from you.
Easy Ways to Make It Your Own
Once you’ve made one, you’ll probably want to make another (that’s how it starts). A few simple ideas:
- Stripes: change color every 4 or 6 rows. Switch colors on the last yarn over of the final stitch in a row for a clean line.
- Wider band: start with ch 16 instead of 14 (14 hdc) for more coverage on very cold days.
- Twist instead of cinch: before seaming, give one end a half twist, then fold the ends into each other for a turban-style look.
- Add a button: skip the seam, overlap the ends, and sew on a large button for an adjustable fit.
Frequently Asked Questions
How long does it take to crochet an ear warmer?
For most beginners, two to three hours. Your second one will likely go noticeably faster.
Can I use a smaller yarn?
Yes. With worsted weight (#4), either hold two strands together, or use a 5 mm hook with a single strand and start with ch 20 (18 hdc) to keep a similar width. You’ll need more rows, so keep measuring.
What’s the best yarn for sensitive skin?
Soft acrylic, cotton blends, or superwash merino tend to be the least itchy. If you can, rub a skein against your neck or wrist in the shop before buying.
Can I wash it?
Follow the care label on your yarn. When in doubt, hand wash in cool water and lay it flat to dry so it keeps its shape.
Your First Finished Project Is Closer Than You Think
Remember my sad little scarf in the drawer? The difference between that project and the ear warmer wasn’t talent. It was size. A small, achievable project let me practice the basics and actually reach the finish line, and that feeling of wearing something I made is what kept me crocheting.
That’s what I hope this pattern gives you: one stitch, one evening, and something warm you can be proud of. Don’t worry if it isn’t perfect. Your first one is supposed to teach you, and your second one will show you how far you’ve come.
Have you made this ear warmer? I’d love to hear how it went. Tell me in the comments which color you chose, whether you went for the cinched front, and if any step tripped you up. Your question might help the next beginner, too. And if this pattern helped you, save it or share it with a friend who’s been saying “I want to learn to crochet” for far too long.