The first granny square vest I ever made sat in a bag for three months as a pile of twenty-something squares. I loved making them. I was terrified of putting them together.
I kept thinking: what if it doesn’t fit? What if the seams look lumpy? What if I spend all this time and end up with a very colorful potholder shaped like regret?

Here’s what I eventually figured out, and what I want you to know before you pick up your hook: a granny square vest is just squares sewn into two rectangles. That’s it. If you can make one square, you can make this vest. The rest is counting and a bit of patience.
So let’s walk through it together, from the very first stitch to the moment you pull it on over a white T-shirt and catch yourself in the mirror.
Key Takeaways
- This vest uses 30 identical granny squares and only one main stitch: the double crochet.
- Construction is simple: a 16-square back panel, a 14-square front panel, then four short seams.
- Your square size controls the fit. Measure one square before you make the other 29.
- A simple border around the hem, neckline, and armholes is what makes it look “finished” instead of homemade.
- Budget roughly 800–950 yards of worsted-weight yarn for an average adult size, and buy a little extra.
Why a Granny Square Vest Is the Perfect First Garment
Most beginners assume sweaters are the “real” crochet goal and vests are a side quest. Honestly? I think it’s the other way around.
A vest has no sleeves, which means no shaping, no decreasing, and no trying to make two arms match. And because it’s built from squares, you’re never staring at one huge, intimidating piece. You’re making small wins, one square at a time, often in 15 to 20 minutes each.
That’s the quiet genius of the granny square. It’s portable. You can make one on the bus, on your lunch break, or while half-watching a show. By the time you’re bored of a color, it’s time to switch.
And let’s be honest: granny square vests are everywhere right now. They layer over shirts and dresses, they work in spring and fall, and every single one looks different because the colors are entirely yours.
What You’ll Need Before You Start
You don’t need fancy supplies. Here’s my go-to kit for this project:
- Yarn: Worsted weight (category 4), around 800–950 yards total for an adult medium. Cotton or a cotton-acrylic blend is great for warmer weather; wool or acrylic for cozier layering.
- Hook: 5 mm (US H-8). Go up or down a size to adjust fit (more on that below).
- Tapestry needle: For weaving in ends and seaming.
- Scissors and a measuring tape.
- Stitch markers or safety pins: Handy for holding squares in place while you seam.
A quick word on yarn choice. If this is your first garment, pick a smooth, light-colored yarn for your main color. Fuzzy, dark, or very splitty yarns hide your stitches, and when you’re learning, you want to see what you’re doing.
This pattern uses US crochet terms. If you learned with UK terms, a US double crochet (dc) is the same as a UK treble (tr).
Stitches and Abbreviations
- ch – chain
- sl st – slip stitch
- sc – single crochet
- dc – double crochet
- sp – space (the gap made by a chain)
- cluster – a group of 3 dc worked into the same space
Notice how short that list is? That’s why this is a true beginner pattern.
Step 1: Make the Classic Granny Square
Every square in this vest is the same five-round classic granny square. Make one, then pause before you make any more. I’ll explain why in a second.
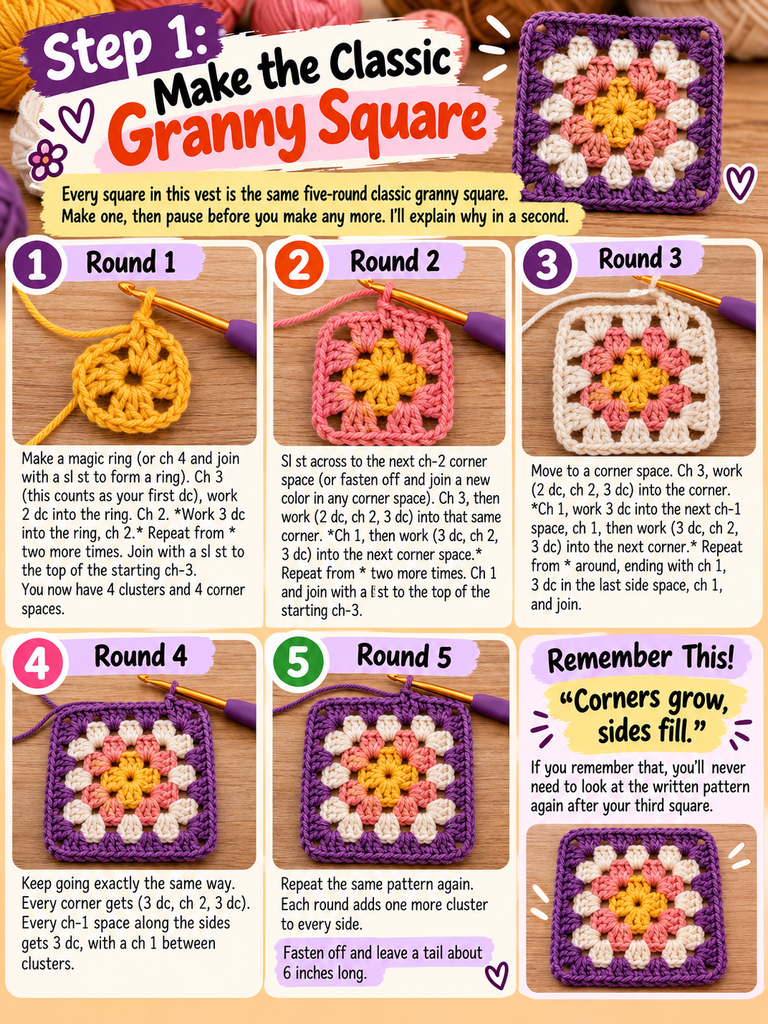
Round 1: Make a magic ring (or ch 4 and join with a sl st to form a ring). Ch 3 (this counts as your first dc), work 2 dc into the ring. Ch 2. *Work 3 dc into the ring, ch 2.* Repeat from * two more times. Join with a sl st to the top of the starting ch-3. You now have 4 clusters and 4 corner spaces.
Round 2: Sl st across to the next ch-2 corner space (or fasten off and join a new color in any corner space). Ch 3, then work (2 dc, ch 2, 3 dc) into that same corner. *Ch 1, then work (3 dc, ch 2, 3 dc) into the next corner space.* Repeat from * two more times. Ch 1 and join with a sl st to the top of the starting ch-3.
Round 3: Move to a corner space. Ch 3, work (2 dc, ch 2, 3 dc) into the corner. *Ch 1, work 3 dc into the next ch-1 space, ch 1, then work (3 dc, ch 2, 3 dc) into the next corner.* Repeat from * around, ending with ch 1, 3 dc in the last side space, ch 1, and join.
Rounds 4 and 5: Keep going exactly the same way. Every corner gets (3 dc, ch 2, 3 dc). Every ch-1 space along the sides gets 3 dc, with a ch 1 between clusters. Each round adds one more cluster to every side.
Fasten off and leave a tail about 6 inches long.
Here’s the mental shortcut that made granny squares finally “click” for me: corners grow, sides fill. If you remember that, you’ll never need to look at the written pattern again after your third square.
Step 2: Check Your Gauge (Please Don’t Skip This)
I know. Nobody wants to hear the word “gauge.” But this is the single step that decides whether your vest fits or ends up as a gift for a much smaller friend.
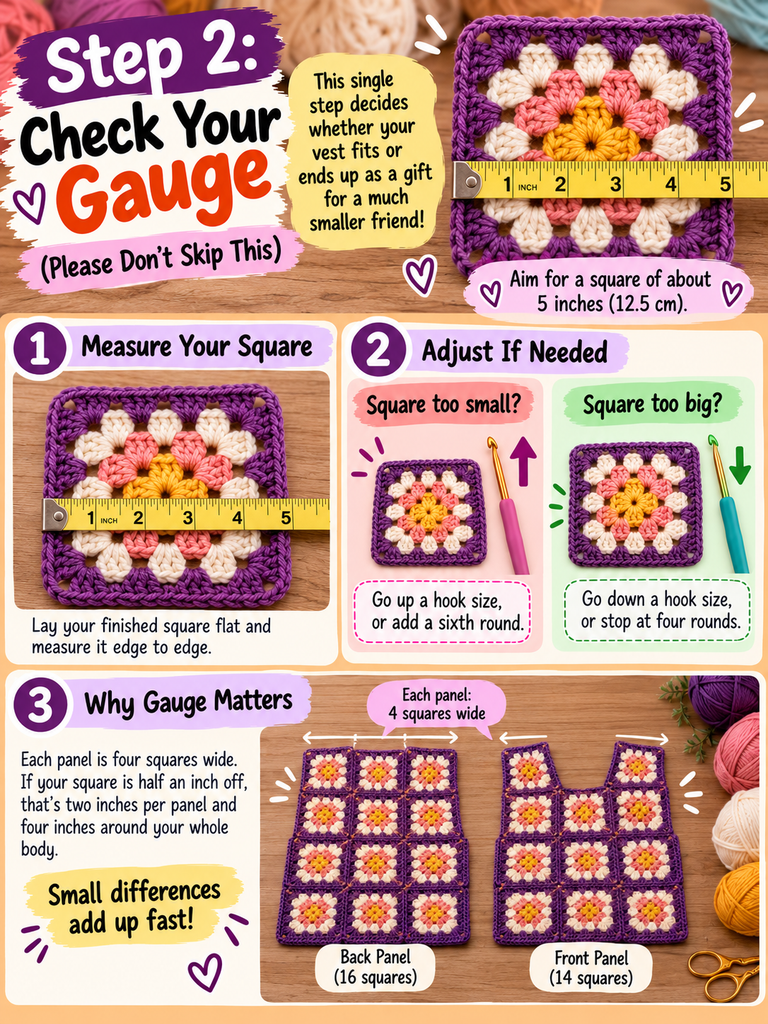
Lay your finished square flat and measure it edge to edge. For this pattern, you’re aiming for a square of about 5 inches (12.5 cm).
- Square too small? Go up a hook size, or add a sixth round.
- Square too big? Go down a hook size, or stop at four rounds.
Here’s why it matters so much. Each panel is four squares wide. If your square is half an inch off, that’s two inches per panel and four inches around your whole body. Small differences add up fast.
Step 3: Plan Your Size
With 5-inch squares, the vest comes out like this:
- Width of each panel: 4 squares = about 20 inches (50 cm)
- Total chest circumference: about 40 inches (100 cm)
- Length: 4 squares = about 20 inches, plus 1–1.5 inches of border
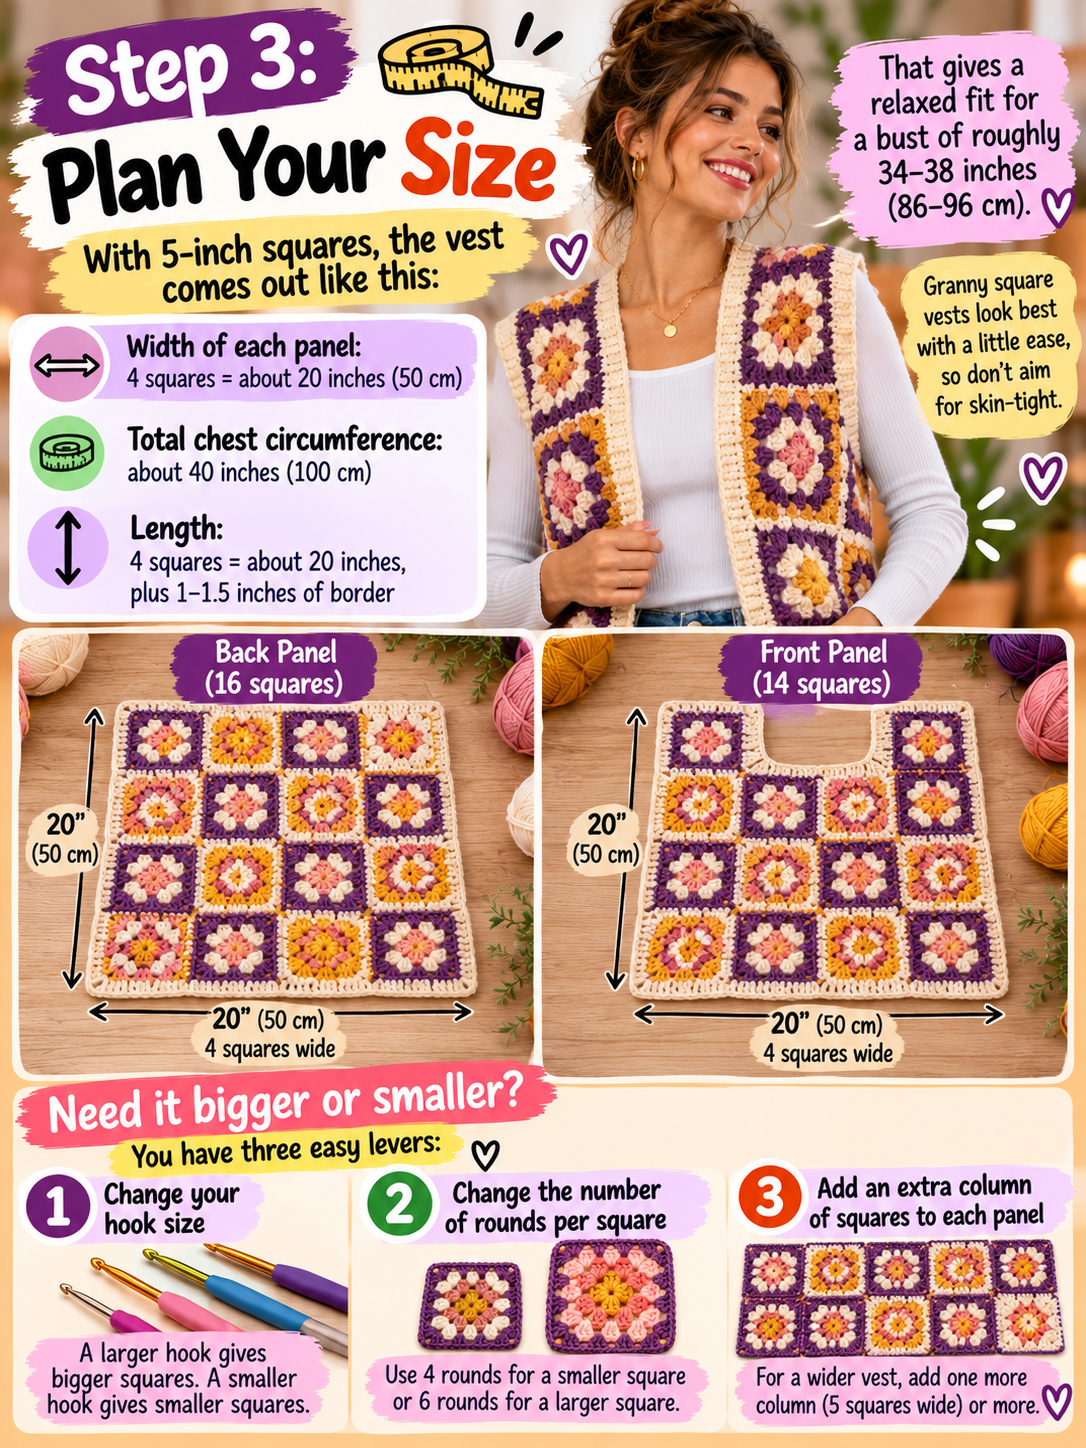
That gives a relaxed fit for a bust of roughly 34–38 inches (86–96 cm). Granny square vests look best with a little ease, so don’t aim for skin-tight.
Need it bigger or smaller? You have three easy levers: change your hook size, change the number of rounds per square, or add an extra column of squares to each panel. Changing the square size is the simplest, because the construction stays exactly the same.
Step 4: Make All 30 Squares
You’ll need:
- 16 squares for the back panel (4 wide × 4 tall)
- 14 squares for the front panel (4 wide × 4 tall, minus the 2 top center squares to create the neckline)

This is the fun part, and also the part where your color plan comes to life. A few approaches I love:
- Scrappy: Use random leftover colors for rounds 1–4, then the same neutral (cream, black, or oatmeal) for round 5 on every square. The shared outer round ties the chaos together beautifully.
- Limited palette: Pick three or four colors and rotate them. Calm, modern, and easy to style.
- Solid: One color throughout. Surprisingly chic, and the fewest ends to weave in.
My best tip here, learned the hard way: weave in your ends as you finish each square. Weaving in a hundred-plus tails at the end is where good vests go to die in the back of a closet.
Step 5: Block Your Squares
Blocking sounds technical, but it’s simply getting your squares wet (or steamed), pinning them flat to the same size, and letting them dry.
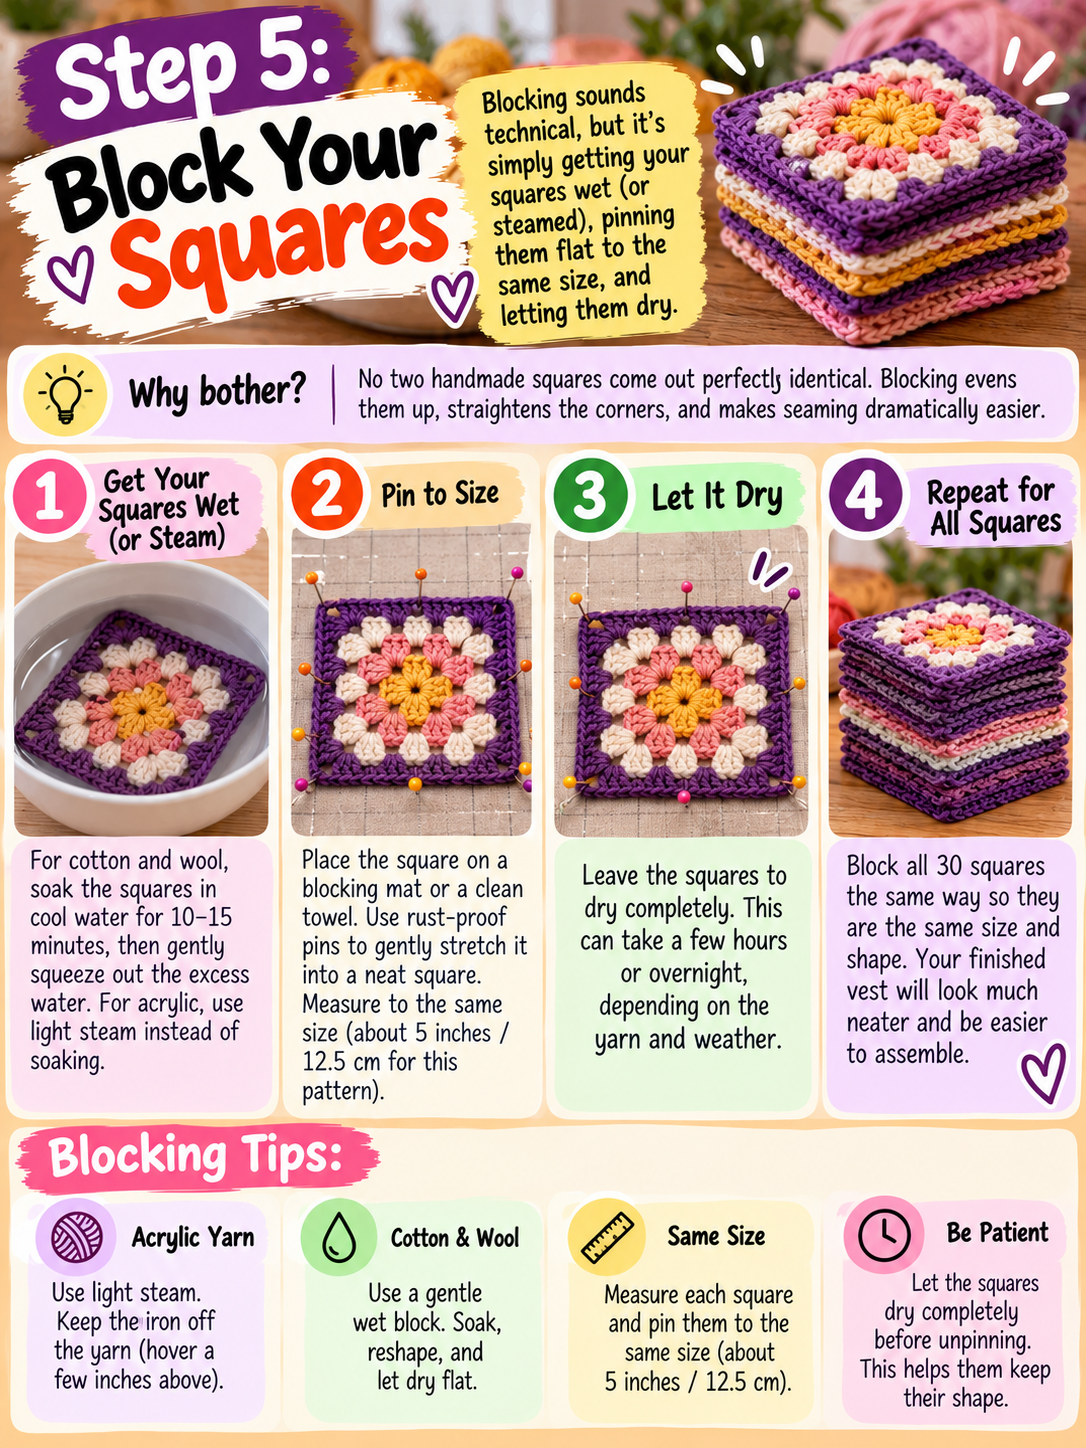
Why bother? Because no two handmade squares come out perfectly identical. Blocking evens them up, straightens the corners, and makes seaming dramatically easier. For acrylic, use light steam and keep the iron off the yarn. For cotton and wool, a gentle wet block works well.
Step 6: Join the Squares into Panels
Lay your squares out on the floor or a bed before you join anything. Move them around until the color arrangement makes you happy. Take a photo so you remember the layout.
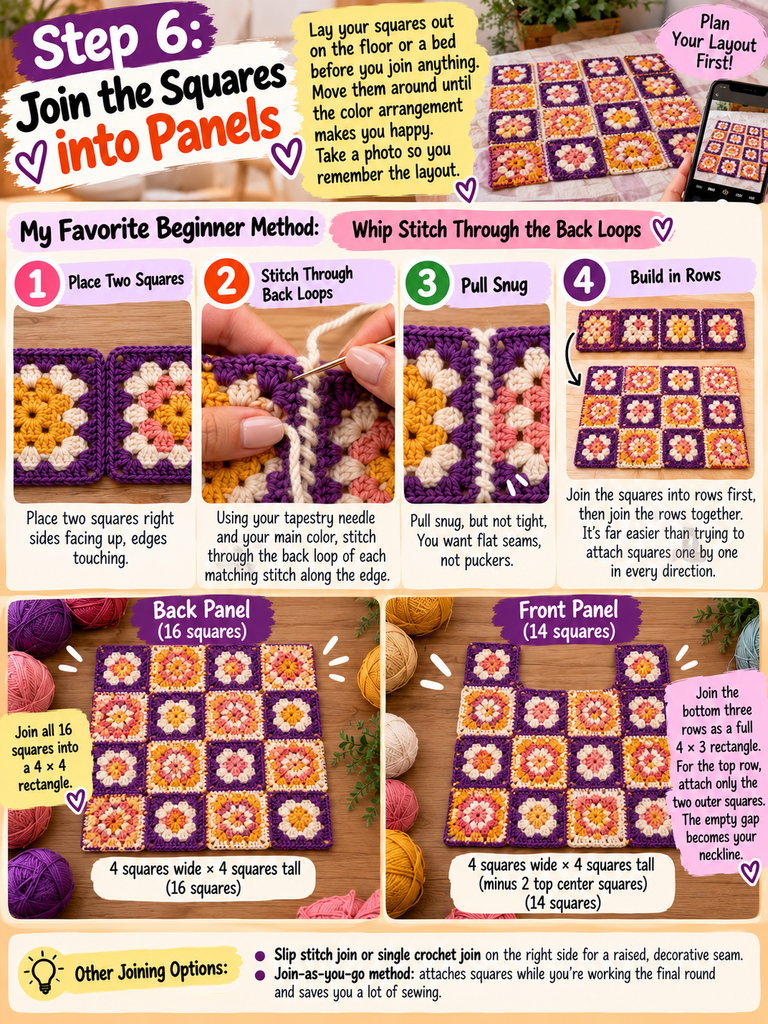
Now join them. My favorite beginner method is the whip stitch through the back loops:
- Place two squares right sides facing up, edges touching.
- Using your tapestry needle and your main color, stitch through the back loop of each matching stitch along the edge.
- Pull snug, but not tight. You want flat seams, not puckers.
Join the squares into rows first, then join the rows together. It’s far easier than trying to attach squares one by one in every direction.
Back panel: Join all 16 squares into a 4 × 4 rectangle.
Front panel: Join the bottom three rows as a full 4 × 3 rectangle. For the top row, attach only the two outer squares (one on the far left, one on the far right). The empty gap in the middle becomes your neckline.
If you’d prefer a raised, decorative seam, a slip stitch join or single crochet join on the right side works too. And once you’re comfortable, look up the “join-as-you-go” method, which attaches squares while you’re working the final round and saves you a lot of sewing.
Step 7: Assemble the Vest
This is the moment that stopped me for three months. It’s much less dramatic than I feared.
- Lay the back panel flat, then place the front panel directly on top, wrong sides facing each other.
- Seam the shoulders: Join the top edge of each front shoulder square to the matching top corner square on the back. Leave the middle two squares’ width open for your head.
- Seam the sides: Starting at the bottom hem, join the side edges for the first two squares (about 10 inches) only. The top two squares on each side stay open to form the armholes.

Try it on now, before the border. If the armholes feel a bit deep, don’t panic. The border in the next step tightens them up nicely, and you can add an extra round there if you need to.
Step 8: Add the Border That Makes It Look Professional
Here’s a little secret most patterns don’t say out loud: the border is what separates “I made this” from “where did you buy that?”
Hem: Join your yarn at a side seam. Work 1 round of sc evenly around the bottom edge, placing 1 sc in each stitch and 1 sc in each chain space. Then work 2 more rounds of sc (or hdc, if you’d like it a touch taller). Join and fasten off.
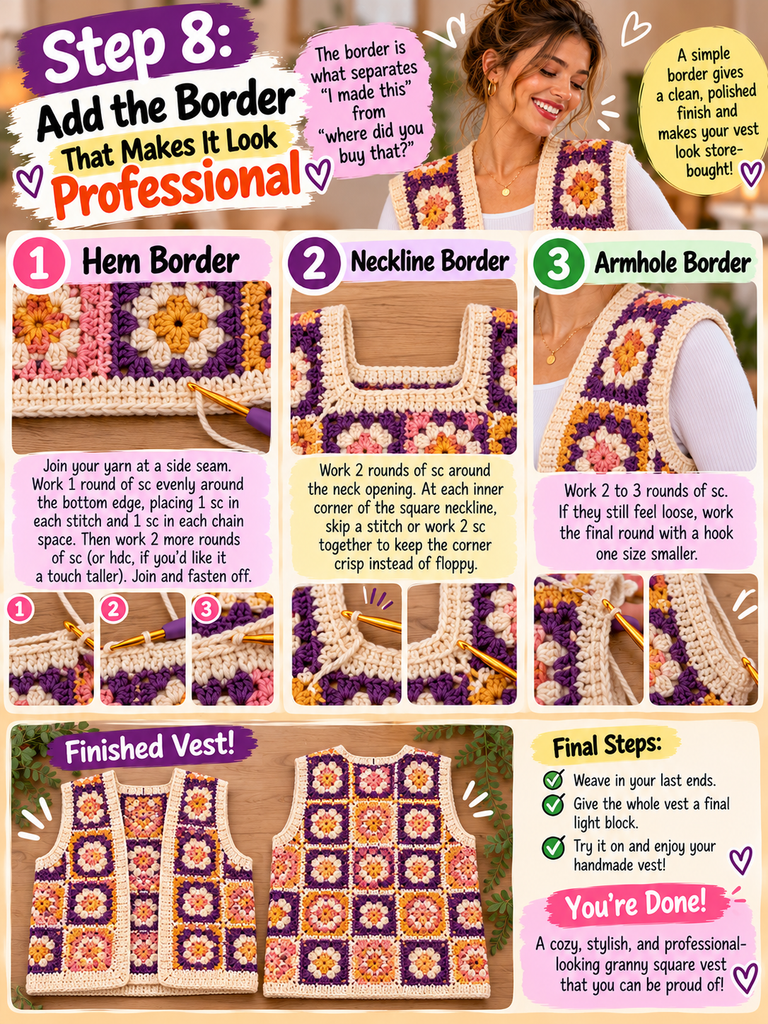
Neckline: Work 2 rounds of sc around the neck opening. At each inner corner of the square neckline, skip a stitch or work 2 sc together to keep the corner crisp instead of floppy.
Armholes: Work 2 to 3 rounds of sc. If they still feel loose, work the final round with a hook one size smaller.
Weave in your last ends, give the whole vest a final light block, and you’re done.
Common Beginner Mistakes (and How to Fix Them)
My squares are turning into circles or wavy shapes. This almost always comes from too many or too few stitches at the corners. Count each corner: it should be exactly (3 dc, ch 2, 3 dc).
My squares are twisting. This is very normal with granny squares worked in continuous rounds. Turning your work at the end of each round, or joining a new color in a different corner each time, helps a lot. Blocking fixes the rest.
My squares are all slightly different sizes. Tension changes with mood. (Truly. Stressed crocheters crochet tight.) Blocking will even out small differences. If one square is noticeably off, it’s worth remaking it.
My seams look bulky. Join through the back loops only, and use a thinner yarn of the same color if your main yarn is chunky.
Styling Your Granny Square Vest
Once it’s done, the possibilities are endless. Wear it over a white tee and jeans for an easy everyday look. Layer it over a long-sleeve button-up for cooler days. Throw it over a slip dress for something a bit more playful.
The best part? People will ask about it. And you’ll get to say, “Oh, this? I made it.”
Frequently Asked Questions
How long does it take to make a granny square vest?
Most beginners take somewhere between 15 and 25 hours in total, depending on speed. Squares are quick once you’ve made a few; seaming and borders take an evening or two.
Can I use a different yarn weight?
Yes. Just remember your squares will change size, so make a test square and adjust the number of squares or rounds to match your measurements.
Is a granny square vest warm?
In wool or acrylic, it adds a comfortable layer of warmth. In cotton, it’s light and breathable, perfect for spring and summer layering.
Do I need to know how to read a crochet chart?
Not at all. Everything in this pattern is written out, and once you understand “corners grow, sides fill,” you won’t need any chart
Final Thoughts: Just Make the First Square
Remember that bag of squares I left untouched for three months? When I finally sat down and joined them, the whole thing took one weekend. All that fear was about a step that turned out to be the easiest part.
So here’s my advice: don’t think about the whole vest yet. Don’t think about seams or borders or sizing charts. Pick a color you love, grab your hook, and make one square tonight.
Then make another. Before long, you’ll have 30 of them, and a vest that’s completely, unmistakably yours.
Now I’d love to hear from you. What colors are you thinking of for your first granny square vest? Are you going scrappy, minimal, or bold? Drop your color plan in the comments, and if you make one, share a photo. I genuinely love seeing what you create, and your vest might be exactly the inspiration another beginner needs to finally start theirs.