Picture this. You’ve watched a few videos, bought a lovely skein of yarn, and found a sock pattern that looks friendly enough. The cuff goes great. The leg is relaxing. Then you hit the heel, and the pattern says something like “work heel flap, turn heel, pick up gusset stitches.” You stare at the page. You re-read it. It might as well be written in another language.

I want to fix that. Crochet socks are not hard. They’re just badly explained, far too often. So this is a free pattern written for people who have never made a sock, with every step spelled out and no secret handshakes required.
Table of Contents
Key takeaways
- A sock is just a tube with a heel and a closed toe. Crochet the tube first and give the heel its own little mini-project.
- You need sock-friendly yarn, a hook around 3.5 mm, a stitch marker, and about 300 to 400 yards for a pair (more for big feet).
- The heel looks scary, but it’s only rows of single crochet with a few decreases. We’ll go row by row.
- Make both socks’ cuffs first if you’re prone to “second sock syndrome.”
- Always test-fit as you go. Your foot is the only pattern that matters.
Why Most Sock Patterns Feel Impossible (and Why This One Won’t)
There’s a classic experiment from a Stanford psychology study, described in the book Made to Stick by Chip and Dan Heath. People were asked to tap out the rhythm of a well-known song, like “Happy Birthday,” on a table while a partner tried to guess the tune. Tappers predicted their partners would get it right about half the time. In reality, listeners guessed only 3 out of 120 songs.
Why the gap? The tapper hears the whole song in their head. The listener hears a bunch of random knocks. The Heaths call this the Curse of Knowledge: once you know something, it’s nearly impossible to remember what it felt like not to know it.
Sock patterns suffer from exactly this. Experienced designers hear the full melody. You, the beginner, hear knocking on a table. So in this post, I’m going to say what each step looks like, why we do it, and what to check before moving on. If you’ve been burned by a pattern that said “work even until desired length” and nothing more, you’ll see the difference.
How Do You Make Your Own Socks? The Big Picture
Before any stitches, here’s the whole sock in four parts. Keep this map in your head and nothing will surprise you:
- The cuff and leg: a simple tube worked in the round.
- The heel: you work back and forth on half the stitches to build a flap, then shape the bottom of the heel with a few decreases.
- The foot: you pick up stitches along the heel, decrease back to your original count, then crochet the tube until it’s nearly long enough.
- The toe: evenly spaced decreases close the end.
That’s it. Every sock you’ll ever see, whether knit or crocheted, is a variation on those four parts.
What You’ll Need (and How Much Yarn for One Pair of Socks)
- Yarn: A sport-weight or DK-weight yarn, ideally a wool blend with a little nylon for durability. Superwash wool is easy to care for. As a rough guide, one pair of adult socks takes somewhere around 300 to 400 yards (about 100 grams). Crochet uses more yarn than knitting, and bigger feet or longer legs need more, so buy a little extra if you can.
- Hook: 3.5 mm to start. If your fabric feels floppy, drop to 3.25 mm. Socks should feel dense and snug, not lacy.
- Notions: A stitch marker, a yarn needle, and scissors.
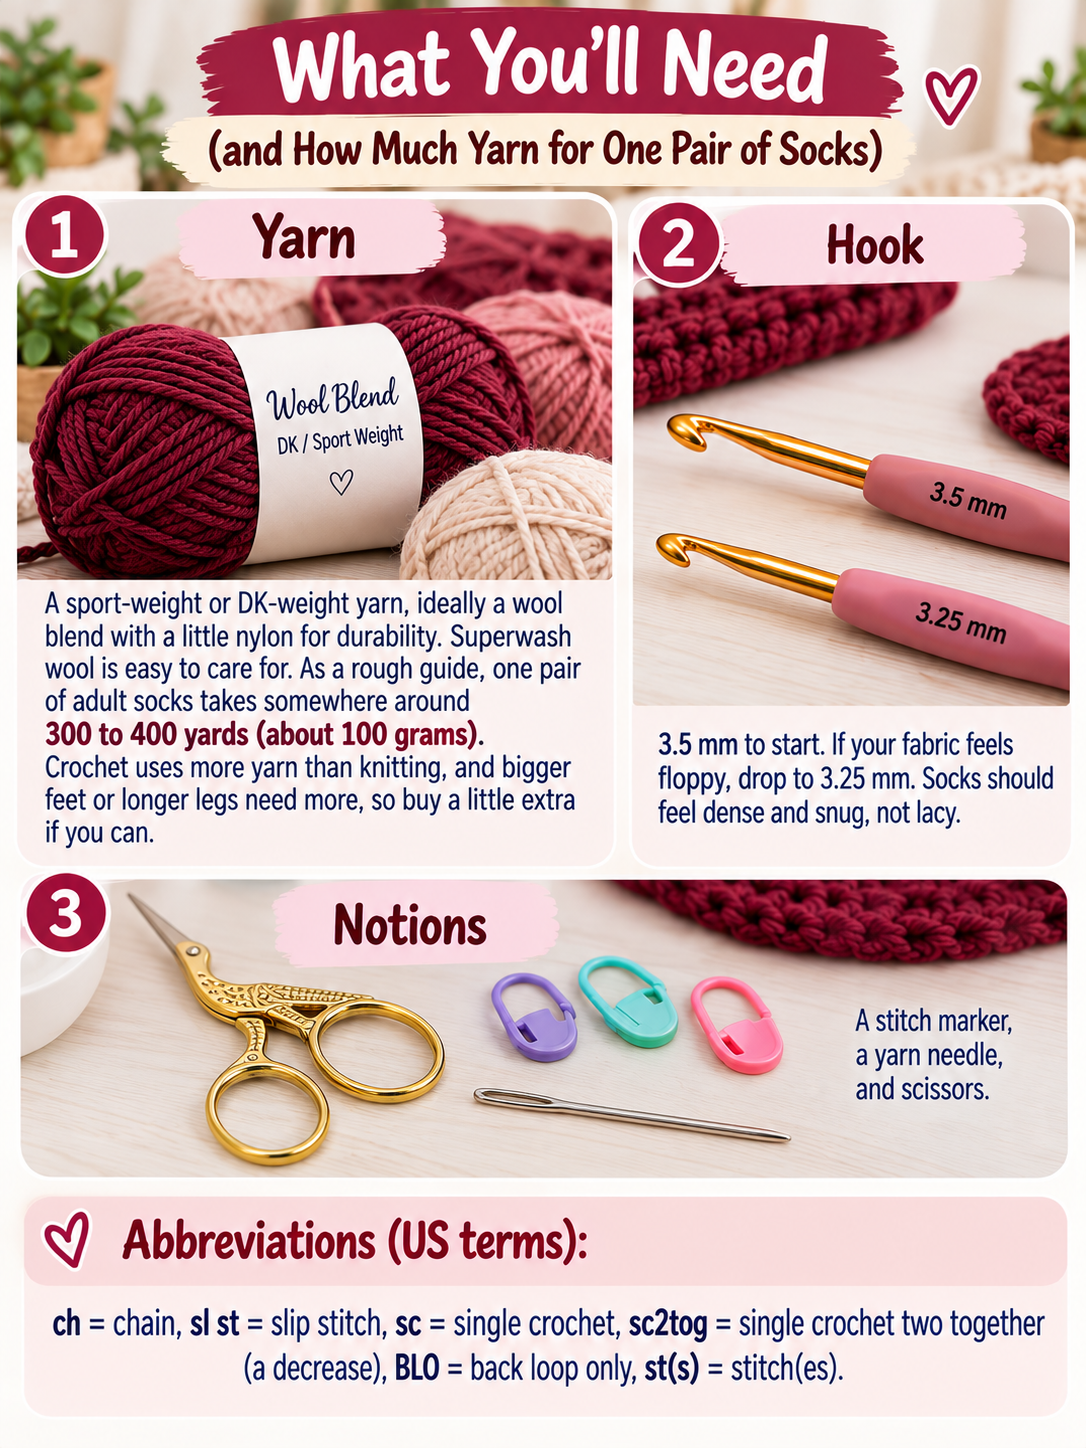
Abbreviations (US terms): ch = chain, sl st = slip stitch, sc = single crochet, sc2tog = single crochet two together (a decrease), BLO = back loop only, st(s) = stitch(es).
How Many Stitches Should I Cast On for a Sock?
This is the question everyone asks, and the honest answer is: it depends on your yarn, your hook, and your foot. Here’s the rule of thumb. Your sock tube should measure about 90% of the distance around the widest part of your foot, because crocheted fabric stretches a little.
With sport-weight yarn and a 3.5 mm hook, single crochet usually works up to roughly 4.5 to 5 stitches per inch. Use this as a starting point:
- Small (child or narrow adult foot): chain 30
- Medium (typical adult foot): chain 36
- Large: chain 42
Stick to multiples of six. The toe decreases later depend on it. The pattern below is written for 36 stitches. If you’re using 30 or 42, the heel uses half your stitches, so the heel numbers below change. Medium is the easiest place to learn, so I’d start there.
Quick gauge check: Chain 36, join in the round, and crochet a few rounds. Wrap it around your foot, loosely, just in front of the ankle bone. It should feel snug but not tight. If it’s too loose, drop a hook size or two.
The Free Pattern: Step by Step
Step 1: The cuff

Chain 36. Join with a sl st to the first chain, making sure the chain isn’t twisted. (Lay it flat on a table first. All the “bumps” should face the same way.)
Round 1: Sc in each chain around (36 sts). Place a stitch marker in the first stitch. We’ll work in a continuous spiral, so there’s no joining at the end of each round. Just move the marker up as you go.
Rounds 2 to 10: Sc in the back loop only of each stitch (36 sts). Working in the back loops gives you a stretchy, ribbed-looking cuff that hugs your leg.
Step 2: The leg
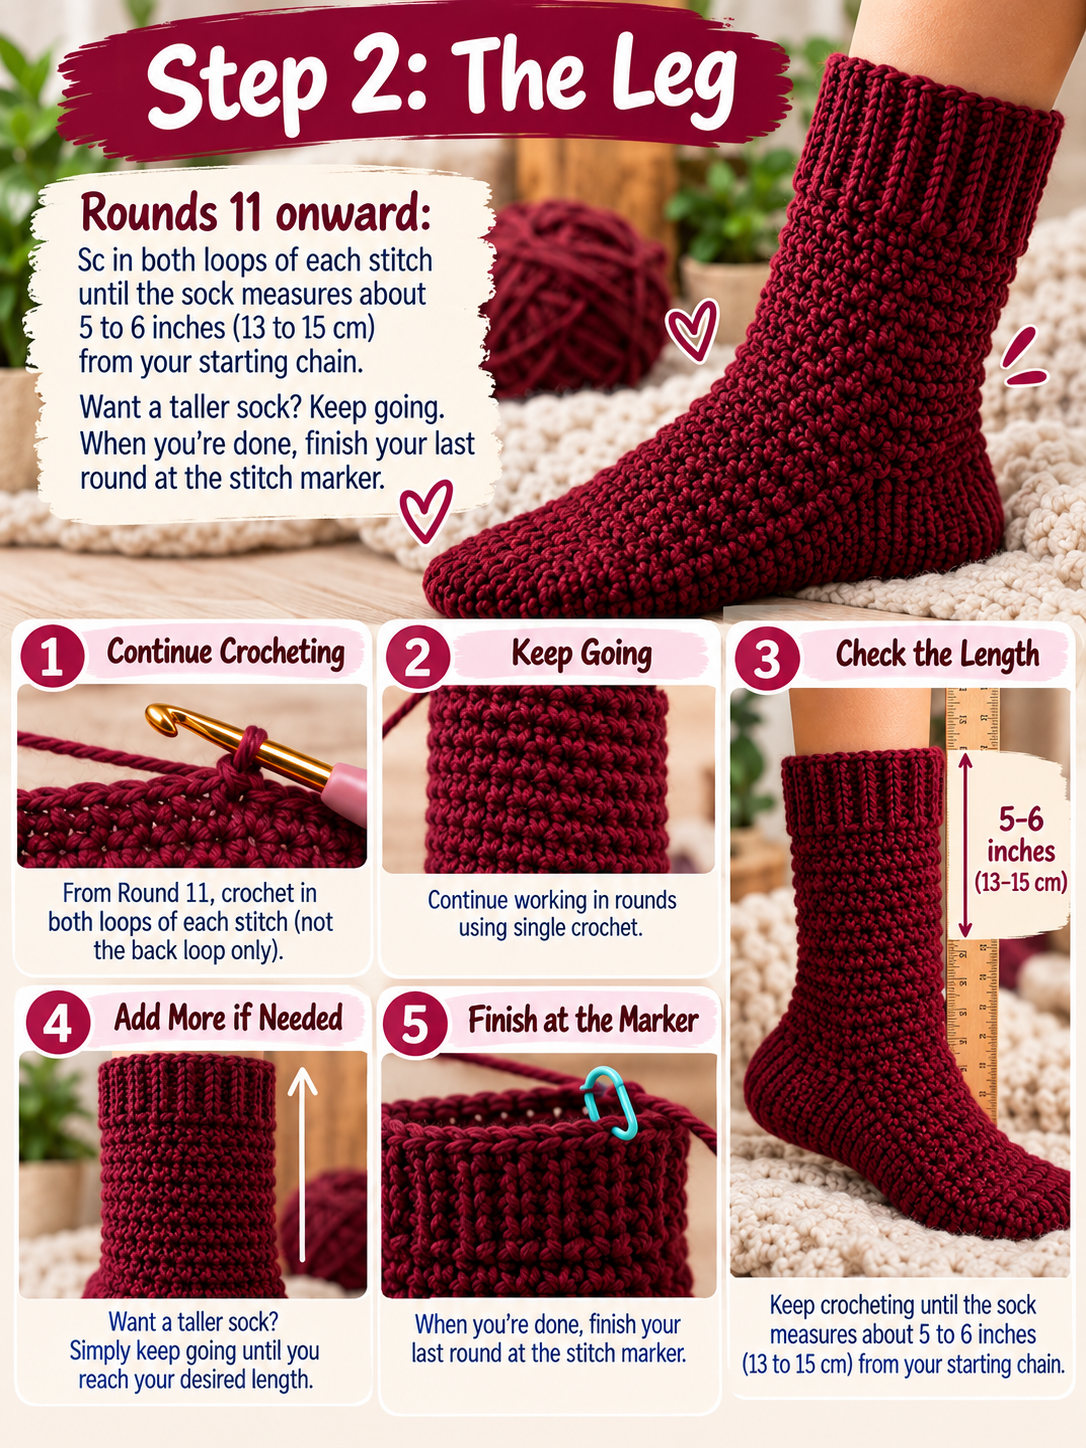
Rounds 11 onward: Sc in both loops of each stitch until the sock measures about 5 to 6 inches (13 to 15 cm) from your starting chain. Want a taller sock? Keep going. When you’re done, finish your last round at the stitch marker.
Step 3: The heel flap

Time for the part everyone fears. Here’s the trick: forget about the sock for a moment. You’re about to crochet a small flat rectangle.
Row 1: Sc in the next 18 sts, then turn your work. The other 18 stitches (the top of the foot) just sit there, untouched. They’re called the instep, and we’ll come back to them.
Row 2: Ch 1 (this doesn’t count as a stitch), sc in each of the 18 sts, turn.
Rows 3 to 16: Repeat Row 2. You should end with a flat square-ish flap, roughly 3 inches tall. If it looks like a little pocket, you’re doing it right.
Step 4: Turning the heel (a.k.a. the Dutch heel)

You’ll often see this called a Dutch heel or a heel flap with a gusset. It’s the classic sock heel: a flap for strength, a cup for shape. Here’s how we make the cup. Read the first line of each row, then do exactly that. The idea is simple. Each row, you work most of your stitches, then decrease with one stitch from the “unworked” pile at the end, which slowly eats up the side stitches until only the center remains.
Row 1: Ch 1, sc in the first 12 sts, sc2tog over the next 2 sts, turn. (You’ll have 4 stitches left unworked at the end.)
Row 2: Ch 1, sc in the first 7 sts, sc2tog over the next 2 sts, turn. (Now you have 4 unworked stitches on each side.)
Rows 3 to 10: Ch 1, sc in the first 7 sts, then sc2tog over your next stitch and the nearest unworked heel stitch, turn. Each row eats one of those leftover stitches, alternating sides. After Row 10, there are no unworked stitches left, and you’ll have 8 stitches on your hook.
Row 11: Ch 1, sc in each of the 8 sts. Don’t turn.
Take a breath. Look at the little cup you just made. That’s your heel. If you were nervous, notice that it was just rows of single crochet with a few decreases, nothing more.
Step 5: The gusset (back to a tube)
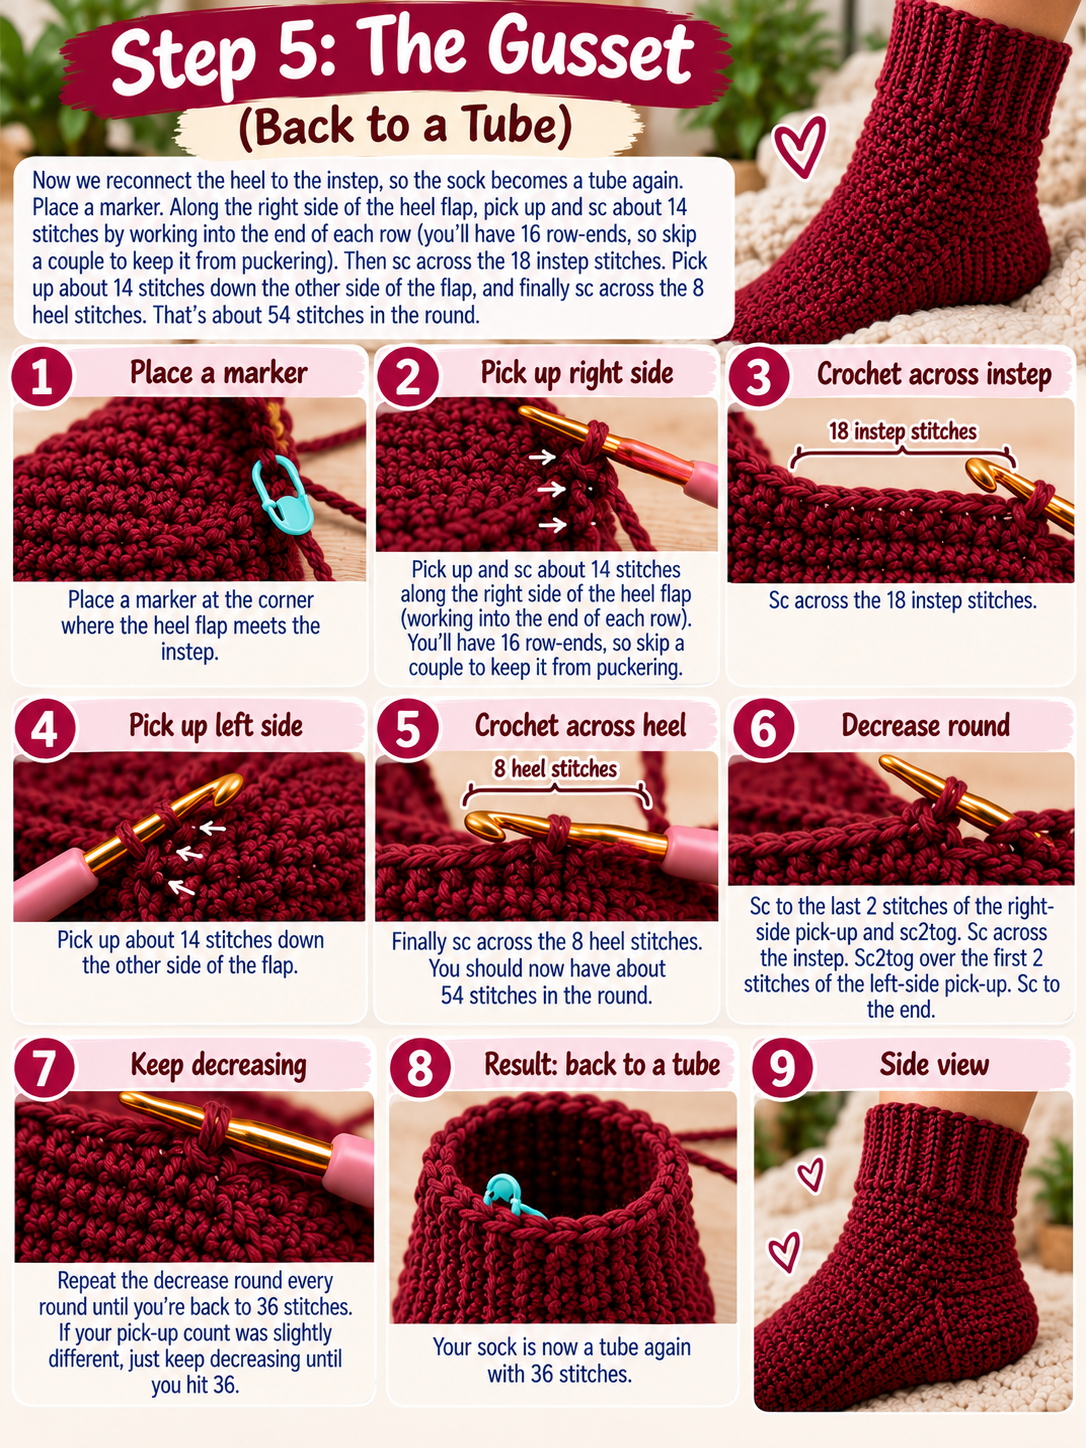
Now we reconnect the heel to the instep, so the sock becomes a tube again.
Place a marker. Along the right side of the heel flap, pick up and sc about 14 stitches by working into the end of each row (you’ll have 16 row-ends, so skip a couple to keep it from puckering). Then sc across the 18 instep stitches. Pick up about 14 stitches down the other side of the flap, and finally sc across the 8 heel stitches. That’s about 54 stitches in the round.
Decrease round: Sc to the last 2 stitches of the right-side pick-up and sc2tog. Sc across the instep. Sc2tog over the first 2 stitches of the left-side pick-up. Sc to the end.
Repeat the decrease round every round until you’re back to 36 stitches. If your pick-up count was slightly different, no problem. Just keep decreasing until you hit 36.
Step 6: The foot
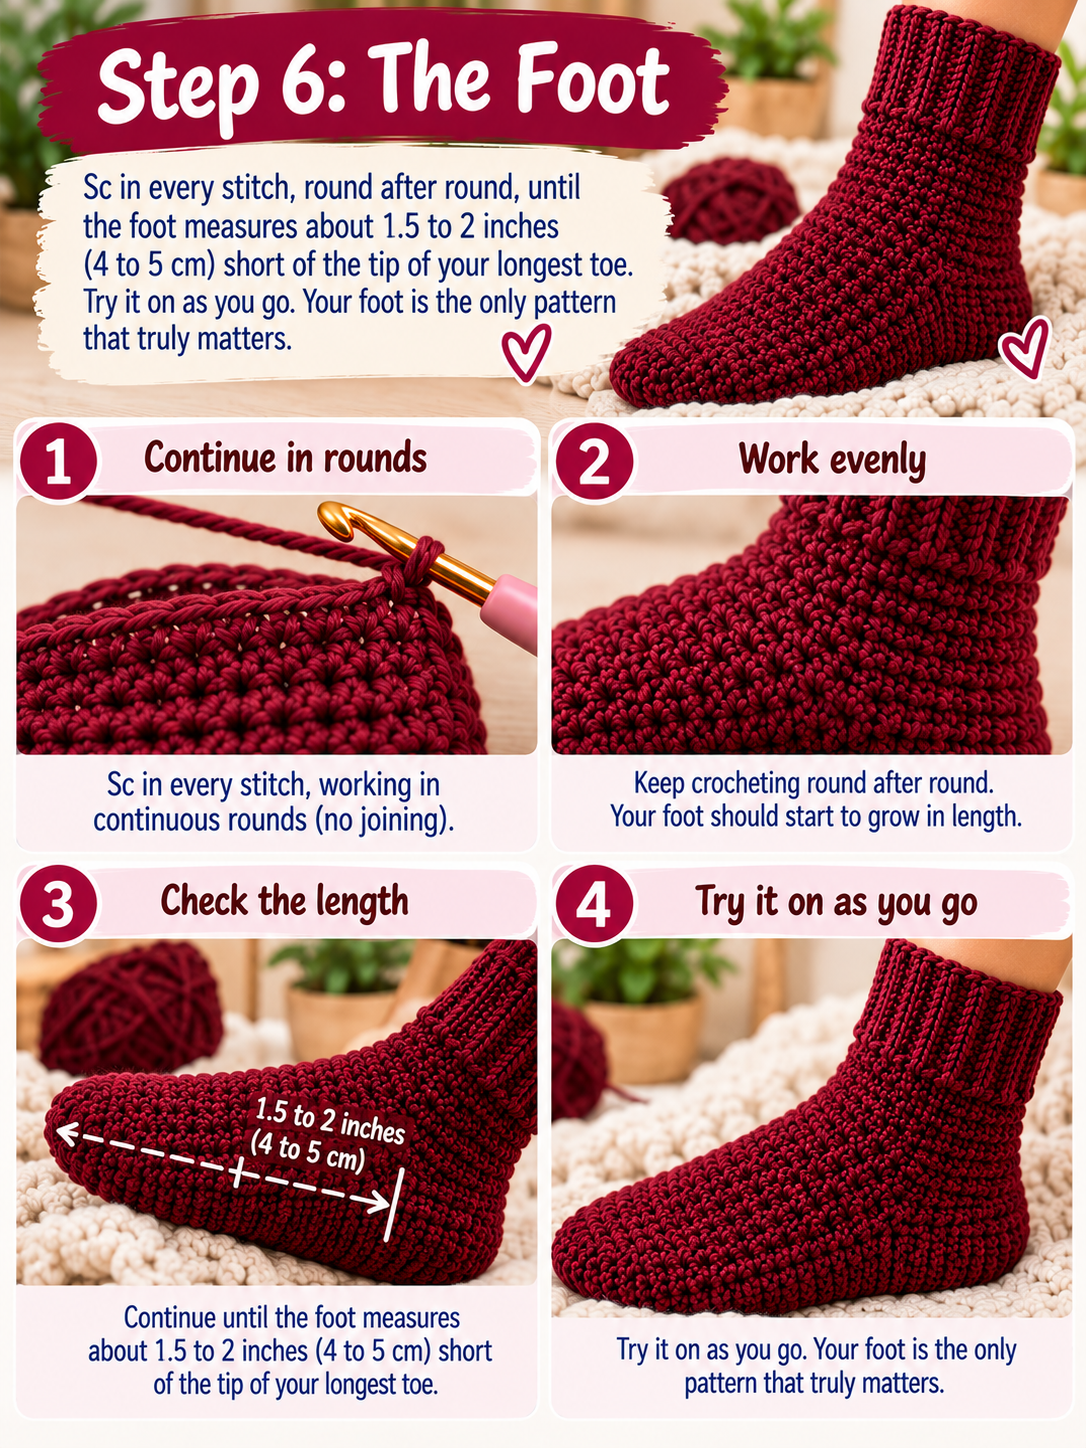
Sc in every stitch, round after round, until the foot measures about 1.5 to 2 inches (4 to 5 cm) short of the tip of your longest toe. Try it on as you go. Your foot is the only pattern that truly matters.
Step 7: The toe
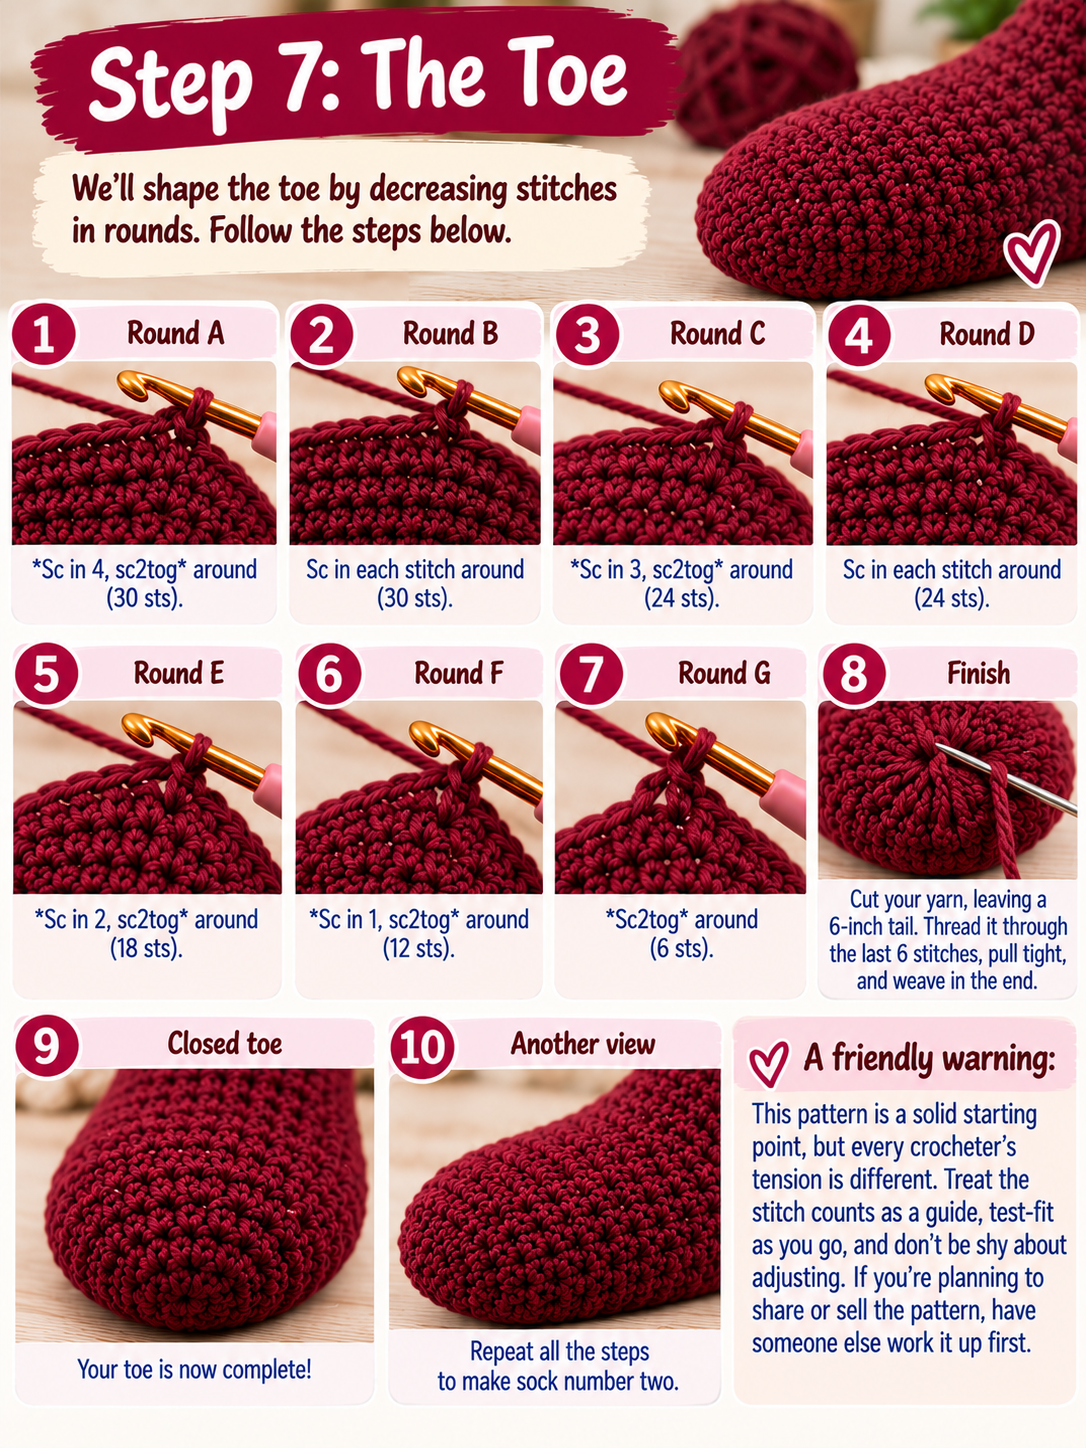
Round A: *Sc in 4, sc2tog* around (30 sts).
Round B: Sc in each stitch around.
Round C: *Sc in 3, sc2tog* around (24 sts).
Round D: Sc in each stitch around.
Round E: *Sc in 2, sc2tog* around (18 sts).
Round F: *Sc in 1, sc2tog* around (12 sts).
Round G: *Sc2tog* around (6 sts).
Cut your yarn, leaving a 6-inch tail. Thread it through the last 6 stitches with your yarn needle, pull tight, and weave in the end. Then do it all again for sock number two.
A friendly warning: This pattern is a solid starting point, but every crocheter’s tension is different. Treat the stitch counts as a guide, test-fit as you go, and don’t be shy about adjusting. If you’re planning to share or sell the pattern, have someone else work it up first.
What Is Second Sock Syndrome (and How to Beat It)
You finish sock number one. It fits. It’s glorious. And then it sits in a project bag for six months, because starting the second one feels like doing the same homework twice.
That’s second sock syndrome, and it’s so common that sock makers joke about it. Here are a few ways to dodge it:
- Crochet both cuffs first. Starting sock two is the hardest part, so get it over with while you’re still excited.
- Write down your numbers. Note your hook, stitch count, leg length, and foot length right after the first sock, so the second one matches.
- Set a mini deadline. “I’ll finish this pair before the first cold weekend” works better than “someday.”
Your Crochet Sock Questions, Answered
What is the most beginner-friendly crochet pattern?
For a true first project, a simple dishcloth, scarf, or coaster is hard to beat. They’re flat, forgiving, and you’ll practice the same stitches over and over. Socks are a step up, but if you can single crochet in the round, you can do this. The heel is the only truly new skill.
What can I crochet in one hour?
Small, quick wins like coasters, a headband, a scrunchie, or a simple dishcloth are all realistic for a beginner in about an hour, depending on your speed. Socks, on the other hand, are a weekend (or a few evenings) project. Worth it, but not a quick one.
What is the first thing I should crochet as a beginner?
Start with a flat square or rectangle in a smooth, light-colored worsted yarn so you can see your stitches. Once you can keep the edges straight, move on to working in the round, and then socks.
Is it okay to wear the same socks for two days?
Generally, yes, if they’re clean, dry, and your feet haven’t been sweating heavily. Wool is naturally good at managing moisture and odor, which is one reason it’s such a great sock fiber. If your feet got damp or you notice any smell, swap them out and let that pair air out
Where can I find more free crochet sock patterns?
Crochet blogs, Ravelry’s free pattern filters, and YouTube tutorials are all good places to look. Try a few different heel styles once you’ve finished this one. Seeing the same sock built in different ways is the fastest way to understand how a sock actually works.
One Last Thought Before You Pick Up Your Hook
Here’s what I hope you take from this. A sock is not a mystery. It’s a tube, a flat flap, a handful of decreases, and a closed toe. Once you’ve been through it once, you’ll never look at a sock the same way again.
Your first pair might be a little lumpy. The heel might be too tall or the toe might be slightly off-center. That’s normal. Wear them anyway. A slightly wonky sock you made yourself is warmer than any perfect one from a store.
Ready to try it? Grab your yarn and chain 36. If you get stuck on the heel, leave a comment and tell me which row tripped you up. I’d love to hear how your first sock turns out, so share a photo or tell us about it below.