Last October I made one of these squares, left it on the coffee table, and went to bed. The next morning my teenage son walked in, saw a bloodshot eyeball staring up at him from beside the remote, and actually jumped.
That reaction is why I keep telling everyone about the Halloween Eye granny square from Raffaella of Raffamusa Designs. It’s one of the simplest squares you’ll ever make, and somehow it’s also one of the most unsettling.

In this guide I’ll walk you through what makes this design special, how the colors are laid out round by round, the small finishing trick that makes the eye look real, and what to do with your squares once they start multiplying (they will).
Table of Contents
Key Takeaways
- The Halloween Eye is Part 1 of Raffamusa Designs’ free Halloween Granny Squares CAL, paired with a Spiderweb square.
- It’s an 8-round basic circle granny square. The “eye” comes entirely from color changes, so there’s no tricky shaping.
- You need DK yarn, a 4.0 mm hook and a tapestry needle. Expect a square of about 5.5″ (14 cm) in acrylic DK.
- The magic is in the finishing: embroidered red veins and a tiny white highlight on the pupil.
- The PDF is free only for a limited time during the October 2026 CAL. After that, the bundle is a paid pattern on Ravelry, LoveCrafts and Etsy.
Meet the Designer Behind the Eyeball
Raffaella is the crocheter and blogger behind Raffamusa Designs, known for themed granny square collections for Christmas, spring and summer. Her Halloween collection first came out as a crochet-along in 2020.
What I love is how honest she is about it. She has admitted that her own original squares sat in an unfinished-projects box for six years and never became a blanket. (If you have a bag of orphan granny squares in your closet right now, you are in very good company.)
So in October 2026 she brought the CAL back, this time with a clear goal: finish the blanket. She also added new appliques and squares, plus joining instructions and a border.
Why This Square Is So Easy (and So Effective)
Here’s the clever part. The Halloween Eye isn’t a special stitch pattern at all. It’s Raffaella’s standard Simple Circle Granny Square, the same base she uses for the whole collection, worked in a specific color order.
A granny square that starts as a circle is already an eyeball waiting to happen. You just have to color it in the right order. No colorwork charts, no tapestry crochet, no counting rows of pixels.
That makes it a perfect first square if you’re joining the CAL, or a great warm-up if you haven’t picked up a hook since last winter.
What You’ll Need
- Yarn: DK (3, Light). Raffaella used Paintbox Yarns Simply DK, and also recommends Stylecraft Special DK or Paintbox Baby DK.
- Colors: black, green (or any iris color you like), white, and a background color
- Hook: 4.0 mm (G/6 US, 8 UK). Her collection also lists a 3.5 mm hook for appliques on other squares.
- Red yarn for the veins
- Tapestry needle

Got a stash of leftovers? This is the square for them. The pupil and iris use only a few yards each.
Size and Yarn Amounts
Your square size depends on your yarn and hook. Here’s what the designer gives for her basic square:
| Yarn | Main hook | Square size | Yarn per square |
|---|---|---|---|
| Cotton DK | 3.5 mm | 4.75″ (12 cm) | 33 yds (30 m) |
| Acrylic DK | 4.0 mm | 5.5″ (14 cm) | 43 yds (40 m) |
| Cotton Worsted | 4.5 mm | 5.9″ (15 cm) | Not measured |
| Acrylic Worsted | 5.5 mm | 7″ (18 cm) | Not measured |
As a rough guide, the circle center takes about 8 yards and squaring it off takes about 12 more.
The Color Map, Round by Round
This is the whole design in one glance. Work Raffaella’s basic circle granny square with your 4.0 mm hook and change colors like this:
- Round 1: Black. This is the pupil.
- Round 2: Green, or your iris color of choice.
- Rounds 3–4: White. This is the eyeball.
- Rounds 5–8: Your background color. This squares off the circle.
That’s it. Four rounds make the eye, four rounds make the square.
How to Crochet the Halloween Eye Granny Square: Step by Step
Here’s how I work an 8-round eye square that follows the same color plan. This is my own written method, so if you want Raffaella’s exact stitch counts, her free Part 0 PDF has her basic square, and she also has a written tutorial and a YouTube video for her Simple Circle Granny Square.
Abbreviations (US Terms)
- ch – chain
- sl st – slip stitch
- sc – single crochet
- hdc – half double crochet
- dc – double crochet
- tr – treble crochet
- st(s) – stitch(es)
- sp – space
Pattern Notes
- Use a 4.0 mm hook throughout.
- In Rounds 1 to 4, the beginning ch 2 does not count as a stitch. Join each round with a sl st to the first dc.
- To change color, fasten off the old color and join the new one in any stitch.
- Work with the right side facing you the whole time.
Part 1: The Eye
Round 1 (black – pupil): Make a magic ring. Ch 2, then work 12 dc into the ring. Pull the tail to close the ring and sl st to the first dc. Fasten off. (12 sts)
Round 2 (green – iris): Join green in any st. Ch 2, work 2 dc in each st around. Sl st to the first dc and fasten off. (24 sts)
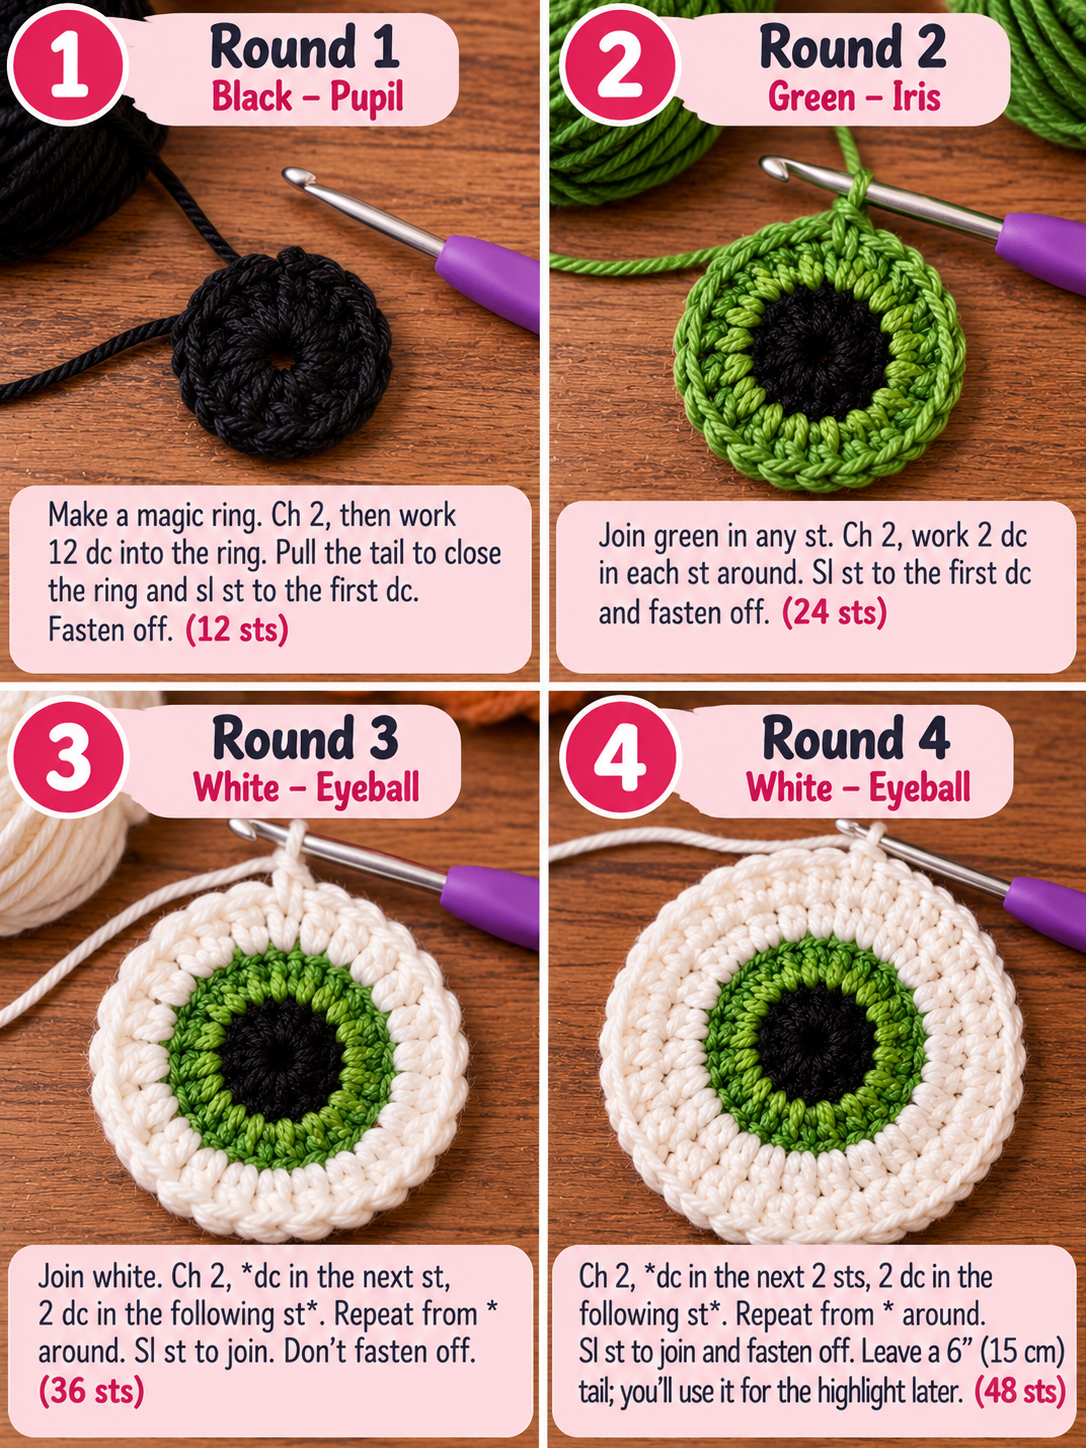
Round 3 (white – eyeball): Join white. Ch 2, *dc in the next st, 2 dc in the following st*. Repeat from * around. Sl st to join. Don’t fasten off. (36 sts)
Round 4 (white – eyeball): Ch 2, *dc in the next 2 sts, 2 dc in the following st*. Repeat from * around. Sl st to join and fasten off. Leave a 6″ (15 cm) tail; you’ll use it for the highlight later. (48 sts)
Check your circle now. It should lie flat. If it ruffles, go down half a hook size. If it curls up like a bowl, go up half a size.
Part 2: Squaring It Off
Round 5 (background color): Join your background color in any st. Ch 3 (counts as a tr), then work (tr, ch 2, 2 tr) in the same st. This is your first corner. Now work along the side on the next 11 sts:
tr in next st, dc in next st, hdc in next 2 sts, sc in next 3 sts, hdc in next 2 sts, dc in next st, tr in next st.
*In the next st work (2 tr, ch 2, 2 tr) for a corner, then repeat the 11-stitch side sequence.* Repeat from * twice more. Sl st to the top of the beginning ch 3. (15 sts on each side + 4 ch-2 corner spaces)
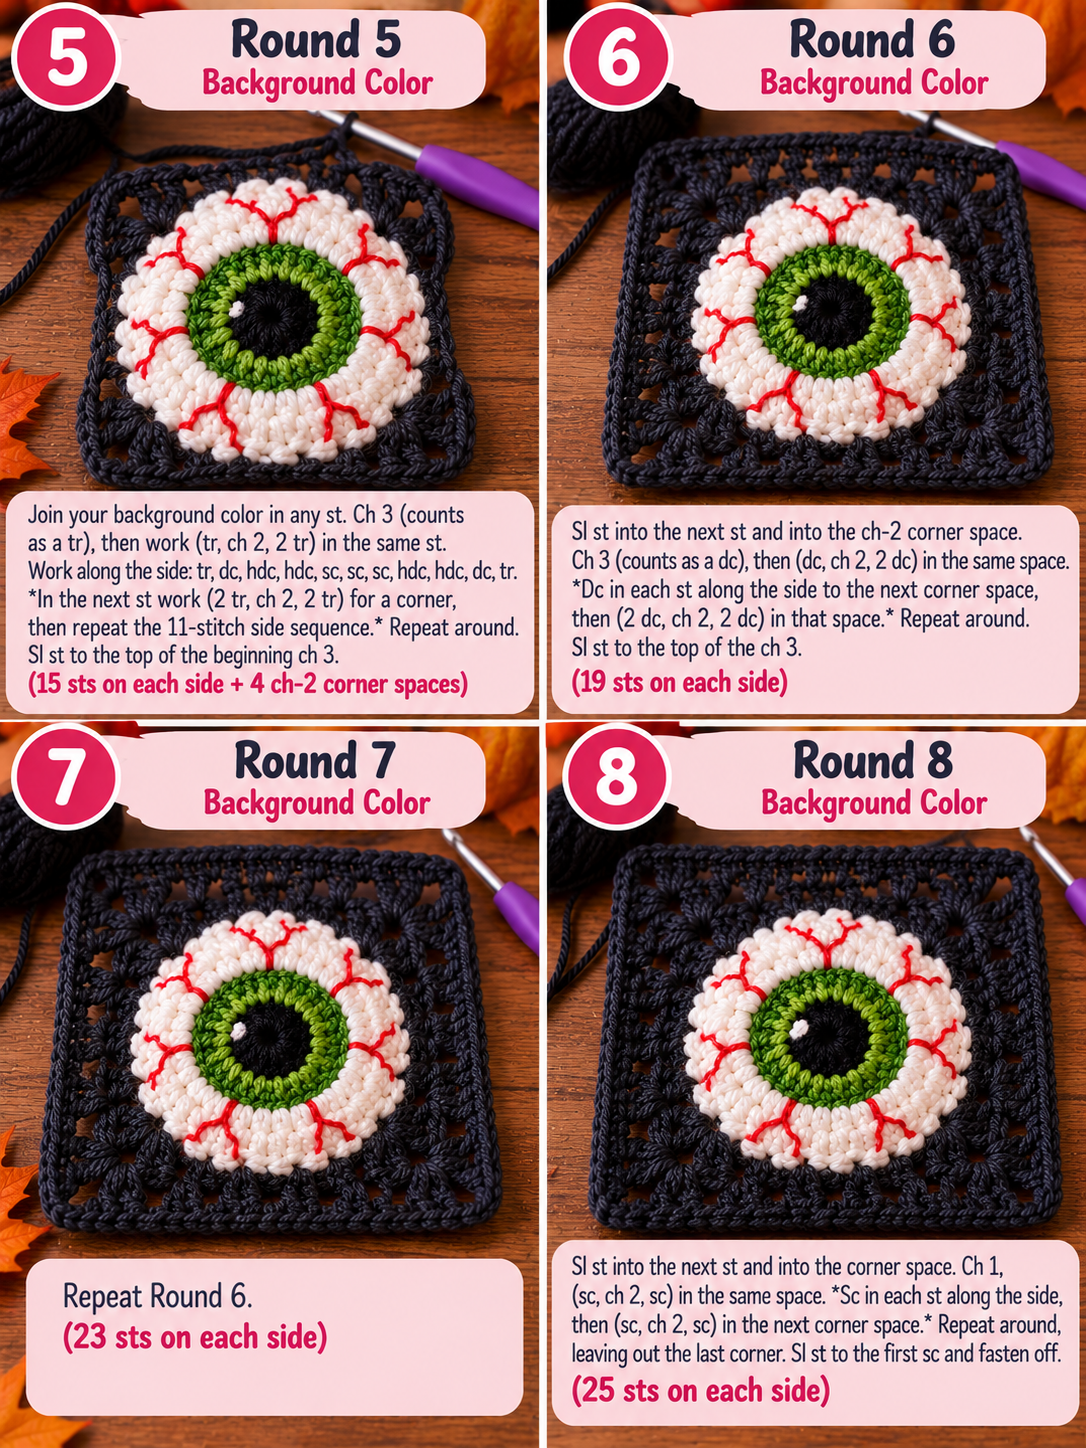
Why the mix of stitch heights? The tall trebles push the corners out and the short single crochets hold the middle of each side in. That’s what turns a round eye into a square.
Round 6 (background color): Sl st into the next st and into the ch-2 corner space. Ch 3 (counts as a dc), then (dc, ch 2, 2 dc) in the same space. *Dc in each st along the side to the next corner space, then (2 dc, ch 2, 2 dc) in that space.* Repeat from * twice more, then dc in each st to the end. Sl st to the top of the ch 3. (19 sts on each side)
Round 7 (background color): Repeat Round 6. (23 sts on each side)
Round 8 (background color): Sl st into the next st and into the corner space. Ch 1, (sc, ch 2, sc) in the same space. *Sc in each st along the side, then (sc, ch 2, sc) in the next corner space.* Repeat from * around, leaving out the last corner. Sl st to the first sc and fasten off. (25 sts on each side)
In acrylic DK your square should measure about 5.5″ (14 cm). Now it’s time to make it look alive.
Part 3: The Finishing Trick That Makes It Look Real
Honestly, at this point your square looks like a cute cartoon eye. The finishing is what turns it creepy.
Step 1 – Bloodshot veins. Thread about 20″ (50 cm) of red yarn onto your tapestry needle. Starting at the outer edge of the white part (where it meets the background), work short straight stitches pointing in toward the iris. Go all the way around the eye. Raffaella’s key tip is to keep them irregular: different lengths, uneven spacing. Perfectly even veins look like a sun drawing. Messy ones look like a real, tired, slightly angry eye.
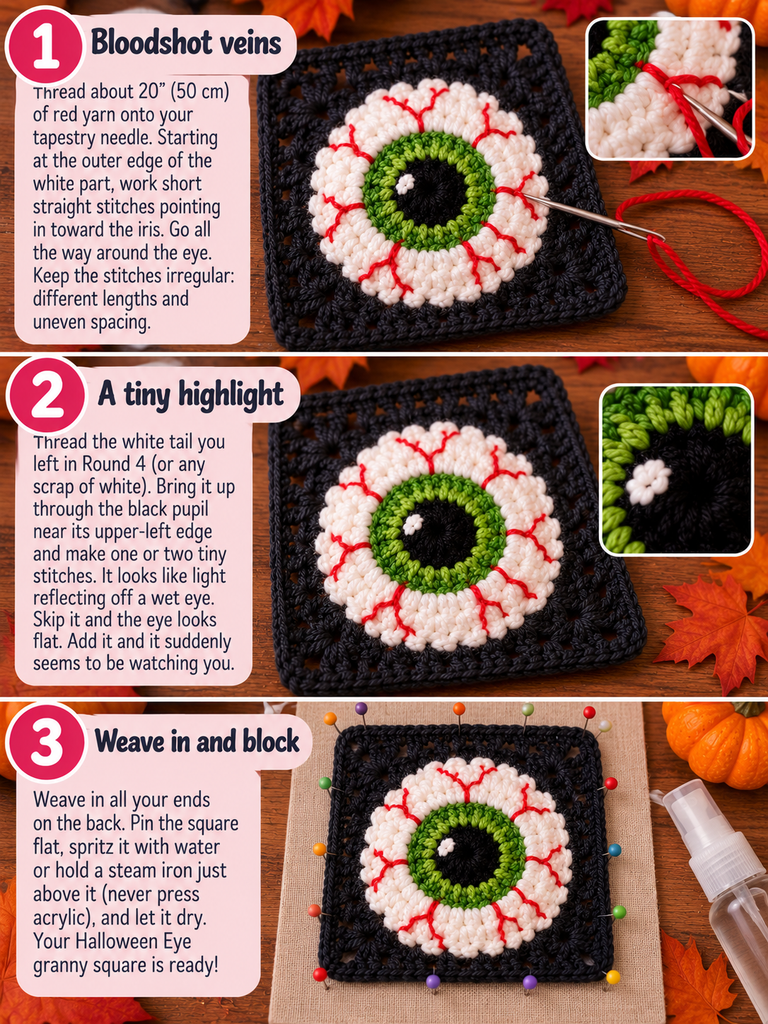
Step 2 – A tiny highlight. Thread the white tail you left in Round 4 (or any scrap of white). Bring it up through the black pupil near its upper-left edge and make one or two tiny stitches. It looks like light reflecting off a wet eye. Skip it and the eye looks flat. Add it and the eye suddenly seems to be watching you.
Step 3 – Weave in and block. Weave in all your ends on the back. Pin the square flat, spritz it with water or hold a steam iron just above it (never press acrylic), and let it dry. Your Halloween Eye granny square is ready!
My Tips for the Best Eyeball
- Choose the iris color for the mood you want. Green is classic monster. Blue is eerie and human. Red or yellow is pure nightmare fuel.
- Use a bright, crisp white. Cream makes the eye look dull.
- Pick a dark background. Black, deep purple or burnt orange make the white pop the most.
- Make the veins with thinner yarn. If your red yarn looks too chunky, split the strand or use embroidery floss.
- Block it. A quick steam block keeps the eye perfectly round and the corners square.
What About the Spiderweb Square?
The eye’s partner in Part 1 is the Spiderweb square. It’s the same basic granny square, worked in one solid color, with a web embroidered on top in white. Four straight lines go across the square, then long stitches connect them along the gaps between rounds. Make them both and alternate them, and you’ve got the start of a very spooky blanket.
What to Make With Your Eye Squares
- The CAL blanket: 63 squares for about 40″ × 50″ (102 × 127 cm), or 42 squares for a baby blanket.
- A cushion: 9 squares per side gives a pillow of about 17″ (45 cm).
- A garland: string a row of eyes across a mantel or doorway.
- Potholders or coasters: use cotton yarn so they handle heat.
- A candy bag: join a few squares for trick-or-treating.
- A single eye on a jacket or tote: sew it on as a patch for instant Halloween style.
Frequently Asked Questions
Is the Halloween Eye granny square free?
Yes, during the October 2026 CAL, as a temporarily downloadable PDF on the Raffamusa Designs blog. After that, the full Halloween Granny Squares bundle is sold on Ravelry, LoveCrafts and Etsy.
Is it suitable for beginners?
Yes. If you can crochet in the round and change colors, you can make it. The embroidery is just simple straight stitches.
Can I sell items I make with it?
Raffaella allows you to sell finished items made from her patterns. You may not republish or share the pattern itself, or use her photos in your listings.
Can I join the CAL late?
Yes, but download each PDF as soon as you can, because the free links don’t stay up after the CAL ends.
Final Thoughts
Remember my son jumping at the eyeball on the coffee table? That’s what one evening and a few yards of leftover yarn can do. The Halloween Eye granny square is simple, quick and forgiving, and it has more personality than most projects ten times its size.
Make one this week. Leave it somewhere unexpected. Then wait.