My first crochet project was supposed to be a scarf. It ended up as a long, lopsided rectangle that got wider every row and lived in a drawer for two years. Sound familiar?
Here’s what I wish someone had told me back then: start small. Really small. Like, fits-under-your-coffee-mug small.
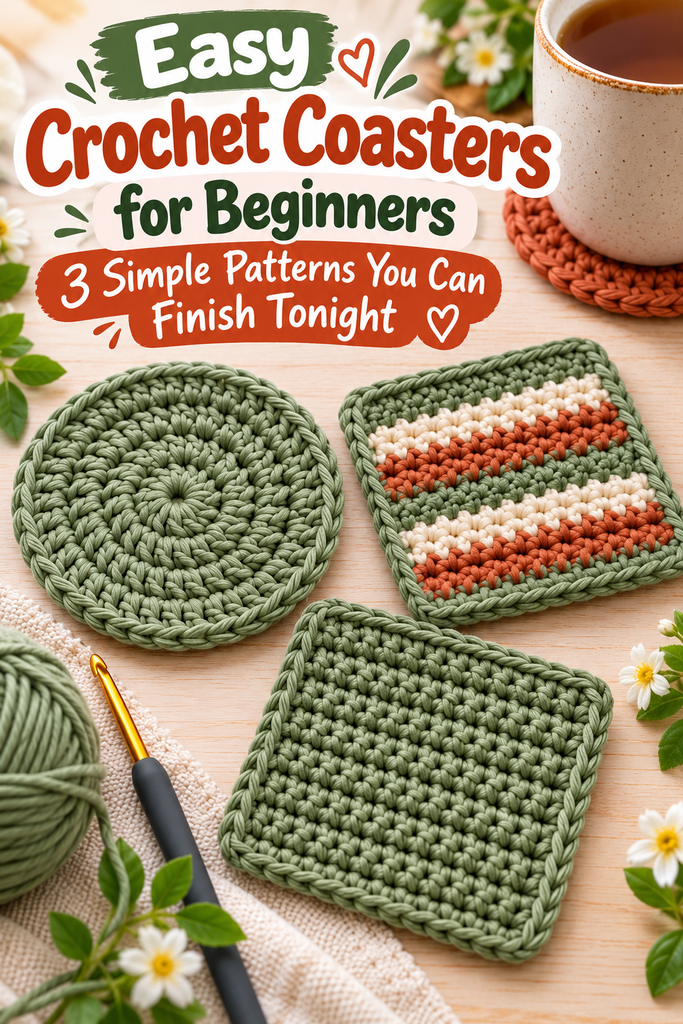
Coasters are, hands down, the best first project for anyone learning to crochet. You get to practice the same stitches over and over, you finish in under an hour, and at the end you have something you’ll actually use every single day. No drawer of shame required.
In this guide, I’ll walk you through exactly what you need, three easy patterns (round, square, and a striped version), and the little fixes that will save you from frustration.
Table of Contents
Key Takeaways
- Use 100% cotton yarn. It absorbs moisture and handles hot mugs better than acrylic.
- You only need one stitch (single crochet) to make every pattern in this guide.
- A round coaster grows by 6 stitches every round. Remember that rule and your circle stays flat.
- Each coaster takes about 30 to 60 minutes once you’re comfortable, which makes them perfect for practice and gifting.
- Count your stitches at the end of every round or row. It’s the single habit that fixes most beginner mistakes.
Why Coasters Are the Perfect First Crochet Project
Think about learning to drive. You don’t start on the highway. You start in an empty parking lot, going in circles, getting a feel for the pedals.
Coasters are your parking lot.
They’re small enough that a mistake costs you ten minutes, not ten hours. You can rip one out and start again without feeling like you’ve wasted a weekend. And because you’ll probably make several (who has just one coaster?), you get built-in repetition. By coaster number four, your tension evens out and your hands stop feeling like they belong to someone else.
There’s also a sneaky psychological win here. Finishing something matters. That little rush of “I made this” is what keeps beginners going, and coasters hand it to you fast.
What You’ll Need (It’s Less Than You Think)
One of the nicest things about this project is how little it costs. You probably need just one ball of yarn to make a full set of four to six coasters.
- Cotton yarn, worsted weight (weight 4): Look for 100% cotton. Brands like Lily Sugar’n Cream or any “kitchen cotton” work beautifully.
- A 5 mm (US H-8) crochet hook: This is the size most worsted cotton labels recommend, and it’s comfortable for beginner hands.
- A tapestry needle: The big blunt needle you’ll use to weave in your ends.
- Scissors.
- A stitch marker: Optional, but honestly, a lifesaver for round coasters. A bobby pin or a scrap of contrasting yarn works too.
Why cotton and not acrylic?
I get this question a lot, because acrylic is cheap, soft, and comes in every color imaginable. But a coaster has one job: to sit under a drink. Cotton soaks up condensation from a cold glass, it doesn’t get slippery, and it holds up to a hot mug. Acrylic tends to repel water (so your table still gets wet), and it can soften or even melt under high heat.
Cotton is also machine washable, which matters more than you’d think once coffee gets involved.
The Only Stitches You Need to Know
Let’s be honest: crochet abbreviations look like a secret code the first time you see them. Here’s your cheat sheet. Everything in this guide uses US crochet terms.
- ch = chain
- sc = single crochet
- sl st = slip stitch
- st(s) = stitch(es)
- 2 sc in next st = an increase (two stitches worked into the same spot)
- MR = magic ring (also called a magic circle)
Quick heads-up for readers using UK patterns: a US single crochet is called a double crochet in UK terms. Same stitch, different name. This trips up a lot of people, so if a pattern looks way too tall or too short, check which terms it uses.
If you can make a chain and a single crochet, you can make every coaster below. That’s it.
Pattern 1: The Classic Round Coaster
This is the one I always teach first. It’s worked in a spiral, and once you see how the circle grows, something just clicks.
Finished size: about 4 inches (10 cm) across, depending on your tension.
Round 1: Make a magic ring. Work 6 sc into the ring. Pull the tail to close it tight. Place your stitch marker in the first stitch. (6 sts)
Round 2: 2 sc in each stitch around. (12 sts)
Round 3: *1 sc in the next st, 2 sc in the next st*. Repeat from * around. (18 sts)
Round 4: *1 sc in each of the next 2 sts, 2 sc in the next st*. Repeat around. (24 sts)
Round 5: *1 sc in each of the next 3 sts, 2 sc in the next st*. Repeat around. (30 sts)
Round 6: *1 sc in each of the next 4 sts, 2 sc in the next st*. Repeat around. (36 sts)
Round 7 (optional): *1 sc in each of the next 5 sts, 2 sc in the next st*. Repeat around. (42 sts)
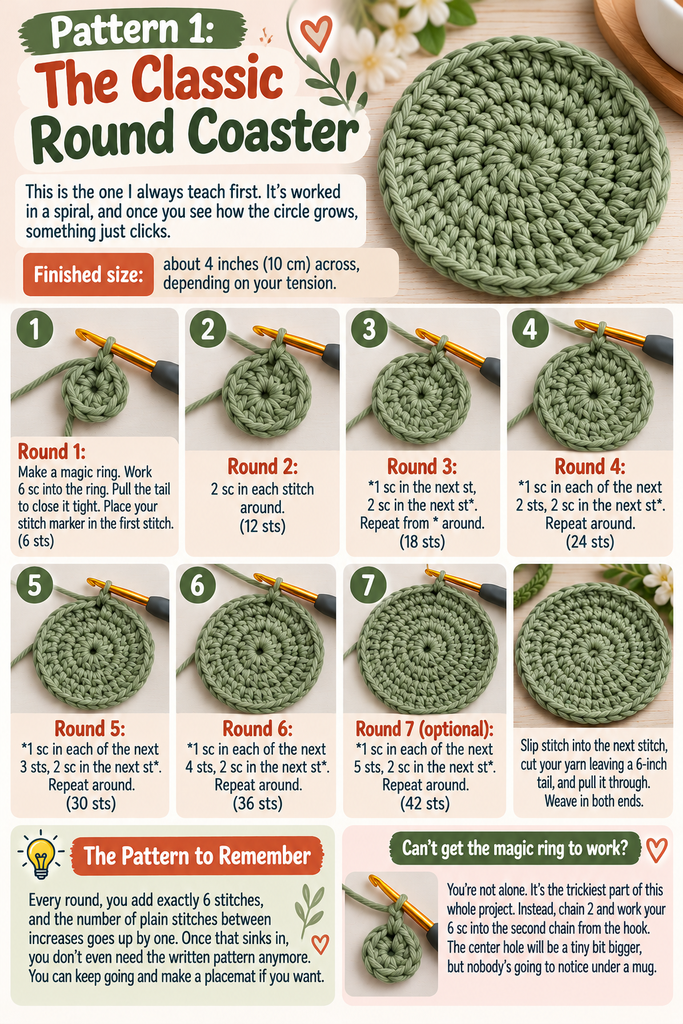
Slip stitch into the next stitch, cut your yarn leaving a 6-inch tail, and pull it through. Weave in both ends.
See the pattern? Every round, you add exactly 6 stitches, and the number of plain stitches between increases goes up by one. Once that sinks in, you don’t even need the written pattern anymore. You can keep going and make a placemat if you want.
Can’t get the magic ring to work? You’re not alone. It’s the trickiest part of this whole project. Instead, chain 2 and work your 6 sc into the second chain from the hook. The center hole will be a tiny bit bigger, but nobody’s going to notice under a mug.
Pattern 2: The Simple Square Coaster
If rounds make your head spin, start here instead. Square coasters are worked back and forth in straight rows, so there’s nothing to count except stitches across.
Foundation: Chain 17.
Row 1: Sc in the 2nd chain from the hook and in each chain across. (16 sts)
Row 2: Ch 1, turn your work. Sc in each stitch across. (16 sts)
Rows 3 onward: Repeat Row 2 until your piece is square. That’s usually somewhere around 16 to 18 rows.
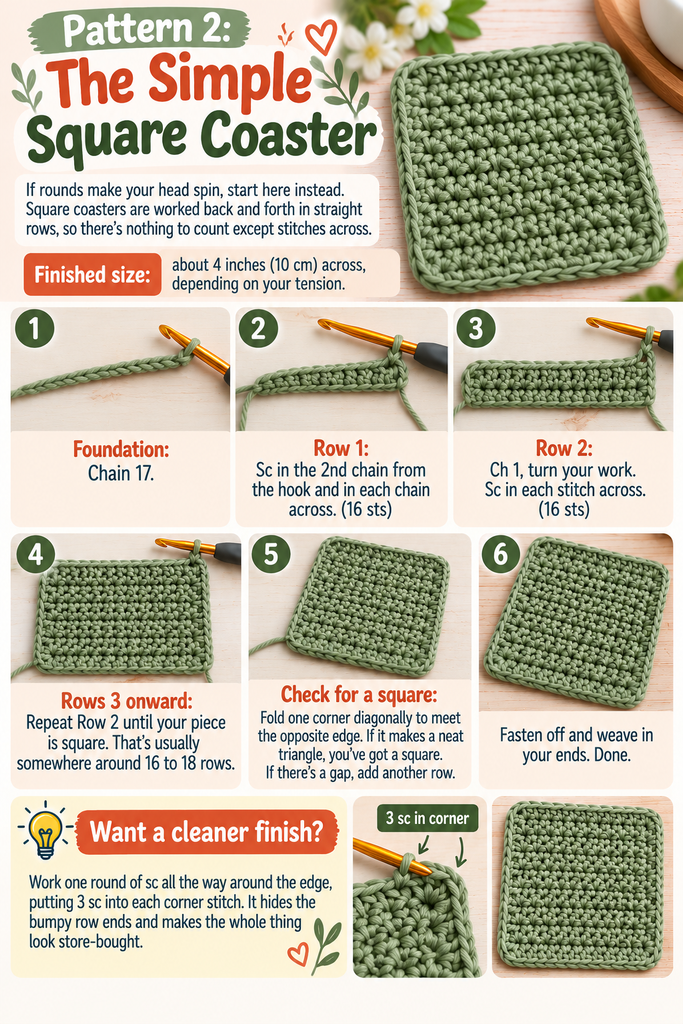
Here’s a little trick for checking: fold one corner diagonally to meet the opposite edge. If it makes a neat triangle, you’ve got a square. If there’s a gap, add another row.
Fasten off and weave in your ends. Done.
Want a cleaner finish? Work one round of sc all the way around the edge, putting 3 sc into each corner stitch. It hides the bumpy row ends and makes the whole thing look store-bought.
Pattern 3: The Striped Coaster (Your First Color Change)
Once you’ve made one or two plain coasters, this is a great next step. You’ll use the square pattern above, but switch colors every two rows.
The secret to a clean color change is doing it before the new color shows up. On the last stitch of a row, work your single crochet until you have two loops on the hook. Then drop the old color, grab the new one, and pull it through both loops. Ch 1, turn, and keep going in the new color.
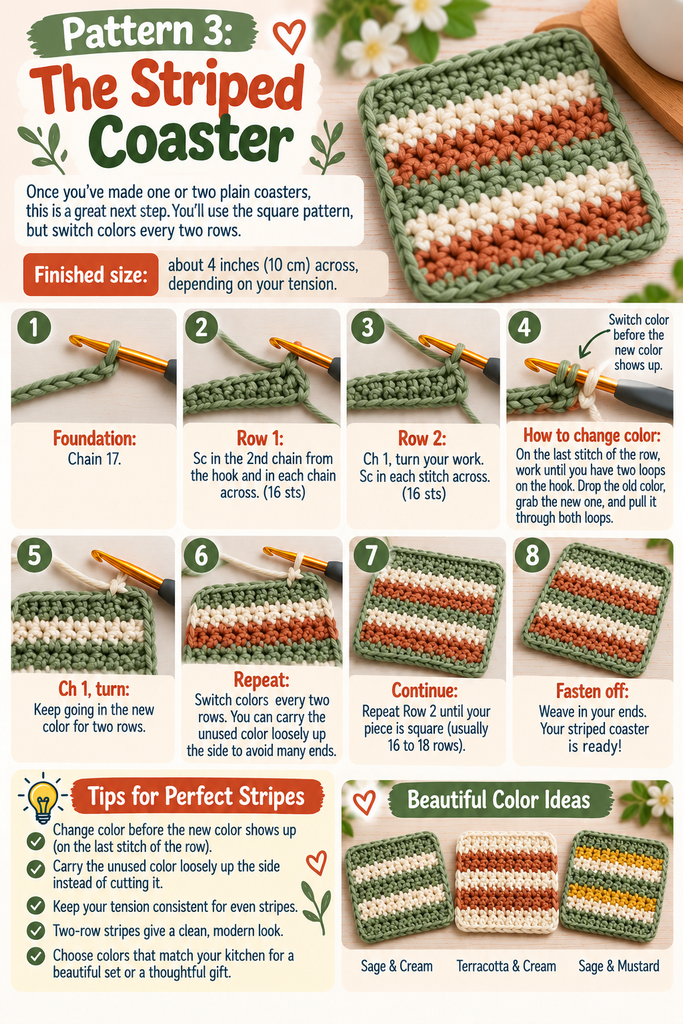
Don’t cut the yarn every time. If your stripes are only two rows tall, you can carry the unused color loosely up the side of your work and pick it up again when you need it. Fewer ends to weave in. (Trust me, your future self will thank you.)
A set of four striped coasters in two colors that match your kitchen makes a genuinely lovely housewarming gift. I’ve given more of these away than I can count.
Common Beginner Mistakes (and How to Fix Them)
Every crocheter makes these. Every single one. Here’s what’s going on and how to sort it out.
“My round coaster is curling up like a bowl.”
You’ve got too few stitches. Usually that means an increase got skipped somewhere. Count your stitches: you should have a multiple of 6 at the end of every round (6, 12, 18, 24…). If you’re short, rip back to where the count was last right.
“My round coaster is wavy and ruffled.”
The opposite problem: too many stitches, or a hook that’s too big for your yarn. Double-check your count, and if it’s correct, try going down a hook size.
“My square coaster is turning into a triangle.”
This is the classic beginner mistake, and it means you’re losing a stitch at the end of rows, usually the very last one, which hides right at the edge. Count to 16 at the end of every row. Every time. It’s boring, but it works.
“My stitches are so tight I can barely get the hook in.”
Totally normal. Most beginners grip the yarn like it’s trying to escape. Relax your hand, let the yarn flow a little more freely, and make sure you’re forming each loop on the thick part of the hook (the shaft), not the skinny throat near the tip.
Finishing Touches That Make a Big Difference
The gap between “homemade” and “handmade” is mostly in the finishing. A few small steps go a long way.
Weave your ends in properly. Thread the tail onto your tapestry needle and weave it through the back of your stitches in one direction, then turn and go back the other way for a few stitches. This locks it in place so it won’t pop out in the wash.

Block your coasters. This just means getting them wet and letting them dry flat in the right shape. Soak them in water, gently squeeze out the extra (don’t wring), then pin them flat on a towel or foam mat until they’re dry. Round coasters come out rounder, square ones come out squarer, and any wobbly stitches settle down.
Make them in sets. One coaster is a swatch. Four matching coasters are a gift. Use the same yarn and hook for the whole set, and try to make them in one or two sittings so your tension stays consistent.
Frequently Asked Questions
How long does it take to crochet a coaster?
Your very first one might take an hour or two while you’re figuring things out. Once you’ve got the rhythm, most people finish a coaster in about 30 to 45 minutes.
How much yarn do I need?
Not much at all. A standard 2.5 oz (70 g) ball of worsted cotton is usually enough for a set of four to six coasters, depending on their size.
Can I wash crochet coasters?
Yes, if they’re cotton. Machine wash on a gentle cycle and lay them flat to dry. Cotton can shrink a little the first time, so if exact size matters, wash your yarn or a test swatch first.
Can I sell coasters I make from these patterns?
These are basic, classic constructions that crocheters have used for generations, so go for it. Handmade coaster sets are a popular item at craft fairs and online shops.
Your First Coaster Is Closer Than You Think
Remember that lopsided scarf in my drawer? I still have it. Every now and then I pull it out, not because it’s pretty, but because it reminds me that everyone starts somewhere.
The difference is that if I’d started with a coaster, I would have had a finished project on my table that same night. And that small win would have carried me straight into the next one.
So grab a ball of cotton yarn, a 5 mm hook, and an hour of your evening. Make one coaster. Count your stitches. Then make another. By the end of the week, you’ll have a set, and more importantly, you’ll have hands that know what they’re doing.
Now I’d love to hear from you. Which pattern are you going to try first: the round, the square, or the striped one? Drop a comment below and tell me, or share a photo of your finished coaster. And if you get stuck on a step, ask away. I read every comment, and there’s no such thing as a silly crochet question.