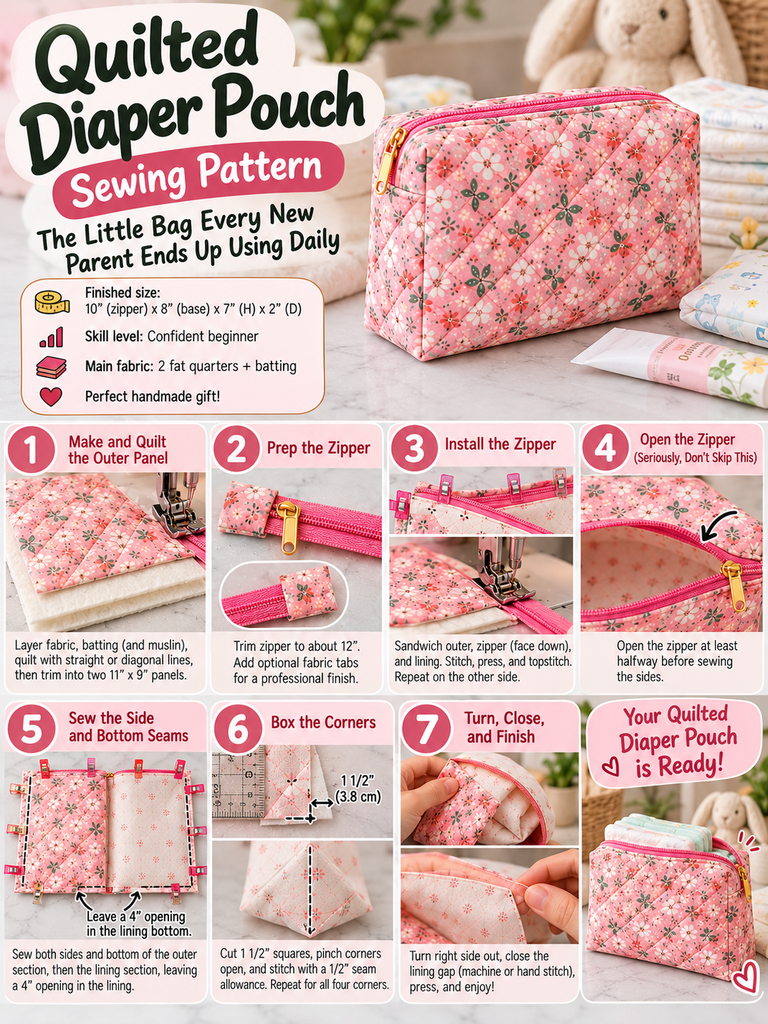
The first tote bag I ever sewed had one strap longer than the other, a lining that bunched up at the bottom, and a seam I’d sewn twice because I forgot to put the right sides together. I used it for groceries for three years anyway.
That’s the funny thing about a tote bag. It forgives you. It doesn’t need to fit a body, it doesn’t care about darts or zippers, and even a slightly wonky one is still genuinely useful. Which is exactly why it’s the project I recommend to every single person who tells me they “want to get into sewing.”
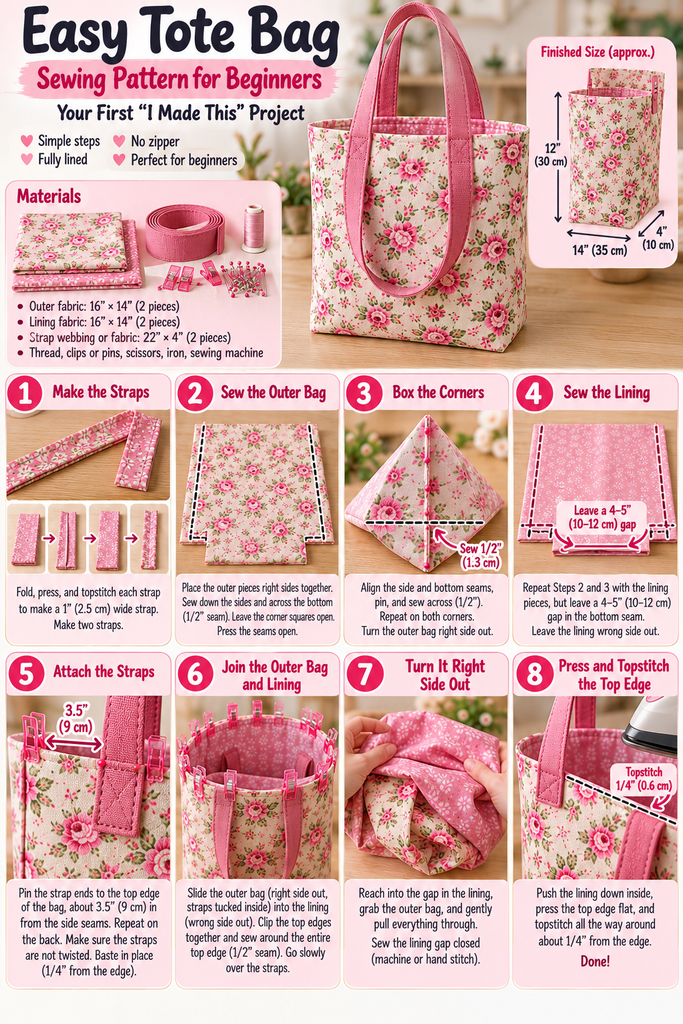
This easy tote bag sewing pattern is the one I wish I’d had back then. It’s fully lined, it has boxed corners so it actually stands up and holds things, and the straps are sewn in a way that won’t rip off the first time you load it with a few jars of jam. If you can sew a straight line (or a mostly straight line), you can make this bag in an afternoon.
Table of Contents
Key Takeaways
- Time: 2 to 3 hours for a first-timer, closer to 1 hour once you’ve made one.
- Finished size: roughly 14″ wide x 13″ tall x 3″ deep (36 x 33 x 8 cm).
- Fabric: about half a yard each of sturdy outer fabric (canvas or duck cloth) and cotton lining.
- Skills you’ll learn: straight seams, pressing, making straps, boxed corners, and turning a lined bag through a gap.
- The big secret: pressing with an iron at every step matters more than perfect stitching.
Why a Tote Bag Is the Perfect First Sewing Project
Here’s the thing most beginner guides don’t say out loud: your first project isn’t really about the object. It’s about building confidence with your machine. You want something with lots of straight lines, few pieces, and a finished result you’ll actually use.
A tote ticks every box. There are only six pieces to cut. Every seam is straight. And you’ll learn three techniques (boxed corners, a clean lining, and topstitching) that show up again and again in bags, pouches, and home décor projects later on.
Plus, honestly? There’s nothing quite like someone at the market asking “Where did you get that bag?” and getting to say, “I made it.”
What You’ll Need
You don’t need a fancy setup. A basic domestic sewing machine handles this project perfectly well.
Fabric
- Outer fabric: 1/2 yard (about 50 cm) of medium-weight canvas, duck cloth, denim, or home décor cotton. Something with body so the bag holds its shape.
- Lining fabric: 1/2 yard of quilting cotton. This is where you can have fun with a bold print that peeks out when the bag is open.
- Optional: 1/2 yard of medium-weight fusible interfacing if your outer fabric feels floppy.
Tools
- Sewing machine and matching all-purpose polyester thread
- A fresh needle for heavier fabric (size 90/14 or 100/16, often sold as “denim” or “jeans” needles)
- Fabric scissors or a rotary cutter, ruler, and cutting mat
- Pins or, even better, sewing clips
- Iron and ironing board
- Fabric marker or chalk
A quick word on that needle. A lot of the “my machine keeps skipping stitches” frustration I hear from beginners comes down to using a tired universal needle on canvas. Swap it out before you start. It’s the cheapest fix in sewing.
Cutting Your Pattern Pieces
No paper pattern needed. Everything here is a rectangle, so you can measure and cut directly on your fabric. All measurements include a 1/2″ (1.3 cm) seam allowance.
- Outer fabric: 2 rectangles, 15″ wide x 16″ tall (38 x 41 cm)
- Lining fabric: 2 rectangles, 15″ wide x 16″ tall (38 x 41 cm)
- Straps: 2 strips, 4″ wide x 24″ long (10 x 61 cm), cut from the outer fabric
Now, for the boxed corners: on each of the four main rectangles, cut a 2″ (5 cm) square out of both bottom corners. Measure carefully here, because uneven squares are the main reason a tote ends up leaning to one side.
Before you cut anything: if you’re using cotton canvas, wash and dry it first. Canvas can shrink noticeably, and you don’t want your lovely new bag to warp the first time it goes through the wash.
Step-by-Step: How to Sew a Tote Bag
Step 1: Make the Straps
Take one strap strip and fold it in half lengthwise, wrong sides together. Press a sharp crease. Open it back up, then fold each long raw edge in to meet that center crease and press again. Finally, fold it in half along the original crease so all the raw edges are hidden inside.
You should now have a neat strap about 1″ (2.5 cm) wide. Clip it together and topstitch about 1/8″ from each long edge. Repeat for the second strap.
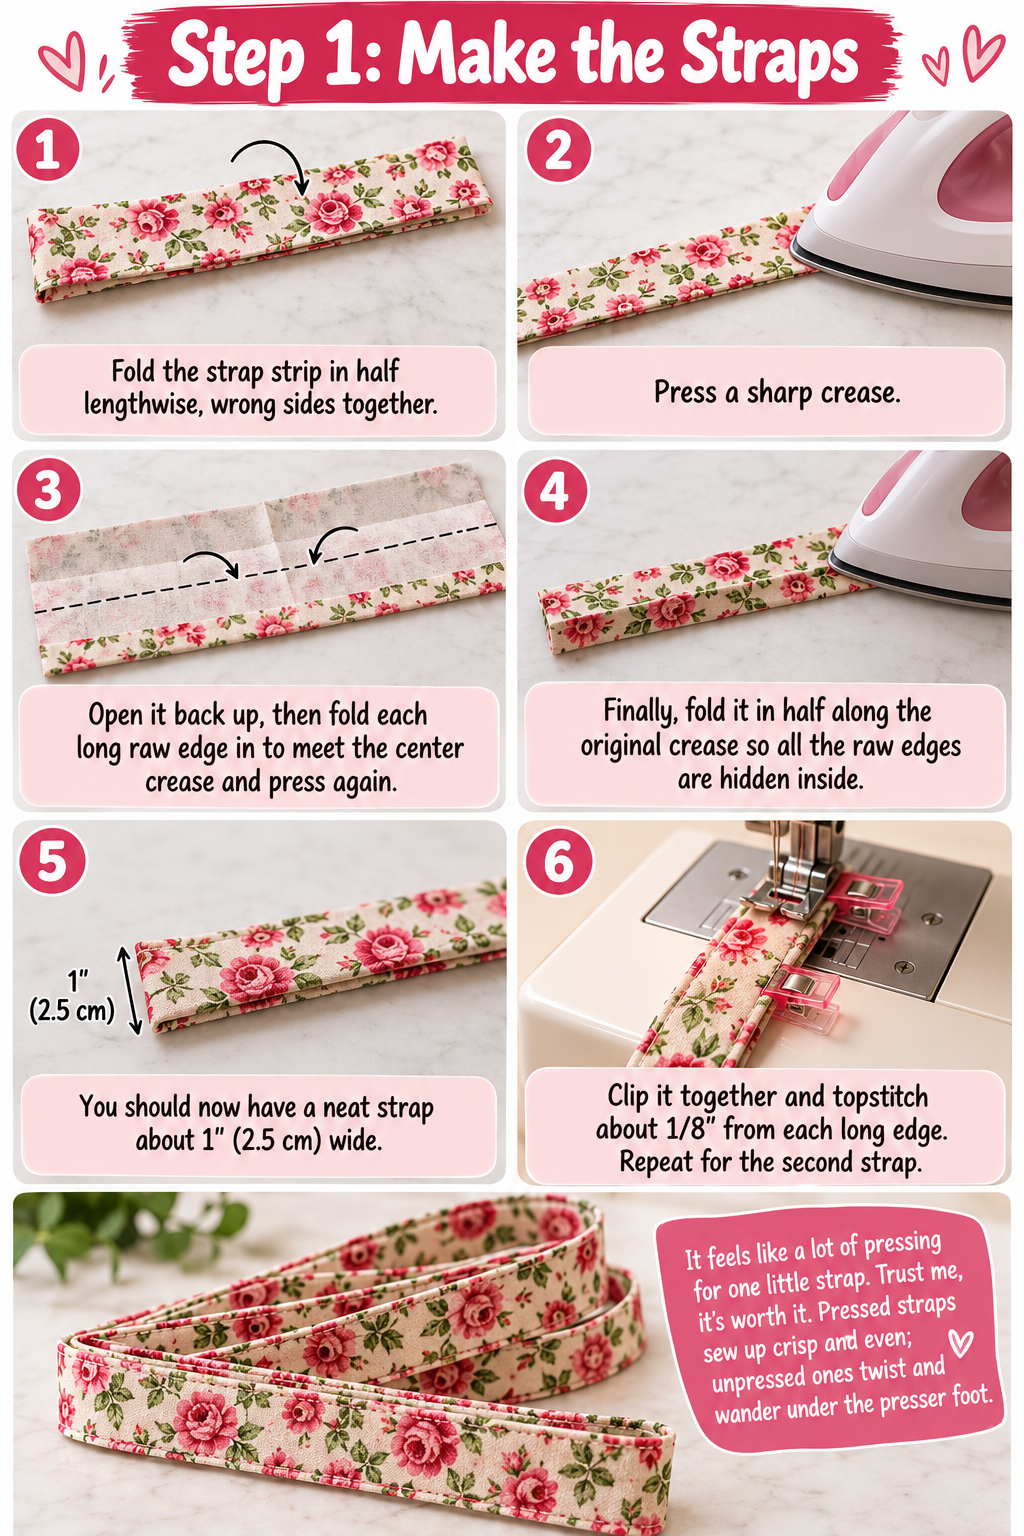
It feels like a lot of pressing for one little strap. Trust me, it’s worth it. Pressed straps sew up crisp and even; unpressed ones twist and wander under the presser foot.
Step 2: Sew the Outer Bag
Place your two outer pieces right sides together. Sew down one side, across the bottom, and up the other side using a 1/2″ seam allowance. Leave the cut-out corner squares open for now. Backstitch at the start and end of each seam.
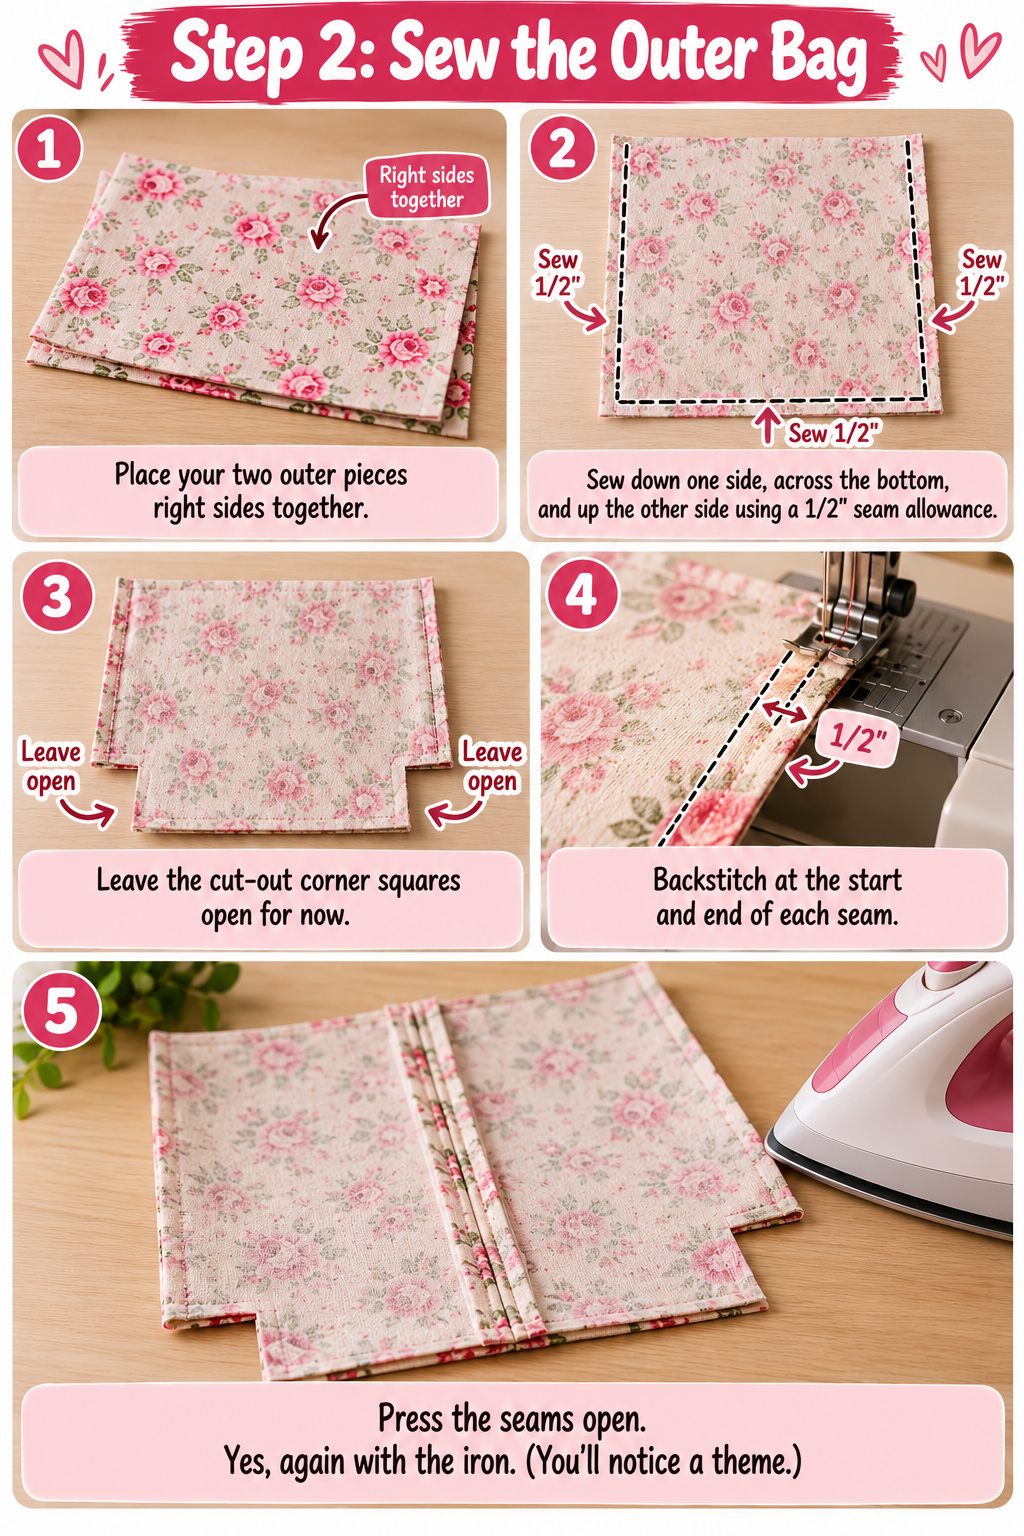
Press the seams open. Yes, again with the iron. (You’ll notice a theme.)
Step 3: Box the Corners
This is the step that makes people feel like real sewists, and it’s simpler than it looks.
Pick up one of the open corners and pull the front and back apart so the side seam lines up directly on top of the bottom seam. The raw edges will now form a single straight line. Pin it so the seams nest together, then stitch straight across with a 1/2″ seam allowance. Do the same on the other corner.
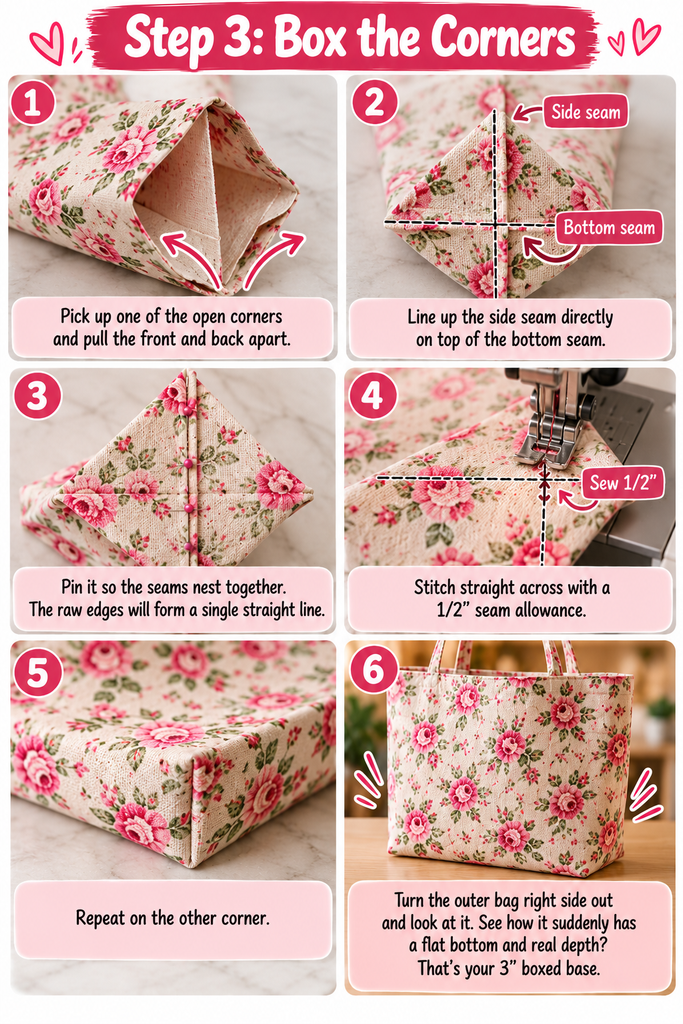
Turn the outer bag right side out and look at it. See how it suddenly has a flat bottom and real depth? That’s your 3″ boxed base.
Step 4: Sew the Lining (With a Gap)
Repeat steps 2 and 3 with your lining pieces, with one important difference: leave a 4 to 5 inch (10 to 12 cm) gap in the middle of the bottom seam. Backstitch on both sides of the gap. This opening is how you’ll turn the whole bag right side out later.
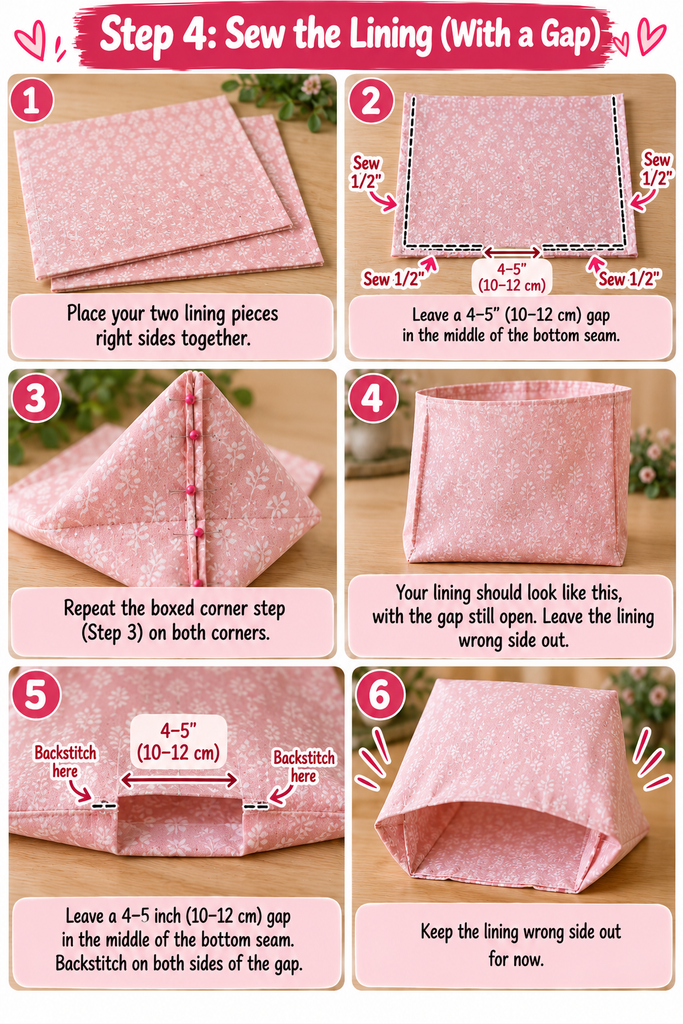
Leave the lining wrong side out.
Step 5: Attach the Straps
With the outer bag right side out, pin the ends of one strap to the top edge of the front, with each end about 3.5″ (9 cm) in from the side seams. The raw ends of the strap should line up with the raw top edge of the bag, and the loop of the strap should hang down against the bag.
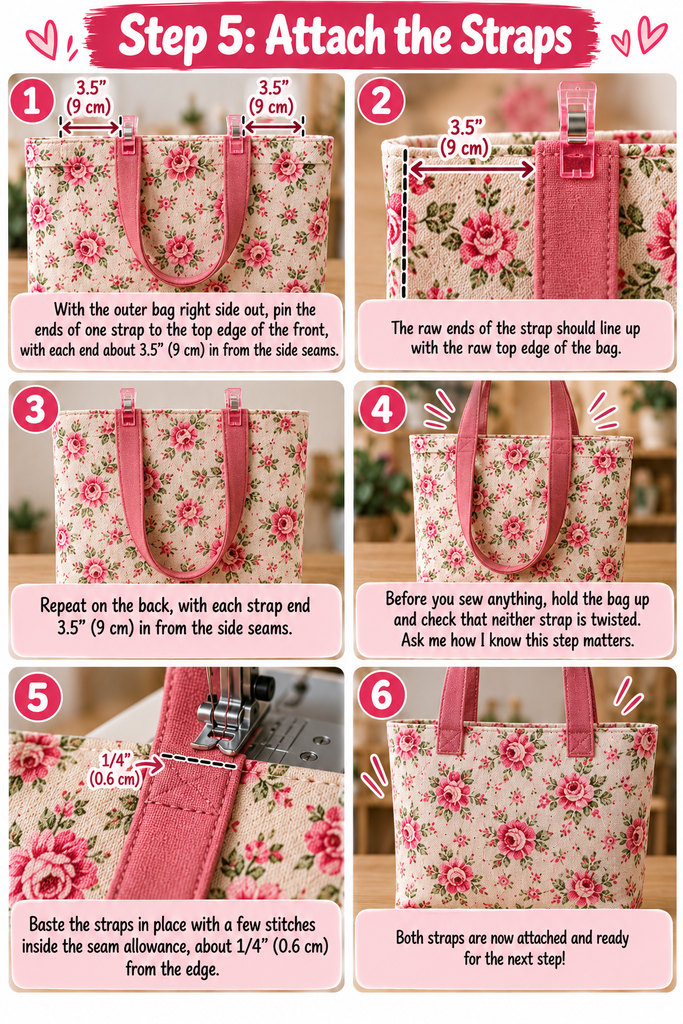
Repeat on the back. Then, before you sew anything, hold the bag up and check that neither strap is twisted. Ask me how I know this step matters.
Baste the straps in place with a few stitches inside the seam allowance, about 1/4″ from the edge.
Step 6: Join the Outer Bag and Lining
Here’s where it all comes together, and where most beginners pause and think, “Wait, that can’t be right.”
Slide the outer bag (right side out, straps tucked down inside) into the lining (wrong side out). The right sides of the outer and lining are now facing each other. Line up the side seams and the top raw edges, and clip all the way around.
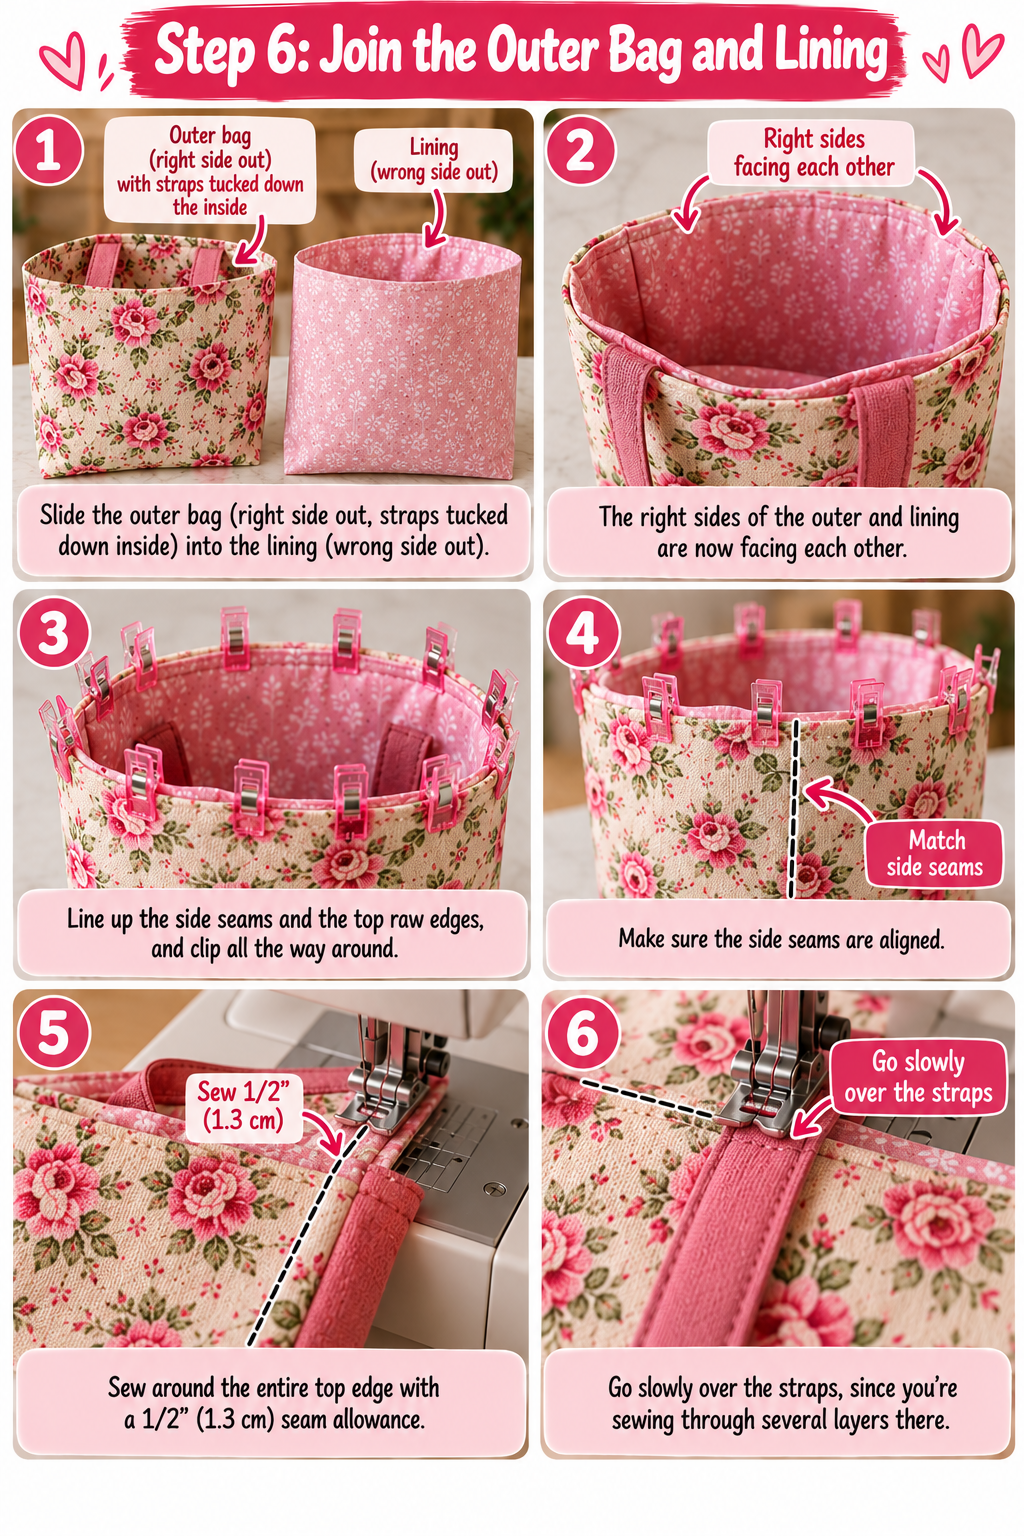
Sew around the entire top edge with a 1/2″ seam allowance. Go slowly over the straps, since you’re sewing through several layers there.
Step 7: Turn It Right Side Out
Reach into the gap you left in the lining, grab the outer bag, and gently pull everything through. It’ll look like a crumpled mess for a moment. That’s completely normal.
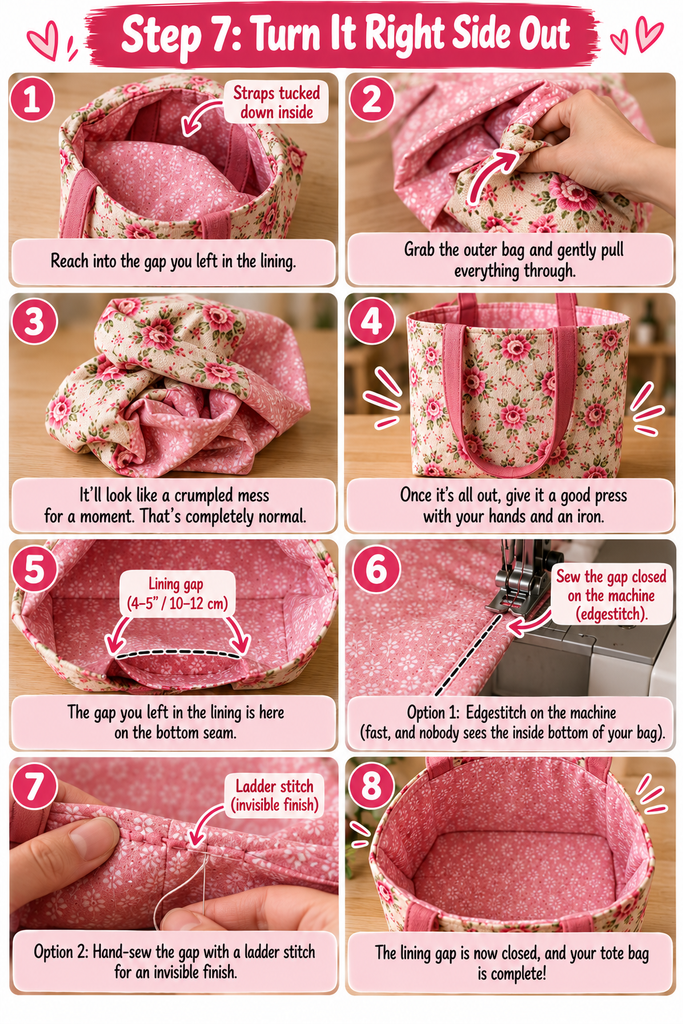
Once it’s all out, sew the lining gap closed. You can edgestitch it on the machine (fast, and nobody sees the inside bottom of your bag) or hand-sew it with a ladder stitch for an invisible finish.
Step 8: Press and Topstitch the Top Edge
Push the lining down inside the bag. Roll the top seam between your fingers so the lining sits just slightly below the edge and doesn’t peek over, then press the whole top edge flat.

Finally, topstitch all the way around the opening about 1/4″ from the edge. This keeps the lining from creeping up, gives a polished, store-bought look, and adds a second line of stitching that anchors your straps. Done!
Beginner Mistakes I See All the Time (and How to Avoid Them)
Skipping the iron. I can’t say this enough. Pressing is half of sewing. Seams that are pressed open lie flat, corners line up, and the whole bag looks more professional.
Sewing over pins. It’s tempting, but hitting a pin can break your needle or knock your machine’s timing out. Remove pins as you reach them, or use clips, which work much better on thick canvas anyway.
Forgetting to backstitch. A tote carries weight. A few backstitches at the start and end of every seam stop it from unravelling under a full load.
Choosing fabric that’s too thin. Quilting cotton alone makes a floppy bag. If that’s all you have, iron fusible interfacing to the outer pieces first and you’ll be amazed at the difference.
Easy Ways to Make It Your Own
Once you’ve sewn this pattern once, it becomes a blank canvas (sometimes literally). A few ideas to try on your second bag:
- Add an inside pocket. Sew a simple hemmed rectangle onto one lining piece before step 4. Perfect for keys and your phone.
- Make it bigger. Add 4″ to the width and height for a beach or market tote, and lengthen the straps to 28″ for an over-the-shoulder carry.
- Try contrast straps. Cotton webbing or a bold print strap instantly changes the look.
- Use what you have. Old jeans, a worn-out canvas tablecloth, or curtain fabric all make brilliant, sustainable totes.
Frequently Asked Questions
Can I sew a tote bag by hand?
Yes. It takes longer, but a small, tight backstitch is strong enough for a tote. Go for lighter canvas or cotton twill to save your fingers.
What’s the best fabric for a beginner tote bag?
Cotton canvas or duck cloth in a medium weight (around 7 to 10 oz) is ideal. It’s sturdy, it presses beautifully, and it feeds through a home machine without drama.
Do I need a walking foot?
It’s helpful but not necessary. If your layers shift, lengthen your stitch slightly and sew a little slower.
How much weight can this tote hold?
With canvas, backstitched seams, and the topstitched top edge, it comfortably handles a full load of groceries or books for everyday use
Your First Bag Is the Start of Something Bigger
I still have that lopsided first tote. It lives in the cupboard now, retired, but I keep it because it reminds me of the exact moment sewing stopped feeling intimidating. Your first bag might not be perfect either, and that’s the whole point. Every slightly wobbly seam teaches your hands something your brain can’t learn from a tutorial.
So clear off the table, swap in a fresh needle, and give yourself one afternoon. By tonight, you could be packing your own handmade bag for tomorrow’s errands.
Over to you: Have you made this tote? I’d genuinely love to see it. Share a photo in the comments or tell me which fabric you picked, and if you got stuck on a step (boxed corners, I’m looking at you), ask below and I’ll help you through it. And if this pattern helped, pass it along to a friend who keeps saying they’d “love to learn to sew someday.” Someday can be this weekend.