Every October I tell myself I’m not going to buy another plastic skeleton. And every October I end up standing in a store aisle holding one anyway, wondering why all the “spooky” decor looks exactly the same as last year’s.

That’s how I fell for Halloween doilies. They’re small, they’re quick, and they turn an ordinary side table into something that looks like it belongs in a cozy, slightly haunted farmhouse. The Happy Haunting Doily is one of those patterns that hits the sweet spot: festive without being gory, pretty without being fussy, and easy enough that you can actually finish it before the trick-or-treaters show up.
If you’ve got a hook, a bit of yarn and a free evening, let’s talk about how to make this one your own.
Table of Contents
Key Takeaways
- The Happy Haunting Doily is a free, easy Halloween crochet pattern, a great pick if you’re newer to doilies.
- It’s worked in the round with basic stitches, so there’s no complicated lacework to decode.
- Color choice does most of the “spooky” work: think orange, black, purple, lime green or ghostly white.
- A quick blocking session makes a huge difference to how flat and crisp your finished doily looks.
- It’s a perfect last-minute make for gifts, party tables and craft fair stock.
Why a Doily, of All Things, for Halloween?
I’ll be honest: when I first heard “Halloween doily,” I pictured my grandmother’s lace runners dyed black. Not exactly scary.
But here’s what changed my mind. A doily is basically a mandala you can put a pumpkin on. It sits under candles, candy bowls and little ceramic ghosts, and it quietly ties a whole display together. Swap the colors to Halloween shades and suddenly that “old-fashioned” craft looks charming, a little vintage, and very October.
There’s also something lovely about decorating with something you made. Store-bought decor gets packed away and forgotten. A doily you crocheted on a rainy weekend? That one comes out of the box every year with a story attached.
Who This Pattern Is Perfect For
You might be wondering whether you’re “good enough” for a doily. If you can chain, slip stitch, single crochet and double crochet, you’re ready. The word easy in the pattern name isn’t marketing fluff; it’s built for crocheters who want a satisfying result without a chart that looks like a subway map.
It’s a great fit if you are:
- A beginner who’s mastered the basics and wants a first “real” round project
- A busy crocheter looking for a quick seasonal make
- Someone stocking up a craft fair table or Etsy shop for autumn
- A parent or teacher hunting for a calm, screen-free October hobby
Gathering Your Supplies
One of the best things about this kind of pattern is that you probably already own everything you need. Here’s the general toolkit (exact pattern materials are listed with the pattern below):
- Yarn or thread: Worsted weight acrylic or cotton gives you a chunkier, faster doily. Crochet thread gives you that traditional lacy look but takes longer.
- A crochet hook sized to match your yarn (check the label on your skein).
- Scissors and a yarn needle for weaving in ends.
- Blocking supplies: pins, a foam mat or folded towel, and a spray bottle.
A little tip from experience: cotton blocks beautifully and holds its shape. Acrylic is softer and cheaper but can be stubborn about lying flat, so plan on a bit of steam (carefully, and never press the iron directly onto acrylic).
Picking Colors That Actually Say “Halloween”
This is where the fun really starts. The stitches stay the same; the mood changes completely depending on what yarn you grab.
- Classic: orange center, black edging. You can’t go wrong.
- Witchy: deep purple with a lime green border. Very “potion shelf.”
- Ghostly: all white or cream. Elegant, and it looks gorgeous under candlelight.
- Candy corn: yellow, orange and white in rounds. Cheerful and kid-friendly.
- Gothic: solid black. Put it on a white tablecloth and it reads like a spiderweb.
Can’t decide? Make two. They’re quick, and a pair of mismatched doilies looks intentional, not indecisive. (That’s my story and I’m sticking to it.)
Working the Pattern: Tips Before You Start
The full round-by-round pattern is waiting for you at the end of this post. Before you jump ahead, here are the things I wish someone had told me before my first doily.
Mark your first stitch. Working in the round, it’s surprisingly easy to lose track of where a round begins. A simple stitch marker (or a scrap of contrasting yarn) saves a lot of frogging.
Count every round. Doilies are all about symmetry. If you’re one stitch off in round three, your doily will start to ruffle or cup by round six. Counting takes thirty seconds; ripping back takes thirty minutes.
Watch your tension. If the center starts to curl like a bowl, you may be crocheting too tightly. If the edges wave like a ruffle, you may be adding too many stitches or crocheting loosely. Small adjustments fix both.
Change colors at the end of a round. Finish the round, fasten off, and join the new color cleanly. It keeps the stripes crisp and the back tidy.
Weave in ends as you go. Trust me. Future you, on October 30th, will be grateful.
Blocking: The Step Most People Skip (Don’t)
Picture this: you’ve just finished your last round, you hold the doily up, and it looks a little… crumpled. That’s completely normal. Every doily looks rumpled straight off the hook.
Blocking is where it transforms. Lightly dampen the doily, lay it on a foam mat or towel, and gently stretch it into a perfect circle. Pin around the edges, especially at any points or scallops, and let it dry completely. If you’re using cotton, a little spray starch gives it a crisp, professional finish.
It’s the difference between “I made this” and “Wait, you made this?”
How to Crochet the Happy Haunting Doily Step by Step
Here it is, start to finish. Grab your orange and black yarn and let’s make a doily.
Materials
- Worsted weight (4) yarn in orange and black (small amounts of each)
- 5 mm (H) crochet hook
- Scissors and a yarn needle
Finished size: about 8–9 inches across, depending on your yarn and tension.
Stitches (US terms)
- ch – chain
- sl st – slip stitch
- sc – single crochet
- hdc – half double crochet
- dc – double crochet
Note: The ch-3 at the beginning of a round counts as 1 dc.
Instructions
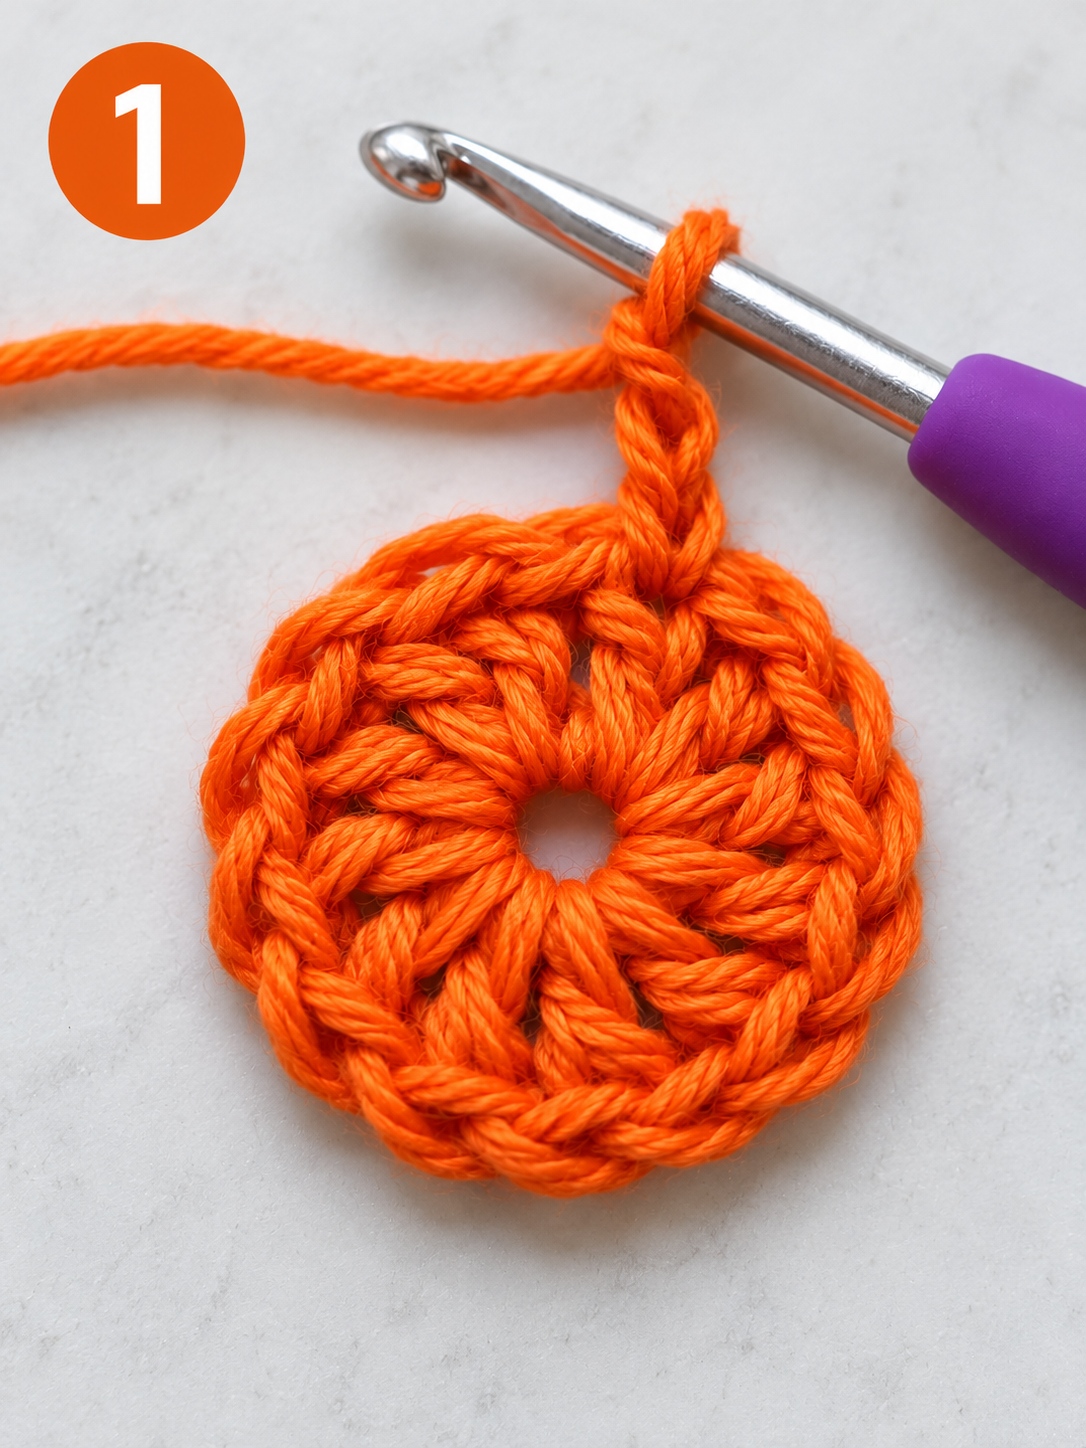
Round 1 (orange): Make a magic ring. Ch 3, then work 11 dc into the ring. Join with a sl st to the top of the ch-3. (12 dc)
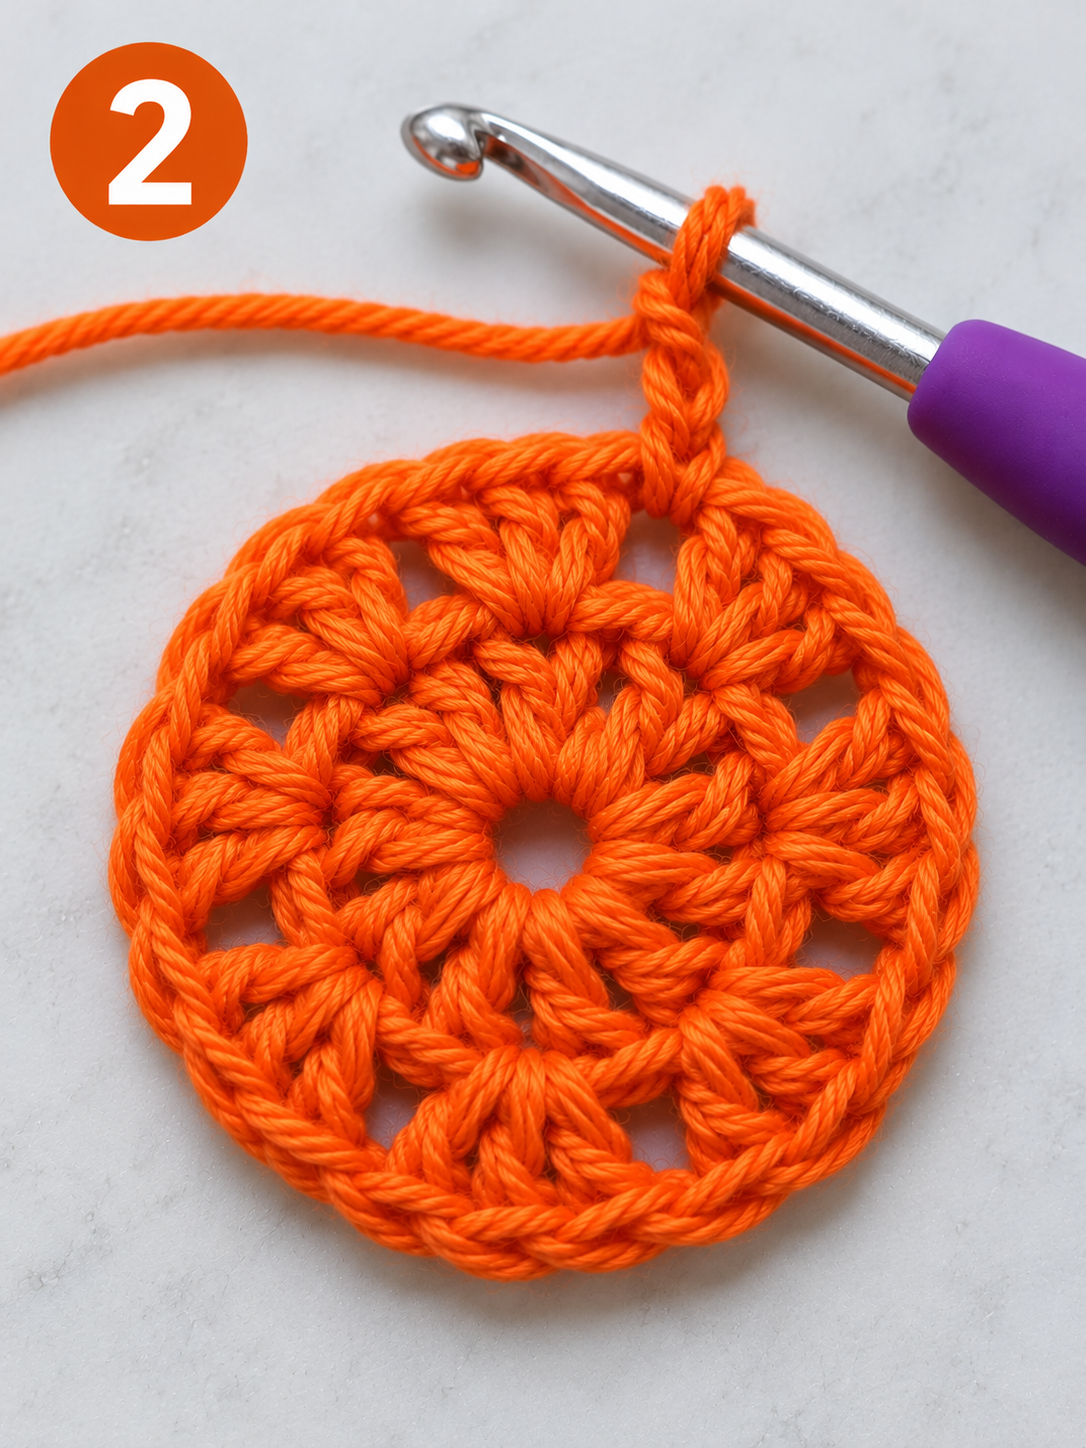
Round 2: Ch 3, 1 dc in the same st, then 2 dc in each st around. Join. (24 dc)

Round 3: Ch 3, 2 dc in the next st, *1 dc in the next st, 2 dc in the next st*; repeat from * around. Join and fasten off. (36 dc)

Round 4 (black): Join black in any st. Ch 1, sc in the same st, ch 3, skip 2 sts. *Sc in the next st, ch 3, skip 2 sts*; repeat from * around. Join to the first sc and fasten off. (12 ch-3 loops)
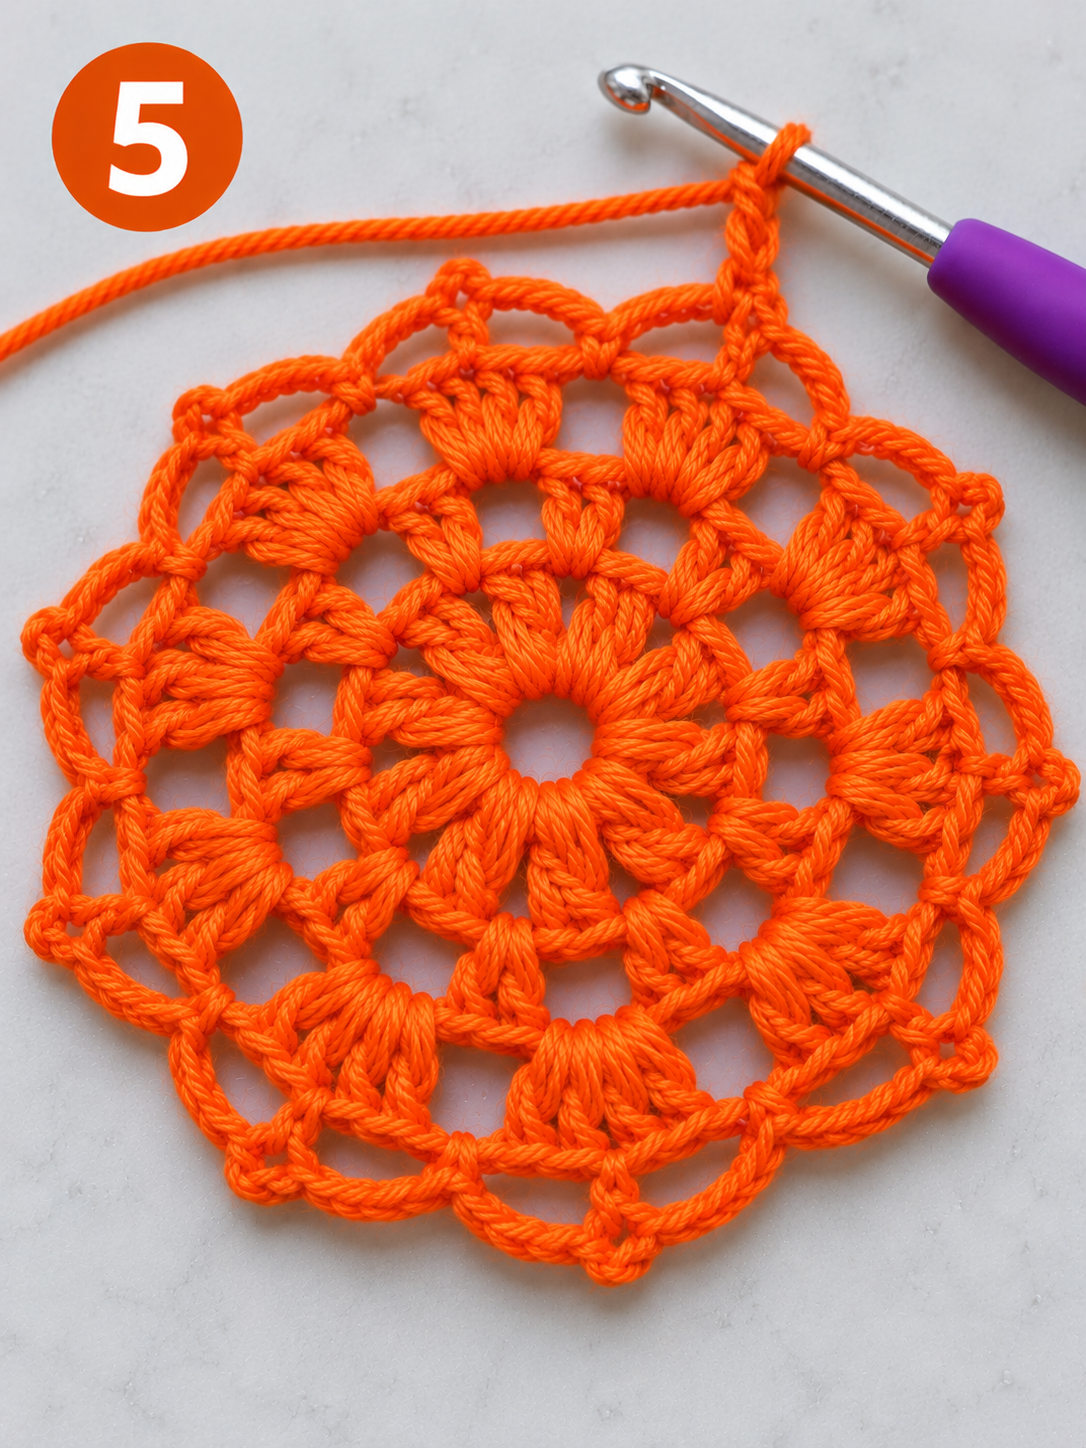
Round 5 (orange): Join orange in any ch-3 loop. Ch 3, 3 dc in the same loop, ch 1. *4 dc in the next loop, ch 1*; repeat from * around. Join and fasten off. (12 groups of 4 dc)

Round 6 (black): Join black in any ch-1 space. Ch 1, sc in the same space, ch 5. *Sc in the next ch-1 space, ch 5*; repeat from * around. Join to the first sc. (12 ch-5 loops)

Round 7 (black, scallop edge): Sl st into the first ch-5 loop. In each loop around, work (sc, hdc, 3 dc, hdc, sc). Join and fasten off. (12 scallops)
Finishing
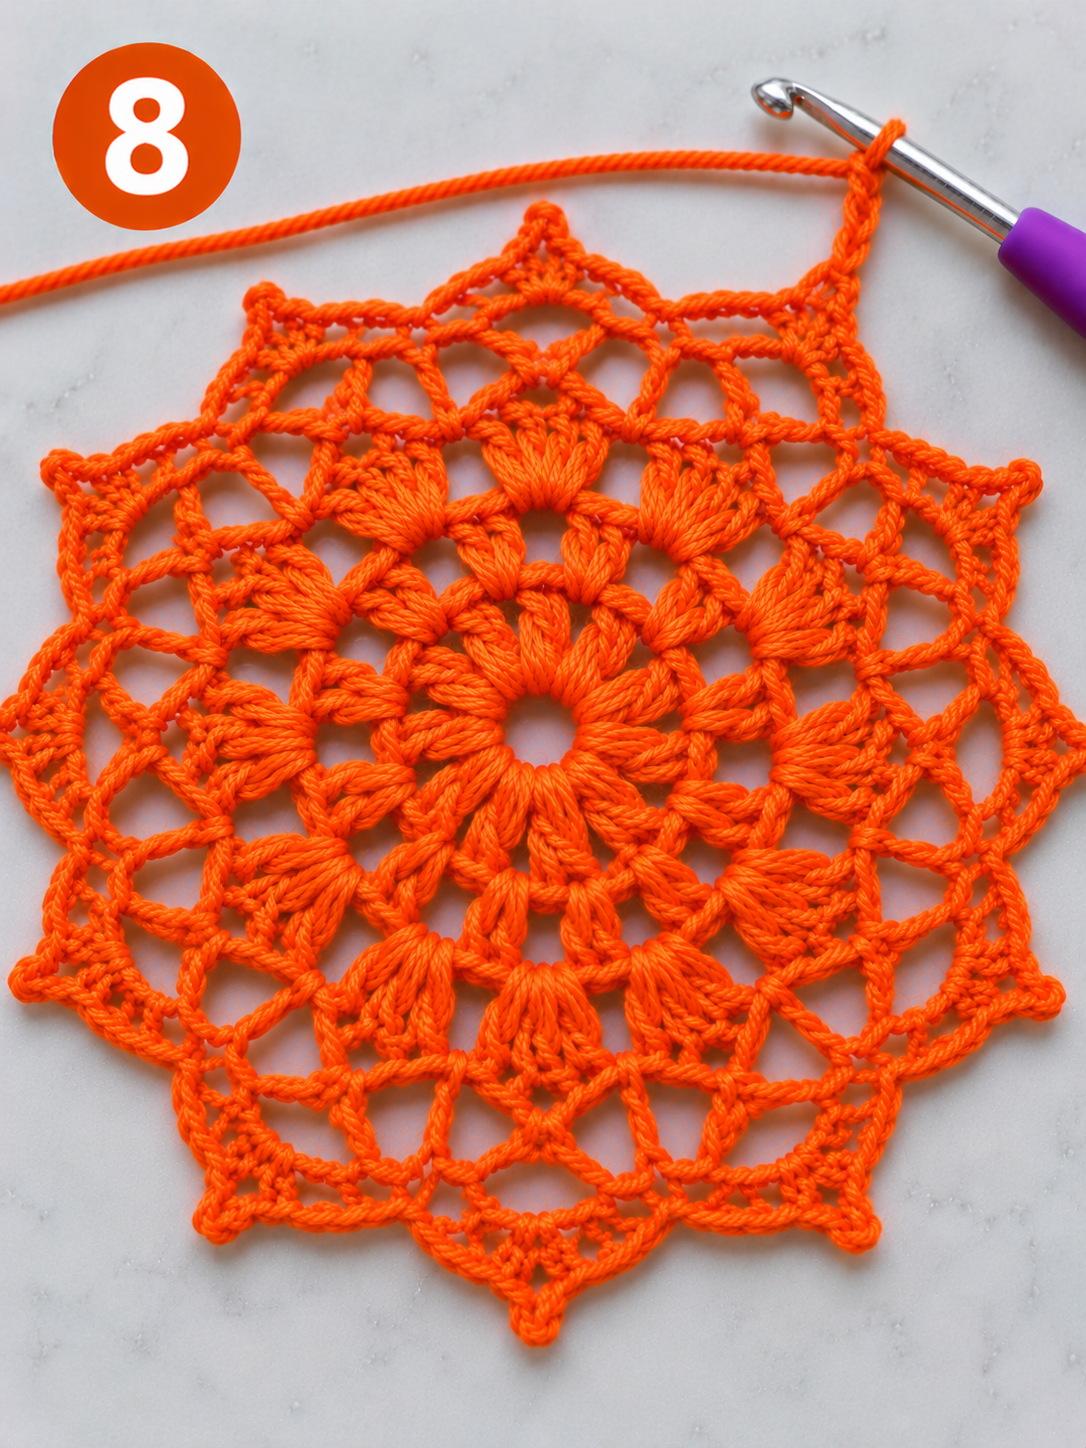
Weave in all your ends. Lightly dampen the doily, pin it into a flat circle with a pin at the center of each scallop, and let it dry completely.
Want it extra lacy? In Round 7, add a little picot (ch 3, sl st in the same st) on top of the middle dc of each scallop.
Creative Ways to Use Your Happy Haunting Doily
Once it’s done, don’t just leave it on the coffee table (although that’s a great spot). A few ideas:
- Under a candy bowl at the front door
- Beneath a jar candle or a small LED pumpkin on the mantel
- Stretched in an embroidery hoop as a wall hanging
- As a centerpiece base for a Halloween dinner party
- Tucked into a gift basket with cocoa and a spooky paperback
- Made in a smaller size as coasters for your fall drinks
And if you sell your makes, Halloween doilies are a lovely craft fair item. They’re light, easy to display, and people love buying something handmade for the season.
Common Questions
Is the Happy Haunting Doily really beginner-friendly?
Yes, as long as you’re comfortable with basic stitches. If you’ve never worked in the round, try a simple granny circle first to get the feel, then jump in.
How long does it take to make?
It depends on your yarn and speed. With worsted weight yarn, many crocheters finish a small doily in an evening or two. Thread takes longer but gives a finer, lacier look.
Can I make it bigger?
The easiest way is to go up in yarn weight and hook size. The stitch count stays the same; the doily just grows.
My doily is curling. What did I do wrong?
Probably nothing dramatic. Check your stitch counts first, then your tension. Blocking also solves a lot of minor curling.
Final Thoughts
Remember that plastic skeleton I keep almost buying? This year it’s staying on the shelf. Instead, I’ve got a little stack of doilies in orange, black and purple, each one made in front of a scary movie with a cup of tea going cold beside me.
That’s the real magic of the Happy Haunting Doily. It’s free, it’s easy, and it gives you something you’ll actually want to pull out every October. Halloween decorating doesn’t have to mean more clutter. Sometimes it just means one small, handmade thing that makes the whole room feel like the season.
Ready? Here’s everything you need.
Your Turn
Which colors are you going for: classic orange and black, witchy purple, or ghostly white? Drop a comment below and tell me. And if you make one, I’d genuinely love to see it. Share a photo, tag a friend who needs a new October project, and save this post to your Halloween crochet board so it’s waiting for you next year too.
Happy hooking, and happy haunting! 🎃