


I still remember the first bow I ever crocheted. It was lopsided, one loop was twice the size of the other, and I’d somehow used enough yarn to make a small scarf. That was eight frustrating attempts and about forty-five minutes ago. The bow I make now takes ninety seconds and looks like something off a boutique gift box.
The difference wasn’t talent. It was knowing the handful of tricks nobody tells you when you’re starting out the right chain count, the stitch that won’t eat your yarn stash, and the one folding technique that makes any bow look intentional instead of accidental.
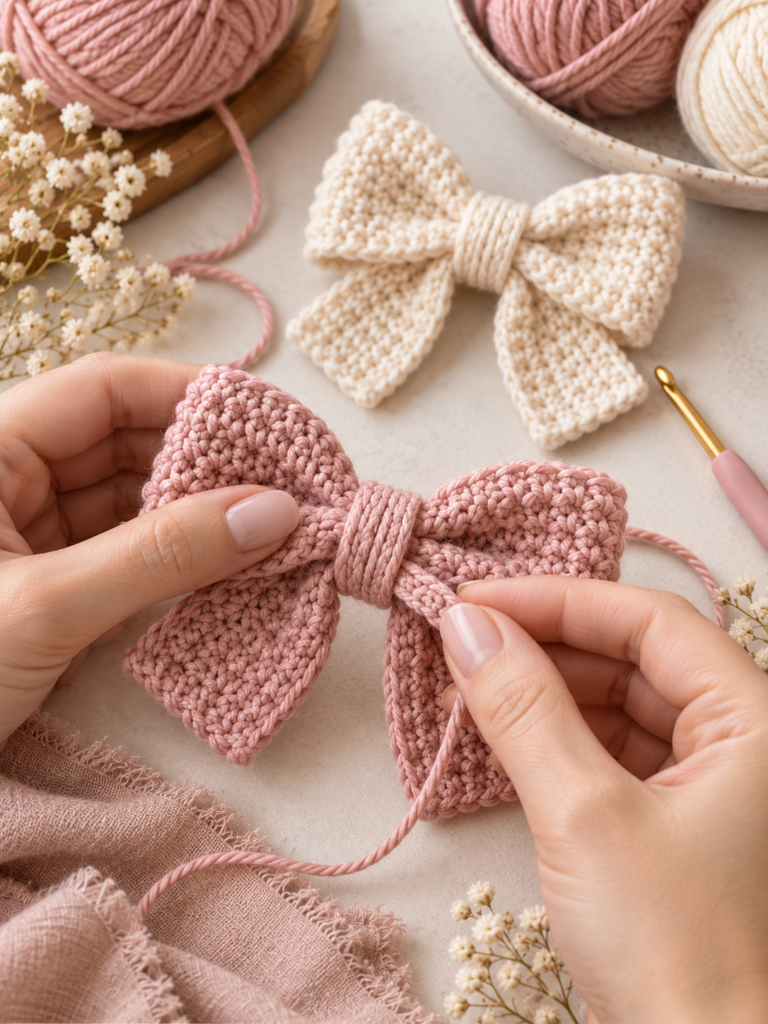
This guide walks through all of it: the fast finger-crochet method for when you need a bow right now, the full hook-and-yarn pattern with actual chain counts, where the good free patterns actually live online, and answers to the odder questions crocheters keep typing into Google at 11 p.m. yes, including whether this hobby is secretly good for your brain.
Table of Contents
Quick Answers Before We Dive In
- Fastest bow: No hook needed wrap yarn around your fingers, tie the center, done in under 2 minutes
- Standard crochet bow: Usually starts with a chain of 20-30 stitches depending on desired width
- Best stitch for beginners: Single crochet (sc) tight, controlled, hard to mess up
- Most yarn-efficient stitch: Single crochet or Moss/Linen stitch both use noticeably less yarn than fluffy stitches like the puff or popcorn
- Where to find free patterns: Ravelry, YouTube tutorials, and independent maker blogs beat generic pattern-mill sites almost every time
Now let’s get into the actual how.
Method 1: The No-Hook Emergency Bow (Under 2 Minutes)
Sometimes you don’t need a “pattern” at all you need a bow, and you needed it five minutes ago. This is the version I use for last-minute gift wrapping.
- Wrap the yarn. Loop yarn around four fingers about 15-20 times, depending on how full you want the bow.
- Slide it off carefully, keeping the loops together.
- Pinch the center and tie it tightly with a short separate strand of the same yarn.
- Fluff and separate the loops on each side into a fan shape.
- Trim the tails or leave them long enough to tie around a gift.
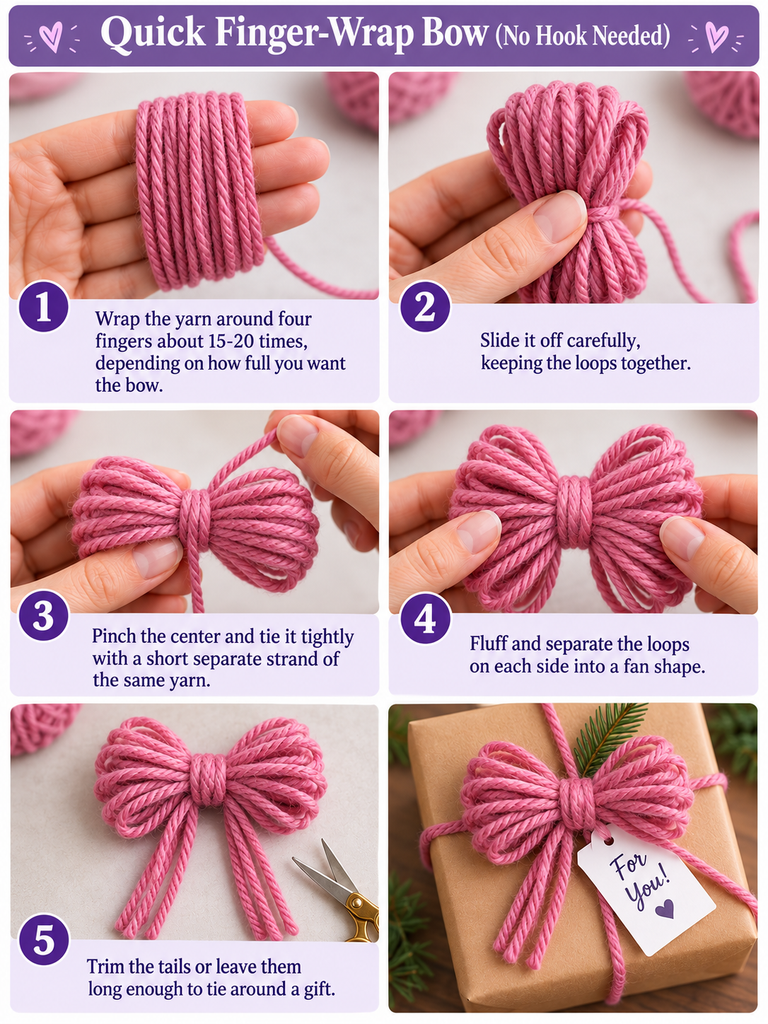
This is the answer to “how to make a fast bow” and “how to make a bow with just your fingers” in one move no hook, no chains, no stitch counting. It’s not technically crochet, but it’s the fastest bow in your arsenal, and it’s how most people get introduced to bow-making before they ever pick up a hook.
Method 2: The Simple One-Loop Crochet Bow
This is the bridge between finger-wrapping and a “real” crocheted piece a single loop, cinched in the middle, that reads as a proper bow.
What you’ll need: A hook one size smaller than your yarn’s recommended size (this keeps the stitches tight enough to hold their shape), and worsted weight yarn.
The pattern:
- Chain 4 and join with a slip stitch to form a ring.
- Chain 3 (counts as your first double crochet), then work 11 more double crochet stitches into the ring — 12 stitches total.
- Join with a slip stitch to the top of the starting chain.
- Fasten off, leaving a long tail.
- Flatten the resulting circle into a figure-eight shape by pinching the center from both sides.
- Use the long tail to wrap tightly around the pinched center 3-4 times, then secure with a knot and weave in the end.

That center wrap is what separates a professional-looking bow from a floppy circle of stitches — don’t skip it, and don’t be shy about wrapping tighter than feels natural.
Method 3: The Classic Chain-Count Bow (Most Requested Pattern)
This is the one most people are actually searching for when they ask “how do I crochet a bow step-by-step” a bow built from two rectangular strips rather than a single loop, which gives you more control over size and proportion.
Chain count guide by size:
| Bow Size | Starting Chain | Rows |
|---|---|---|
| Small (hair bow, ~2″) | Chain 10 | 4 rows |
| Medium (gift topper, ~3.5″) | Chain 20 | 6 rows |
| Large (statement bow, ~5″) | Chain 30 | 8 rows |
Steps for a medium bow:
- Chain 21 (20 stitches + 1 turning chain).
- Single crochet in the 2nd chain from hook and across 20 sc total.
- Chain 1, turn. Repeat for 6 rows total.
- Fasten off, leaving a long tail (at least 12 inches you’ll need it).
- Fold the rectangle so the two short ends meet in the middle, creating a bow shape.
- Pinch the center and wrap your long tail around it 4-5 times to cinch it into a bow.
- Secure with a few small stitches through the back, then weave in ends.
- Optional: crochet a small separate strip (chain 6, sc across for 1 row) to wrap around the center for a cleaner finish instead of visible yarn wraps.
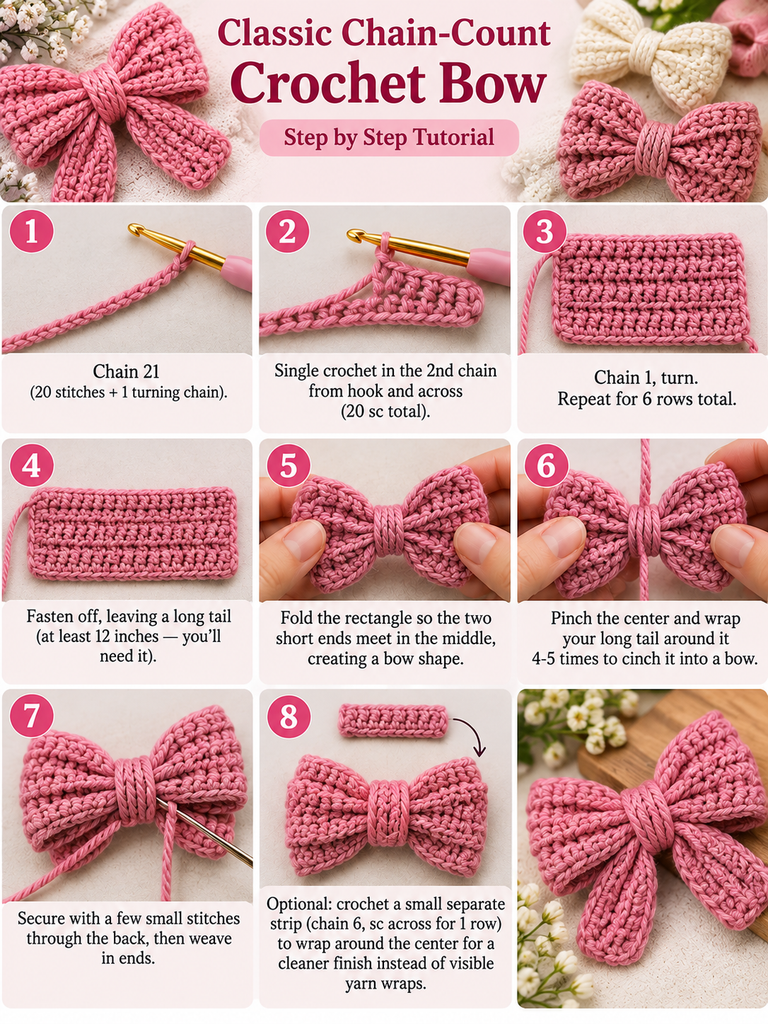
That last step the wrap-around center strip instead of raw yarn wrapping is the detail that separates amateur-looking bows from ones that look store-bought. Most tutorials skip it. Don’t.
Which Stitch Should You Actually Use?
This question comes up constantly, usually phrased as “what’s the prettiest crochet stitch” or “which stitch doesn’t eat yarn” and the honest answer is that those two goals often pull in opposite directions.
For yarn efficiency: Single crochet and linen stitch are your best friends. They’re dense, flat, and don’t have the airy loops that fancier stitches use to create texture which is exactly what makes them use less material per inch.
For visual impact (the “prettiest stitch” debate): This is genuinely subjective, but a few stitches dominate the conversation among experienced crocheters:
- Bavarian crochet layered, dimensional, almost floral in appearance
- Puff stitch soft, rounded texture that photographs beautifully
- Crocodile stitch scaled, textured look that’s become a favorite for statement pieces
The “hardest stitch in the world” debate: There’s no single official answer, but the stitches that consistently show up on “most difficult” lists are the Bruges lace stitch, Tunisian entrelac, and Bavarian crochet all of which require tracking multiple stitch types simultaneously and reading your work several rows back, not just the row you’re on.
And if you’ve stumbled across the term “drunken granny stitch” and wondered if you missed a memo it’s a playful, informal name for a granny square variation worked with deliberately mismatched or randomly rotated colors and angles, giving it a charmingly chaotic, “wobbly” look rather than the usual neat symmetry. It’s not a technical term you’ll find in stitch dictionaries, but it’s a real and popular style choice.
Where the Good Free Patterns Actually Are
A lot of “free crochet pattern” roundup articles just link to the same five generic sites over and over. Here’s what’s actually worth your time:
- Ravelry still the largest searchable pattern database, with genuine community reviews telling you which patterns actually work as written
- YouTube for bow patterns specifically, video tutorials outperform written ones because the folding and cinching steps are genuinely easier to see than to read
- Independent maker blogs often better-tested and more detailed than pattern-mill sites, though quality varies, so check for photos of the finished result before committing yarn to a pattern
- Pinterest not a source itself, but the best discovery tool for finding those independent blogs in the first place
One tip: search “[bow type] + written pattern” rather than just “[bow type] pattern” it filters out a surprising number of video-only results that don’t include the actual stitch counts you need.
The Questions Nobody Answers Properly
A few genuinely common questions get asked constantly but rarely get a straight answer.
Is crocheting an ADHD thing?
Anecdotally, yes many people with ADHD describe crochet as one of the few activities that keeps their hands occupied enough to let their mind focus, similar to how some people need background noise to concentrate. There’s growing occupational-therapy interest in repetitive, rhythmic hand crafts as a regulation tool, but it’s worth being clear that this is emerging, informal territory rather than settled clinical science.
Does crocheting reduce dementia risk?
Some cognitive research has linked engaging, skill-based hobbies (crochet among them) to better cognitive engagement in aging populations, largely because it combines fine motor coordination, pattern-following, and sustained attention. It’s not a guaranteed prevention method, but “use it or lose it” thinking around the brain does apply here in a general sense.
What’s a person who crochets called?
Simply a “crocheter.” There’s no fancier official title, despite what internet lists sometimes claim.
Which country crochets the most?
There’s no single authoritative global dataset tracking this, so treat any confident-sounding ranking with skepticism. What’s better documented is that crochet has deep historical roots across Europe and South America, with Peru in particular known for a strong traditional crochet culture, while the U.S. and U.K. currently dominate the largest online crochet communities (Ravelry, Instagram, TikTok).
What’s trending in crochet going into 2026?
Based on current pattern-community momentum: oversized, exaggerated bows (as accessories and gift toppers, not just hair pieces), textured “granny” revival pieces with intentionally mismatched color palettes, and a broader shift toward quick, low-commitment projects bows being a perfect example as an antidote to burnout from massive multi-week projects.
Bringing It All Together
The truth about crochet bows is that there isn’t one “correct” pattern there’s a spectrum from the 90-second finger-wrap version to the fully engineered, double-strip, hidden-wrap-center bow that takes real technique. Most people don’t need to master all of it. They need the right method for what they’re actually making: a gift topper, a hair accessory, or a decorative embellishment on a bigger project.
If you take one thing from this guide, let it be the center-wrap trick cinching your bow with a separate crocheted strip instead of raw yarn. It’s the single detail that makes a homemade bow look intentional rather than improvised, and almost no tutorial mentions it.
Now it’s your turn: pick up a hook, chain 21, and make your first bow this week. Tag it, share it, or just admire it sitting on your desk either way, you’ll never go back to store-bought gift toppers again.



One Comment