

The first granny square I ever made looked less like a square and more like a lopsided pillow that had given up on life. One corner bulged, another curled, and somewhere in round three I’d lost count completely. I almost put the hook down for good.
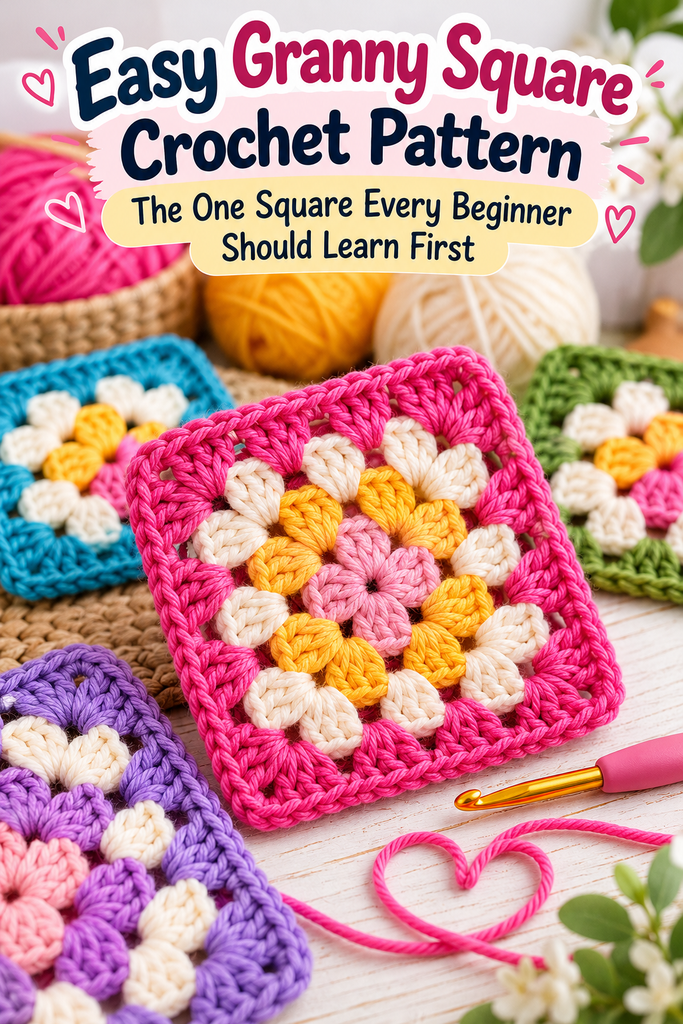
I’m glad I didn’t. Because once the granny square “clicks,” it opens up an entire world: blankets, bags, cardigans, pillow covers, coasters, even those patchwork tops you keep seeing everywhere. It’s the building block of crochet, and honestly, it’s one of the most satisfying things you can make in under an hour.
So let’s do this together. Below you’ll find a truly easy granny square crochet pattern, written in plain language, with the little tricks I wish someone had told me before that first sad pillow-square.
Table of Contents
Key Takeaways
- The classic granny square uses just three stitches: chain, slip stitch, and double crochet.
- Every round follows the same rhythm: clusters of 3 double crochets along the sides and (3 dc, ch 2, 3 dc) in each corner.
- Worsted weight yarn and a 5 mm (H-8) hook are the most forgiving combo for beginners.
- Most “wonky square” problems come from tension, skipped corner chains, or working into the wrong space.
- Once you’ve made one, you can make a blanket. It’s the same square, just more of them.
Why the Granny Square Is Still Worth Learning
Here’s the thing about granny squares: they’re small. That sounds obvious, but it’s the secret to why they work so well for beginners. You aren’t committing to a giant project and hoping it turns out. You make one little square, see your progress immediately, and if it’s a bit off, you just make another.
They’re also wonderfully portable. A ball of yarn, a hook, and a pair of scissors fit in any bag. I’ve made squares on trains, in waiting rooms, and during more than one long family dinner (no regrets).
And they’re a brilliant way to use up leftover yarn. Those half-balls sitting in a drawer? They’re future granny squares waiting to happen.
What You’ll Need
You don’t need anything fancy. In fact, keeping it simple is the best thing you can do for your first few squares.
- Yarn: Worsted weight (category #4). Choose a smooth, light-colored yarn so you can actually see your stitches. Dark or fuzzy yarn makes beginners’ lives much harder.
- Hook: 5 mm (US H-8), or whatever your yarn label recommends.
- Scissors
- Tapestry needle for weaving in ends
- Optional: a stitch marker to mark the start of your round
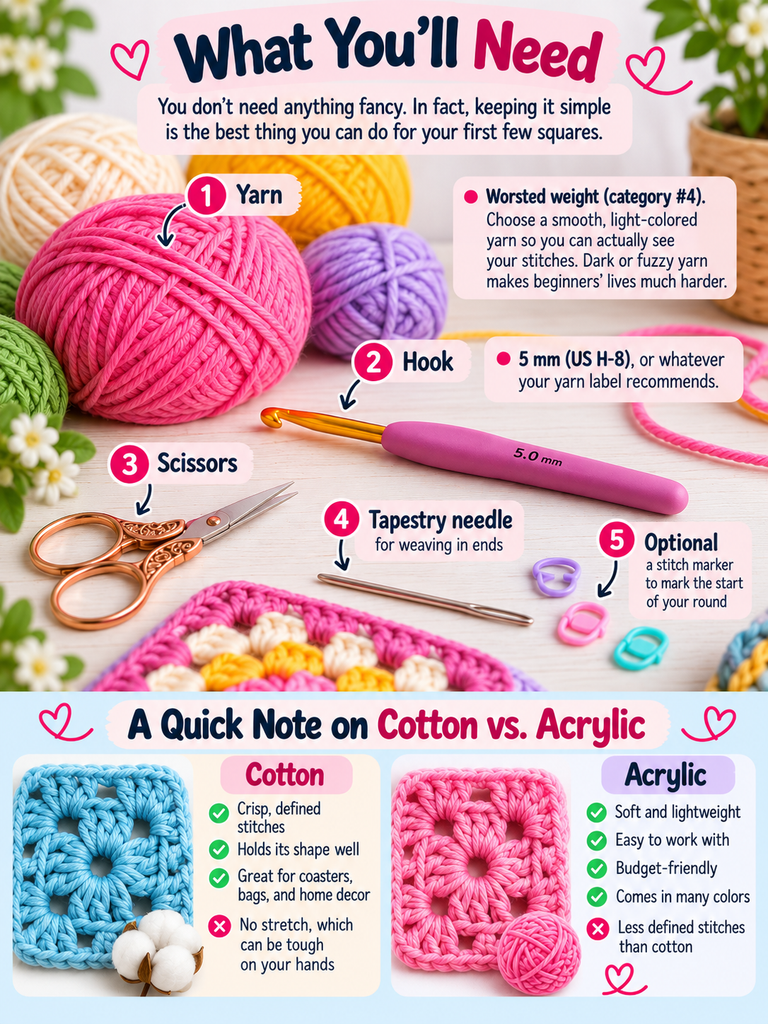
A quick note on cotton versus acrylic: cotton gives crisp, defined stitches but has no stretch, which can be tough on your hands. Acrylic is softer to work with and more forgiving while you’re learning. Start with acrylic, then experiment later.
Abbreviations (US Terms)
This pattern uses US crochet terms. If you learned with UK terms, just remember that a US double crochet is a UK treble crochet.
- ch – chain
- sl st – slip stitch
- dc – double crochet (UK: treble, tr)
- sp – space
- ch-2 sp – the gap created by 2 chains (your corners)
- ch-1 sp – the gap created by 1 chain (between side clusters)
Understanding the Granny Square Before You Start
Before we jump into the steps, let me explain the “why” behind the pattern. Trust me, this makes everything easier.
A granny square is built from clusters: groups of 3 double crochets worked together into the same space. You never work into the tops of individual stitches. Instead, you always work into the gaps between clusters.
There are only two kinds of gaps:
- Corner gaps (ch-2 spaces): each one gets two clusters, separated by 2 chains. This is what turns the corner.
- Side gaps (ch-1 spaces): each one gets one cluster.
That’s genuinely the whole pattern. Every new round just adds one more cluster to each side. Once you see that, you’ll never need to read the instructions again.
The Easy Granny Square Pattern, Round by Round
Round 1: The Center
Make a magic ring (or ch 4 and sl st to the first ch to form a ring).
Ch 3 (this counts as your first dc). Work 2 dc into the ring. You now have your first cluster.
Ch 2. *Work 3 dc into the ring, ch 2.* Repeat from * two more times.
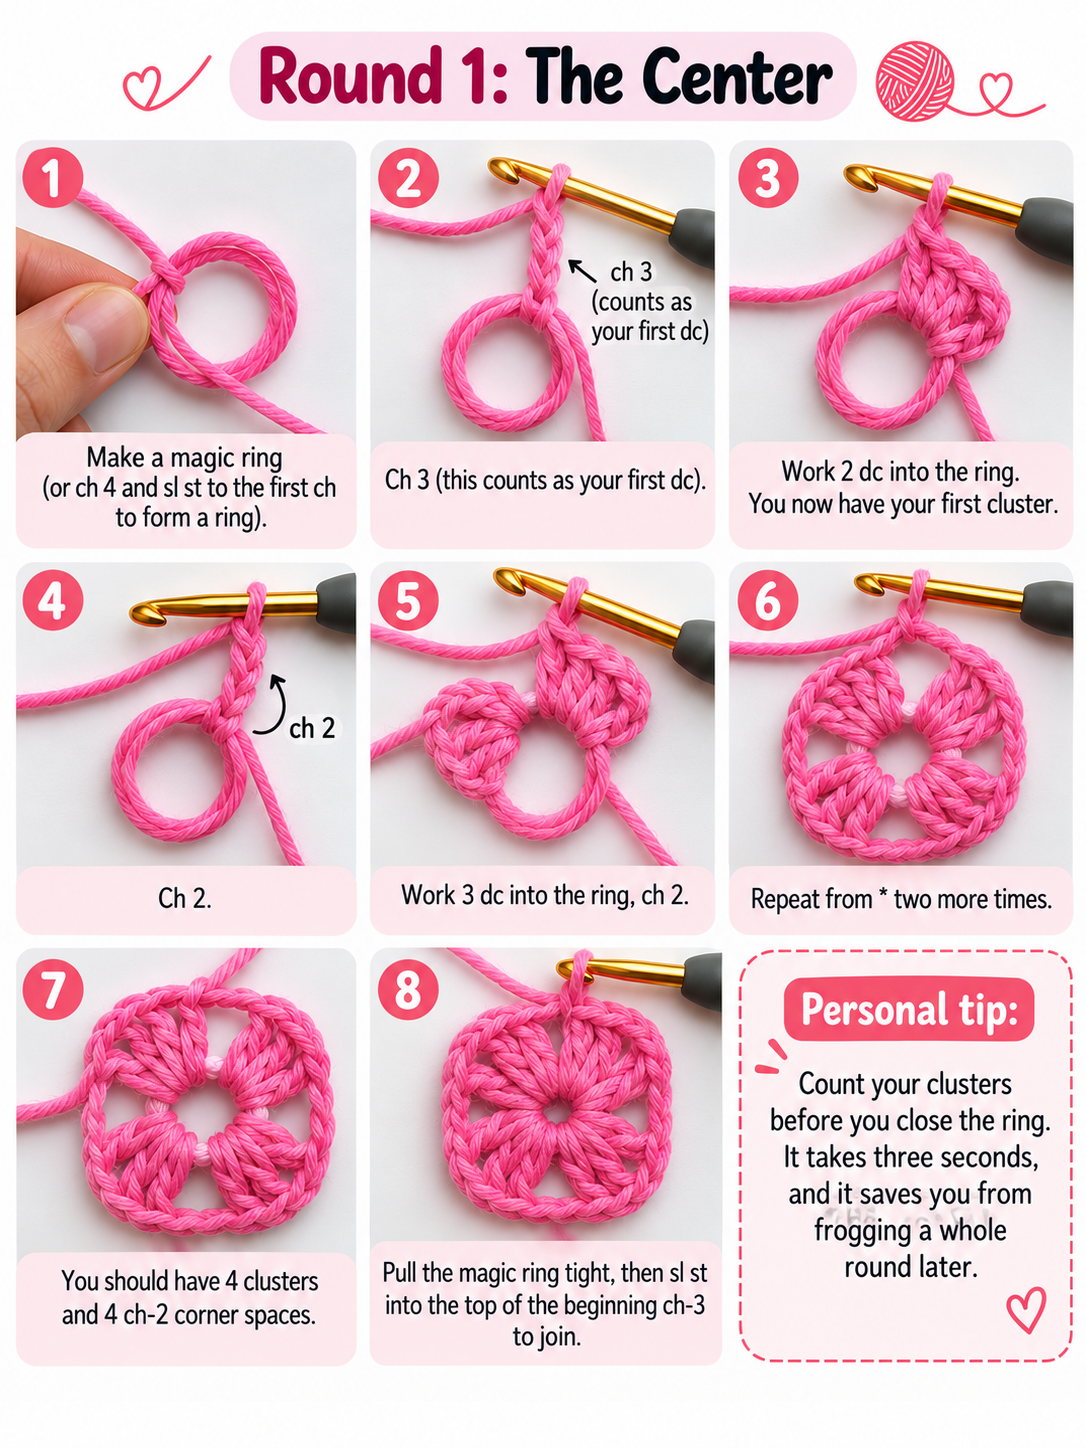
You should have 4 clusters and 4 ch-2 corner spaces. Pull the magic ring tight, then sl st into the top of the beginning ch-3 to join.
Personal tip: Count your clusters before you close the ring. It takes three seconds, and it saves you from frogging a whole round later.
Round 2: Building Your First Corners
Sl st into the next 2 dc and into the first ch-2 corner space. This moves your hook to the corner without breaking the yarn.
Ch 3 (counts as dc), then work 2 dc, ch 2, 3 dc all into that same corner space. That’s your first corner.
Ch 1. *In the next ch-2 corner space, work (3 dc, ch 2, 3 dc). Ch 1.* Repeat from * two more times.
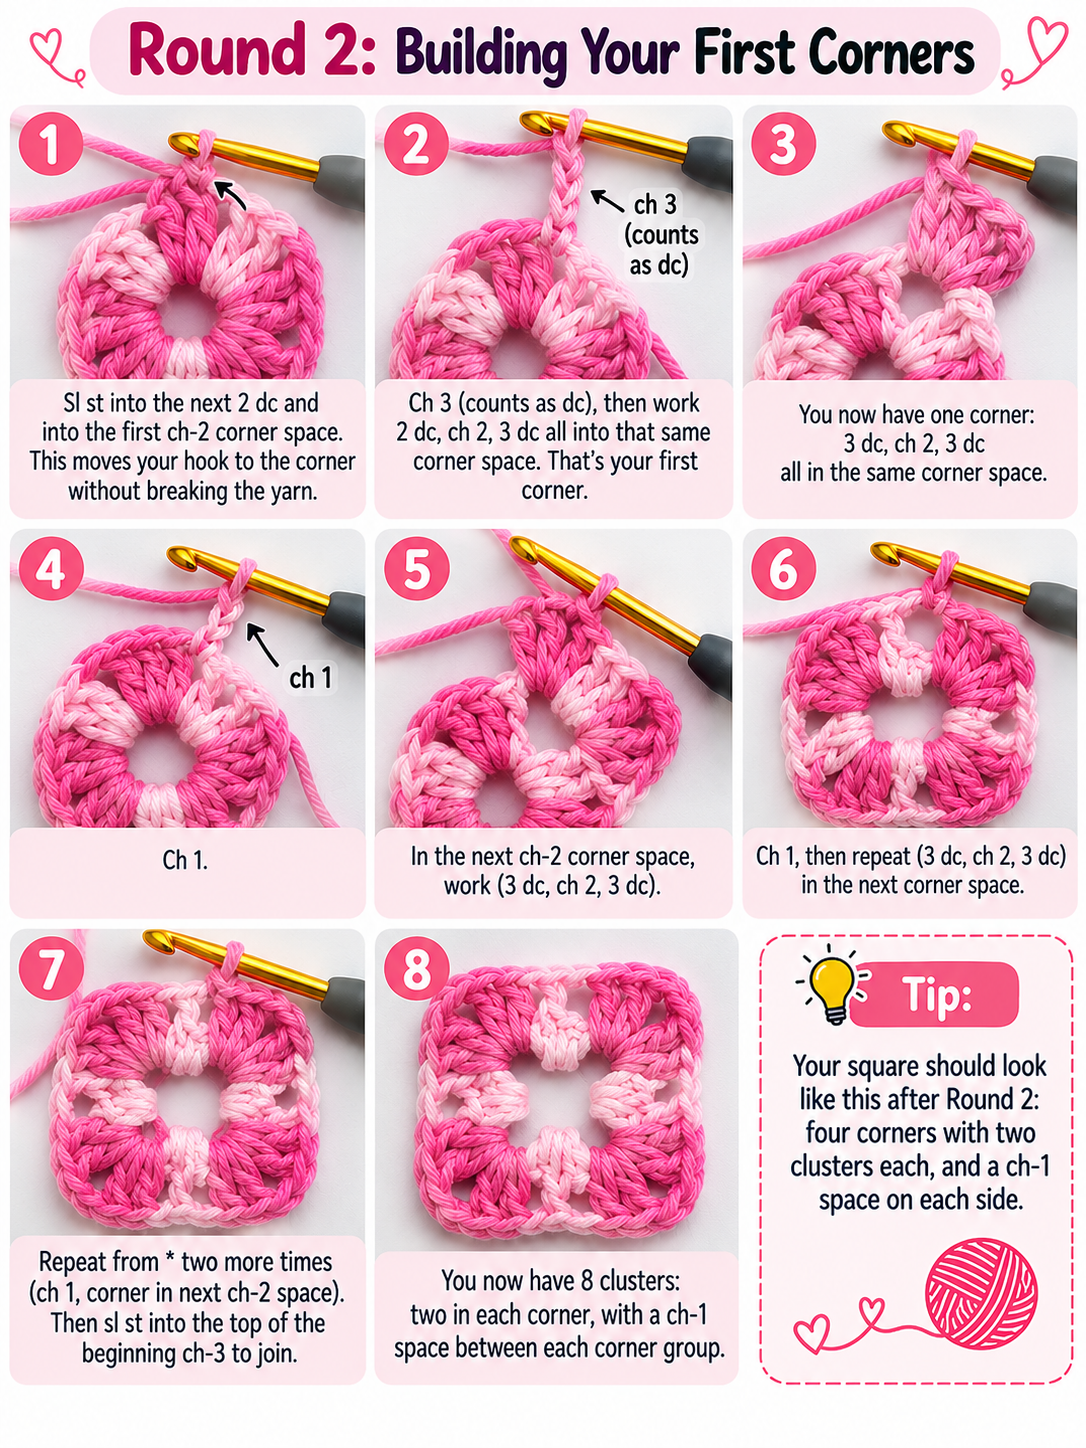
Sl st into the top of the beginning ch-3 to join.
You now have 8 clusters: two in each corner, with a ch-1 space between each corner group.
Round 3: Adding the Sides
Sl st into the next 2 dc and into the ch-2 corner space.
Ch 3, then (2 dc, ch 2, 3 dc) in the same corner space. Ch 1.
Work 3 dc into the next ch-1 side space. Ch 1.

*In the next corner space, work (3 dc, ch 2, 3 dc). Ch 1. Work 3 dc into the next ch-1 space. Ch 1.* Repeat from * two more times.
Sl st into the top of the beginning ch-3 to join. You now have 3 clusters per side (counting the corner clusters).
Round 4 and Beyond: Repeat the Rhythm
From here on, every round follows the exact same logic:
- Every corner space gets (3 dc, ch 2, 3 dc).
- Every side space gets 3 dc.
- Always ch 1 between groups along the sides.

Each round adds one more cluster to every side. Keep going until your square is the size you want. Four rounds is a classic size for blankets; six to eight rounds makes a lovely standalone coaster or pillow front.
When you’re done, cut the yarn, leaving a 6-inch tail, and pull it through the last loop to fasten off.
How to Change Colors (Without the Mess)
Let’s be honest: the colors are half the fun. That patchwork, retro look comes from switching yarn every round or two.
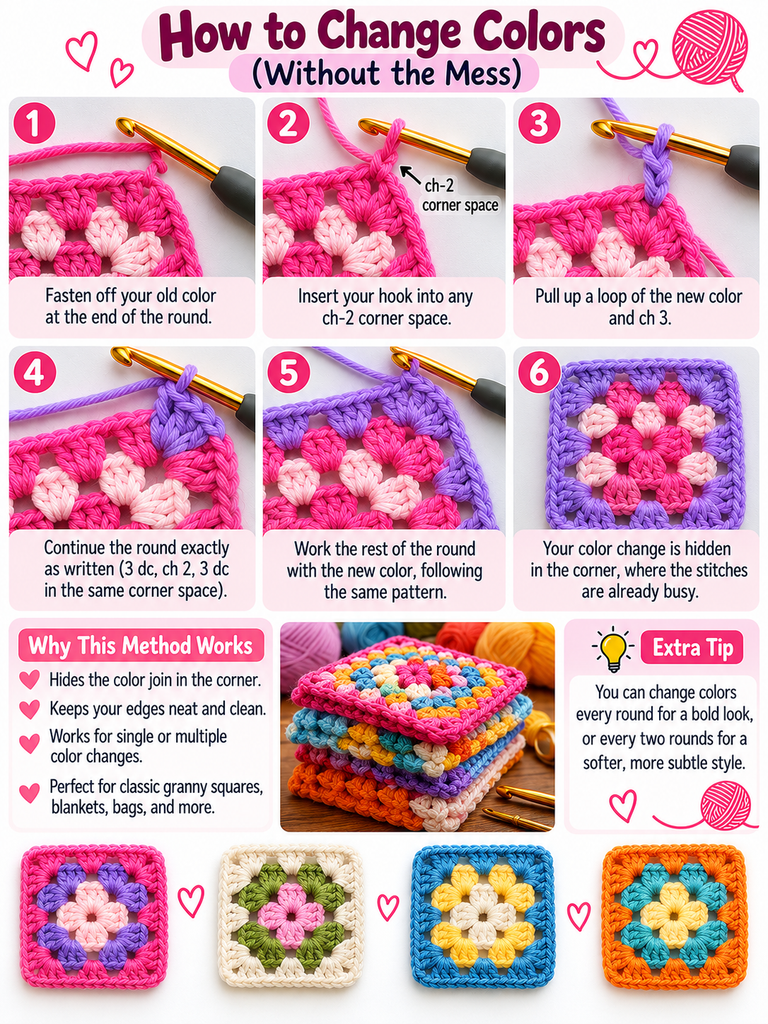
The neatest method I’ve found is to start each new color in a corner space, not at the old joining spot:
- Fasten off your old color at the end of the round.
- Insert your hook into any ch-2 corner space.
- Pull up a loop of the new color and ch 3.
- Continue the round exactly as written above.
This hides your color join in the corner, where the stitches are already busy, so it practically disappears. Bonus: you can work over the yarn tails as you go, which means fewer ends to weave in later. Future you will be very grateful.
Common Granny Square Problems (and How to Fix Them)
You might be wondering why your square doesn’t look like the photos. Don’t worry. Every crocheter has been here, and the fixes are usually simple.
“My square is curling or cupping.” Your tension is probably too tight, or your corner chains are too short. Try going up a hook size, or make your ch-2 corners a little looser.
“My square is ruffling or wavy.” The opposite problem. You may have added an extra cluster somewhere. Count clusters per side after each round; they should all match.
“My square is twisting into a spiral.” This is the famous granny square slant, and it’s completely normal. It happens because you’re always working in the same direction. To fix it, simply turn your work over at the end of each round and crochet the next round from the back. Blocking also helps a lot.
“My corners look rounded, not sharp.” Double-check that you’re working ch 2 (not ch 1) in every corner. Some crocheters even use ch 3 for crisper corners. Experiment and see what you like.
Blocking: The Step Beginners Skip (Please Don’t)
Blocking sounds intimidating, but it just means gently shaping your finished square with moisture. It’s the difference between “homemade” and “handmade,” if you know what I mean.
For acrylic yarn, pin the square flat to a foam mat or towel and hold a steam iron just above it (don’t press it down). For cotton or wool, lightly spray it with water, pin it into shape, and let it dry completely.
Suddenly your slightly crooked square becomes crisp and even. It’s honestly a little magical.
What Can You Make With Granny Squares?
Once you have a pile of squares, the fun really begins. Here are a few ideas, from easiest to most ambitious:
- Coasters: one square of cotton yarn, about four rounds. Perfect first project.
- Pillow cover: two large squares sewn together, or four small ones per side.
- Tote bag: a handful of squares joined into a rectangle, with a crocheted strap.
- Scarf: a single row of squares joined end to end.
- Blanket: the classic. Make squares while you watch TV, and before you know it you’ll have enough.
- Cardigan or vest: the trendy option, and a great goal once you’re comfortable.
To join squares, you can sew them together with a whip stitch, or slip stitch them together through the back loops for a neat ridge. Both work well. It’s really about the look you prefer.
Frequently Asked Questions
How long does it take to make one granny square?
Your first one might take an hour while you get used to the rhythm. With a little practice, a four-round square usually takes 15 to 25 minutes.
Can I use any yarn for granny squares?
Yes, but worsted weight is the easiest to learn with. Just keep the same yarn weight within one project so your squares come out the same size.
Does the beginning ch 3 count as a stitch?
In this pattern, yes. It counts as the first dc of the round, which is why you only work 2 more dc to complete the first cluster.
How many squares do I need for a blanket?
It depends on your square size and the blanket size you want. Measure one finished, blocked square, then divide your target blanket width and length by that measurement to get the number of squares per row and column.
Final Thoughts: One Square Is All It Takes
Remember my lopsided pillow-square? I still have it. It sits in my yarn basket as a reminder that every crocheter starts somewhere, and the gap between “this is a disaster” and “wait, I actually made this” is usually just a few more squares.
The granny square isn’t just a beginner pattern. It’s a skill you’ll come back to for years, because it’s simple, flexible, and endlessly creative. Master these few rounds, and you’ve learned the foundation for hundreds of projects.
So grab some yarn, pick a color that makes you happy, and make your first square today. Don’t aim for perfect. Aim for finished.
Now I’d love to hear from you: what’s the first thing you want to make with your granny squares? A blanket, a bag, something completely unexpected? Share your plans (or a photo of your very first square, wonky corners and all) in the comments below. And if this pattern helped you, pass it along to a friend who’s been wanting to learn crochet.



One Comment