Tropical Beach Nail Art Inspiration

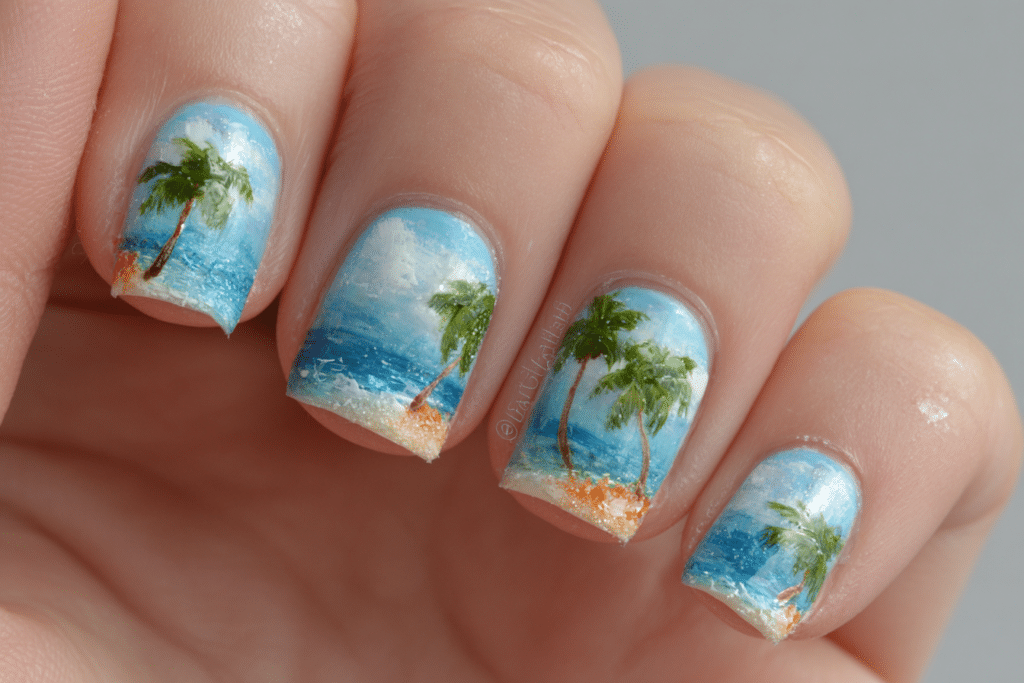
Tropical Beach Nail Art Inspiration captures the essence of paradise with vibrant colors, palm trees, ocean waves, and sandy shores on your nails.
This popular nail art style combines bright gel polishes with creative designs that evoke vacation vibes year-round. Professional nail artists and beginners alike can master these techniques to create stunning beach-themed manicures that showcase summer aesthetics and tropical beauty.
| Topic | Details |
|---|---|
| Category | Nail Art |
| Skill Level | Intermediate |
| Time Needed | 90-120 minutes |
| Tools Needed | UV/LED lamp, gel polishes, nail art brushes, dotting tools |
| Best For | Summer events, vacation manicures, tropical themed occasions |
Table of Contents
Why This Nail Technique Works
Tropical beach nail art works exceptionally well because gel polish provides the vibrant color saturation needed for realistic beach scenes. The curing process locks in detailed designs, ensuring palm trees, waves, and sunset gradients remain crisp and defined. Unlike regular nail polish, gel formulas maintain their glossy finish for weeks, making intricate tropical designs practical for extended wear. The layering capability of gel polish allows nail artists to create dimensional effects that mimic ocean depth and sandy textures authentically.
The popularity of beach-themed nail art stems from its versatility and emotional connection to relaxation and escape. Tropical designs translate beautifully across different nail shapes and lengths, from short natural nails to extended stiletto tips. The color palette naturally complements various skin tones, with turquoise blues, coral pinks, and golden yellows offering universal appeal. Professional nail technicians favor this style because it showcases technical skills while delivering visually striking results that clients photograph and share widely on social media platforms.
Beach nail art also works because it allows for creative freedom within a cohesive theme. You can combine multiple techniques like ombre gradients, stamping, hand-painting, and embellishments while maintaining thematic consistency. The tropical aesthetic accommodates both maximalist designs with multiple elements per nail and minimalist approaches featuring single accent nails. This adaptability makes the style suitable for beginners practicing basic techniques and advanced artists pushing creative boundaries with complex compositions.
Tools and Products Needed
| Product | Purpose | Alternatives |
|---|---|---|
| UV/LED Lamp | Cures gel polish layers properly | 48W LED lamp or higher wattage |
| Base Coat | Protects natural nail and ensures adhesion | Rubber base for flexibility |
| Gel Polish Set | Bright tropical colors (blue, turquoise, coral, yellow, white) | Individual color bottles |
| Detail Brushes | Creates fine lines for palm trees and waves | Striping brushes or liner brushes |
| Dotting Tools | Makes palm tree coconuts and texture details | Bobby pins or toothpicks |
| Nail File | Shapes nails and refines edges | 180 grit glass file |
| Nail Buffer | Smooths nail surface for even application | 240 grit buffer block |
| Cuticle Oil | Maintains nail health during wear | Jojoba or vitamin E oil |
| Top Coat | Seals design and adds shine | No-wipe glossy top coat |
| Nail Cleanser | Removes sticky layer between coats | Isopropyl alcohol 91% |
For quality gel nail products and professional tools, visit Gel Nails by Lina to explore curated collections designed for both beginners and experienced nail artists.
Step-by-Step Application Guide
Nail Preparation
- Remove any existing nail polish using acetone and cotton pads completely.
- Push back cuticles gently using a wooden cuticle pusher or metal tool.
- File nails to your desired shape, maintaining consistent length across all fingers.
- Buff the nail surface lightly to remove shine and create texture for adhesion.
- Clean nails thoroughly with nail cleanser to remove oils and dust particles.
- Apply dehydrator or pH balance solution to ensure maximum gel polish adhesion.
Base Coat Application
- Apply a thin layer of base coat, avoiding the cuticle area by one millimeter.
- Cap the free edge by running the brush along the nail tip.
- Cure under UV/LED lamp according to manufacturer specifications, typically 30-60 seconds.
- Check that the base coat has cured completely with no tacky spots remaining.
Gel Polish Layers
- Select your tropical beach base colors, such as turquoise for ocean or beige for sand.
- Apply the first thin layer of colored gel polish in smooth, even strokes.
- Cure the first color layer completely under the lamp for recommended time.
- Apply a second thin coat for opacity and vibrant color payoff.
- Cure the second layer thoroughly before proceeding to nail art details.
- Create ombre effects by blending two colors with a sponge technique if desired.
Creating Beach Nail Art Designs
- Paint ocean waves using white gel polish with a detail brush in curved motions.
- Add palm tree trunks using brown gel polish and a thin liner brush.
- Create palm fronds by painting thin lines extending from the tree trunk.
- Dot small coconuts at the tree crown using a dotting tool and brown polish.
- Paint sandy beaches using beige or tan gel polish along the nail base.
- Add sunset gradients by blending orange, pink, and yellow gel polishes together.
- Create seagulls using black or gray polish in simple V-shaped strokes.
- Cure each detailed layer for 30 seconds to prevent smudging between elements.
Curing Process
- Ensure all nail art elements are completely cured before adding protective layers.
- Check that intricate details have hardened properly by gently touching the surface.
- Avoid over-curing, which can cause gel polish to become brittle or discolored.
- Position hands correctly in the lamp to ensure even exposure across all nails.
Finishing and Top Coat
- Apply a generous layer of glossy top coat over the entire nail design.
- Cap the free edge thoroughly to seal the design and prevent chipping.
- Cure the top coat for the full recommended time, usually 60 seconds or more.
- Wipe away any sticky residue using nail cleanser and a lint-free wipe.
- Apply cuticle oil around the nail edges to hydrate and complete the manicure.
- Massage the cuticle oil into the skin for optimal absorption and nail health.
For additional tutorials and technique demonstrations, explore the resources available at Gel Nails by Lina for comprehensive nail art education.
Pro Nail Technician Tips
- Keep gel polish layers thin to prevent lifting and ensure proper curing throughout the design. Multiple thin coats create better adhesion than single thick applications that may remain soft underneath the surface.
- Seal the free edge with every single layer of polish, including base coat, color, and top coat. This professional technique prevents premature chipping and extends the tropical beach nail art longevity significantly.
- Use a cleanup brush dipped in acetone to perfect the cuticle line before curing each layer. This creates crisp, professional edges that make tropical designs appear salon-quality and polished throughout the wear period.
- Allow gel polish bottles to reach room temperature before application to ensure smooth consistency. Cold polish applies unevenly and may not cure properly, compromising the intricate details in beach nail art designs.
- Cure each nail art element separately when layering multiple colors or techniques. This prevents colors from bleeding into each other and maintains the distinct boundaries necessary for realistic tropical scenes.
- Store tropical colored gel polishes away from direct sunlight to prevent pigment degradation. Vibrant blues and corals can fade when exposed to UV light outside the lamp, affecting color consistency in future applications.
Common Gel Nail Mistakes
| Mistake | Why it Happens | How to Fix |
|---|---|---|
| Thick Gel Layers | Applying too much product at once for faster coverage | Apply multiple thin coats instead of one thick layer for proper curing |
| Improper Curing | Insufficient lamp wattage or incorrect timing | Use 48W LED lamp minimum and follow exact cure times per product |
| Skipping Nail Prep | Rushing through initial steps to save time | Always buff, cleanse, and dehydrate nails before base coat application |
| Flooding the Cuticle | Applying polish too close to the skin | Leave 1mm gap from cuticle and use cleanup brush for precision |
| Smudged Nail Art | Touching designs before complete curing | Cure each layer fully and test edges before proceeding to next step |
Tropical Beach Nail Art Design Variations
| Style | Description | Best Occasion |
|---|---|---|
| Sunset Palm Trees | Ombre gradient background with silhouette palm trees in black | Summer evenings, beach weddings, vacation |
| Ocean Waves | Turquoise base with white foam waves and glitter accents | Pool parties, cruise vacations, coastal events |
| Tropical Fruits | Pineapples, watermelons, and coconuts on bright backgrounds | Tropical parties, summer festivals, casual wear |
| Flamingo Accents | Pink flamingo silhouettes on pastel or white bases | Bachelorette parties, spring break, resort wear |
| Seashell Details | Hand-painted shells, starfish, and coral on sandy tones | Beach weddings, coastal vacations, summer formals |
| Minimalist Beach | Single accent nail with simple wave or palm tree design | Professional settings, everyday wear, subtle style |
| Tropical Flowers | Hibiscus, plumeria, and tropical blooms in vibrant colors | Hawaiian themed events, garden parties, destination weddings |
Nail Care and Maintenance for Beach Nail Art
Maintaining tropical beach nail art requires consistent care to preserve the vibrant colors and intricate details throughout the wear period. Apply cuticle oil twice daily, especially after washing hands or exposure to water, which can dry out the nail area. The oil creates a protective barrier that prevents lifting and keeps the skin around the nails hydrated and healthy. This simple step significantly extends the life of detailed nail art designs and maintains the glossy appearance of the top coat.
Avoid using your nails as tools to open cans, scrape surfaces, or pick at objects, which creates stress on the gel polish layers. Wear protective gloves when cleaning with harsh chemicals or doing dishes for extended periods. The chemicals in household cleaners can break down gel polish bonds and cause premature chipping or dulling of tropical colors. Proper protection maintains the integrity of beach nail art and prevents unnecessary damage to both the design and natural nails underneath.
Keep nails at a manageable length to reduce the risk of catching and breaking, which often occurs with longer nail art designs. If a nail chips or lifts at the edge, address it immediately by applying a thin layer of top coat to seal the area temporarily. Schedule regular fill appointments every two to three weeks if wearing extended nail art to maintain appearance. For more detailed maintenance guidance, visit Gel Nails by Lina for professional care recommendations.
How to Remove Gel Nails Safely
Safe gel nail removal protects your natural nails from damage while preserving nail health for future manicures. Begin by gently filing the shiny top coat layer with a 180-grit file to break the seal, which allows acetone to penetrate the gel layers effectively. Soak cotton pads in pure acetone and place them directly on each nail, ensuring complete coverage of the gel polish surface. Wrap each fingertip tightly with aluminum foil to hold the cotton in place and prevent acetone evaporation during the soaking process.
Allow nails to soak for 10 to 15 minutes, checking periodically to see if the gel has softened sufficiently. The gel polish should appear lifted and bubbled when ready for removal. Gently push the softened gel off the nail using a wooden cuticle pusher, working from the cuticle toward the free edge. Never force or pry gel polish off, as this removes layers of your natural nail and causes significant damage. If gel remains stubborn, rewrap and soak for an additional five minutes rather than scraping aggressively.
Nail Health and Safety
Maintaining nail health while wearing tropical beach nail art requires attention to proper application and removal techniques. Over-filing the nail surface during preparation removes too many layers of the natural nail plate, causing weakness and sensitivity. Always use light pressure when buffing and stop once the shine is removed. Excessive filing creates a rough, damaged surface that may lead to peeling and breakage even after the gel polish is removed completely.
Watch for signs of infection or allergic reactions, including redness, swelling, pain, or unusual discharge around the nail bed. Some individuals develop sensitivities to gel polish ingredients, particularly uncured gel that touches the skin. Always ensure proper curing times and avoid contact between uncured gel and surrounding skin. If you notice persistent irritation, discontinue gel nail applications and consult a dermatologist for professional evaluation and treatment recommendations.
Frequently Asked Questions
How long do gel nails last?
Gel nails typically last two to three weeks with proper application and care. The longevity depends on factors like nail preparation quality, daily activities, and maintenance routines. Tropical beach nail art may require touch-ups around day 14 if intricate details begin showing wear. Applying cuticle oil daily and avoiding harsh chemicals helps extend the wear time significantly.
How to remove gel nails safely at home?
Safe gel nail removal requires soaking nails in pure acetone for 10 to 15 minutes after filing the top coat. Wrap each nail with acetone-soaked cotton and aluminum foil to maximize penetration and effectiveness. Gently push softened gel off using a wooden tool, never forcing or peeling it away. Follow with intensive moisturizing to counteract acetone’s drying effects on nails and surrounding skin.
What is the difference between gel nails and acrylic nails?
Gel nails cure under UV or LED light and offer a more flexible, natural appearance than acrylic nails. Acrylics use a liquid monomer and powder polymer that air-dry into a harder, more durable enhancement. Gel polish typically causes less damage during removal and emits fewer strong odors during application. Tropical beach nail art works beautifully with both systems, though gel polish provides more vibrant color options.
Why do my gel nails peel or lift?
Gel nails peel or lift due to inadequate nail preparation, moisture exposure, or oil on the nail surface before application. Skipping the dehydration step leaves natural oils that prevent proper adhesion between layers. Thick gel polish layers may not cure completely, causing separation from the nail bed. Always buff nails, cleanse thoroughly, and apply thin coats to prevent lifting issues.
How can I make my gel nails last longer?
Make gel nails last longer by applying cuticle oil twice daily and wearing gloves during household chores. Avoid prolonged water exposure, which softens the gel and weakens adhesion over time. Keep nails at a moderate length to reduce stress and breaking potential. Proper preparation, including thorough buffing and dehydration, creates the foundation for extended wear and prevents premature chipping.
Conclusion
Tropical Beach Nail Art Inspiration offers endless creative possibilities for expressing summer vibes and vacation aesthetics through stunning gel nail designs. By following proper preparation techniques, using quality products, and applying professional tips, you can achieve salon-worthy beach-themed manicures at home. The versatility of tropical designs allows for personalization while maintaining cohesive themes that capture paradise on your fingertips. Whether you prefer elaborate sunset scenes or minimalist wave accents, these techniques empower you to create beautiful, long-lasting nail art. Explore your creativity with tropical beach nail art and bring the beauty of coastal paradise to your next manicure session.