Whimsical Witchy Nails: Enchanting Nail Art Guide

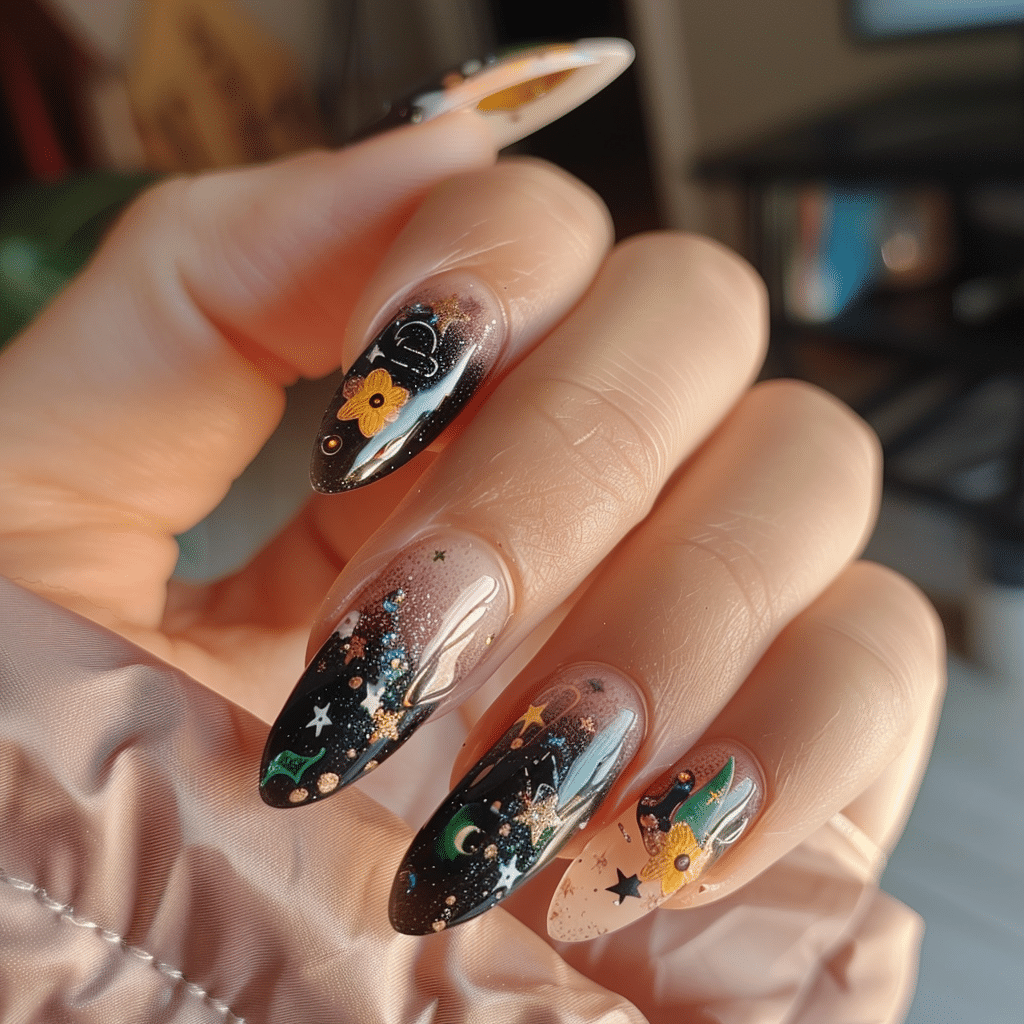
Whimsical witchy nails combine mystical elements, celestial imagery, and enchanting designs to create spellbinding nail art.
This magical style incorporates moon phases, stars, crystals, potion bottles, and supernatural motifs that capture the essence of modern witchcraft aesthetics. These designs work beautifully with gel polish formulas that provide lasting wear and dimensional effects for intricate details.
| Topic | Details |
|---|---|
| Category | Nail Art / Gel Nails |
| Skill Level | Intermediate to Advanced |
| Time Needed | 90 to 120 minutes |
| Tools Needed | UV/LED lamp, gel polish, nail art brushes, dotting tools, stamping plates |
| Best For | Creative individuals, Halloween events, mystical enthusiasts, special occasions |
Table of Contents
Table of Contents
Why Whimsical Witchy Nails Work
This nail art style resonates because it taps into the growing interest in mystical aesthetics and self-expression through beauty. Whimsical witchy nails allow individuals to showcase their connection to nature, celestial bodies, and spiritual practices through wearable art. The designs combine dark romantic elements with playful details, creating a balance between mysterious and approachable aesthetics.
Gel polish serves as the ideal medium for these intricate designs because it provides a stable base for detailed artwork and layering. The curing process between layers allows artists to build dimension with glitter, foils, and hand-painted elements without smudging. The glossy finish enhances metallic accents and deep jewel tones commonly used in witchy color palettes, while the extended wear time ensures your magical manicure lasts through multiple moon cycles.
The versatility of whimsical witchy nails makes them suitable beyond Halloween season. Many people incorporate these designs year-round as part of their personal aesthetic. The themes can be adapted from bold and theatrical to subtle and minimalist, making this style accessible for both professional settings and creative environments.
Tools and Products Needed
| Product | Purpose | Alternatives |
|---|---|---|
| UV/LED Lamp | Cures gel polish layers | Dual wavelength lamp for faster curing |
| Base Coat | Protects natural nail and ensures adhesion | Strengthening base for weak nails |
| Black Gel Polish | Primary color for witchy designs | Dark purple or midnight blue |
| Metallic Gold/Silver Gel | Accent colors for celestial elements | Chrome powder over gel |
| White Gel Polish | Moon phases and highlight details | Opaque nude or cream |
| Fine Nail Art Brush | Hand-painted details and line work | Striping brush or toothpick |
| Dotting Tools | Creates stars and constellation patterns | Bobby pin or ballpoint pen |
| Stamping Kit | Transfers intricate mystical designs | Nail stickers or decals |
| Nail File (180 grit) | Shapes nails and smooths edges | Glass file for gentler shaping |
| Nail Buffer | Creates smooth surface for polish adhesion | Fine grit buffer block |
| Cuticle Oil | Hydrates and maintains nail health | Vitamin E or jojoba oil |
| Top Coat (No-Wipe) | Seals design with glossy finish | Matte top coat for alternative look |
| Gel Cleanser | Removes tacky layer between steps | Isopropyl alcohol 91% |
For premium gel polish options and professional nail tools, visit Gel Nails by Lina for curated product recommendations.
Step-by-Step Application Guide for Whimsical Witchy Nails
Nail Preparation
- Remove any existing polish using acetone and lint-free wipes to ensure a clean nail surface.
- Push back cuticles gently using a cuticle pusher or orangewood stick to create a neat nail bed.
- File nails into your desired shape, with almond or coffin shapes working particularly well for witchy designs.
- Buff the nail surface lightly using a fine buffer to remove shine and create adhesion.
- Cleanse nails thoroughly with isopropyl alcohol to remove oils and debris that prevent proper bonding.
- Apply pH balancing nail dehydrator to ensure the nail plate is completely dry before gel application.
Base Coat Application
- Apply a thin layer of gel base coat, ensuring coverage from cuticle to free edge without touching the skin.
- Cap the free edge by running the brush along the nail tip to prevent lifting and chipping.
- Cure under UV/LED lamp according to manufacturer instructions, typically 30 to 60 seconds.
- Check for any missed areas or flooding near the cuticle before proceeding to color application.
Gel Polish Layers
- Apply your chosen base color in a thin, even layer, starting with black, deep purple, or midnight blue for classic witchy aesthetics.
- Cure the first color layer for the recommended time, usually 60 seconds under LED or 2 minutes under UV.
- Apply a second coat for full opacity and rich color depth, maintaining thin layers for proper curing.
- Cure the second layer completely before beginning any nail art details or embellishments.
- Plan your design placement, deciding which nails will feature accent art and which will remain solid.
Creating Witchy Nail Art Designs
- Paint crescent moons using a fine detail brush dipped in white or metallic gold gel polish.
- Create moon phases across multiple nails by painting full moons, crescents, and new moon silhouettes.
- Add tiny stars using a dotting tool dipped in metallic gel, creating constellation patterns around moon designs.
- Paint simple potion bottles or cauldron shapes on accent nails using black outlines and colorful fills.
- Incorporate mystical symbols like pentacles, crystals, or simple cat silhouettes using fine line work.
- Use stamping plates with pre-designed witchy motifs for more intricate patterns if hand-painting feels challenging.
- Cure each artistic layer for 30 to 60 seconds to set the design before adding additional elements.
- Add dimensional glitter or iridescent flakes while the top layer remains tacky for magical sparkle effects.
Finishing and Top Coat
- Apply a thin layer of gel top coat over the entire nail, encapsulating all artwork and embellishments.
- Ensure the top coat seals the free edge by capping it thoroughly to maximize wear time.
- Cure the top coat for the full recommended time, typically 60 seconds, for a hard, glossy finish.
- If using a traditional top coat with tacky layer, cleanse with gel cleanser to reveal shine.
- Apply cuticle oil around the nail bed and massage in to hydrate the surrounding skin.
- Admire your completed whimsical witchy nails and photograph them in good lighting to capture the magical details.
Pro Nail Technician Tips for Witchy Nail Art
- Work with extremely thin gel layers when creating detailed artwork to prevent wrinkling or improper curing that dulls your mystical designs.
- Clean your nail art brush immediately after use with gel cleanser to prevent bristles from hardening and losing their fine point.
- Create a color palette on a small piece of foil before starting your design to test color combinations and mixing ratios.
- Use a matte top coat over certain elements while leaving others glossy to create visual depth and contrast in your witchy designs.
- Practice drawing moons, stars, and mystical symbols on paper or practice wheels before applying them to actual nails for better precision.
- Incorporate negative space designs where the natural nail or base color shows through to create ethereal, ghostly effects.
- Layer sheer glitter gels over dark bases to create a galaxy effect that enhances the celestial theme of whimsical witchy nails.
- Cure accent nails separately if they have thick embellishments to ensure proper hardening without over-curing surrounding nails.
For more advanced nail art techniques and professional tips, explore the tutorials at Gel Nails by Lina.
Common Gel Nail Mistakes with Whimsical Witchy Nails
| Mistake | Why It Happens | How to Fix |
|---|---|---|
| Thick gel layers causing wrinkling | Applying too much product at once prevents proper UV penetration and curing | Use thin coats and build opacity gradually with multiple layers |
| Artwork bleeding or spreading | Base layer still has tacky residue or polish is too thin | Cleanse tacky layer before art or use slightly thicker polish consistency |
| Colors mixing unintentionally | Not curing between detailed elements allows wet polish to merge | Cure each color element for 15-30 seconds before adding adjacent colors |
| Designs looking muddy | Using too many colors or overworking the artwork creates visual clutter | Limit color palette to three main shades plus metallics for cohesive look |
| Premature lifting or chipping | Skipping proper nail preparation or flooding cuticles with gel | Ensure thorough dehydration, avoid cuticle contact, and cap free edges consistently |
| Dull finish after curing | Under-cured top coat or residue from inhibition layer | Cure top coat for full time and cleanse thoroughly with lint-free wipes |
Whimsical Witchy Nail Design Variations
| Style | Description | Best Occasion |
|---|---|---|
| Classic Moon Phase Nails | Each nail displays a different moon phase in white or gold against dark background | Everyday wear, full moon celebrations, spiritual events |
| Constellation Galaxy Nails | Deep space background with connected star patterns forming recognizable constellations | Night events, astronomy enthusiasts, winter seasons |
| Potion Bottle Accent Nails | Detailed miniature potion bottles with colorful liquids on one or two accent nails | Halloween parties, fantasy conventions, themed gatherings |
| Crystal and Gemstone Nails | Hand-painted crystals with geometric facets and rainbow reflections | Music festivals, metaphysical fairs, bohemian events |
| Black Cat Silhouette Nails | Minimalist cat outlines against gradient sunset or moon backgrounds | Cat lovers, everyday subtle witchy aesthetic, autumn season |
| Tarot Card Inspired Nails | Simplified tarot imagery like suns, moons, and stars in vintage color schemes | Fortune teller events, mystical gatherings, creative photoshoots |
| Herbology Botanical Nails | Delicate dried flower and herb illustrations with vintage botanical drawing style | Garden parties, natural wellness events, spring and summer |
| Gothic Witchy French Tips | Black tips with tiny moons, stars, or mystical symbols on nude or sheer base | Professional settings, weddings, sophisticated everyday wear |
Nail Care and Maintenance for Witchy Gel Nails
Maintaining whimsical witchy nails requires consistent care to preserve both the artistic details and natural nail health. Apply cuticle oil twice daily around the nail bed and underneath the free edge to prevent drying and maintain flexibility. This practice prevents the gel from becoming brittle and reduces the likelihood of premature lifting or cracking at the edges.
Wear protective gloves when performing household tasks involving water, cleaning products, or harsh chemicals that can degrade gel polish integrity. Avoid using your nails as tools to open containers or scrape surfaces, as this creates stress points that lead to chips and breaks. The intricate artwork on whimsical witchy nails makes damage more noticeable, so gentle handling preserves the magical aesthetic longer.
Schedule fills or complete removal every two to three weeks to maintain healthy nail growth and prevent excessive stress on the natural nail. If you notice any lifting, apply a small amount of gel top coat to the affected area and cure it to temporarily seal the edge until professional maintenance. Monitor your natural nails for signs of weakness, thinning, or discoloration, which indicate the need for a break from gel applications.
How to Remove Whimsical Witchy Gel Nails Safely
- Gather supplies including pure acetone, cotton pads, aluminum foil, a nail file, cuticle oil, and a wooden cuticle stick.
- File the shiny top coat surface to break the seal and allow acetone to penetrate more effectively.
- Soak cotton pads in pure acetone and place them directly on each nail, covering the entire nail surface.
- Wrap each fingertip securely with aluminum foil to hold the cotton in place and prevent acetone evaporation.
- Wait 10 to 15 minutes to allow the acetone to dissolve the gel polish layers completely.
- Remove the foil wraps one finger at a time and gently push softened gel off the nail using the wooden cuticle stick.
- Avoid scraping or forcing gel off if it resists, instead rewrap and soak for an additional five minutes.
- Buff away any remaining residue gently using a fine buffer, working in one direction to minimize nail damage.
- Wash hands thoroughly with soap and warm water to remove all acetone traces from skin and nails.
- Apply cuticle oil generously to all nails and massage into the nail bed and surrounding skin.
- Moisturize hands with thick hand cream and consider wearing cotton gloves overnight for intensive hydration treatment.
- Allow nails to rest for at least 24 hours before applying new gel polish to prevent overprocessing.
Nail Health and Safety for Gel Applications
Protecting your natural nails while enjoying whimsical witchy gel manicures requires attention to proper application and removal techniques. Never peel or pick at lifting gel polish, as this removes layers of the natural nail plate and causes significant thinning and weakness. The temptation to remove gel polish manually is strong, but this habit creates lasting damage that requires months to repair.
Limit continuous gel wear to three months maximum before taking a break to allow natural nails to recover and strengthen. During rest periods, apply strengthening treatments and maintain regular moisturizing routines. Watch for signs of allergic reactions including redness, swelling, or itching around the nail bed, which may indicate sensitivity to gel polish ingredients.
Ensure proper ventilation in your workspace when applying gel polish to avoid inhaling fumes from products and acetone. While gel polish produces fewer fumes than acrylic systems, adequate airflow remains important for respiratory health. Avoid over-filing the natural nail during preparation, as excessive buffing thins the nail plate and creates vulnerability to damage and infection.
Practice proper UV lamp safety by applying broad-spectrum sunscreen to hands before curing or using fingerless UV protection gloves. While UV exposure during curing is brief, regular gel manicure enthusiasts accumulate exposure over time. If you notice persistent nail problems, consult a dermatologist for professional evaluation and treatment recommendations.
Discover more about maintaining healthy nails while enjoying beautiful gel manicures at Gel Nails by Lina.
Frequently Asked Questions About Whimsical Witchy Nails
How long do whimsical witchy gel nails last?
Whimsical witchy gel nails typically last two to three weeks with proper application and care. The longevity depends on factors including nail preparation quality, gel brand, daily activities, and maintenance practices. Intricate artwork may show minor wear at edges before the base polish chips, but overall integrity remains intact. Apply cuticle oil daily and wear gloves during housework to maximize wear time and keep your mystical designs looking fresh.
Can beginners create whimsical witchy nail designs?
Beginners can absolutely create whimsical witchy nails by starting with simple elements like dots for stars and basic crescent moon shapes. Use stamping plates or nail stickers for intricate details while building hand-painting skills gradually. Practice designs on paper or practice wheels before applying them to nails. Start with one or two accent nails featuring artwork while keeping other nails solid colors to reduce overwhelm and build confidence.
What colors work best for witchy nail aesthetics?
Classic witchy nail colors include black, deep purple, midnight blue, forest green, and burgundy as base shades. Pair these with metallic gold, silver, or copper for celestial accents and mystical symbols. White creates striking contrast for moon phases and stars, while sheer iridescent toppers add magical dimension. Consider seasonal variations with burnt orange and rust tones for autumn or icy silver and blue for winter solstice themes.
How do you prevent gel nail art from smudging?
Prevent smudging by curing each color element for 15 to 30 seconds before adding adjacent details. Use gel polish specifically formulated for nail art rather than regular gel, as it has better pigmentation and consistency. Clean your brush between colors to avoid contamination, and work with thin layers that cure completely. If using stamping, ensure the base is fully cured and cleansed before transferring designs for crisp, clean results.
Are whimsical witchy nails appropriate for professional settings?
Whimsical witchy nails can be adapted for professional environments by choosing subtle variations like dark French tips with tiny moon accents or minimalist constellation dots on neutral bases. Opt for shorter nail lengths and sophisticated color combinations rather than bold, theatrical designs. Matte finishes create a more refined aesthetic than glossy, while keeping intricate artwork limited to one accent nail maintains professionalism. Assess your workplace culture and dress code to determine appropriate design intensity.
Conclusion
Whimsical witchy nails offer endless creative possibilities for expressing mystical aesthetics through beautiful nail art. This enchanting style combines technical gel application skills with artistic vision to create wearable magic on your fingertips. Whether you prefer bold Halloween-inspired designs or subtle everyday celestial accents, the techniques and tips provided help you achieve professional results. Gather your gel polish collection, practice your moon phases and star patterns, and embrace the magical world of witchy nail art that reflects your unique spiritual style and creative personality.