20 Lemon Nails That’ll Add a Citrus Pop to Your Mani Game

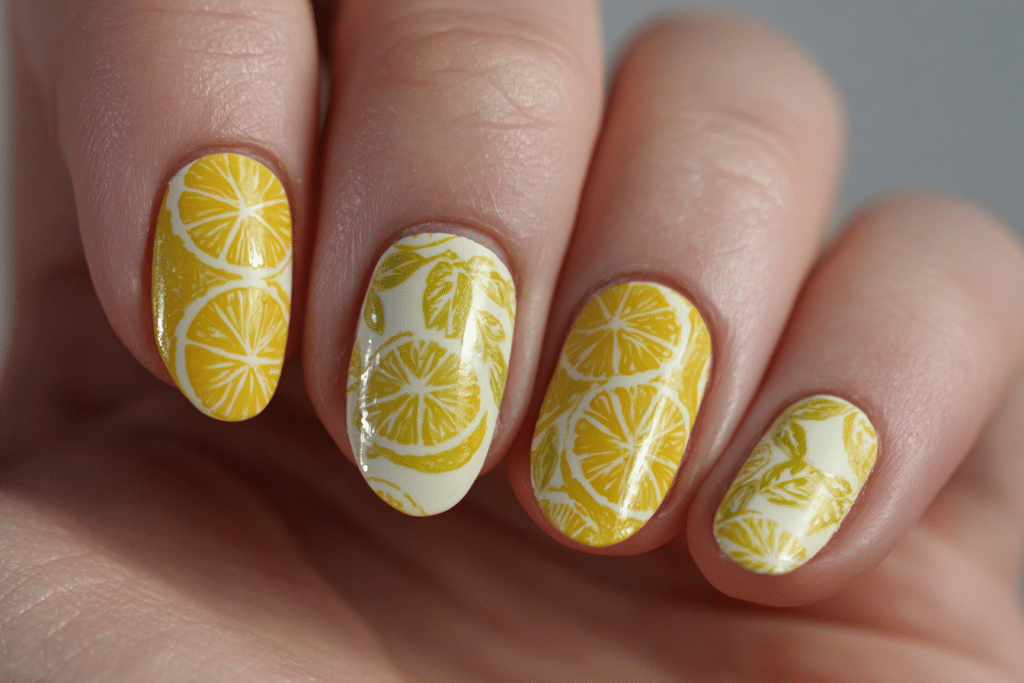
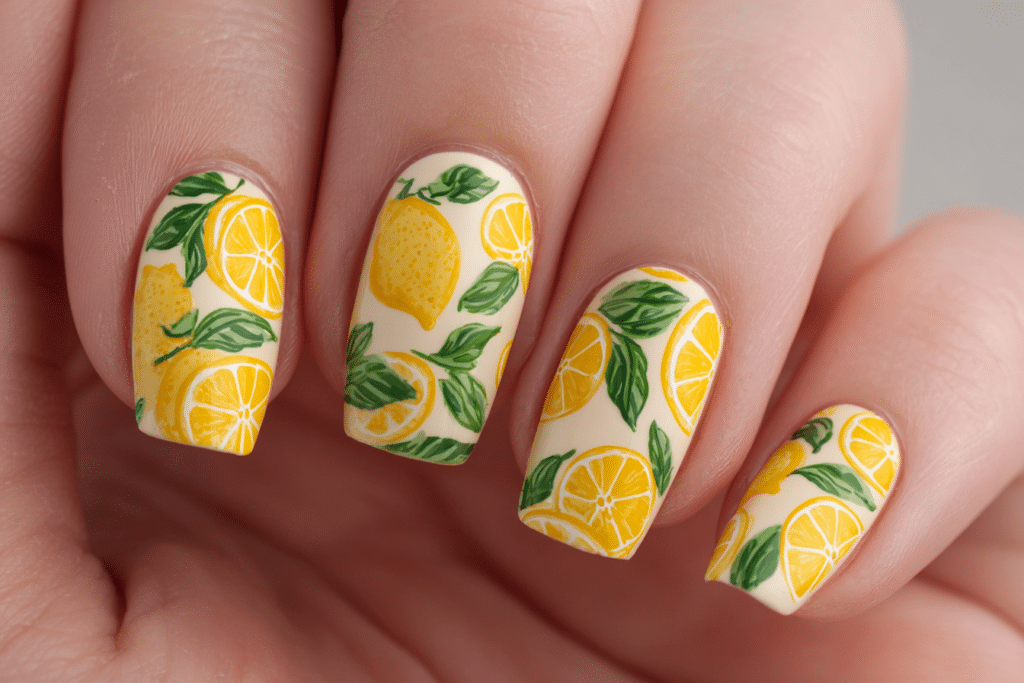
Lemon nails bring bright, cheerful energy to any manicure with their vibrant yellow hues and playful citrus designs.
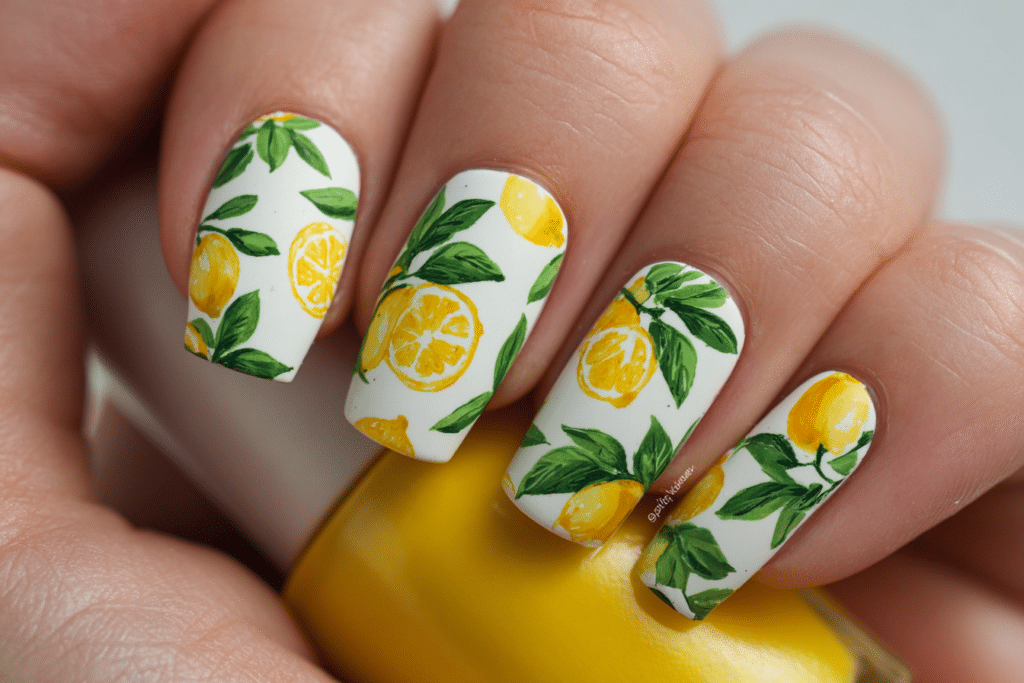
These 20 lemon nails that’ll add a citrus pop to your mani game showcase everything from minimalist slices to detailed fruit art that captures summer vibes year-round. Whether you prefer subtle lemon accents or bold all-over designs, this fresh nail trend offers endless creative possibilities for gel nail enthusiasts.
| Topic | Details |
|---|---|
| Category | Nail Art / Gel Nails |
| Skill Level | Beginner to Intermediate |
| Time Needed | 45-90 minutes |
| Tools Needed | UV/LED lamp, gel polish, dotting tools, nail art brushes |
| Best For | Summer looks, tropical themes, cheerful everyday wear |
Table of Contents
Why Lemon Nail Art Works
Lemon nail designs work exceptionally well because they combine psychological color theory with artistic versatility that suits multiple seasons and occasions. Yellow tones naturally evoke feelings of happiness, optimism, and energy, making lemon nails an instant mood booster every time you glance at your hands. The circular shape of lemon slices also provides a naturally balanced geometric element that creates visual harmony on the nail canvas.
From a technical perspective, lemon designs translate beautifully to gel polish applications because the bright yellows and contrasting whites cure evenly under LED lamps without color distortion. The design elements typically include simple shapes like circles, crescents, and dots that beginners can master quickly while still looking professionally executed. Advanced nail artists can layer dimension with hand-painted details, 3D gel accents, or chrome powders to elevate the citrus theme.
These nail designs work across multiple nail lengths and shapes, from short rounded nails to long almond or coffin styles. The adaptable nature of lemon motifs means you can customize the scale and placement to flatter your specific nail bed proportions while maintaining the fresh, fruity aesthetic that makes this trend so appealing.
Tools and Products Needed for Lemon Gel Nails
| Product | Purpose | Alternatives |
|---|---|---|
| UV/LED Lamp | Cures gel polish layers properly | 36W or 48W lamp options |
| Base Coat Gel | Protects natural nail and ensures adhesion | Ridge-filling base for textured nails |
| Yellow Gel Polish | Primary lemon color base | Bright yellow, pastel yellow, neon yellow |
| White Gel Polish | Creates lemon flesh and highlights | Opaque white or ivory tones |
| Green Gel Polish | Adds leaves and stems | Lime green or forest green shades |
| Dotting Tools | Creates lemon seeds and perfect circles | Toothpicks or bobby pins |
| Thin Nail Art Brush | Details slices and fine lines | Striping brush or liner brush |
| Gel Top Coat | Seals design and adds glossy finish | Matte top coat for different texture |
| Cuticle Oil | Maintains nail health and hydration | Vitamin E oil or jojoba oil |
| Nail File 180 Grit | Shapes nails and smooths edges | Glass file or emery board |
| Nail Buffer | Creates smooth surface for polish adhesion | 240 grit buffer block |
Quality gel products make a significant difference in how your lemon nail art appears and lasts. Visit Gel Nails by Lina for professional-grade gel polish recommendations that provide optimal pigmentation and durability for intricate nail art designs.
Step-by-Step Lemon Nail Application Guide
Nail Preparation
- Remove any existing nail polish completely using acetone and lint-free wipes to ensure a clean surface.
- Push back cuticles gently using a wooden or rubber cuticle pusher to create a clear working canvas.
- File nails to your desired shape, whether square, round, almond, or coffin, using smooth strokes in one direction.
- Buff the nail surface lightly with a 240-grit buffer to remove shine and create texture for better gel adhesion.
- Cleanse nails thoroughly with rubbing alcohol or nail dehydrator to remove oils and dust particles.
- Apply a thin layer of pH-balancing primer if you have oily nail beds or experience frequent lifting.
Base Coat Application
- Apply a thin, even layer of gel base coat starting from the cuticle area and pulling toward the free edge.
- Cap the free edge by running the brush along the nail tip to seal and prevent chipping.
- Cure the base coat under your UV/LED lamp according to manufacturer instructions, typically 30-60 seconds.
- Check for any uncured spots or areas that feel tacky beyond normal residue layer.
Gel Polish Color Layers
- Choose your base color for the lemon nail design, whether bright yellow, white, or a neutral nude shade.
- Apply the first thin coat of colored gel polish using controlled strokes and avoiding cuticle flooding.
- Cure the first color layer for the recommended time, usually 30-60 seconds depending on polish opacity.
- Apply a second coat for full opacity and vibrant color payoff, keeping layers thin for proper curing.
- Cure the second layer completely before beginning any nail art details or additional design work.
Lemon Design Creation
- Select accent nails for detailed lemon slice designs, typically the ring finger and thumb for balanced visual interest.
- Use white gel polish to paint circular lemon slice shapes using a thin brush or dotting tool.
- Add yellow segments radiating from the center using a striping brush to create the classic citrus wedge appearance.
- Apply tiny dots of brown or black gel polish in the center to represent lemon seeds using your smallest dotting tool.
- Paint small green leaves using a detail brush for added dimension and realistic citrus fruit representation.
- Cure each layer of nail art completely before adding the next element to prevent smudging or blending.
Curing Process
- Position your hand correctly inside the lamp with all nails exposed to the light for even curing.
- Set the timer according to your specific gel polish brand recommendations, never under-curing designs.
- Keep your hand steady during the entire curing cycle to prevent shifting that could blur details.
- Allow the lamp to complete its full cycle before removing your hand from the device.
Finishing and Top Coat
- Apply a generous layer of gel top coat over the entire nail including all design elements for protection.
- Cap the free edge again with top coat to seal everything and maximize wear time.
- Cure the top coat for the full recommended time, often 60 seconds for a hard, glossy finish.
- Wipe away the sticky residue layer using rubbing alcohol and a lint-free wipe for a perfect shine.
- Apply cuticle oil around the nail perimeter to hydrate skin and enhance the overall finished appearance.
- Allow nails to rest for 10 minutes before exposing them to water or performing detailed tasks.
For more detailed gel application techniques, explore the comprehensive guides available at Gel Nails by Lina for professional results at home.
Pro Nail Technician Tips for Lemon Designs
- Use a white base coat under bright yellow gel polish to prevent staining and enhance color vibrancy without requiring multiple coats.
- Create lemon slice templates by practicing circles on paper first, then transfer the muscle memory to nail application for consistent shapes.
- Mix a tiny amount of clear gel into yellow polish if the shade appears too opaque, allowing you to build dimension gradually.
- Work with one accent nail at a time when creating detailed designs to prevent the base from curing too hard before you add details.
- Store yellow gel polish away from direct sunlight as this shade is particularly prone to color shifting when exposed to UV rays.
- Layer a matte top coat over select nails while keeping others glossy to create textural contrast that makes lemon designs pop visually.
Common Gel Lemon Nail Mistakes
| Mistake | Why It Happens | How to Fix |
|---|---|---|
| Yellow polish appears streaky | Yellow pigments naturally have lower opacity and settle in bottles | Roll polish bottle between hands, apply white base first, use three thin coats instead of two thick ones |
| Lemon designs look muddy | Colors blend together before curing or too much polish applied at once | Cure each color completely before adding adjacent shades, use smaller amounts of polish on brush |
| White details disappear | Insufficient opacity or not allowing proper cure time between layers | Use highly pigmented white gel, apply two coats of white elements, cure fully between applications |
| Design looks unbalanced | Too many detailed nails or inconsistent sizing across hand | Limit detailed lemon slices to 2-3 accent nails, keep remaining nails solid colors or minimal designs |
| Top coat dulls bright colors | Some top coats create a cloudy effect over certain pigments | Test top coat compatibility first, use non-cleanse top coats for maximum clarity, apply thinner top coat layers |
Lemon Nail Design Variations
| Style | Description | Best Occasion |
|---|---|---|
| Classic Lemon Slices | Realistic citrus cross-sections with yellow segments and white pith on accent nails | Summer parties, casual daytime events, vacation manicures |
| Minimalist Lemon Accent | Single small lemon or slice on one nail with nude or white base | Professional settings, everyday wear, understated summer style |
| 3D Lemon Art | Raised gel elements creating textured lemon designs with dimensional appeal | Special events, nail competitions, statement manicures |
| Lemon French Tips | Yellow tips with tiny lemon slices or wedges along the smile line | Weddings, formal events, elegant summer occasions |
| Abstract Lemon Watercolor | Soft yellow washes with loose lemon shapes for artistic interpretation | Creative settings, artistic expression, bohemian style events |
| Lemon and Greenery | Lemons paired with botanical leaves and floral elements | Garden parties, spring weddings, nature-inspired looks |
| Glitter Lemon Nails | Sparkly yellow base with lemon accents and shimmer top coat | Evening events, celebrations, festive summer gatherings |
| Lemonade Theme | Yellow and white swirls with lemon slices mimicking a refreshing drink | Pool parties, beach outings, casual summer fun |
Nail Care and Maintenance for Lemon Designs
Maintaining vibrant lemon nail art requires consistent care practices that protect both the gel polish and your natural nails underneath. Apply cuticle oil twice daily, focusing on the nail perimeter and underneath the free edge to prevent dryness that can lead to lifting or peeling. Yellow gel polish can show wear more noticeably than darker shades, so keeping your nails moisturized helps maintain the fresh appearance longer.
Avoid exposing your lemon gel nails to harsh chemicals like bleach or strong cleaning products without wearing protective gloves. These substances can dull the glossy finish and cause premature breakdown of the gel structure. When performing tasks that involve prolonged water exposure, such as washing dishes or swimming, apply a layer of cuticle oil beforehand to create a protective barrier.
Watch for signs of lifting at the cuticle area or free edge, addressing them immediately to prevent water from seeping underneath. If you notice any lifting, apply a thin layer of gel top coat to the affected area and cure it properly to reseal the nail. For professional maintenance guidance, check the resources at Gel Nails by Lina for tips on extending your manicure lifespan.
Schedule proper gel removal and reapplication every two to three weeks to maintain nail health and keep your lemon designs looking fresh. Never pick or peel gel polish as this removes layers of your natural nail plate and causes significant damage over time.
How to Remove Lemon Gel Nails Safely
- File the shiny top coat layer gently using a 180-grit nail file to break the seal and allow acetone penetration.
- Saturate cotton pads or balls with pure acetone, ensuring they are thoroughly soaked for effective gel breakdown.
- Place the acetone-soaked cotton directly onto each nail, covering the entire gel surface completely.
- Wrap each fingertip securely with aluminum foil to create heat and keep the acetone in contact with gel.
- Wait 10-15 minutes without disturbing the wraps, allowing the acetone to dissolve the gel structure properly.
- Remove one foil wrap and gently push softened gel off the nail using a wooden cuticle stick or orangewood stick.
- Rewrap and wait longer if the gel has not softened sufficiently, never forcing or scraping stubborn areas.
- Buff nails gently with a fine buffer to smooth any remaining residue without aggressive filing.
- Wash hands thoroughly with soap and warm water to remove all acetone traces from skin and nails.
- Apply cuticle oil generously and hand cream to rehydrate nails and skin after the drying acetone exposure.
Nail Health and Safety for Lemon Nail Art
Maintaining healthy nails while enjoying decorative lemon gel designs requires attention to both application practices and rest periods. Your natural nails need occasional breaks from gel polish to breathe and recover, especially if you notice thinning, brittleness, or discoloration. Dermatologists recommend allowing nails to remain bare for at least a week every eight to twelve weeks of continuous gel wear.
Proper sanitation of all nail tools prevents bacterial and fungal infections that can develop under gel enhancements. Clean brushes, dotting tools, and files with rubbing alcohol after each use, and never share nail implements with others. Watch for signs of infection including redness, swelling, tenderness, or separation of the nail from the nail bed, seeking medical attention if these symptoms appear.
The UV lamps used for curing gel polish expose skin to ultraviolet radiation similar to tanning beds, though in shorter durations. Apply broad-spectrum sunscreen with SPF 30 or higher to your hands before gel application sessions, or wear fingerless UV protection gloves to minimize skin exposure while still allowing nail curing.
Frequently Asked Questions
How long do lemon gel nails last?
Lemon gel nails typically last two to three weeks with proper application and care before requiring maintenance or removal. The longevity depends on factors including nail preparation quality, gel product durability, and your daily activities. Detailed nail art with multiple colors may show minor wear around day 10-14, particularly if you use your hands frequently for work. Regular cuticle oil application and avoiding harsh chemicals help extend the lifespan of your lemon nail designs significantly.
Why do my yellow gel nails peel or lift?
Yellow gel nails peel or lift primarily due to inadequate nail preparation, oil or moisture on the nail plate before application, or insufficient curing time. Yellow pigments sometimes require slightly longer cure times than other colors to fully harden. Improper sealing at the cuticle area or free edge also allows water to penetrate underneath, breaking the bond between gel and natural nail. Always ensure nails are completely clean, dry, and properly buffed before applying gel products for maximum adhesion.
What is the difference between gel nails and acrylic nails for lemon designs?
Gel nails cure under UV or LED light and offer a glossy, flexible finish that works beautifully for detailed lemon art with vibrant colors. Acrylic nails use a liquid monomer and powder polymer that air-dry into a harder, more rigid enhancement suitable for longer extensions. Gel polish provides better color clarity for bright yellows and whites needed in lemon designs, while acrylics excel at creating structural length. Gel removal typically involves acetone soaking, whereas acrylic removal requires more intensive filing and soaking procedures.
How can I make my lemon gel nails last longer?
Making lemon gel nails last longer starts with thorough nail preparation including proper buffing, dehydrating, and applying quality base coat. Keep your nails at a moderate length to reduce stress on the free edge that causes cracking or lifting. Apply cuticle oil daily to maintain flexibility and prevent the gel from becoming brittle and lifting at the edges. Wear gloves during cleaning tasks, avoid using nails as tools, and schedule fills or removal before significant growth creates excessive stress at the cuticle line.
Can I create lemon nail designs at home or do I need a salon?
You can absolutely create lemon nail designs at home with basic gel nail supplies and some practice with nail art techniques. Start with simpler designs like single lemon accents on one or two nails before progressing to detailed slice patterns across multiple fingers. Invest in quality dotting tools and thin brushes specifically designed for nail art to achieve cleaner lines and shapes. Watch tutorial videos, practice on nail wheels first, and be patient with yourself as nail art skills develop over time with consistent practice.
Conclusion
These 20 lemon nails that’ll add a citrus pop to your mani game offer endless creative possibilities for expressing your personality through vibrant nail art. From minimalist accents to elaborate fruit designs, lemon-themed manicures bring cheerful energy and summery freshness to any look. With proper techniques, quality gel products, and consistent maintenance, you can achieve salon-worthy lemon nails in the comfort of your own home. Embrace the citrus trend and let your nails showcase your bright, optimistic style with these refreshing designs that never go out of season.