A beginner-friendly amigurumi you can finish in an afternoon (with tea breaks included).
There’s something about a tiny elephant that makes people melt. Put a finished one on a table at a baby shower and watch what happens: someone picks it up, squeezes the trunk, and asks, “Wait, you made this?”
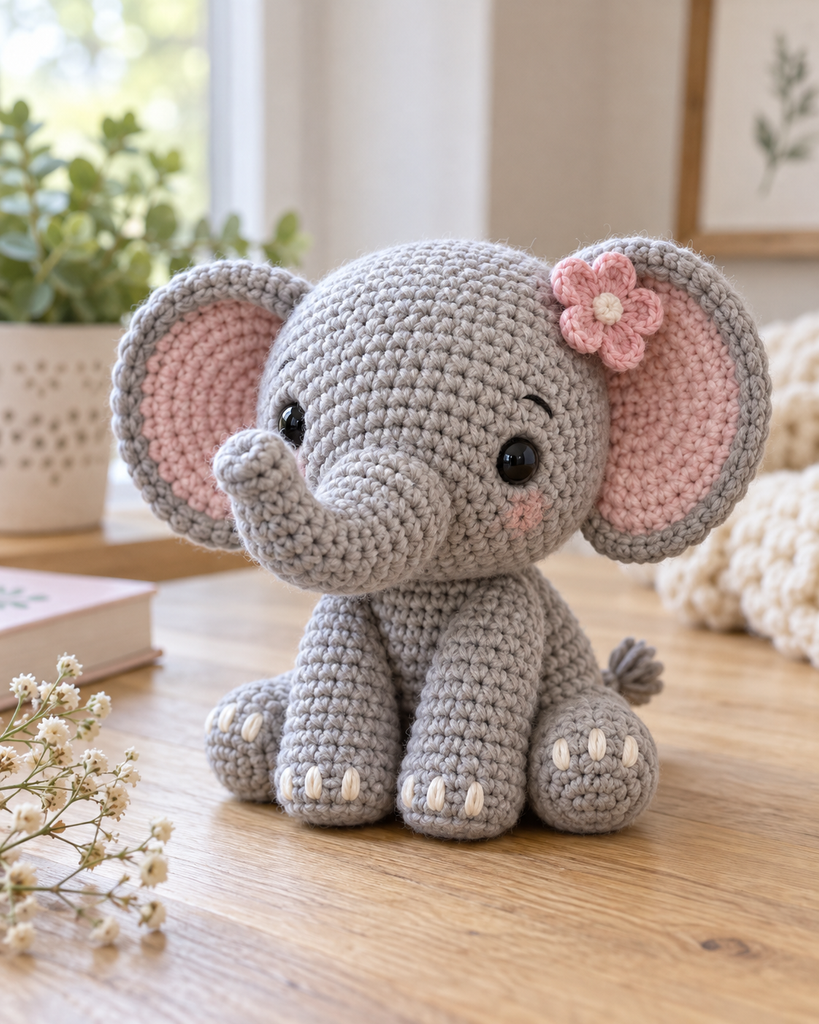
That moment is exactly why I love this little guy. He looks like he took days. He didn’t. If you can work a magic ring and a single crochet, you can make him, and I’m going to walk you through every round, every stitch count, and every spot where beginners usually get stuck.
Grab your grey yarn. Let’s make an elephant.
Table of Contents
Key Takeaways
- Skill level: Easy. The whole pattern uses single crochet, increases, and decreases, worked in continuous rounds.
- Time: About 3 to 5 hours, depending on your speed and how fussy you are about the face (no judgment, I’m very fussy).
- Size: Roughly 5 to 5.5 inches (13 to 14 cm) tall when sitting, with DK cotton and a 2.5 mm hook.
- Yarn: About 50 g of grey, plus small scraps of pink and white. A perfect stash-buster.
- Best for: Baby gifts, nursery decor, market stalls, or a quick confidence-boosting first amigurumi.
Why This Little Elephant Is Worth Your Time
Let’s be honest: plenty of “easy” amigurumi patterns aren’t. They hide a tricky color change in round 23 or ask you to crochet a trunk straight out of the head through a gap you have to count your way into.
This one keeps things simple on purpose. Every part is crocheted separately, stuffed, and sewn on. That means if your trunk comes out a little wonky, you redo the trunk. Not the whole head.
It also means you can stop after any piece. Do the head on Monday night, the body on Tuesday, and assemble on the weekend. Small wins add up.
And the design is a blank canvas. Change the color, swap the flower for a bow, add a tiny scarf. Same base, endless personalities.
Materials and Tools
- Yarn: DK (light worsted) weight cotton or cotton blend
- Grey: about 50 g (roughly 110 to 120 m)
- Pink: a small amount (inner ears and flower)
- White: a few yards (toenails and eye highlights)
- Hook: 2.5 mm (US B/1 or C/2). Go down a size if your fabric looks holey.
- Safety eyes: 8 mm black, or black yarn to embroider eyes
- Fiberfill stuffing
- Tapestry needle for sewing
- Stitch marker (a scrap of contrasting yarn works too)
- Pins for placing pieces before sewing
- Scissors
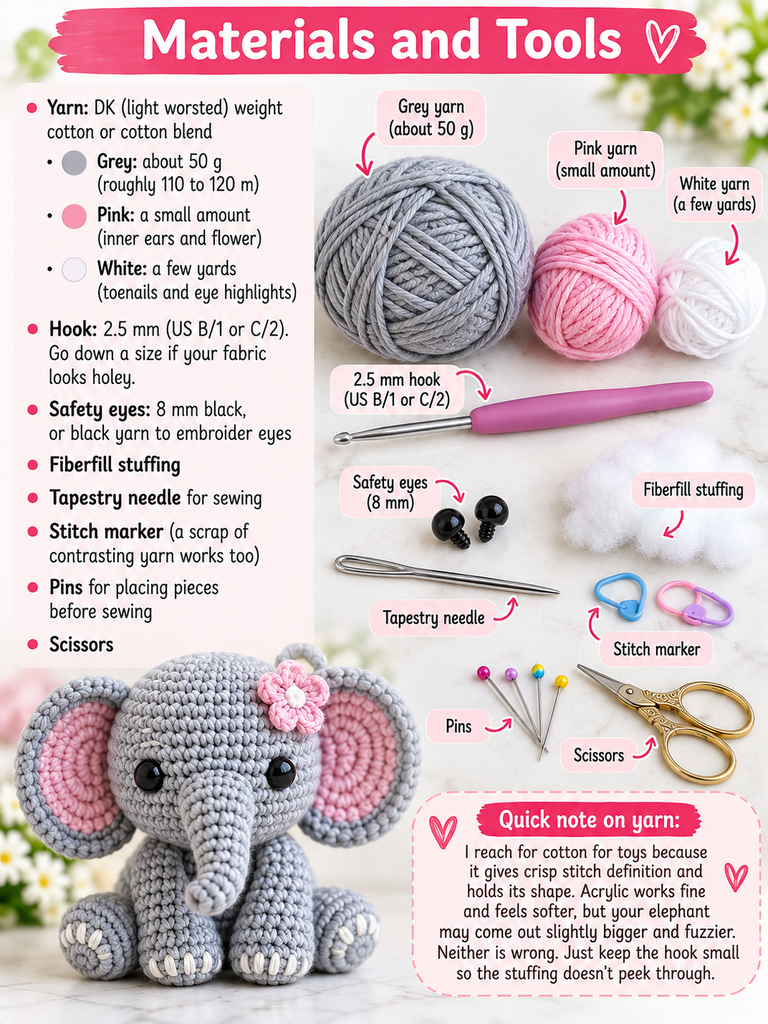
Quick note on yarn: I reach for cotton for toys because it gives crisp stitch definition and holds its shape. Acrylic works fine and feels softer, but your elephant may come out slightly bigger and fuzzier. Neither is wrong. Just keep the hook small so the stuffing doesn’t peek through.
Stitches and Abbreviations (US Terms)
- MR – magic ring
- ch – chain
- sc – single crochet
- inc – increase (2 sc in the same stitch)
- dec – decrease (I strongly recommend the invisible decrease: insert hook in the front loops of the next 2 stitches, yarn over, pull through both front loops, yarn over, pull through 2 loops)
- BLO – back loop only
- sl st – slip stitch
- dc – double crochet (only used in the optional flower)
- (…) x6 – repeat what’s in the brackets 6 times
- (36) – total stitches at the end of the round
Before You Start: 4 Tips That Save Headaches
1. Mark the first stitch of every round. We work in a continuous spiral, so there’s no visible “end” to a round. Move your marker up each time. If you skip this, I promise you’ll lose count somewhere around round 9. We’ve all been there.
2. Count after every round with increases or decreases. It takes ten seconds. Ripping back five rounds takes twenty minutes.
3. Leave long tails. Any piece that gets sewn on needs a tail of at least 12 inches (30 cm). Running out of yarn halfway around a neck is a special kind of sad.
4. Stuff in small pieces. Pull the fiberfill apart into little tufts before you push it in. Big clumps make lumps.
The Pattern: Head
Use grey yarn.
Rnd 1: 6 sc in MR (6)
Rnd 2: inc x6 (12)
Rnd 3: (1 sc, inc) x6 (18)
Rnd 4: (2 sc, inc) x6 (24)
Rnd 5: (3 sc, inc) x6 (30)
Rnd 6: (4 sc, inc) x6 (36)
Rnd 7: (5 sc, inc) x6 (42)
Rnds 8–15: sc in each stitch around (42) — 8 rounds

Place the eyes now. Insert the safety eyes between Rnds 11 and 12, with 7 stitches between them. Look at it from the front before you snap on the backs. Wider apart reads sweet and sleepy. Closer together looks curious. Trust your gut here.
Rnd 16: (5 sc, dec) x6 (36)
Rnd 17: (4 sc, dec) x6 (30)
Rnd 18: (3 sc, dec) x6 (24)
Rnd 19: (2 sc, dec) x6 (18)
Stuff the head firmly. Really firmly. A soft head sags forward once the trunk is on.
Rnd 20: (1 sc, dec) x6 (12)
Rnd 21: dec x6 (6)
Fasten off. Thread the tail through the front loops of the last 6 stitches, pull tight to close, and weave it in.
Trunk
Use grey yarn. The trunk starts at the tip and grows wider toward the face.
Rnd 1: 6 sc in MR (6)
Rnd 2: BLO: sc in each stitch around (6)
Rnds 3–5: sc in each stitch around (6)
Rnd 6: (1 sc, inc) x3 (9)
Rnds 7–8: sc in each stitch around (9)
Rnd 9: (2 sc, inc) x3 (12)
Rnd 10: sc in each stitch around (12)
Rnd 11: (3 sc, inc) x3 (15)
Rnd 12: sc in each stitch around (15)
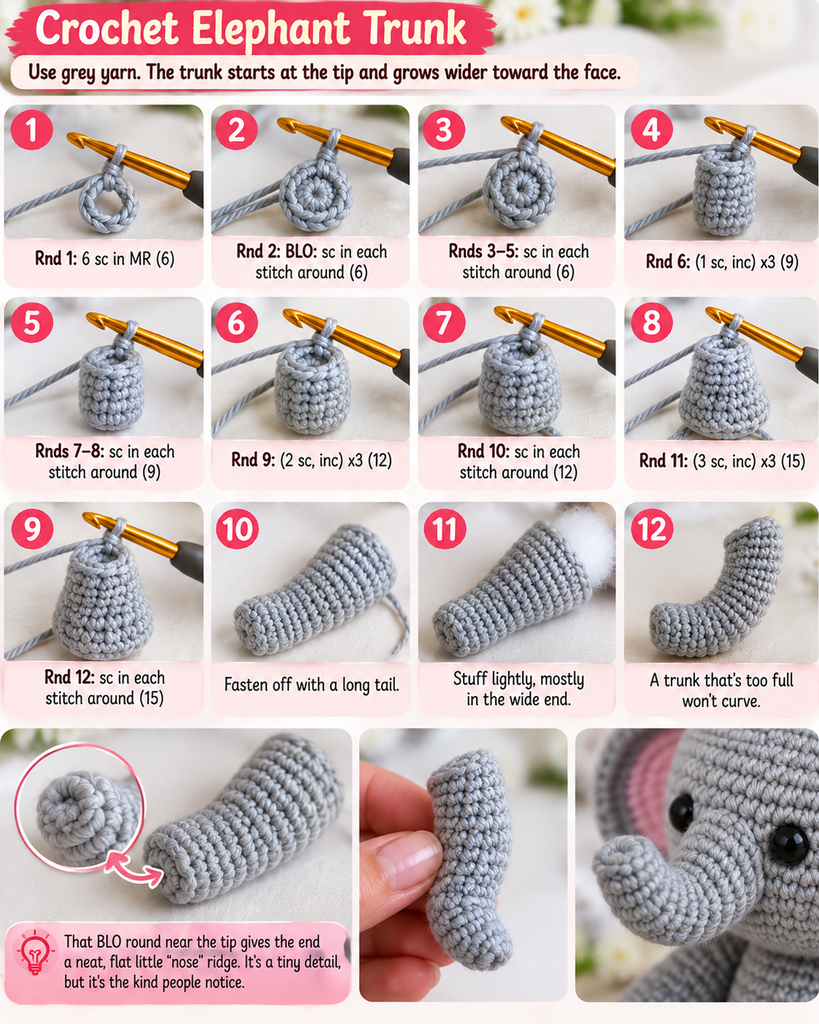
Fasten off with a long tail. Stuff lightly, mostly in the wide end. A trunk that’s too full won’t curve.
That BLO round near the tip gives the end a neat, flat little “nose” ridge. It’s a tiny detail, but it’s the kind people notice.
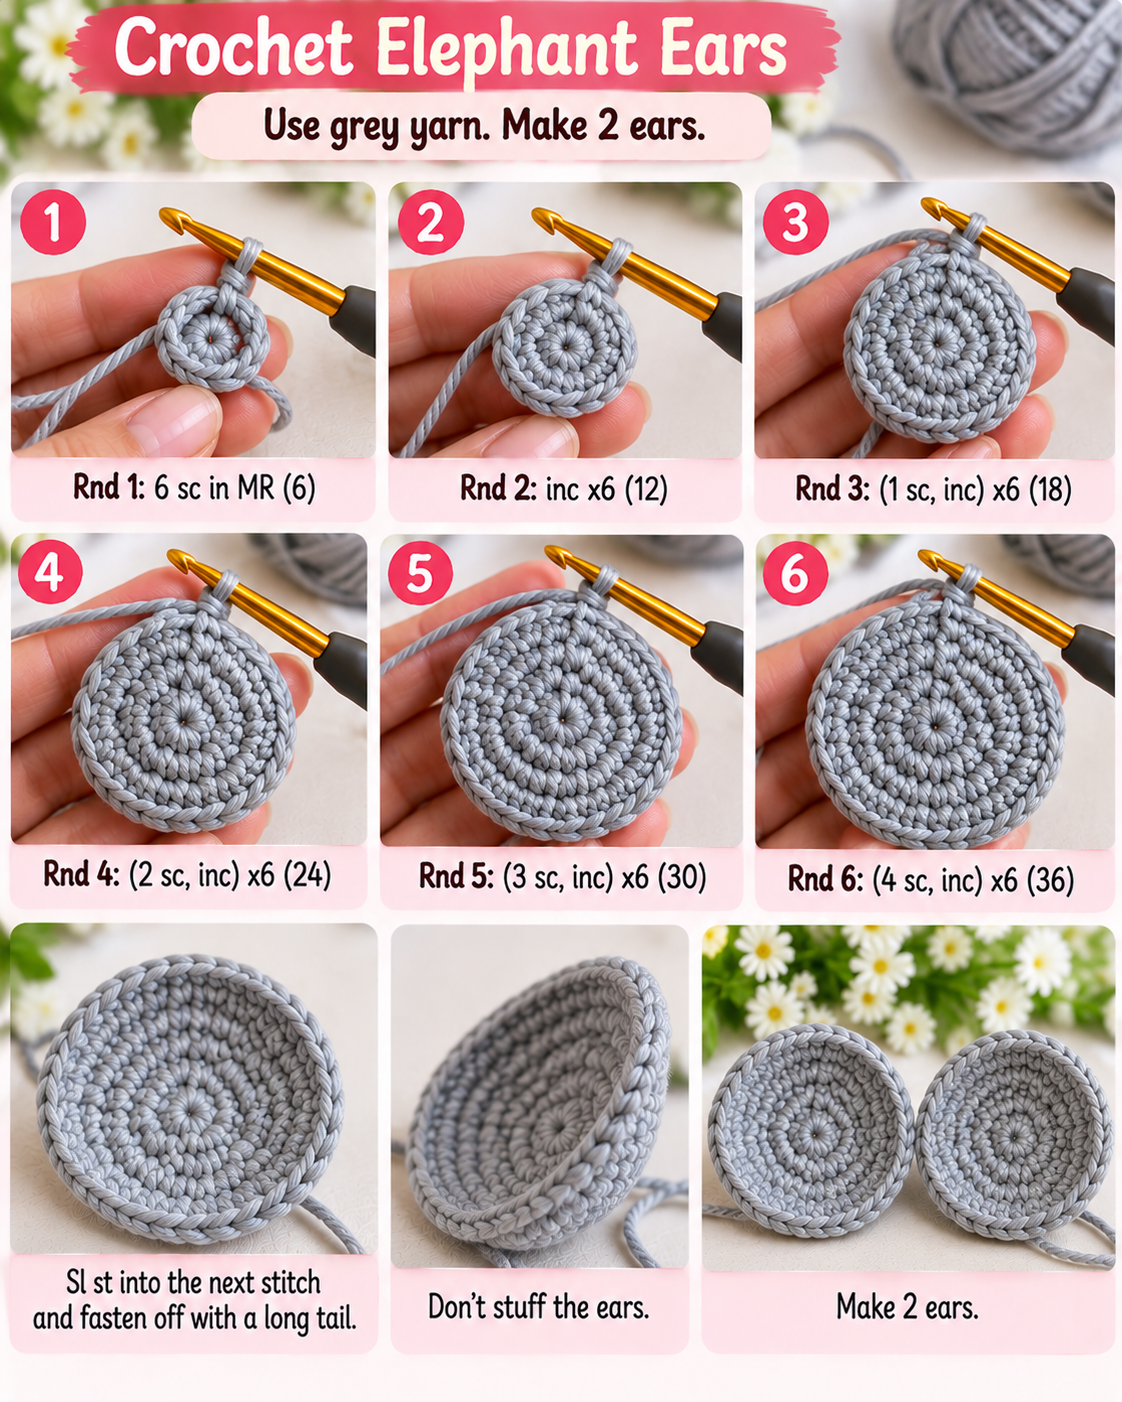
Ears (Make 2)
Use grey yarn.
Rnd 1: 6 sc in MR (6)
Rnd 2: inc x6 (12)
Rnd 3: (1 sc, inc) x6 (18)
Rnd 4: (2 sc, inc) x6 (24)
Rnd 5: (3 sc, inc) x6 (30)
Rnd 6: (4 sc, inc) x6 (36)
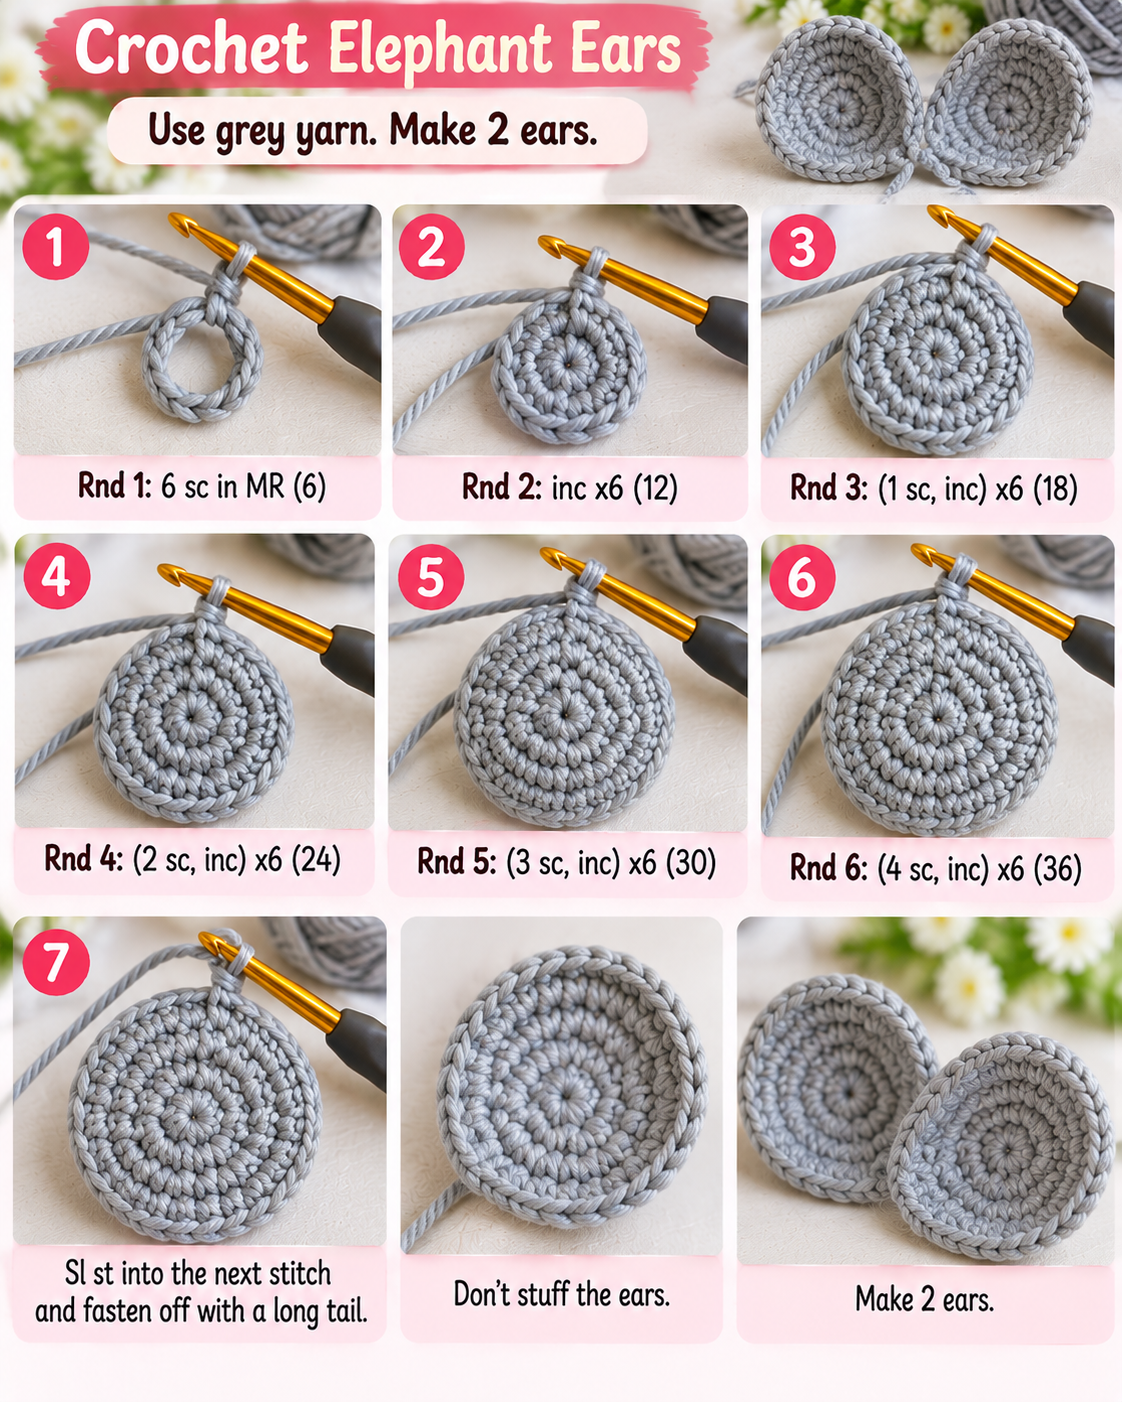
Sl st into the next stitch and fasten off with a long tail. Don’t stuff the ears.
Inner Ears (Optional, Make 2)
Use pink yarn.
Rnd 1: 6 sc in MR (6)
Rnd 2: inc x6 (12)
Rnd 3: (1 sc, inc) x6 (18)
Sl st, fasten off, and whipstitch each pink circle to the center of a grey ear, slightly toward one edge. That edge will face forward.
Body
Use grey yarn. We start at the bottom so he sits flat and steady.
Rnd 1: 6 sc in MR (6)
Rnd 2: inc x6 (12)
Rnd 3: (1 sc, inc) x6 (18)
Rnd 4: (2 sc, inc) x6 (24)
Rnd 5: (3 sc, inc) x6 (30)
Rnd 6: (4 sc, inc) x6 (36)
Rnd 7: BLO: sc in each stitch around (36)
Rnds 8–12: sc in each stitch around (36) — 5 rounds
Rnd 13: (4 sc, dec) x6 (30)
Rnds 14–16: sc in each stitch around (30)
Rnd 17: (3 sc, dec) x6 (24)
Rnds 18–19: sc in each stitch around (24)
Rnd 20: (2 sc, dec) x6 (18)
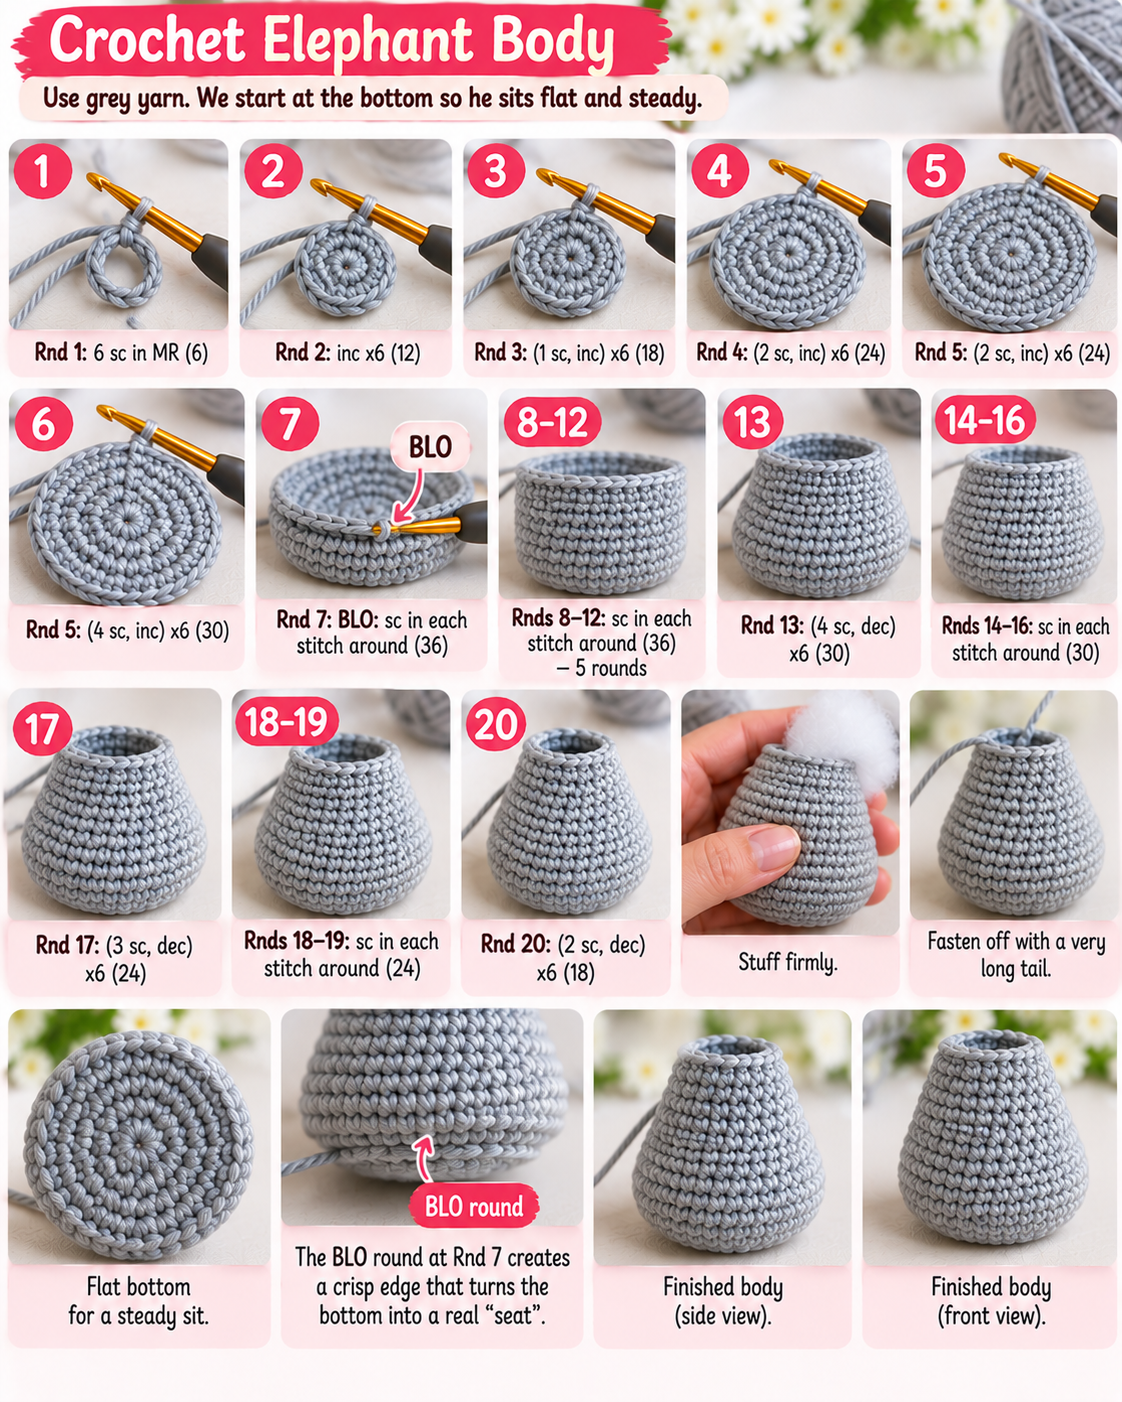
Fasten off with a very long tail (this one sews on the head). Stuff firmly, pressing the base flat with your palm as you go.
Here’s the thing about Rnd 7: working in the back loop creates a crisp edge that turns the bottom into a real “seat.” Skip it and your elephant will roll over like a sleepy puppy. Cute, but not the goal.
Back Legs (Make 2)
Use grey yarn.
Rnd 1: 6 sc in MR (6)
Rnd 2: inc x6 (12)
Rnd 3: BLO: sc in each stitch around (12)
Rnds 4–7: sc in each stitch around (12)

Fasten off with a long tail. Stuff lightly.
Front Legs (Make 2)
Use grey yarn.
Rnd 1: 6 sc in MR (6)
Rnd 2: (1 sc, inc) x3 (9)
Rnd 3: BLO: sc in each stitch around (9)
Rnds 4–8: sc in each stitch around (9)
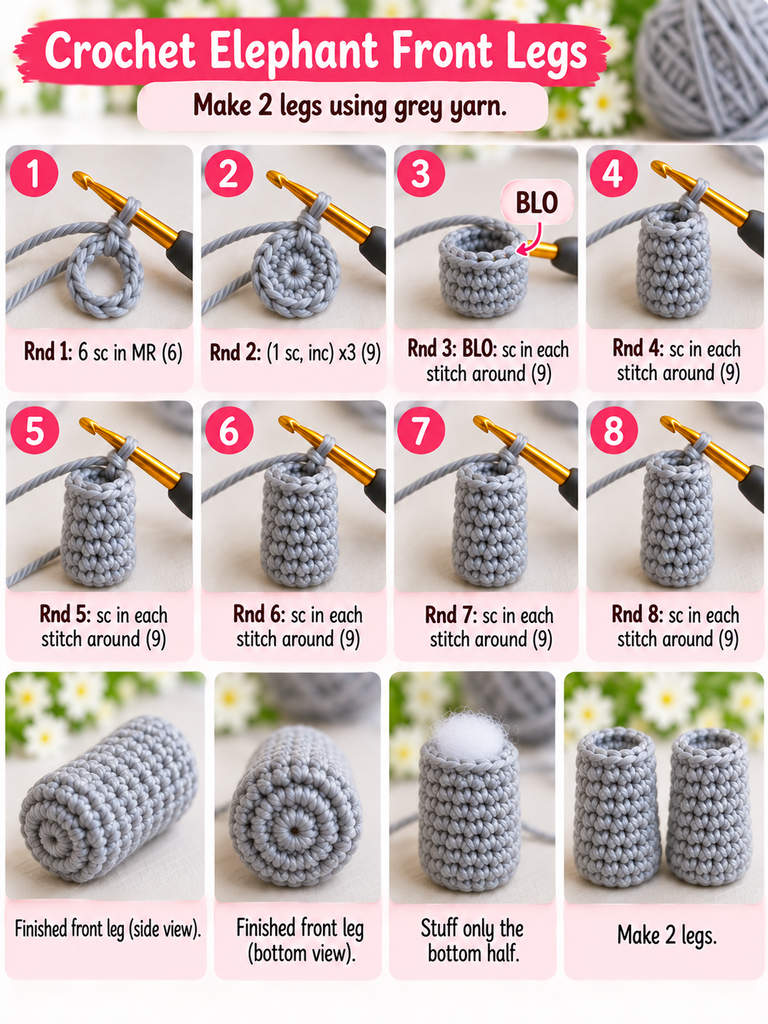
Fasten off with a long tail. Stuff only the bottom half, so the tops flatten nicely against the body.
Tail
Use grey yarn.
Ch 12. Starting in the 2nd chain from the hook, sc in each chain across (11). Fasten off, leaving a tail for sewing.

For a little tuft, fold two short strands of grey yarn in half, pull them through the tip with your hook like fringe, then trim and brush them out with your needle.
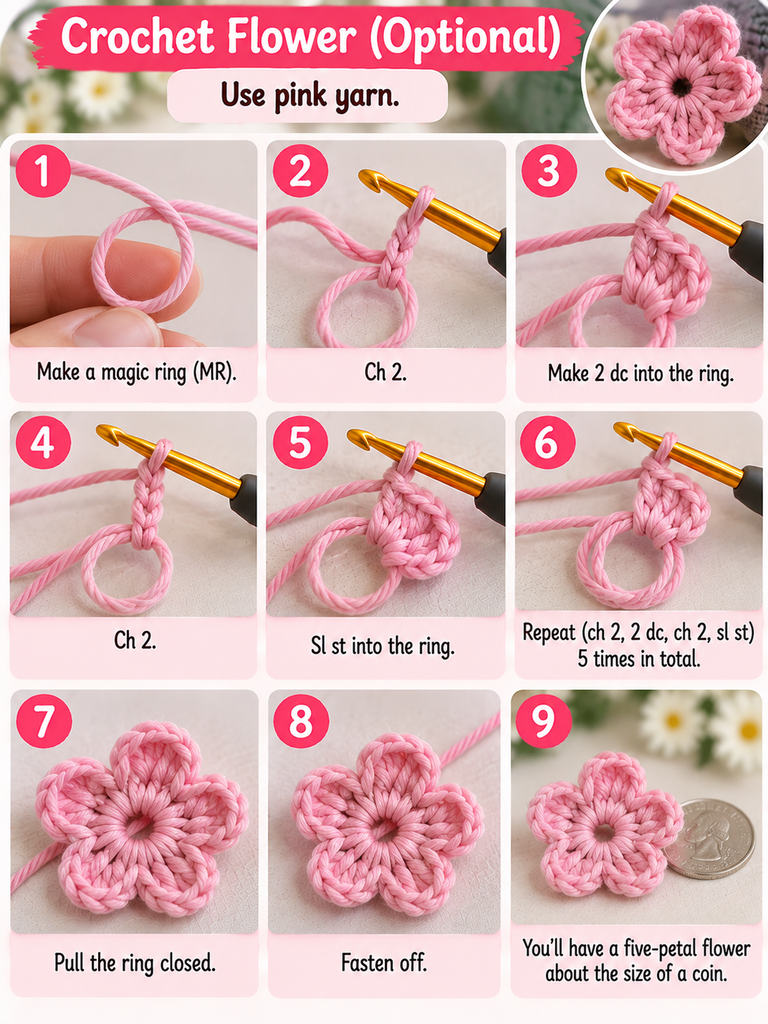
Flower (Optional)
Use pink yarn.
Into a MR: (ch 2, 2 dc, ch 2, sl st into the ring) x5. Pull the ring closed and fasten off. You’ll have a five-petal flower about the size of a coin.
Assembly: Bringing Your Elephant to Life
This is the part where a pile of grey blobs suddenly turns into a character. Take your time. And use those pins. Pinning everything first lets you see the whole face before you commit.
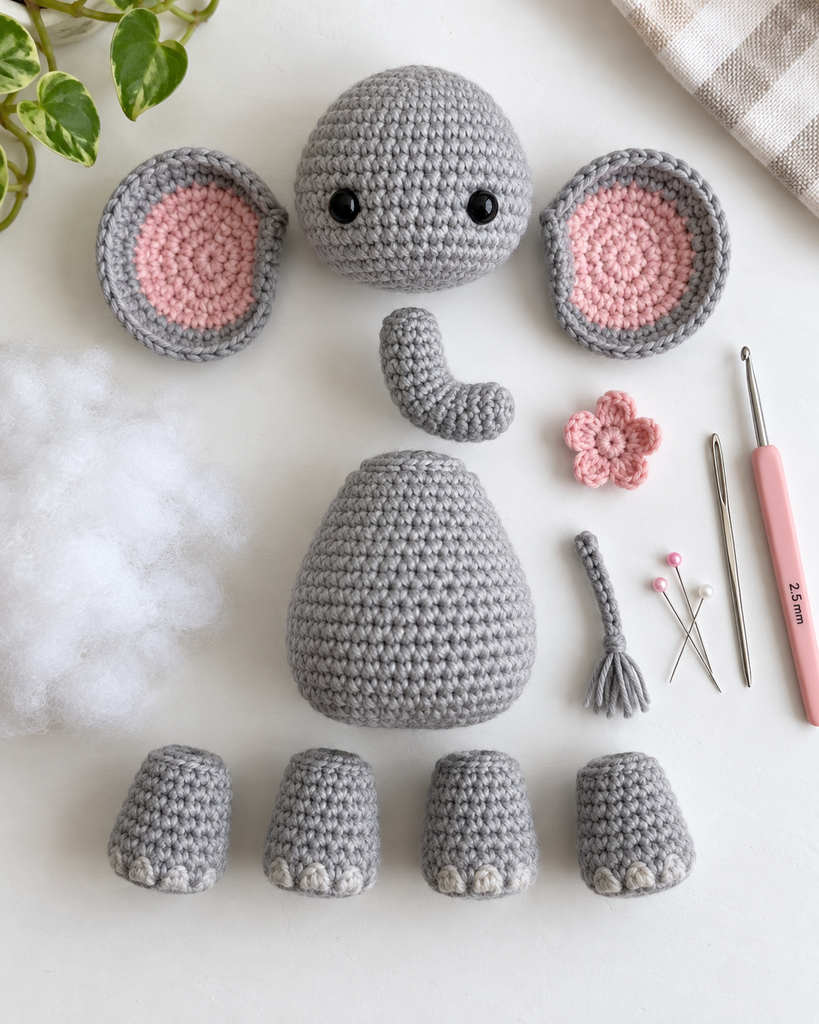
1. Attach the head. Set the head on top of the open neck of the body, with the eyes facing forward. Whipstitch around the neck opening, catching a stitch on the head each time. Add a little extra stuffing into the neck before the last few stitches so the head doesn’t wobble.
2. Sew on the trunk. Pin the wide end centered between the eyes, with its top edge just below the eye line (around Rnds 12 to 17 of the head). Sew all the way around. Then take one or two stitches from the underside of the trunk into the face to give it a gentle upward curve. That small tug makes him look happy instead of droopy.
3. Add the ears. Pinch the bottom edge of each ear together with 2 or 3 stitches so it cups slightly. Pin them on the sides of the head, from about Rnd 7 to Rnd 14, a few stitches behind the eyes, pink side forward. Sew in place.
4. Sew the back legs. Pin them on each side of the body near the base, angled slightly forward, so the flat “soles” face out. Check he still sits flat, then sew.
5. Sew the front legs. Pin them on the front of the body, a couple of rounds below the neck, close together. Sew around the top edge only, so the legs hang naturally.
6. Attach the tail at the center back, about 2 rounds above the base.
7. Embroider the details. With white yarn, add 3 tiny straight stitches on each foot for toenails. If you like, add a small white crescent under each eye for a highlight, and a couple of horizontal lines across the trunk in grey or black for wrinkles.
8. Finish with the flower. Sew it to the base of one ear. One flower feels playful. Two feels formal. Your call.
Now step back. Look at that face. Told you he was worth it.
Common Problems (and Quick Fixes)
“My stitch count is off.” Nine times out of ten, you’ve worked into the slip-stitch-looking top of the first stitch twice, or missed it entirely. Count again from your marker. If you’re off by one, you can usually fix it quietly in the next plain round. Nobody will ever know.
“I can see stuffing through the fabric.” Drop a hook size. Tight fabric is your friend in amigurumi.
“The decreases leave little holes.” Switch to the invisible decrease (front loops only, described above). It’s a game-changer.
“He keeps falling over.” Add a bit more stuffing to the bottom and press it flat, or tuck a small pouch of plastic pellets into the base (skip this for toys meant for babies).
“The trunk points straight down.” Pull a stitch from the underside of the trunk into the face, as described in step 2. Or remove a bit of stuffing from the tip.
Make It Yours: 6 Easy Variations
- Nursery colors: Mint, soft blue, lilac, or cream instead of grey.
- Baby-safe version: Embroider the eyes with black yarn instead of using safety eyes.
- A tiny scarf: Chain 40, sc back across, and tie it around the neck for winter.
- Bow instead of flower: Crochet a small rectangle, cinch the middle with yarn, and sew it on top of the head.
- Keychain or bag charm: Use fingering weight yarn and a 2 mm hook for a pocket-size elephant.
- Elephant family: Make one in DK and one in worsted with a 3.5 mm hook. Instant parent and baby.
Caring for Your Crochet Elephant
Hand wash in cold water with mild soap. Squeeze gently (don’t wring), roll in a towel to remove excess water, and let it air dry at room temperature. Skip the washing machine and dryer. They can felt the yarn and distort the shape.
If you’re gifting him to a little one, a short care note tucked into the gift bag is a lovely touch.
Frequently Asked Questions
Is this elephant crochet pattern good for complete beginners?
Yes. If you’ve practiced the magic ring and single crochet, you’re ready. Everything else (increases, decreases, BLO) is explained above, and each piece is small enough to redo without stress.
How much yarn do I need?
About 50 g of grey DK cotton, plus small scraps of pink and white. Heavier yarn or a bigger hook will use more and make a larger elephant.
Can I use worsted weight yarn instead?
Absolutely. Use a 3.5 mm hook and expect your elephant to come out around 6.5 to 7 inches tall. Keep the fabric tight.
Is it safe for babies?
Safety eyes can be a choking hazard for children under 3. For babies, embroider the eyes, skip any beads or pellets, and sew every piece on very securely.
Can I sell the elephants I make?
Yes, you’re welcome to sell finished elephants made from this pattern. A small credit linking back to this post is always appreciated.
Final Thoughts
Remember that moment I mentioned at the start? Someone picking up your elephant, squeezing the trunk, asking if you really made it?
That’s coming. Maybe at a baby shower. Maybe when a toddler won’t let go of him. Maybe just when you set him on your desk and smile every time you sit down.
And here’s what I hope you take away beyond the stitch counts: small projects like this build real skill. Every round you count, every trunk you curve, makes the next amigurumi easier. This little elephant is a great first step.
Your Turn
I’d genuinely love to see your elephant. Did you go classic grey, or did yours turn out mint with a polka-dot bow? Share a photo or tell me in the comments which color you picked and who he’s for.
And if you get stuck on any round, ask below. I read every comment, and chances are someone else is stuck in the same spot.
Happy crocheting!