

Let me guess. You bought a hook and a ball of yarn with big plans. Maybe a blanket. Maybe a cozy scarf. Three evenings later, you’ve got a lumpy rectangle that’s wider at one end than the other, and the yarn is now living in a drawer.
I’ve been there. Almost everyone who crochets has been there.
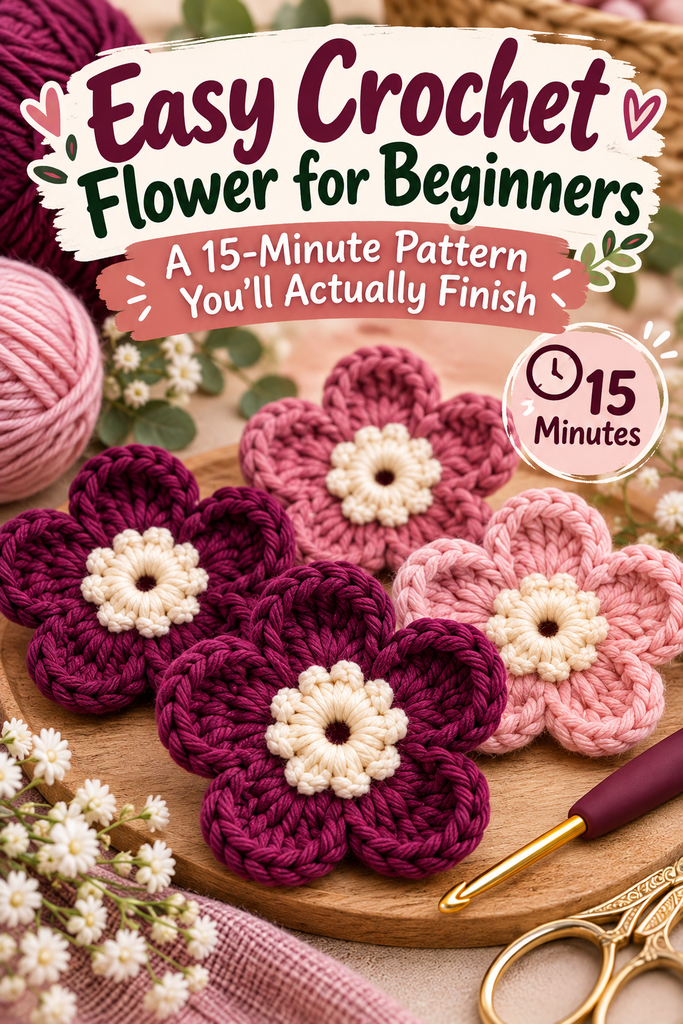
Here’s what I wish someone had told me back then: your first real project should be small enough to finish before your tea goes cold. That’s exactly why I love teaching the simple crochet flower. It takes about 15 minutes, uses only a few basic stitches, and at the end you’re holding something that actually looks like what it’s supposed to be. That little win matters more than you’d think.
Table of Contents
Key Takeaways
- This 5-petal flower uses just four techniques: a magic ring, chain, single crochet, and double crochet.
- The whole pattern is only two rounds, so you’ll finish your first flower in roughly 15 to 20 minutes.
- Medium-weight cotton yarn and a 4 to 5 mm hook make your stitches easier to see and count.
- Counting to 10 at the end of round one is the single best habit for a flower that lies flat.
- Once you’ve made one, you can turn it into brooches, hair clips, bookmarks, garlands, or appliqués.
Why a Flower Is the Perfect First Crochet Project
Most beginner advice says to start with a scarf. I get the logic: it’s just rows of the same stitch. But honestly? Scarves are long, repetitive, and it takes hours before you see any real progress. That’s where a lot of people quit.
A flower flips that around. You learn to work in the round (a skill you’ll need for hats, amigurumi, and granny squares later), you practice two of the most important stitches, and you get a finished object in one sitting.
And there’s something else. When your first flower is a little wonky, it still looks charming. Nobody looks at a handmade flower and says, “Hmm, the tension on petal three is uneven.” They just say, “Oh, you made that?”
What You’ll Need (Spoiler: Not Much)
You don’t need a craft store haul for this one. Here’s the short list:
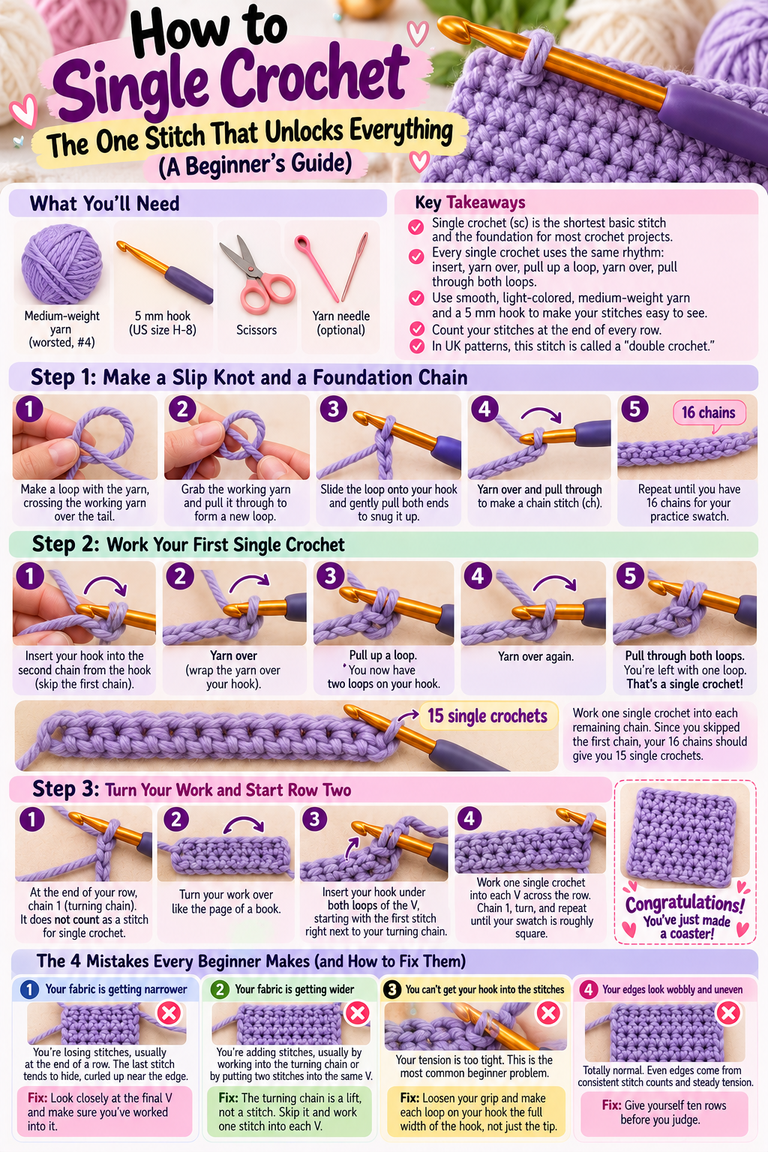
- Yarn: Worsted or medium weight (labeled #4), ideally 100% cotton, in a light or bright color.
- Crochet hook: 4.0 mm to 5.0 mm (US G-6 to H-8). Check your yarn label for the recommended size.
- Scissors: Any small, sharp pair will do.
- Tapestry needle: A blunt needle with a big eye for weaving in the ends.
A quick word on yarn, because it makes a bigger difference than people realize. Cotton holds its shape and shows every stitch clearly, so you can actually see where your hook needs to go. Fuzzy or very dark yarn hides the stitches, and that’s frustrating when you’re still learning. Save the black mohair for later. Trust me.
A Quick Stitch Glossary Before We Start
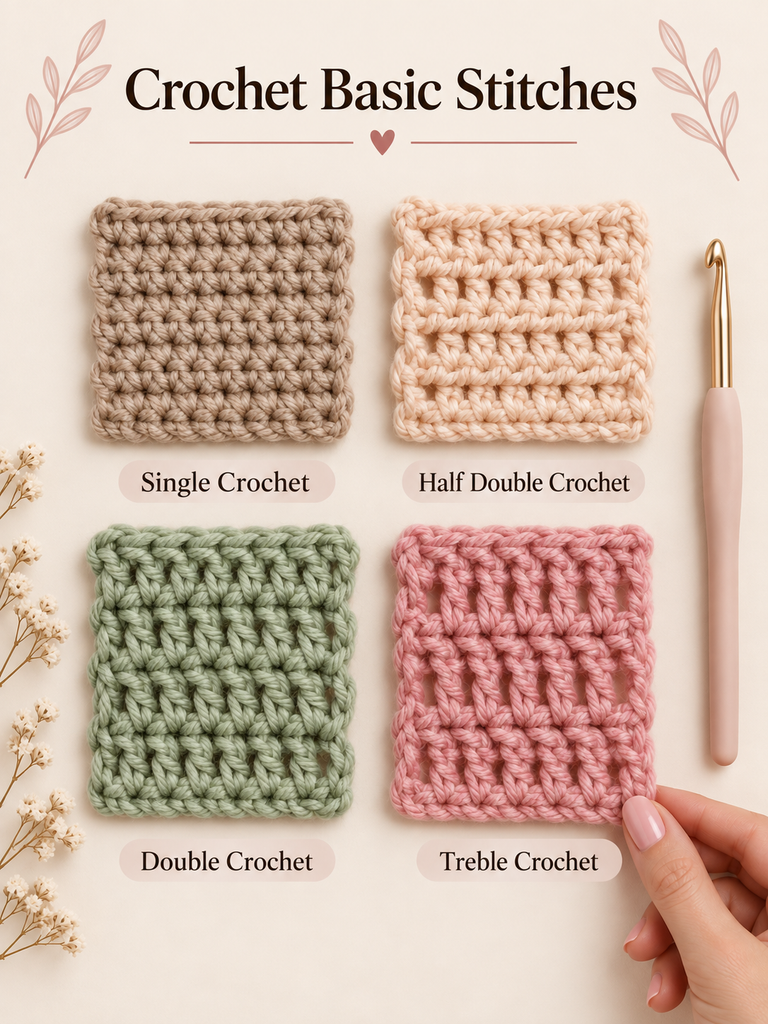
This pattern uses US crochet terms. If you’ve ever been confused by a pattern, there’s a good chance this was why: the US and UK use the same names for different stitches. A US single crochet is a UK double crochet, and a US double crochet is a UK treble. Same stitch, different name. (Yes, it’s annoying. No, nobody is going to fix it.)
- Magic ring (MR): An adjustable loop you work stitches into, then pull tight to close the center.
- Chain (ch): Yarn over, pull through the loop on your hook.
- Slip stitch (sl st): Insert hook, yarn over, pull through the stitch and the loop on your hook in one go.
- Single crochet (sc): Insert hook, yarn over, pull up a loop (2 loops on hook), yarn over, pull through both.
- Double crochet (dc): Yarn over, insert hook, yarn over, pull up a loop (3 loops), yarn over and pull through 2, yarn over and pull through the last 2.
If any of these feel shaky, spend five minutes practicing them on a short chain first. It’s not wasted time. It’s warm-up.
How to Crochet an Easy 5-Petal Flower, Step by Step
Ready? Take a breath. This is just two rounds.
Round 1: Build the Center
- Make a magic ring. Wrap the yarn around two fingers to form a loop, insert your hook, and pull up a loop of the working yarn.
- Chain 1. This doesn’t count as a stitch. It just gets you to the right height.
- Work 10 single crochet into the ring. Make sure you’re crocheting over both the ring and the yarn tail.
- Pull the tail to close the center. Tug gently until the hole disappears.
- Slip stitch into the first single crochet to join the round.
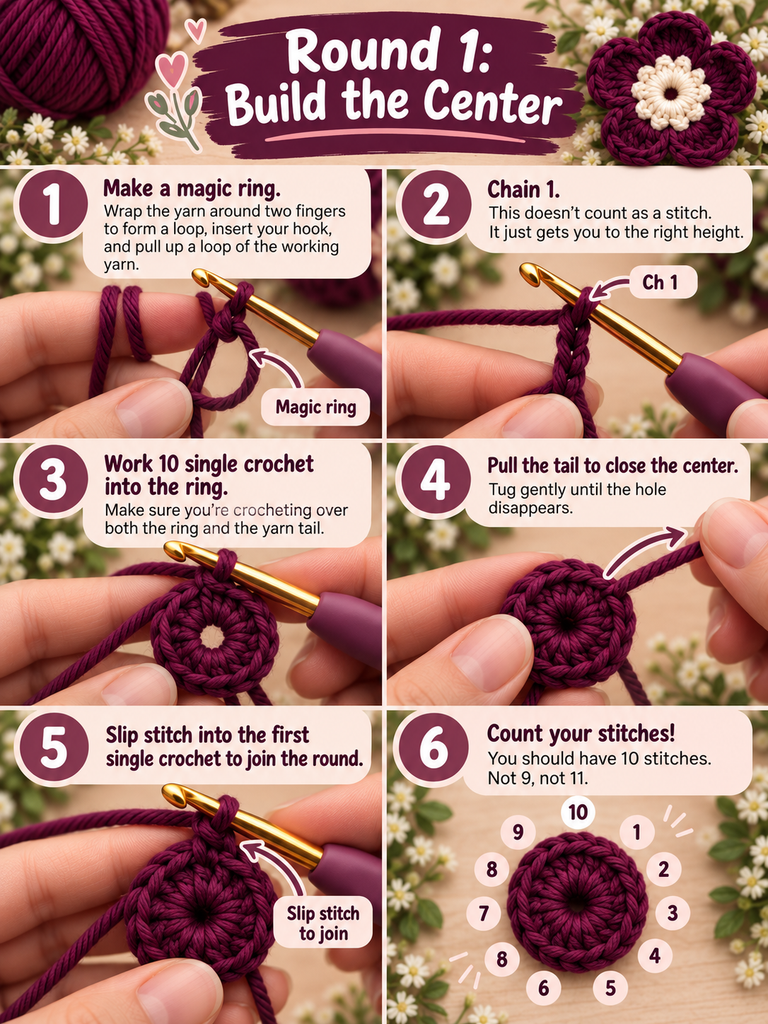
Now stop and count. You should have 10 stitches. Not 9, not 11. I know counting feels tedious, but this is the moment that decides whether your flower lies flat or curls up like a potato chip.
Round 2: Make the Petals
Each petal is worked across two stitches. Ten stitches divided by two gives you five petals. Simple math, pretty result.
- In the same stitch as your join, work: slip stitch, chain 2, then 2 double crochet.
- In the next stitch, work: 2 double crochet, chain 2, then slip stitch.
- That’s one petal! Repeat steps 1 and 2 in each of the next four pairs of stitches until you have five petals.
- Slip stitch into the base of your first petal, cut the yarn leaving a 6-inch (15 cm) tail, and pull it through the loop to fasten off.

Finishing Touches
Thread both tails onto your tapestry needle and weave them through the back of the stitches, changing direction a couple of times so they don’t work loose. Snip what’s left.
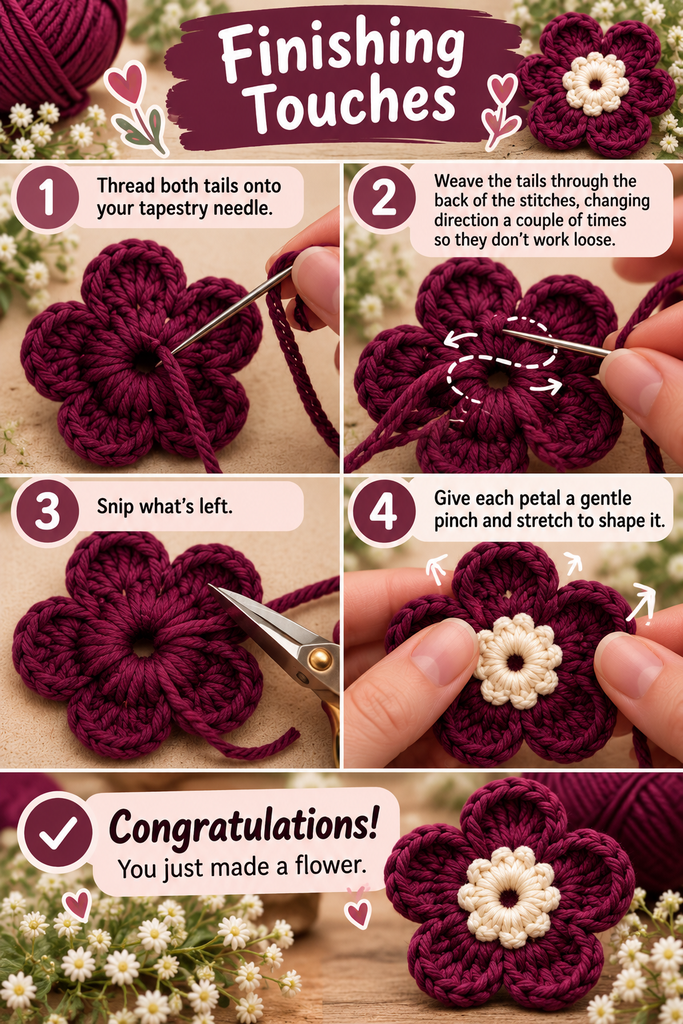
Then give each petal a gentle pinch and stretch to shape it. You’d be amazed how much a few seconds of fussing improves the final look.
Congratulations. You just made a flower.
Common Beginner Mistakes (and How to Fix Them)
When you’re learning, things go sideways. That’s completely normal, and almost every problem with this flower comes down to one of these four culprits.
The center won’t close. This usually means the stitches were worked into the ring but not over the tail, so there’s nothing to pull. Undo round one and try again, making sure the tail sits inside every stitch.
The flower is cupping or ruffling. Count your round one stitches. Too few and the petals bunch up into a cup; too many and they ripple. Ten is the magic number here.
The petals look different sizes. This is a tension issue, and it improves on its own with practice. In the meantime, try to keep the yarn flowing through your fingers at a steady pace rather than yanking each stitch tight.
Everything feels too tight to work. Loosen your grip (seriously, relax your shoulders too), or go up one hook size. Tight stitches are the most common beginner habit, and they make every step harder than it needs to be.
Little Tips That Make a Big Difference
After making more of these flowers than I can count, a few small habits have stuck with me:
- Use a stitch marker (or a bobby pin, or a scrap of yarn) in the first stitch of each round. It saves a lot of guessing.
- Make three flowers in a row. Your first one teaches you the pattern. Your third one shows you how much you’ve improved.
- Try a two-tone version. Work round one in yellow, switch colors, and work the petals in pink or white. It instantly looks more “designed.”
- Block them lightly. Pin the flower flat, mist it with water, and let it dry. Cotton flowers especially love this.
What to Do With Your Crochet Flowers
Here’s where the fun really starts. Once you can make one flower, you can make a dozen, and they’re surprisingly useful:
- Hair clips and headbands: Sew or glue a flower onto a plain clip. Kids adore these.
- Brooches: Attach a pin back and wear it on a coat or tote bag.
- Bookmarks: Add a long chain to the back of a flower and you’ve got a sweet, handmade gift.
- Garlands: String several flowers together for a nursery, a party, or a spring mantel.
- Appliqués: Stitch them onto hats, blankets, baby cardigans, or even a store-bought pillow cover.
- Gift toppers: Swap the plastic bow for a flower. People keep these long after the wrapping paper is gone.
Some of my favorite gifts have been nothing more than three little flowers tied together with a ribbon. Small, quick, personal. That’s the whole charm of crochet.
Frequently Asked Questions
How long does it take a beginner to crochet a flower?
Your very first one might take 20 to 30 minutes while you get comfortable with the magic ring. After two or three, most people get it down to around 10 to 15 minutes.
Can I use a chain ring instead of a magic ring?
Absolutely. Chain 4, slip stitch into the first chain to form a ring, and work your 10 single crochet into that. The center will have a small hole that won’t fully close, but plenty of crocheters prefer this method when they’re starting out.
What’s the best yarn for crochet flowers?
Medium-weight cotton is the easiest for beginners because the stitches are crisp and easy to see. Acrylic works too and comes in endless colors. Thinner yarn with a smaller hook will give you tiny, delicate flowers once you’re more confident.
Is this pattern in US or UK terms?
US terms. If you’re used to UK patterns, read “single crochet” as UK double crochet and “double crochet” as UK treble crochet.
Your First Flower Is Just the Beginning
Remember that lumpy rectangle sitting in the drawer? It wasn’t proof that you’re bad at crochet. It was just the wrong first project.
A simple flower gives you something the rectangle never could: a quick, clear win. And once you’ve felt that, picking up the hook again gets a whole lot easier. Today it’s a 5-petal flower. Next month it might be a granny square. A few months from now, maybe that blanket you dreamed about at the very start.
Grab whatever yarn you have on hand and make one tonight. It doesn’t need to be perfect. It just needs to be yours.
Over to you: Did your first flower turn out the way you hoped, or did it surprise you? Tell me in the comments what color you picked and what you’re planning to do with it. And if you get stuck on a step, ask away. I read every comment, and chances are someone else is wondering the same thing.


One Comment