16 Classic Baseball Nail Ideas with Stitch Art

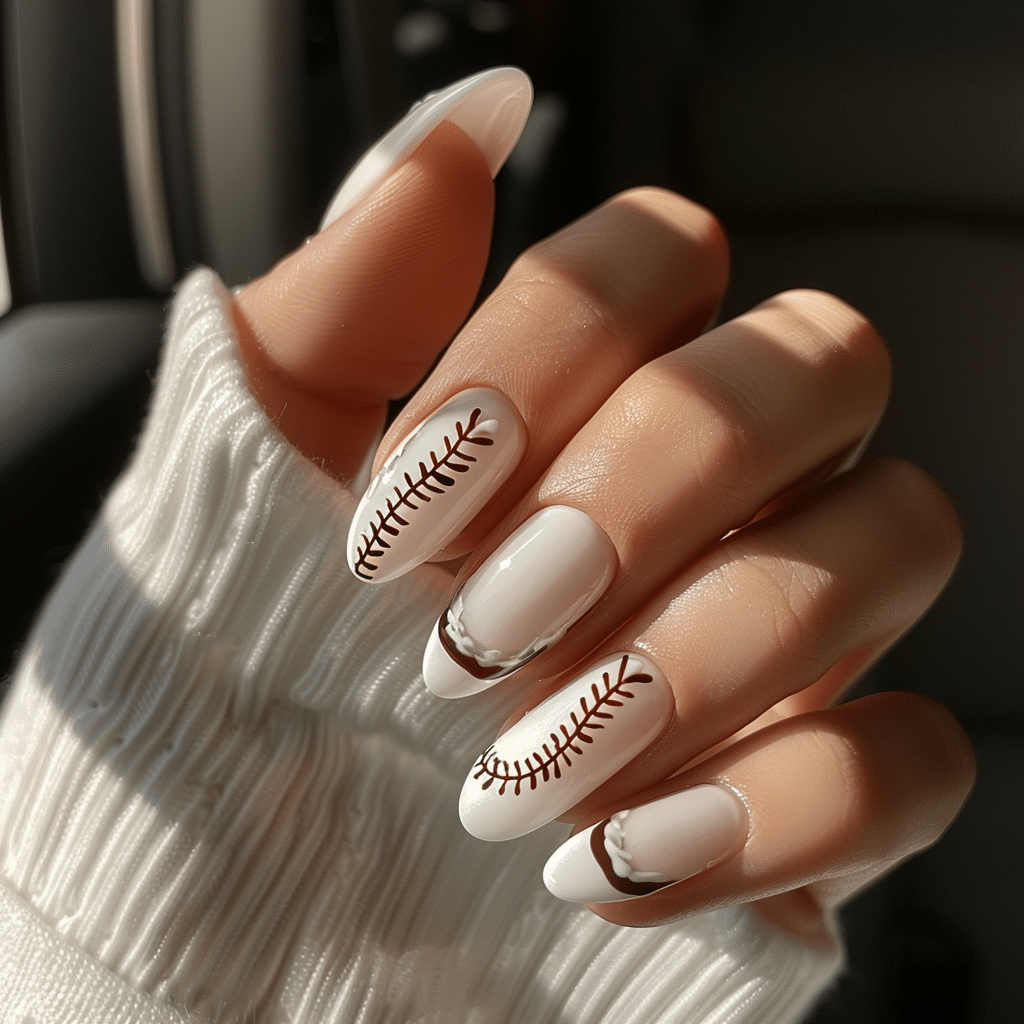
16 Classic Baseball Nail Ideas with Stitch Art showcase sporty elegance through detailed nail designs inspired by America’s favorite pastime.
These nail art concepts combine baseball stitching patterns, team colors, and creative elements to create stunning manicures perfect for game day or everyday wear. Whether you’re a dedicated fan or simply love unique nail art, these baseball-inspired designs offer endless creative possibilities.
| Topic | Details |
|---|---|
| Category | Nail Art |
| Skill Level | Intermediate |
| Time Needed | 45-90 minutes |
| Tools Needed | Gel polish, nail art brushes, dotting tools, UV/LED lamp |
| Best For | Baseball fans, sports enthusiasts, themed events |
Table of Contents
Why Baseball Nail Art with Stitch Designs Works
Baseball nail art has become increasingly popular because it combines personal passion with creative expression. The iconic red stitching against a white background creates high visual contrast that translates beautifully to nail designs. These patterns are instantly recognizable and versatile enough to work on various nail shapes and lengths.
The stitch art technique used in baseball nail designs allows for both simple and complex interpretations. Fine detail work mimics the authentic texture of baseball leather while geometric patterns provide structure and balance. This nail art style works exceptionally well with gel polish because the medium allows for precise line work and maintains vibrant colors without chipping.
From a technical perspective, baseball nail designs offer excellent practice for developing fine motor skills and brush control. The repetitive stitch patterns help nail artists perfect their technique while creating visually cohesive designs. These designs also provide opportunities to incorporate team colors, numbers, and additional sports elements for personalized manicures.
Tools and Products Needed for Baseball Stitch Nail Art
| Product | Purpose | Alternatives |
|---|---|---|
| UV/LED Lamp | Cures gel polish properly | 48W or higher recommended |
| White Gel Base Color | Creates baseball background | Nude or cream shades |
| Red Gel Polish | Stitch detail work | Black or team colors |
| Fine Nail Art Brush | Creates precise stitching lines | Striping brush or liner brush |
| Dotting Tool Set | Creates stitch dots and details | Toothpick or bobby pin |
| Base Coat Gel | Protects natural nails | Ridge-filling base coat |
| Top Coat Gel | Seals design and adds shine | Matte or glossy finish |
| Nail File and Buffer | Shapes and prepares nails | Glass file or 180-grit file |
| Cuticle Oil | Maintains nail health | Jojoba or vitamin E oil |
| Nail Cleanser | Removes oils before application | Isopropyl alcohol alternative |
For premium quality gel products and professional nail tools, visit Gel Nails by Lina for expert-recommended supplies that ensure long-lasting results.
Step-by-Step Application Guide for Baseball Stitch Nail Art
Nail Preparation
- Remove any existing nail polish completely using acetone or gel remover.
- File your nails to your desired shape using smooth, one-directional strokes.
- Gently push back cuticles using a wooden or rubber cuticle pusher.
- Buff the nail surface lightly to create texture for better adhesion.
- Cleanse nails thoroughly with nail cleanser to remove oils and debris.
- Allow nails to dry completely before proceeding to polish application.
Base Coat Application
- Apply a thin layer of gel base coat to each nail, avoiding skin contact.
- Cap the free edge by running the brush along the nail tip.
- Cure under UV/LED lamp according to manufacturer instructions, typically 30-60 seconds.
- Check for any uncured spots and ensure complete polymerization before continuing.
White Base Color Application
- Apply the first thin coat of white gel polish evenly across the nail.
- Cure the first color coat under the lamp for the recommended time.
- Apply a second coat for full opacity and even color saturation.
- Cure the second coat completely before beginning detail work.
- Ensure the white base is smooth without streaks or bumps.
Creating Baseball Stitch Details
- Load a fine nail art brush with red gel polish, removing excess on the bottle rim.
- Create a curved line following the natural arc you want for the baseball seam.
- Add small perpendicular lines across the curved line to create stitch marks.
- Space stitches evenly, approximately 2-3 millimeters apart for realistic appearance.
- Repeat the process on the opposite side to mirror the baseball pattern.
- Use a dotting tool to add small dots at the ends of each stitch for dimension.
- Cure the design thoroughly for 60 seconds under the lamp.
Finishing and Top Coat
- Apply a thin layer of gel top coat over the entire nail design.
- Cap the free edge carefully to seal the design and prevent chipping.
- Cure the top coat for the full recommended time, usually 60-90 seconds.
- Wipe away the tacky residue layer using a lint-free wipe if using a regular top coat.
- Apply cuticle oil around the nail edges to hydrate and finish the manicure.
Pro Nail Technician Tips for Baseball Nail Art
- Practice your stitch pattern on paper or a practice wheel before applying to nails to perfect spacing and consistency.
- Use a striping brush for ultra-thin lines that create more realistic baseball stitching details on smaller nail surfaces.
- Thin your red gel polish slightly with gel medium if it’s too thick for fine detail work and precise application.
- Create a guide dot pattern first with a toothpick before drawing connecting lines for perfectly spaced stitches.
- Layer your design by curing after each color section to prevent smudging and maintain crisp lines throughout.
- Apply thinner coats of polish rather than thick layers to prevent wrinkling, shrinking, or improper curing of gel.
Common Gel Nail Mistakes in Baseball Stitch Art
| Mistake | Why It Happens | How to Fix |
|---|---|---|
| Thick Gel Layers | Applying too much product at once or not self-leveling properly | Use thin coats and allow proper curing time between each layer |
| Smudged Stitch Lines | Not curing between design steps or touching wet polish | Cure each design element separately and use a steady hand support |
| Uneven Stitch Spacing | Freehand application without planning or reference marks | Mark placement points lightly before creating full stitch pattern |
| Flooding the Cuticle | Applying polish too close to skin or using too much product | Leave a small gap at cuticle and clean edges before curing |
| Design Lifting at Edges | Insufficient nail prep or not capping free edge properly | Ensure proper dehydration and seal edges with base and top coat |
16 Baseball Nail Design Variations with Stitch Art
| Style | Description | Best Occasion |
|---|---|---|
| Classic Full Baseball | White background with red stitching across entire nail surface | Game day, casual wear |
| Accent Nail Design | Baseball pattern on ring finger with coordinating solid colors | Everyday wear, subtle sports style |
| Team Color Ombré | Gradient team colors with baseball stitching overlay | Team spirit events, playoffs |
| French Tip Baseball | White tips with red stitching along the smile line | Professional settings, elegant sports look |
| Diamond Pattern Background | Baseball stitching with diamond field texture underneath | Championship games, special events |
| Number Integration | Player numbers incorporated into stitch design | Birthday tributes, player appreciation |
| Glitter Baseball | Sparkling base with matte red stitching details | Evening games, celebrations |
| Negative Space Design | Clear sections with strategic baseball stitch placement | Modern minimalist look, fashion forward |
| Chrome Baseball | Metallic chrome finish with contrasting stitch work | Special occasions, trendy events |
| Matte Finish Baseball | Soft matte base with glossy red stitching contrast | Sophisticated sports style, adult events |
| Mini Baseball Tips | Small baseball design at nail tips only | Workplace appropriate, subtle fandom |
| Full Team Theme | Team logos, colors, and baseball stitching combined | Season opener, fan gatherings |
| Vintage Baseball | Cream and brown tones mimicking aged baseball leather | Retro themed events, classic style |
| 3D Textured Stitches | Raised gel stitching for dimensional effect | Competition nail art, photo shoots |
| Watercolor Baseball | Soft painted background with defined stitch details | Artistic expression, creative events |
| Minimalist Single Stitch | One curved stitch line on neutral background | Understated elegance, professional settings |
Explore more creative nail art designs and tutorials at Gel Nails by Lina for inspiration and professional techniques.
Nail Care and Maintenance for Baseball Stitch Designs
Proper maintenance ensures your baseball nail art remains vibrant and chip-free for weeks. Apply cuticle oil daily to keep the nail bed hydrated and prevent lifting around the edges. This simple step maintains flexibility in the gel polish and prevents cracking from dehydration.
Wear protective gloves when cleaning or doing dishes to shield your nail art from harsh chemicals and excessive water exposure. Prolonged water contact can weaken the bond between gel layers and cause premature lifting. Avoid using your nails as tools to prevent stress on the design.
Schedule regular maintenance appointments every two to three weeks to address growth and refresh your design. Professional nail technicians can perform fills on baseball designs to extend wear time. Between appointments, monitor for any signs of lifting and address immediately to prevent moisture or bacteria from entering.
Keep your nails at a manageable length to reduce stress on the gel polish and prevent accidental breaks. Baseball stitch designs work beautifully on various lengths, but medium lengths offer the best balance between visibility and durability for intricate patterns.
How to Remove Baseball Stitch Gel Nails Safely
- File the shiny top coat layer gently to break the seal and allow acetone penetration.
- Soak cotton pads in pure acetone and place them directly on each nail surface.
- Wrap each finger in aluminum foil to create heat and enhance the removal process.
- Allow the acetone wraps to sit for 10-15 minutes without disturbing them.
- Remove the foil and cotton, then gently push off softened gel with a wooden cuticle stick.
- Avoid forcing or scraping gel that hasn’t fully loosened to prevent nail damage.
- Buff nails gently to remove any remaining gel residue after soaking.
- Wash hands thoroughly and apply nourishing cuticle oil to rehydrate nails.
- Allow nails to rest for at least 24 hours before applying new gel polish.
Nail Health and Safety for Baseball Nail Art
Maintaining healthy nails while enjoying decorative baseball designs requires attention to proper application and removal techniques. Always ensure adequate nail preparation without over-filing, which weakens the nail structure. Light buffing creates sufficient texture for adhesion without compromising nail integrity.
Monitor your nails for signs of allergic reactions to gel products, including redness, swelling, or itching around the nail bed. If sensitivity develops, discontinue use immediately and consult a dermatologist. Some individuals develop sensitivities to gel ingredients over time with repeated exposure.
Avoid keeping gel polish on nails continuously for extended periods. Give your natural nails breaks between applications to allow them to breathe and recover. During break periods, strengthen nails with protein treatments and maintain hydration with quality cuticle oils.
Frequently Asked Questions About Baseball Stitch Nail Art
How long do baseball gel nail designs last?
Baseball gel nail designs typically last two to three weeks with proper application and care. The longevity depends on nail preparation quality, lifestyle factors, and maintenance habits. Using quality gel products and applying thin, even coats extends wear time significantly. Regular cuticle oil application and avoiding harsh chemicals helps preserve the design integrity throughout the wear period.
Can beginners create baseball stitch nail art successfully?
Beginners can absolutely create baseball stitch nail art with practice and patience. Start with simpler designs like single accent nails before attempting full sets. Using nail art brushes or even toothpicks makes creating stitch lines more manageable for those new to detailed work. Practice the pattern on paper first to build confidence before working on actual nails.
What causes baseball nail art designs to peel or lift?
Baseball nail art peels due to inadequate nail preparation, moisture exposure, or improper curing. Failing to properly cleanse and dehydrate the nail surface before application prevents proper adhesion. Applying gel too close to the cuticle or skin allows moisture to seep underneath. Using thick polish layers or insufficient curing time also contributes to premature lifting and peeling issues.
How do I make my baseball stitch nail art last longer?
Make baseball nail art last longer by ensuring thorough nail preparation and proper application technique. Cap the free edge with every coat including base, color, and top coat. Apply cuticle oil daily to maintain flexibility and prevent drying. Wear gloves during cleaning tasks and avoid prolonged water exposure to protect the gel integrity throughout wear.
What is the difference between gel and regular polish for baseball designs?
Gel polish provides superior durability and chip resistance compared to regular polish for detailed baseball designs. Gel requires UV or LED lamp curing and lasts significantly longer without fading or smudging. Regular polish dries through evaporation, chips more easily, and may smudge intricate stitch details. Gel maintains glossy shine throughout wear while regular polish dulls over time and requires more frequent touch-ups.
Conclusion
16 Classic Baseball Nail Ideas with Stitch Art offer sports enthusiasts and nail art lovers creative ways to express their passion through beautiful manicures. These versatile designs range from subtle accent nails to bold full-set statements perfect for any occasion. With proper technique, quality products from Gel Nails by Lina, and consistent maintenance, your baseball stitch nail art will remain stunning throughout the season. Whether you’re cheering from the stands or simply love the aesthetic, these timeless designs celebrate America’s favorite pastime with style and creativity.