
You did it. You made a foundation chain, worked a full row of stitches into it, and reached the end without dropping a loop. You feel like a genius.
Then you look at your work and think: …now what?
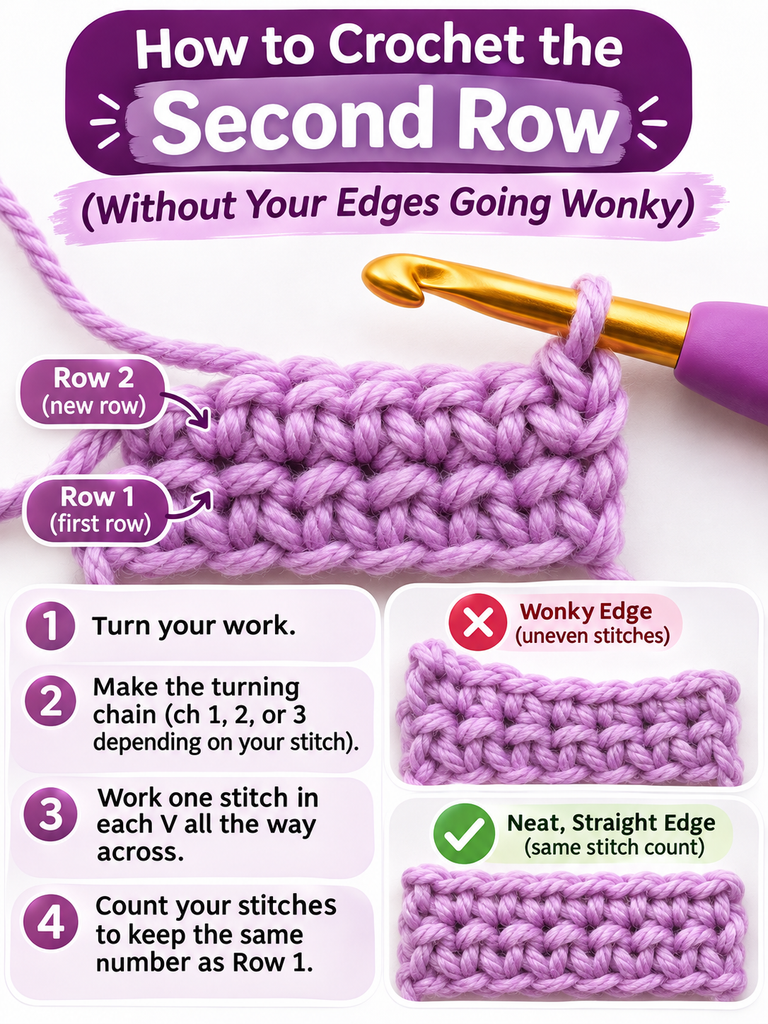
If that’s where you are right now, you’re in very good company. The second row is where almost every beginner gets stuck. The first row has a clear road map (just follow the chain!), but row two asks you to turn, figure out a “turning chain,” and find stitches that suddenly all look the same.
Let’s untangle it together, one step at a time.
Table of Contents
Key Takeaways
- At the end of each row, you turn your work and make a turning chain to reach the height of the next row.
- The turning chain length depends on your stitch: 1 for single crochet, 2 for half double, 3 for double crochet.
- From row two onward, you work into the “V” at the top of each stitch, going under both loops.
- Whether the turning chain counts as a stitch decides where you place your first and last stitches.
- Counting your stitches and using two stitch markers is the easiest way to keep edges straight.
First, a Quick Look at What You’ve Made
Hold your first row up and look closely at the top edge. See that row of little sideways “V” shapes, like a braid running along the top? Each V is the top of one stitch.
Every V has two strands:
- The front loop – the strand closest to you
- The back loop – the strand farthest from you
Unless a pattern says otherwise, you’ll slide your hook under both loops of each V. That’s the “standard” way to crochet, and it’s what we’ll do here.
Honestly, learning to recognize these Vs is half the battle. Once you see them, you’ll never wonder “where does my hook go?” again.
Step 1: Turn Your Work
When you finish the last stitch of row one, you’ll have a single loop on your hook. Keep it there.
Now flip the whole piece over, like turning the page of a book, so the end you just finished is now at the right side (if you’re right-handed) and the back of your work faces you. Your hook and working yarn stay at the same corner.
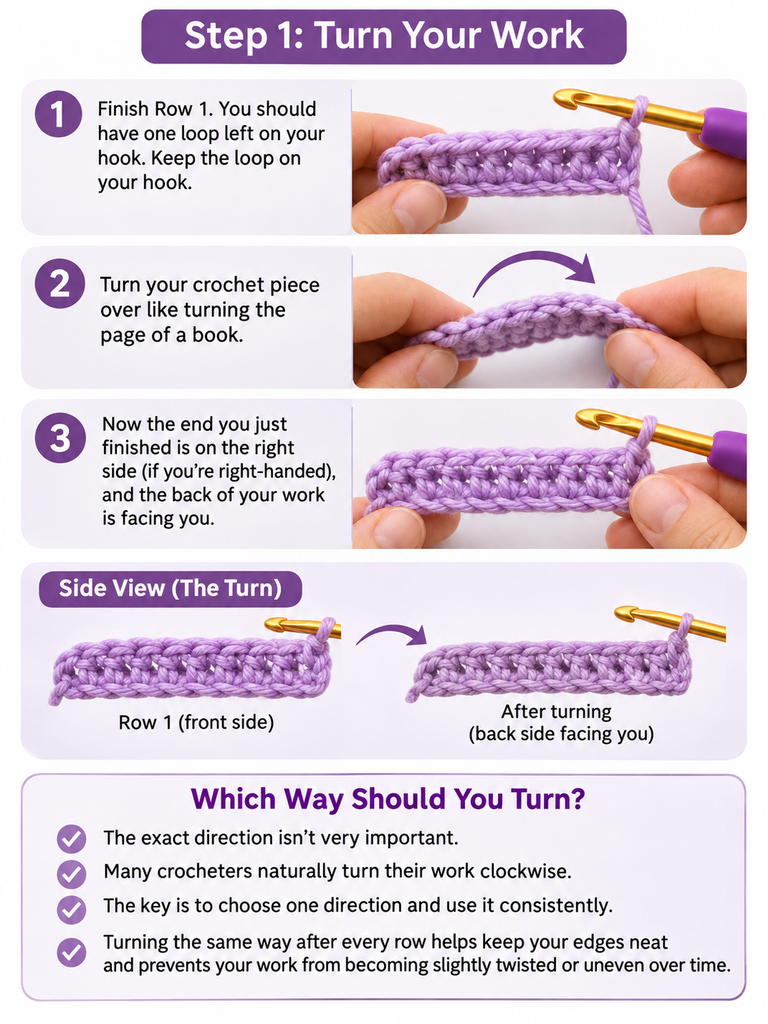
Does it matter which direction you turn? Not really. Most crocheters turn clockwise, but the key is to pick one direction and stick with it. Switching back and forth can twist your edge slightly over time.
Step 2: Make Your Turning Chain
Here’s the bit that confuses everyone, so let’s go slowly.
Crochet stitches have different heights. Before you start a new row, you need to “lift” your yarn up to the height of the stitches you’re about to make. That lift is the turning chain.
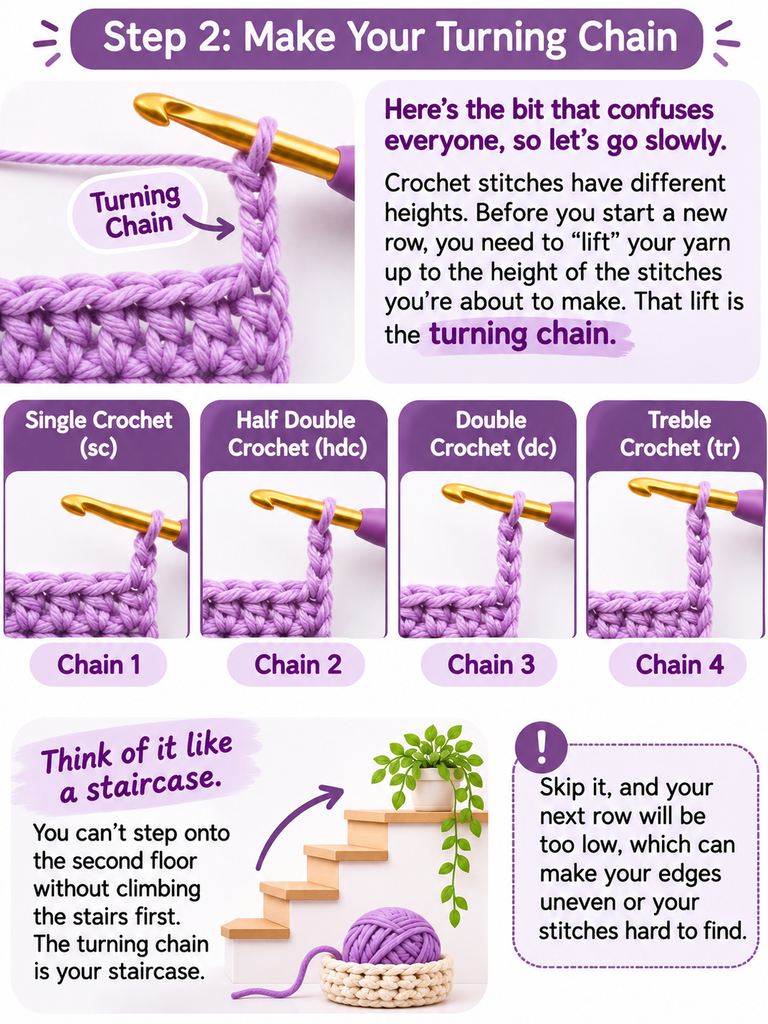
- Single crochet (sc): chain 1
- Half double crochet (hdc): chain 2
- Double crochet (dc): chain 3
- Treble crochet (tr): chain 4
Think of it like a staircase. You can’t step onto the second floor without climbing the stairs first. The turning chain is your staircase.
Skip it, and your edge pulls down and puckers. Make it too long, and you’ll get a loose, loopy edge with little gaps.
Step 3: Does the Turning Chain Count as a Stitch?
This one question decides where your very first stitch goes. And it’s the #1 reason beginners’ work slowly turns into a triangle or trapezoid.
Single crochet: it does NOT count
The chain-1 is too short and skinny to look like a real stitch. So after you chain 1, you work your first sc into the very first stitch, the one right at the base of your turning chain.
At the end of the row, your last sc goes into the last stitch of the previous row. No stitches skipped, none added.
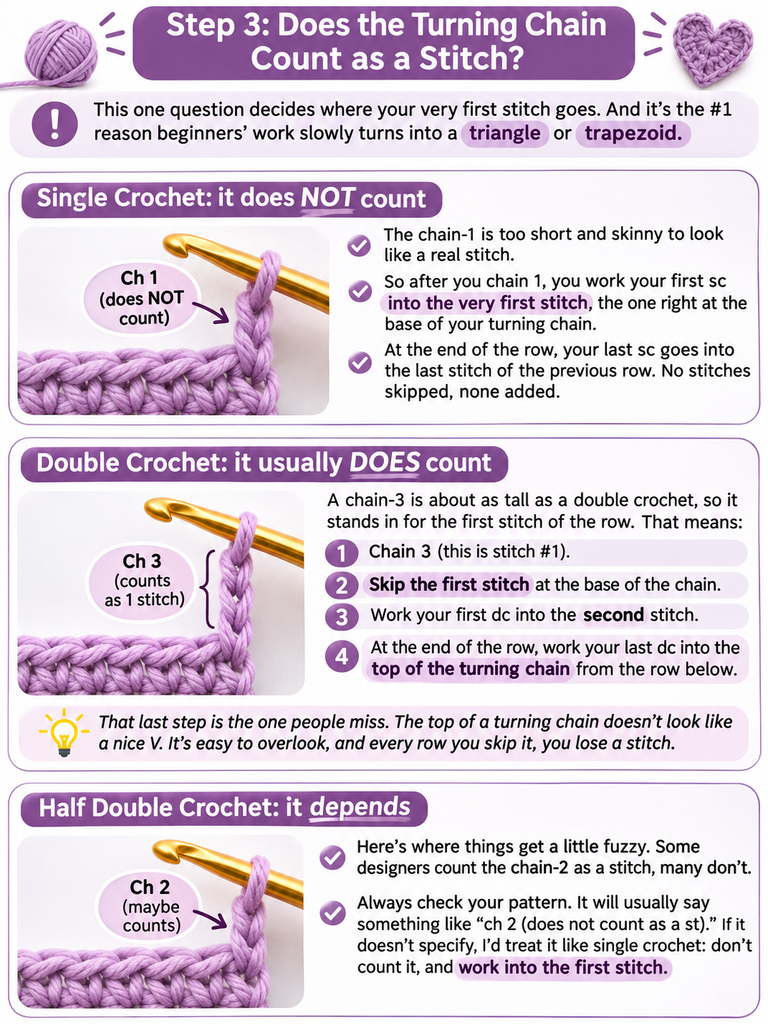
Double crochet: it usually DOES count
A chain-3 is about as tall as a double crochet, so it stands in for the first stitch of the row. That means:
- Chain 3 (this is stitch #1).
- Skip the first stitch at the base of the chain.
- Work your first dc into the second stitch.
- At the end of the row, work your last dc into the top of the turning chain from the row below.
That last step is the one people miss. The top of a turning chain doesn’t look like a nice V. It’s easy to overlook, and every row you skip it, you lose a stitch.
Half double crochet: it depends
Here’s where things get a little fuzzy. Some designers count the chain-2 as a stitch, many don’t. Always check your pattern. It will usually say something like “ch 2 (does not count as a st).” If it doesn’t specify, I’d treat it like single crochet: don’t count it, and work into the first stitch.
Step 4: Work Across the Row
Now the fun part. Insert your hook under both loops of the next V, make your stitch, then move to the next V. Repeat all the way across.
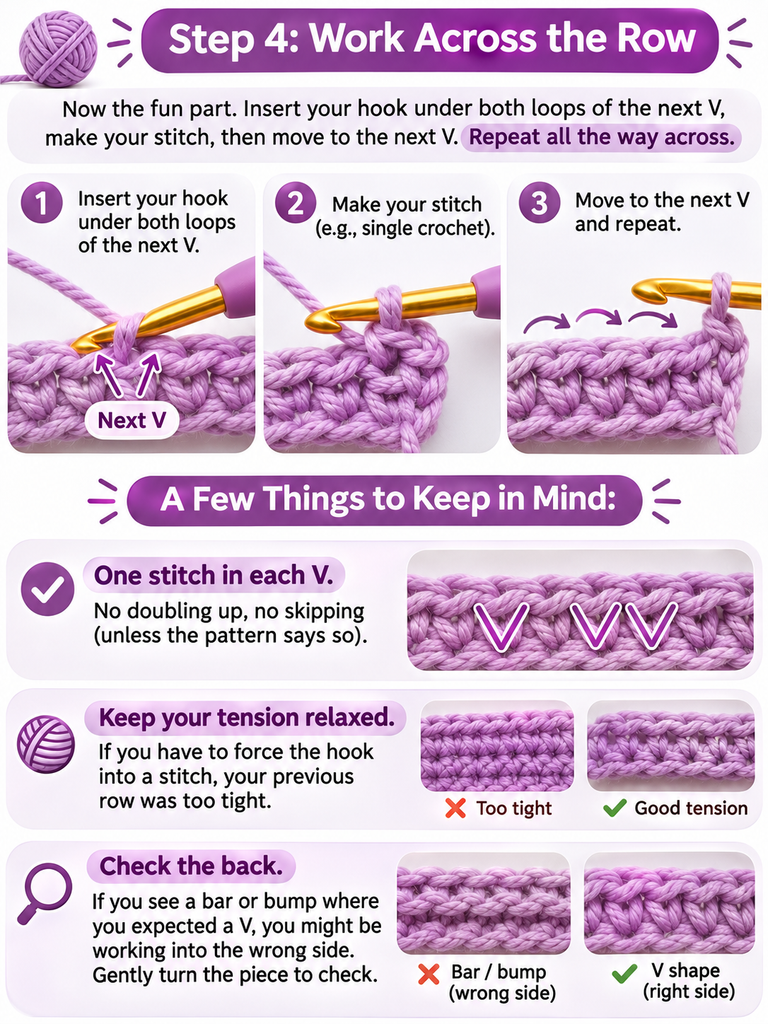
A few things to keep in mind while you go:
- One stitch in each V. No doubling up, no skipping (unless the pattern says so).
- Keep your tension relaxed. If you have to force the hook into a stitch, your previous row was too tight.
- Check the back. If you see a bar or bump where you expected a V, you might be working into the wrong side. Gently turn the piece to check.
Step 5: Count Your Stitches
I know. Counting feels tedious. But if there’s one habit that separates frustrated beginners from confident ones, it’s this.
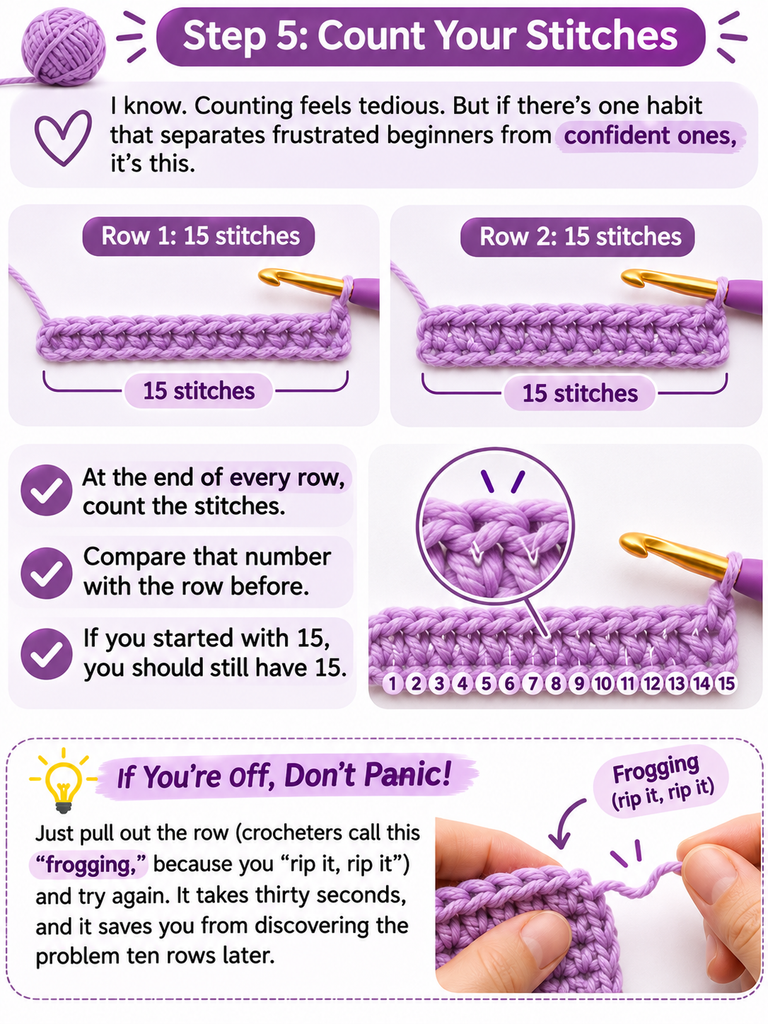
At the end of every row, count the stitches. Compare that number with the row before. If you started with 15, you should still have 15.
If you’re off, don’t panic. Just pull out the row (crocheters call this “frogging,” because you “rip it, rip it”) and try again. It takes thirty seconds, and it saves you from discovering the problem ten rows later.
The Stitch Marker Trick That Changes Everything
Here’s a tip I wish someone had told me on day one.
After you make the first stitch of a row, clip a stitch marker into it. Do the same with the last stitch. When you come back on the next row, those markers show you exactly where the row begins and ends. No guessing, no squinting at edges.
For double crochet, put the marker into the top chain of your turning chain. That way you’ll never forget to work into it.
Once you can spot the edge stitches without help (and you will, sooner than you think), you can retire the markers.
Common Second-Row Problems (and How to Fix Them)
“My work keeps getting wider.” You’re probably adding an extra stitch at the start, usually by working into the base of the turning chain when it already counts as a stitch. Check the rules for your stitch above.
“My work keeps getting narrower.” Most likely, you’re skipping the last stitch, especially the top of the turning chain in double crochet. That last stitch hides at the very edge, so look closely.
“My edges have little holes or gaps.” Your turning chain might be too loose or too long. Try tightening it a bit, or use one chain fewer than usual. Many crocheters do a chain-2 instead of a chain-3 for double crochet for a neater edge.
“I can’t find the first stitch.” It’s often tucked tightly right under your turning chain. Gently stretch the edge or tilt the work toward the light. A smooth, light-colored yarn makes this much easier.
“The second row is way tighter than the first.” Very common! Beginners often relax on row one and tense up on row two. Loosen your grip on the yarn, take a breath, and let your loops be a little roomier.
Practice Makes Rows: A Simple Exercise
Want to lock this in? Try this small swatch:
- Chain 16.
- Row 1: sc in the 2nd chain from the hook and in each chain across (15 sc).
- Row 2: ch 1, turn. sc in each stitch across (15 sc).
- Rows 3–10: repeat Row 2. Count after every row!
Once your little square has straight sides, try the same exercise in double crochet: chain 18, dc in the 4th chain from the hook and in each chain across, then ch 3, turn, skip the first stitch, dc across, and finish in the top of the turning chain. You’ll feel the difference straight away.
And if you haven’t gathered your tools yet, have a look at our guide to Crochet Supplies for Beginners. A smooth #4 yarn and a 5 mm hook will make this practice so much easier.
Final Thoughts
The second row is a turning point (literally). Once you understand how to turn, how tall your turning chain should be, and where the first and last stitches live, every row after that is simply the same thing again.
Scarves, blankets, dishcloths, granny squares: they’re all built on this one skill. So if your first swatch looks a little wobbly, that’s not a failure. That’s a crocheter in progress.
How’s your second row looking? Is your swatch staying straight, or slowly turning into a triangle? (Mine did too, I promise.) Share your progress or your questions in the comments, and I’ll help you figure out what’s going on.