Olive Green Nails: Elegant Almond Nail Designs Perfect for Spring & Weddings

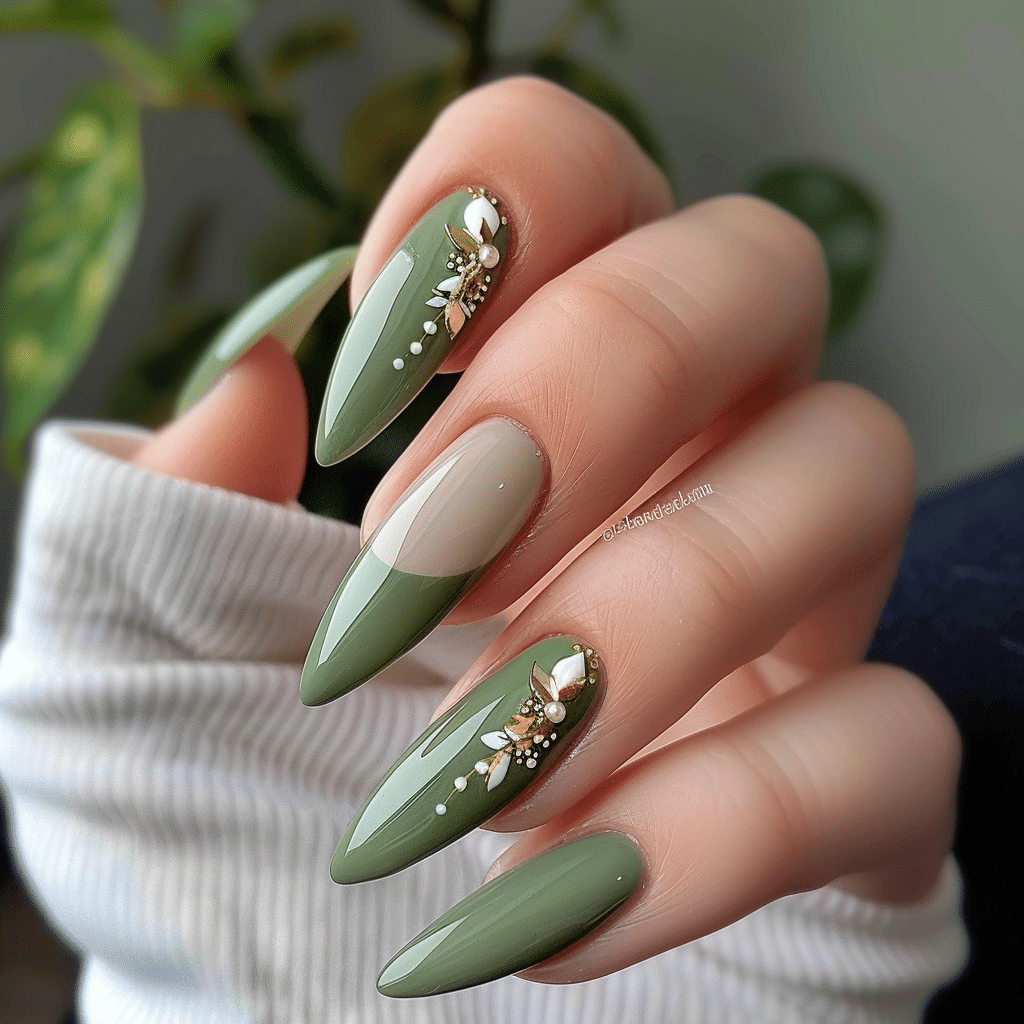
Olive green nails have emerged as the sophisticated choice for modern brides and spring celebrations, combining earthy elegance with timeless refinement.
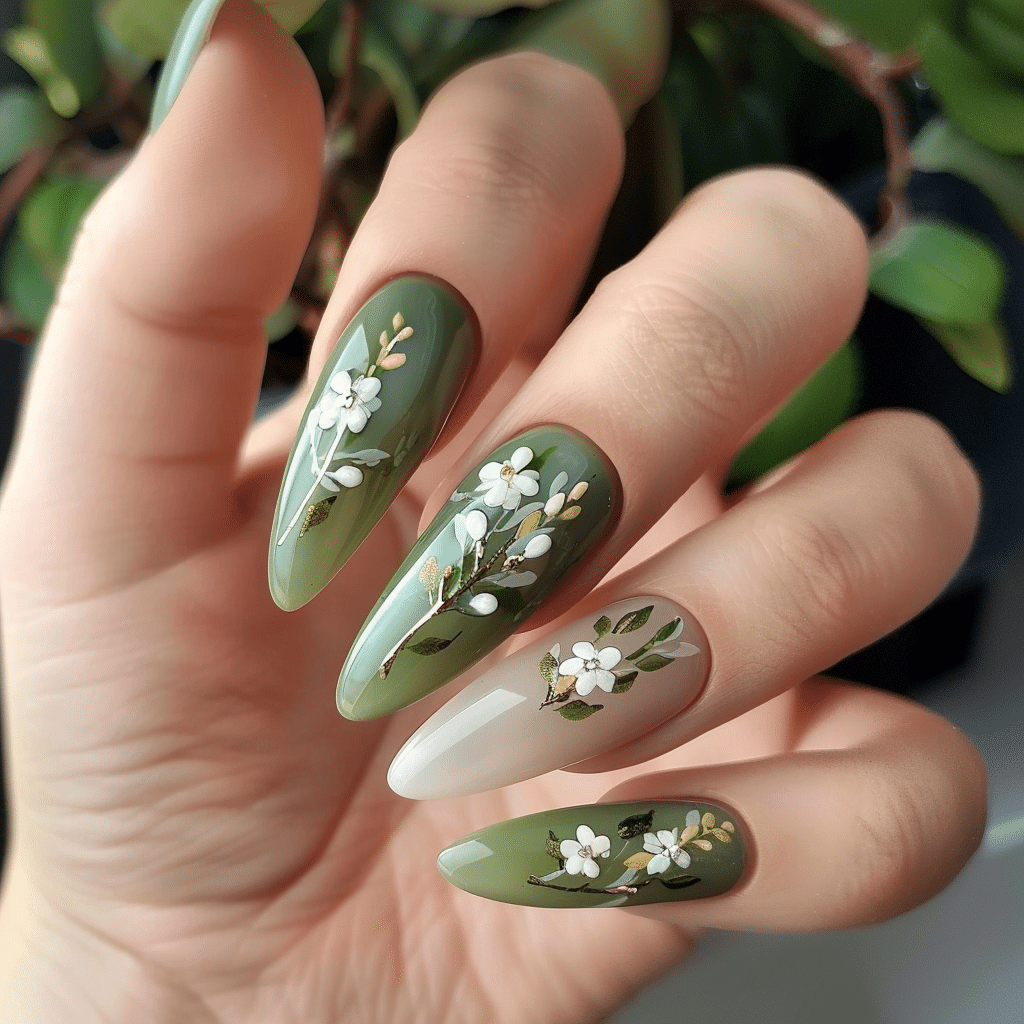
This versatile shade complements various skin tones and wedding themes, from rustic outdoor ceremonies to elegant garden receptions. The almond nail shape enhances the natural beauty of olive green polish, creating a feminine silhouette that elongates fingers while maintaining practicality for everyday wear.
| Topic | Details |
|---|---|
| Category | Gel Nails / Nail Art |
| Skill Level | Intermediate |
| Time Needed | 90-120 minutes for full application |
| Tools Needed | UV/LED lamp, gel polish, nail file, base coat, top coat |
| Best For | Brides, wedding guests, spring events, nature-inspired themes |
Table of Contents
Why This Nail Technique Works
Olive green nail designs work exceptionally well for weddings and spring events because the color embodies natural sophistication without overwhelming bridal aesthetics. The muted, earthy tone provides a neutral backdrop that complements floral arrangements, bridesmaids’ dresses, and outdoor venue settings. Unlike bold or bright colors, olive green maintains elegance while offering distinctiveness that photographs beautifully in natural lighting conditions.
The almond nail shape paired with olive green gel polish creates optical elongation that flatters hands in wedding photography and ring exchange moments. This shape offers structural strength at the stress point, reducing breakage during pre-wedding preparations and honeymoon activities. Gel formulation ensures the olive green shade remains chip-free and glossy throughout extended wedding festivities, maintaining flawless appearance from ceremony through reception.
Professional nail technicians favor olive green for bridal clients because the pigmentation depth allows for versatile nail art applications. The shade serves as an ideal canvas for gold leaf accents, delicate botanical designs, or subtle shimmer overlays. This versatility enables customization that reflects personal style while maintaining wedding-appropriate sophistication that coordinates with various color palettes and seasonal themes.
Tools and Products Needed
| Product | Purpose | Alternatives |
|---|---|---|
| UV/LED Lamp | Cures gel polish for durable finish | 36W LED lamp minimum |
| Olive Green Gel Polish | Primary color application | Sage green, moss green shades |
| Base Coat | Protects natural nail and ensures adhesion | Strengthening base coat |
| Top Coat | Seals design and adds glossy finish | Matte top coat for alternative look |
| Nail File 180-Grit | Shapes almond nail structure | Crystal glass file |
| Nail Buffer | Smooths nail surface for application | 4-way buffer block |
| Cuticle Oil | Maintains nail health and hydration | Jojoba or vitamin E oil |
| Cuticle Pusher | Prepares nail bed area | Wooden orange stick |
| Nail Cleanser | Removes oils before application | Isopropyl alcohol |
| Gel Polish Remover | Safe removal when needed | Pure acetone |
For professional-quality olive green nail designs and gel nail supplies, visit Gel Nails by Lina for curated product recommendations and technique tutorials.
Step-by-Step Application Guide
Nail Preparation
- Sanitize hands and nails thoroughly with antibacterial cleanser to ensure hygienic application conditions.
- Remove existing polish completely using acetone-based remover and lint-free cotton pads.
- Push back cuticles gently using a cuticle pusher at a 45-degree angle to expose the nail bed.
- Trim and shape nails into almond form by filing sides at an angle toward the center point.
- Buff the nail surface lightly with a fine-grit buffer to remove shine and create adhesion texture.
- Wipe nails with nail cleanser to remove dust, oils, and residue that could prevent proper bonding.
Base Coat Application
- Apply a thin layer of base coat starting from the cuticle area and sweeping toward the free edge.
- Cap the free edge by running the brush along the nail tip to seal edges completely.
- Cure under UV/LED lamp according to manufacturer specifications, typically 30-60 seconds for LED lamps.
- Check for complete coverage ensuring no bare spots remain on the nail surface.
Gel Polish Layers
- Apply the first thin layer of olive green gel polish using controlled brush strokes from base to tip.
- Maintain distance from cuticles and sidewalls, leaving a tiny margin to prevent flooding.
- Cure the first olive green layer under the lamp for the recommended time based on polish brand.
- Apply a second thin coat of olive green gel polish for opacity and depth of color.
- Ensure even coverage across the entire nail surface without creating thick pooling areas.
- Cure the second layer completely under the UV/LED lamp following product guidelines.
Curing Process
- Position hands flat inside the lamp ensuring all nails receive direct UV/LED light exposure.
- Cure for the complete recommended duration without removing hands prematurely from the lamp.
- Allow nails to cool for 10-15 seconds after curing before applying additional layers.
- Check each nail for proper curing by gently testing the surface for any tacky or soft areas.
Finishing and Top Coat
- Apply a thin layer of gel top coat over the cured olive green polish using smooth strokes.
- Cap the free edge again with top coat to maximize wear time and prevent chipping.
- Cure the top coat layer under the lamp for the full recommended duration for complete hardening.
- Wipe away any residual sticky layer using cleanser and a lint-free wipe if using a tacky-finish top coat.
- Apply cuticle oil around the nail perimeter to hydrate skin and enhance the finished appearance.
- Massage oil into cuticles and surrounding skin for optimal absorption and nourishment.
Pro Nail Technician Tips
- Store olive green gel polish upside down for 24 hours before application to ensure pigment distribution and prevent streaking during application.
- Use thin polish layers rather than thick coats to prevent wrinkling, shrinking, or incomplete curing that causes premature lifting.
- Extend curing time by 10-15 seconds for darker shades like olive green to ensure complete polymerization and maximum durability.
- Avoid touching the nail surface after cleansing and before base coat application to prevent oil transfer that compromises adhesion.
- Apply cuticle oil daily to nail edges and surrounding skin to maintain flexibility and prevent dryness that leads to lifting.
- Schedule gel nail appointments 3-5 days before wedding events to allow any minor lifting to appear and be corrected if necessary.
Common Gel Nail Mistakes
| Mistake | Why it Happens | How to Fix |
|---|---|---|
| Thick Gel Layers | Attempting to achieve opacity in one coat causes uneven curing | Apply multiple thin layers instead of one thick application |
| Improper Curing | Insufficient lamp wattage or premature hand removal prevents complete hardening | Use minimum 36W LED lamp and cure for full recommended time |
| Skipping Nail Prep | Rushing preparation steps leaves oils and debris that prevent bonding | Always cleanse, buff, and dehydrate nails before base coat application |
| Flooding the Cuticle | Applying polish too close to cuticle line causes lifting and separation | Leave small margin at cuticle area and use precise brush control |
| Neglecting Edge Sealing | Forgetting to cap free edges allows moisture penetration and chipping | Run brush along nail tip with each layer including base and top coat |
Nail Design Variations for Olive Green Nails
| Style | Description | Best Occasion |
|---|---|---|
| French Olive Tips | Classic french manicure with olive green tips on nude base | Subtle wedding look for traditional brides |
| Gold Leaf Accent | Delicate gold foil fragments applied to olive green base | Formal weddings and evening receptions |
| Botanical Nail Art | Hand-painted leaves, ferns, or eucalyptus designs on olive background | Garden weddings and spring celebrations |
| Olive Ombre | Gradient transition from light sage to deep olive green | Modern weddings and fashion-forward events |
| Minimalist Accent Nail | Single accent nail with gold line or pearl embellishment | Understated elegance for any wedding theme |
| Matte Olive Finish | Olive green with matte top coat for sophisticated texture | Contemporary weddings and autumn celebrations |
Explore more olive green wedding nail inspiration and design tutorials at Gel Nails by Lina for seasonal collections and bridal nail art galleries.
Nail Care and Maintenance
Maintaining olive green gel nails requires consistent hydration practices to preserve both polish integrity and natural nail health. Apply cuticle oil twice daily, focusing on the nail perimeter where lifting typically initiates due to dryness and environmental exposure. This practice maintains flexibility in the gel layer while preventing brittleness that leads to cracking or peeling during the two to three week wear period.
Protect olive green wedding nails from harsh chemicals by wearing protective gloves during cleaning activities or exposure to chlorinated water. Chemical contact can dull the sophisticated olive tone and compromise the top coat seal that provides glossy finish and protection. For brides preparing for honeymoon travel, pack cuticle oil and a nail file for minor maintenance needs that preserve the manicure appearance throughout the trip.
Avoid using nails as tools for opening packages, scratching, or prying objects that create stress points on the almond shape structure. The tapered almond form, while elegant, concentrates pressure at the apex point, making it susceptible to breakage under lateral force. Gentle handling preserves the nail shape and prevents premature damage that requires professional repair before important wedding events or photo sessions.
How to Remove Gel Nails Safely
- File the shiny top coat surface gently using a medium-grit file to break the seal and allow acetone penetration.
- Soak cotton pads in pure acetone and place directly onto each nail surface covering the entire olive green area.
- Wrap each finger with aluminum foil strips to secure cotton and prevent acetone evaporation during soaking.
- Wait 12-15 minutes allowing the acetone to dissolve the gel polish layers without rushing the process.
- Remove foil wraps and gently push off softened gel using a wooden cuticle stick or orange stick.
- Avoid scraping or forcing gel removal if resistance occurs; rewrap and soak for additional five minutes instead.
- Buff nails lightly after complete removal to smooth any remaining residue or roughness on the surface.
- Apply nourishing cuticle oil and hand cream to restore moisture lost during the acetone soaking process.
Nail Health and Safety
Maintaining nail health during olive green gel application requires attention to proper preparation techniques that preserve the natural nail structure. Over-filing or aggressive buffing removes essential keratin layers that provide strength and protection against environmental damage. Professional nail technicians recommend light surface buffing only to remove shine while maintaining nail plate thickness that prevents sensitivity and weakness.
Allow natural nails to breathe between gel applications by scheduling breaks every two to three months for restoration periods. During these intervals, apply strengthening treatments and maintain cuticle hydration to rebuild keratin structure and prevent brittleness. This practice proves especially important for brides planning multiple wedding-related events requiring consecutive gel applications over extended periods.
Frequently Asked Questions
How long do olive green gel nails last?
Olive green gel nails typically last two to three weeks with proper application and maintenance practices. The longevity depends on factors including nail preparation quality, daily hand use, and exposure to water or chemicals. Applying cuticle oil daily and avoiding harsh chemical contact extends wear time significantly. Most brides schedule application five to seven days before wedding events to ensure optimal appearance during ceremonies and photographs.
How do I remove gel nails safely at home?
Safe gel nail removal requires soaking nails in pure acetone for 12-15 minutes using cotton pads and aluminum foil wraps. Never peel or force gel polish off as this damages the natural nail surface and removes healthy keratin layers. After soaking, gently push softened gel off using a wooden stick and immediately apply cuticle oil to restore moisture. Professional removal remains the safest option for maintaining long-term nail health and preventing damage.
What is the difference between gel nails and acrylic nails?
Gel nails cure under UV or LED light and provide a flexible, glossy finish that appears more natural than acrylic applications. Acrylic nails use liquid monomer and powder polymer that air-dry to create a harder, more durable enhancement suitable for extreme length. Gel applications like olive green wedding nails offer easier removal, less odor during application, and better flexibility that prevents cracking. Acrylics provide superior strength for clients requiring significant length or structural support for weak natural nails.
Why do my gel nails peel or lift?
Gel nail lifting occurs primarily due to inadequate nail preparation, moisture trapped under polish, or oil contamination before application. Skipping proper buffing, cleansing, or dehydration steps prevents base coat bonding to the natural nail surface. Applying polish too close to cuticles or flooding sidewalls allows moisture penetration that breaks the seal. Ensure thorough preparation, thin polish layers, and proper edge sealing to prevent premature lifting and maximize wear time.
How can I make my olive green gel nails last longer?
Extend olive green gel nail wear by applying cuticle oil twice daily to maintain flexibility and prevent dryness-related lifting. Wear protective gloves during household cleaning, dishwashing, or chemical exposure that compromises polish integrity. Avoid excessive water exposure during the first 24 hours after application to allow complete bonding. Proper nail preparation including thorough cleansing, light buffing, and edge sealing creates the foundation for maximum longevity of two to three weeks.
For additional nail care guidance and olive green nail design inspiration, visit Gel Nails by Lina for expert tutorials and product recommendations.
Conclusion
Olive green nails offer the perfect combination of natural elegance and sophisticated style for spring weddings and special celebrations. The almond nail shape enhances the earthy beauty of olive tones while providing structural durability for extended wear throughout wedding festivities. By following proper application techniques, maintaining consistent nail care, and choosing quality gel products, you can achieve stunning olive green nails that photograph beautifully and complement any bridal aesthetic. Embrace this timeless trend for your next special occasion and experience the versatile elegance that olive green nail designs provide for modern celebrations.