

I still remember the first thing I ever crocheted. It was supposed to be a scarf. It ended up as a long, wobbly trapezoid that got wider every row because I had no idea I was adding stitches. I wore it anyway, mostly out of stubbornness.
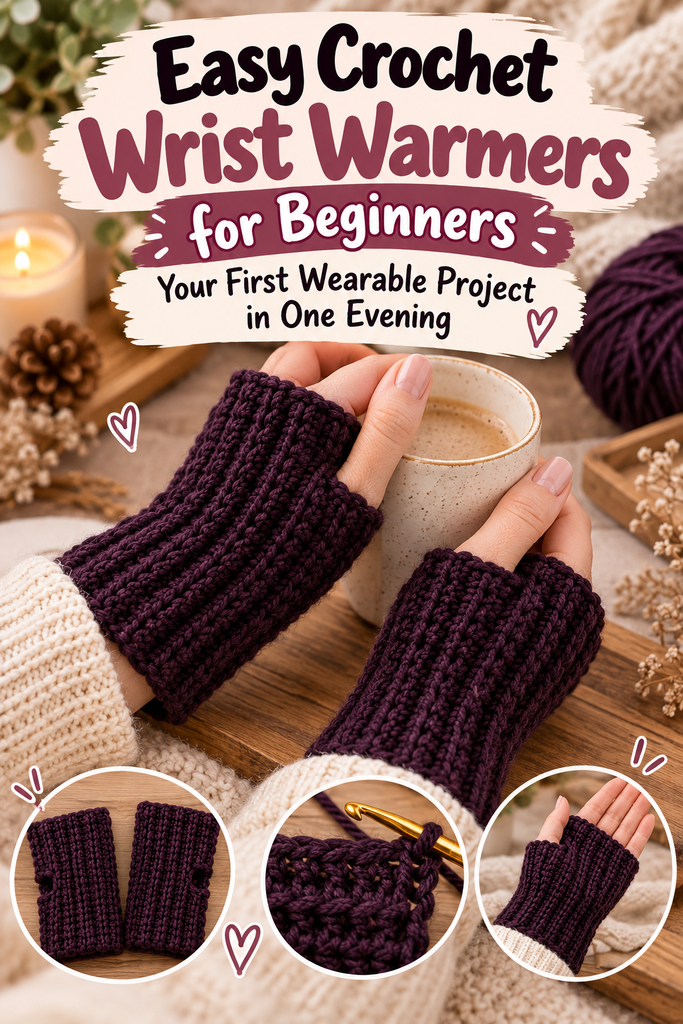
If I could go back and hand my beginner self one pattern, it would be this one. Wrist warmers are small, fast, and genuinely useful. You finish them before you lose interest, and you get to wear them the very next morning. That little win matters more than people admit.
So grab a hook and some yarn. By the end of tonight, you’ll have a pair of cozy fingerless warmers you made with your own hands.
Table of Contents
Key Takeaways
- One stitch does it all. The whole pattern uses half double crochet worked in the back loop, which creates a stretchy, ribbed fabric.
- No shaping required. You crochet a simple rectangle, then fold and seam it, leaving a gap for your thumb.
- One skein is plenty. About 100 to 150 yards of worsted weight yarn makes a full pair.
- Fit is easy to customize. Your starting chain sets the length, and your number of rows sets the width.
- Expect 2 to 4 hours total for both warmers if you’re brand new.
Why Wrist Warmers Are the Perfect First Project
Here’s the thing most beginner guides don’t say out loud: the hardest part of learning to crochet isn’t the stitches. It’s staying motivated long enough to finish something.
A blanket can take months. A scarf can feel endless around row 80. Wrist warmers, though? You can make one during a movie and the second during the next one.
They also teach you the real fundamentals without overwhelming you. You’ll practice a foundation chain, keep a consistent stitch count, turn your work, and seam two edges together. Those are the same skills you’ll use in hats, bags, and sweaters later on.
And honestly? They’re forgiving. If your tension is a little uneven, the ribbed texture hides a lot. Nobody is inspecting your wrists.
What You’ll Need
You don’t need a craft store haul for this. Keep it simple:
- Yarn: About 100 to 150 yards of worsted weight yarn (category 4, sometimes labeled “medium”). Pick a smooth, light-colored yarn so you can actually see your stitches.
- Hook: 5.0 mm (US H-8). This is the size most worsted yarn labels recommend.
- Yarn needle: A large, blunt tapestry needle for seaming and weaving in ends.
- Scissors
- Measuring tape (optional, but it makes sizing so much easier)
A quick word on yarn fiber. Acrylic is cheap, washable, and great for practice. Wool and wool blends are warmer and have a lovely bounce. My honest advice for your first pair is to avoid fuzzy, dark, or novelty yarns. They look gorgeous in the skein and are a nightmare when you’re trying to find the next stitch.
Stitches and Abbreviations (US Terms)
This pattern uses US crochet terms. If you’ve been watching UK tutorials, note that a US half double crochet is called a “half treble” in UK terms.
- ch – chain
- sl st – slip stitch
- hdc – half double crochet
- BLO – back loop only
- st(s) – stitch(es)
Not sure what “back loop only” means? Look at the top of any stitch and you’ll see a little sideways V. The loop farther from you is the back loop. Instead of going under both loops like usual, you slip your hook under just that back one. It’s the tiny trick that turns a flat fabric into stretchy ribbing.
Sizing: Make Them Fit Your Hands
Before you start, take two quick measurements:
- Length: From mid-forearm to just below your knuckles. For most adults, that’s about 7 to 8 inches (18 to 20 cm).
- Width: Around the widest part of your palm, just under your knuckles. Adult hands usually land between 7 and 8.5 inches (18 to 22 cm).
Because this pattern is worked sideways, your starting chain controls the length and your rows control the width. That means you can adjust the fit as you go, which is a huge relief when you’re new.
Gauge isn’t critical here, but for reference, worsted yarn in hdc BLO on a 5.0 mm hook usually comes out around 13 to 14 stitches per 4 inches.
The Pattern: Step by Step
Step 1: The Foundation Chain
Make a slip knot and ch 30. This gives you a warmer about 8 inches long. Want it shorter or longer? Add or remove chains in pairs until the chain matches your length measurement.

Try to keep your chains loose. Tight foundation chains are the number one beginner frustration, because you’ll struggle to work into them on the next row. If yours are tight, go up a hook size just for the chain.
Step 2: Row 1
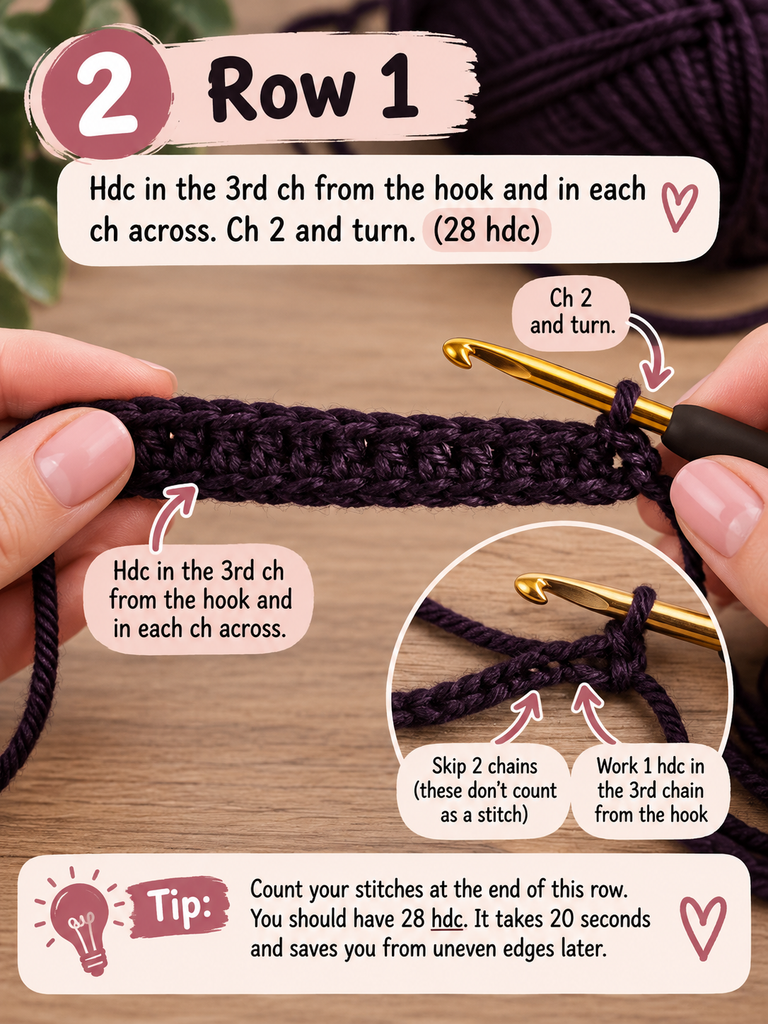
Hdc in the 3rd ch from the hook and in each ch across. Ch 2 and turn. (28 hdc)
The two skipped chains at the start don’t count as a stitch. Count your stitches at the end of this row. Seriously, count them. It takes 20 seconds and saves you from my trapezoid scarf situation.
Step 3: Rows 2 and Onward
Hdc in the BLO of each st across. Ch 2 and turn. (28 hdc)
Repeat this row. That’s it. That’s the whole pattern.
Keep going until the piece wraps snugly around your palm without stretching, usually somewhere between 18 and 22 rows. After a few rows, you’ll see raised ridges forming. That ribbing is what makes the warmer hug your hand instead of sagging.
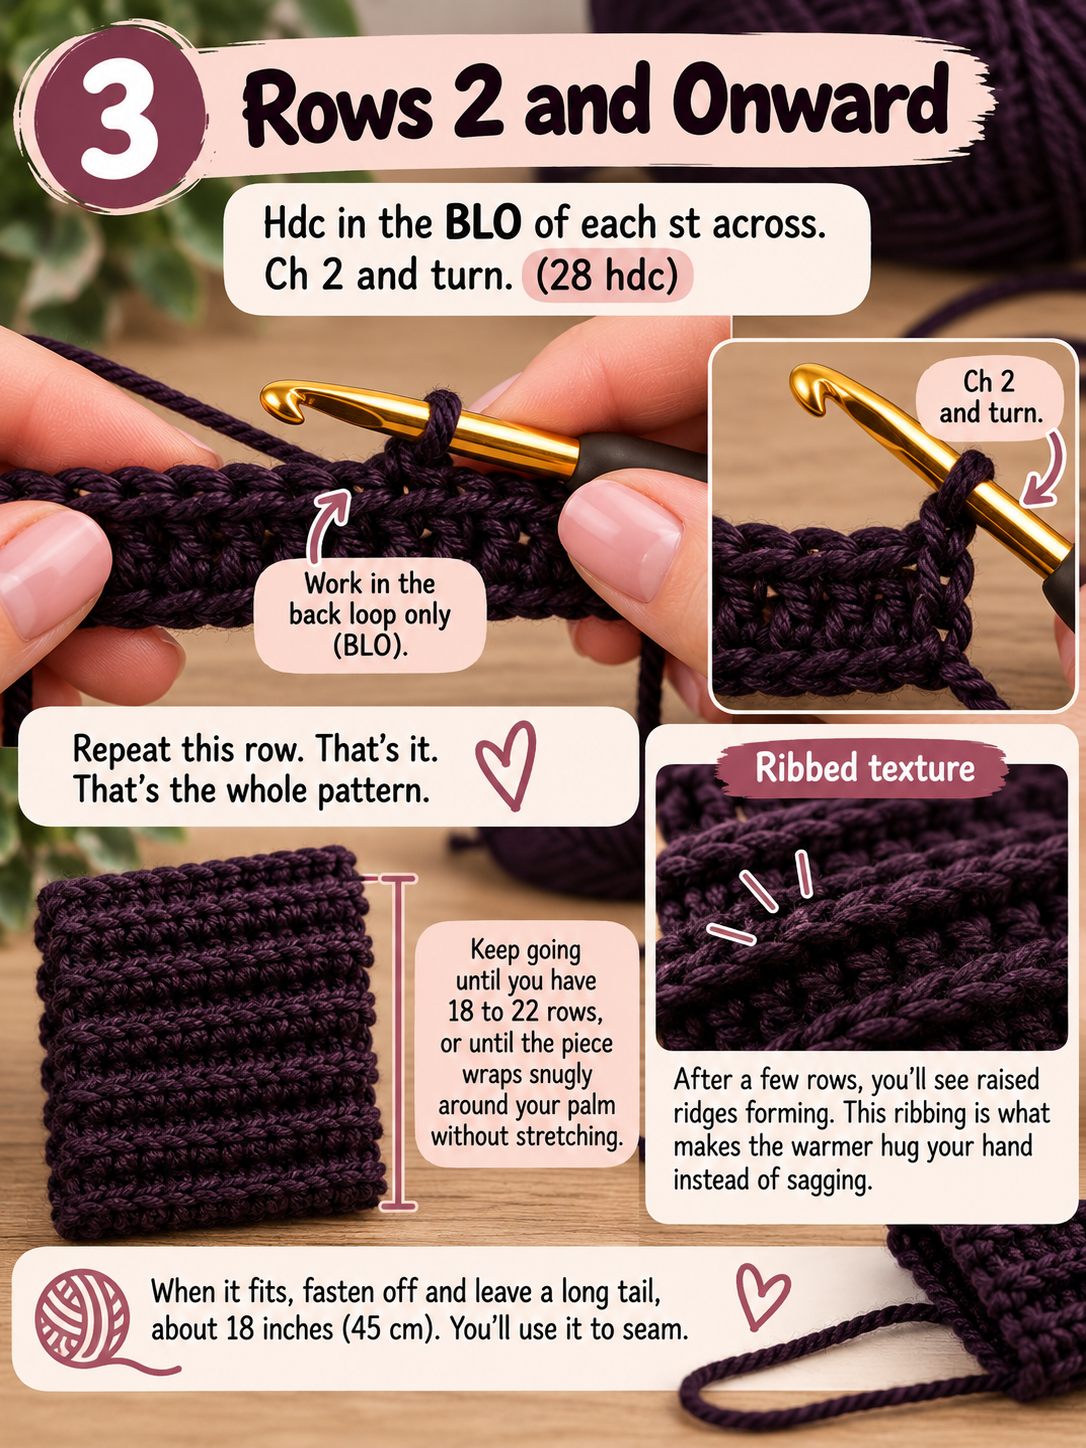
When it fits, fasten off and leave a long tail, about 18 inches (45 cm). You’ll use it to seam.
Step 4: Seam and Create the Thumb Hole
Fold your rectangle in half so the first row and last row line up, with the ridges running up and down your arm. Thread the long tail onto your yarn needle.
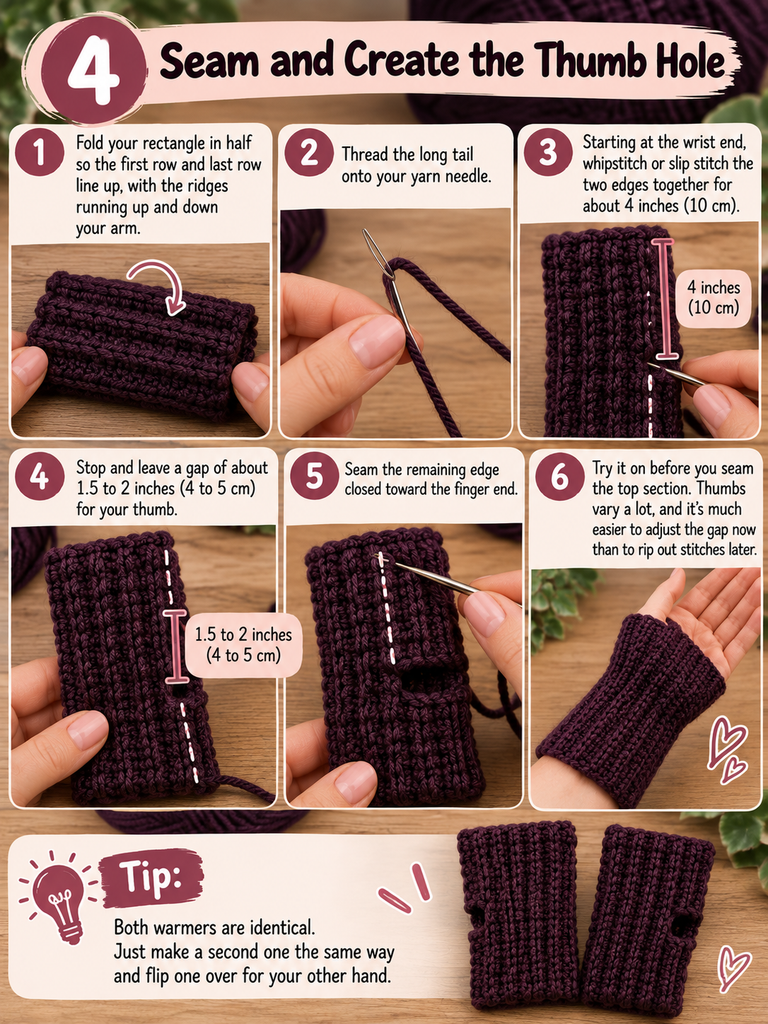
Starting at the wrist end, whipstitch or slip stitch the two edges together for about 4 inches (10 cm). Then stop and leave a gap of about 1.5 to 2 inches (4 to 5 cm) for your thumb. Seam the remaining edge closed toward the finger end.
Here’s an insider tip: try it on before you seam the top section. Thumbs vary a lot, and it’s much easier to adjust the gap now than to rip out stitches later.
Step 5: Finish and Repeat
Weave in all your ends, turn the warmer right side out, and admire it for a minute. You earned that.
Then make the second one exactly the same way. Since the thumb hole sits on the seam, both warmers are identical. Just flip one over for your other hand.

Common Beginner Mistakes (and How to Fix Them)
We’ve all been there. These are the problems I see most often, and none of them mean you’re “bad at crochet.”
- The edges are slanting or wavy. You’re probably adding or skipping a stitch at the end of a row. Place a stitch marker in the first and last stitch of each row so you never miss them.
- The fabric is stiff. Your tension is tight. Relax your grip on the yarn, or move up to a 5.5 mm hook.
- No ribbing is showing. You’re likely working through both loops. Double-check that your hook only goes under the back loop.
- The two warmers are different sizes. Totally normal, because tension changes as you get more comfortable. Count rows on the first one and match them on the second.
Easy Ways to Make Them Your Own
Once you’ve made one pair, you’ll want another. Trust me. Here are a few simple variations that don’t add much difficulty:
- Stripes: Change colors every 2 or 4 rows. Since you’re working sideways, the stripes will run up your arm.
- Longer arm warmers: Start with a longer chain, around 40 to 50, for extra coverage under coat sleeves.
- A decorative edge: Work a round of single crochet or a simple shell stitch around the finger opening.
- A button or embroidery: Stitch a little detail near the wrist. It’s a small touch that makes them look boutique-made.
They also make wonderful handmade gifts. A pair takes so little yarn that you can make several from a single skein of a pricier wool.
Frequently Asked Questions
Can a complete beginner really make these?
Yes. If you can chain and make a half double crochet, you can make these. Many people learn hdc on this exact project.
How long does it take?
Most beginners finish one warmer in 1 to 2 hours. As your speed improves, a full pair can easily fit into one evening.
Can I use a different yarn weight?
You can. With thicker yarn, use a larger hook and fewer chains. With thinner yarn, use a smaller hook and more chains. Just keep measuring against your hand as you go.
Why work in the back loop only?
It creates horizontal ridges that act like ribbing. That makes the fabric stretchier and helps the warmers grip your hand comfortably.
Final Thoughts: Start Small, Finish Proud
That wobbly scarf of mine is long gone, but I still think about it. Not because it was good, but because it taught me something: finishing matters more than perfection.
Wrist warmers give you that finish line fast. You’ll practice real skills, end up with something useful, and gain the confidence to take on bigger projects. And the next time someone asks where you got your cozy warmers, you get to say the best words in crafting: “I made them.”
Your Turn
Have you made your first pair? I’d genuinely love to see them. Share a photo in the comments, tell me which yarn you picked, or ask a question if you got stuck on a step. Every beginner question helps someone else who’s quietly wondering the same thing.
And if this pattern helped you, pin it or share it with a friend who’s been saying “I should learn to crochet” for years. This could be their sign.



One Comment