

Last October, a six-year-old named Eli marched out of my classroom wearing a lopsided orange paper hat, one green vine curl bouncing over his eyebrow. His mom asked him what he learned that morning. Without missing a beat, he said, “God scoops out the yucky stuff and puts His light inside.”
I nearly cried in the hallway.

That’s the magic of this little craft. It’s cheap, it’s quick, and kids wear it out the door, which means the lesson walks right into the car, the grocery store, and the dinner table. If you’re looking for a Christian fall craft that isn’t just “color this pumpkin,” this one’s for you.
Table of Contents
Key Takeaways
- The pumpkin hat takes about 20 to 30 minutes and uses basic classroom supplies: construction paper, glue, a stapler, and pipe cleaners.
- It pairs with the “pumpkin gospel,” a simple object lesson about how God cleans our hearts and fills us with His light.
- Key verses: Matthew 5:16, 2 Corinthians 5:17, and Psalm 51:10.
- It adapts easily for preschoolers (pre-cut pieces) up to older elementary kids (who can cut and write their own verse).
- Because kids wear the hat home, it starts conversations with parents long after class ends.
Why a Pumpkin Hat (and Not Just Another Coloring Sheet)?
Let’s be honest. Fall can feel a little awkward in children’s ministry. Pumpkins are everywhere, kids are excited about them, and plenty of Christian families want to enjoy the season without leaning into the spooky side of things.
Here’s the thing: the pumpkin itself is a wonderful teaching tool. It grows from a tiny seed, it’s harvested in its season, and when you open it up, it’s honestly kind of gross inside. Kids love that part. And it gives you a perfect, concrete picture of something abstract: what God does in a human heart.
A hat takes it one step further. A coloring sheet gets folded into a backpack and forgotten. A hat gets worn. It gets noticed. Someone asks, “Hey, what’s that?” and suddenly a five-year-old is explaining the gospel in the church parking lot.
What You’ll Need
Nothing fancy here. I’ve made this with a class of four and a class of thirty, and the list doesn’t change much.
- Orange construction paper or cardstock (cardstock holds up better for the pumpkin)
- Green construction paper for leaves
- Brown construction paper for the stem
- Yellow tissue paper (this is the “light,” and it’s the secret star of the craft)
- Green pipe cleaners for curly vines
- Glue sticks and a little white glue
- Child-safe scissors
- A stapler (adult use) and clear tape
- Markers or crayons
- A pencil for curling the vines
- Optional: a real pumpkin and a big spoon for the object lesson
Quick tip: If you only buy one “extra,” make it the cardstock. Regular construction paper pumpkins tend to droop forward by the end of class, and nobody wants a sad, flopping pumpkin.
Before Class: A Little Prep Goes a Long Way
You might be wondering how much to prepare ahead of time. It really depends on the age of your group.
For preschoolers (ages 3 to 5): Pre-cut everything. The headbands, the pumpkins, the leaves, the stems. Cut a heart or cross window into each pumpkin ahead of time too. Little hands want to glue and decorate, and that’s plenty.
For early elementary (ages 6 to 8): Pre-cut the headband strips and pumpkins. Let them cut their own leaves and stems from simple traced outlines.
For older kids (ages 9 and up): Give them templates and let them do it all. They’ll also enjoy writing the memory verse themselves.
One more thing I’ve learned the hard way: cut a few extra pumpkins. Somebody always glues theirs upside down, and somebody else always has a visiting cousin show up.
How to Make the Christian Pumpkin Hat: Step by Step
Step 1: Make the Headband
Cut orange or green paper into strips about 2 inches tall, running the long way across a 12 x 18 inch sheet. One strip usually isn’t long enough for a child’s head, so staple two together end to end. Wrap it around the child’s head, overlap the ends, and mark the fit. Don’t staple it closed yet. It’s much easier to decorate a flat strip.

Step 2: Cut Out the Pumpkin
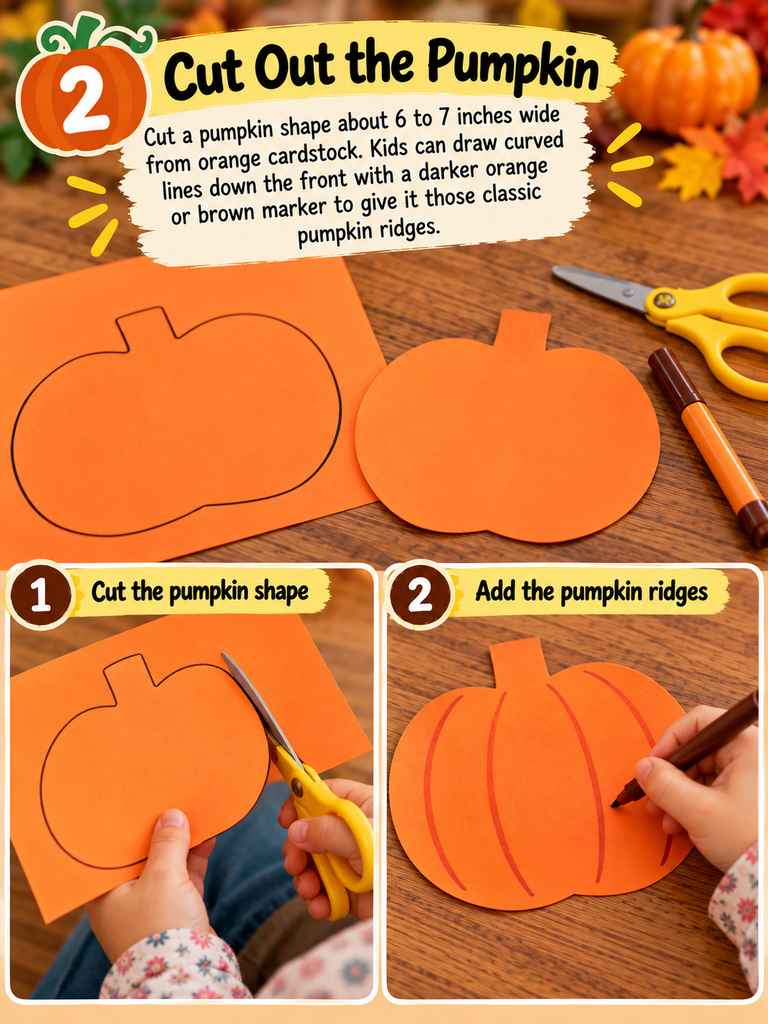
Cut a pumpkin shape about 6 to 7 inches wide from orange cardstock. Kids can draw curved lines down the front with a darker orange or brown marker to give it those classic pumpkin ridges.
Step 3: Add the “Light Inside”
This is my favorite part. Cut a heart or a simple cross shape out of the middle of the pumpkin (adults should do this for younger kids). Then glue a square of yellow tissue paper behind the opening. When the hat’s on and light hits it, the pumpkin looks like it’s glowing from the inside.
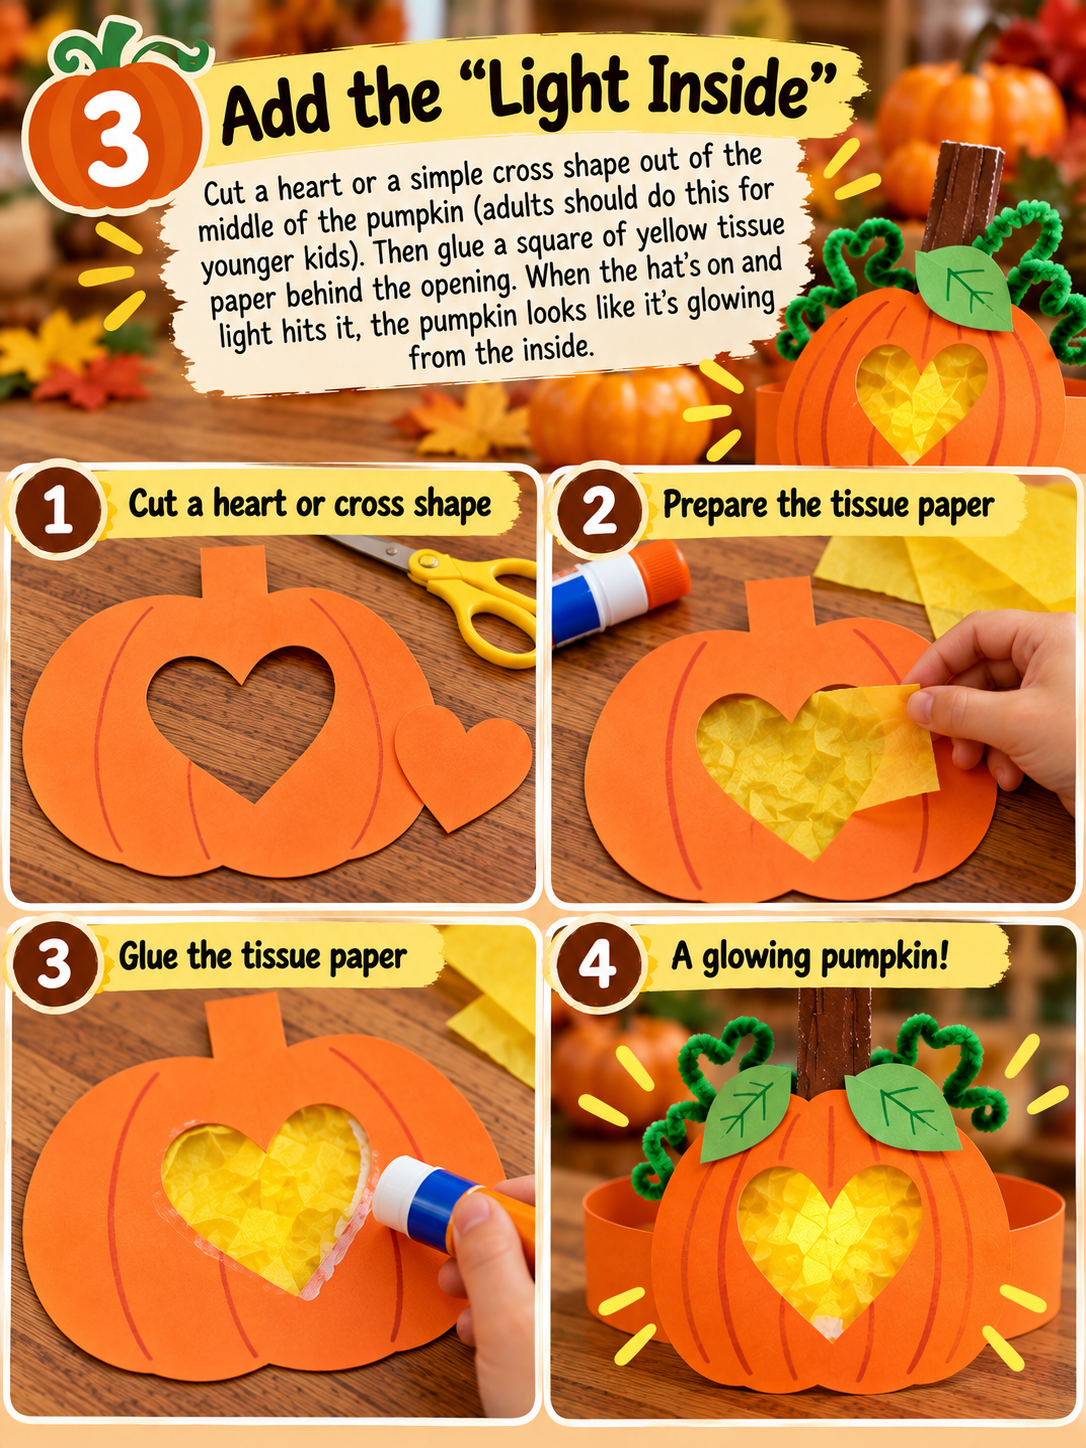
Instead of a spooky face, the pumpkin now carries a heart or cross filled with light. That small change makes all the difference, and it ties straight into the lesson.
Step 4: Add the Stem and Leaves
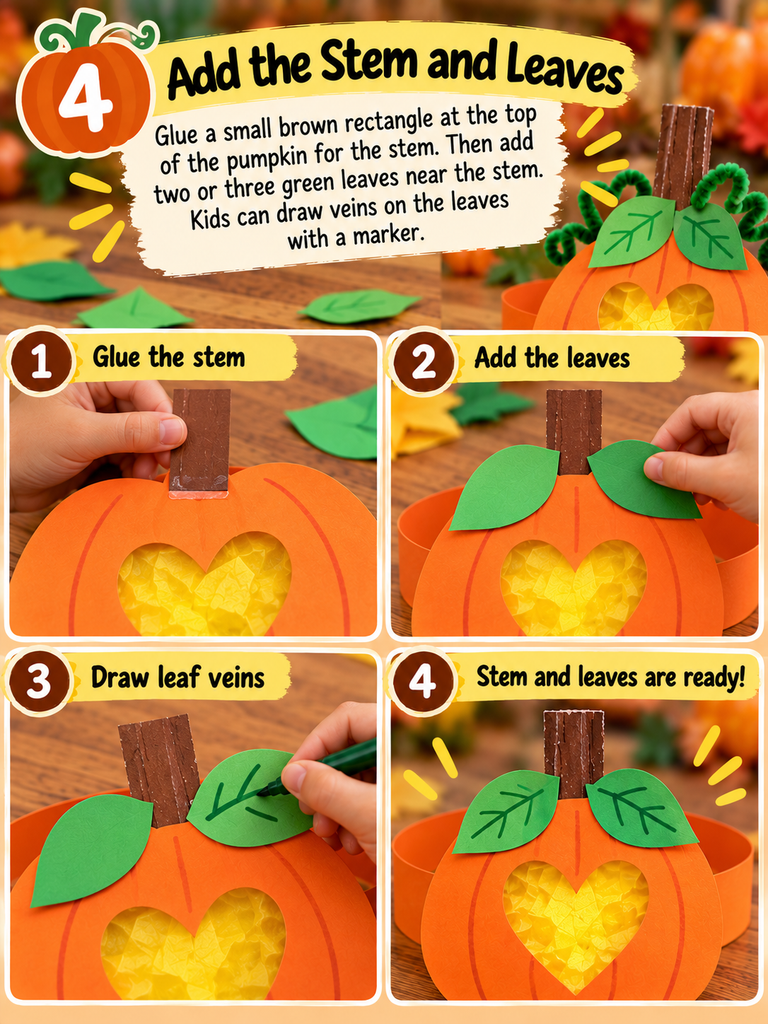
Glue a small brown rectangle at the top of the pumpkin for the stem. Then add two or three green leaves near the stem. Kids can draw veins on the leaves with a marker.
Step 5: Curl the Vines
Wrap a green pipe cleaner tightly around a pencil, then slide the pencil out. Instant vine! Tape or staple one or two curls behind the pumpkin so they bounce around. Fair warning: this step causes a lot of giggling.

Step 6: Write the Verse
On the headband, write a short verse or phrase. For younger kids, “Let your light shine!” is perfect. Older kids can write the full reference, Matthew 5:16.

Step 7: Attach and Fit
Glue or staple the pumpkin to the center front of the headband. Then wrap the band around the child’s head and staple it closed.
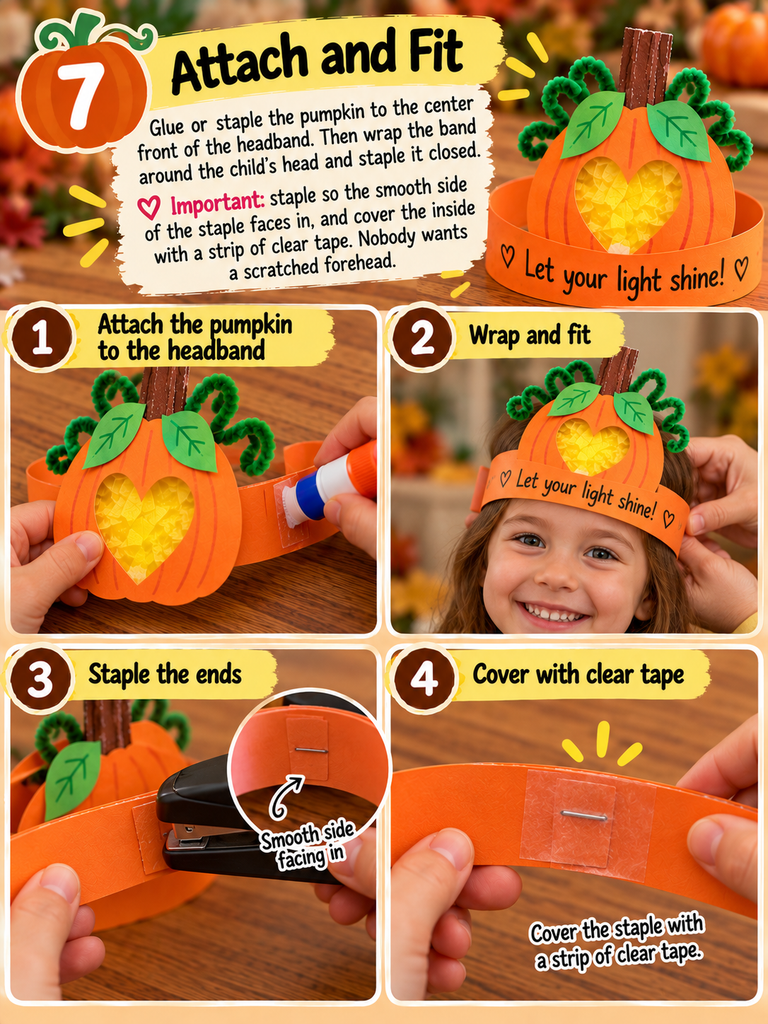
Important: staple so the smooth side of the staple faces in, and cover the inside with a strip of clear tape. Nobody wants a scratched forehead.
The 5-Minute Pumpkin Gospel Talk
Picture this: you’re sitting on the floor with a real pumpkin, a big spoon, and a circle of wide-eyed kids. You don’t need a script, but here’s the flow I use. It’s a version of the “pumpkin gospel” that many Sunday school teachers share each fall.
1. God chooses us. “When you go to a pumpkin patch, you pick one pumpkin out of hundreds. God knows each of us by name, and He loves us.”
2. He cleans us up. “Pumpkins come out of the field covered in dirt. Our hearts can get dirty too, when we’re unkind, when we lie, or when we disobey.”
3. He takes out the yucky stuff. (Open the top and let a few brave kids scoop.) “This is like the sin inside us. We can’t scoop it all out on our own, but Jesus can. When we ask Him, He forgives us.” This is a great moment to read Psalm 51:10: “Create in me a clean heart, O God; and renew a right spirit within me.”
4. He gives us a new face. “Instead of a scary face, God gives us a new heart and a new way to live.” Read 2 Corinthians 5:17: “Therefore if any man be in Christ, he is a new creature: old things are passed away; behold, all things are become new.”
5. He puts His light inside. (Place a battery tea light inside.) “Now the pumpkin shines! When Jesus lives in our hearts, His light shines through us so other people can see Him.” Finish with Matthew 5:16: “Let your light so shine before men, that they may see your good works, and glorify your Father which is in heaven.”
Then point to their hats. “See that yellow light in your pumpkin? That’s a reminder that you get to shine for Jesus this week.”
In my experience, kids remember the scooping part forever. Use it.
Fun Variations to Try
Once you’ve made the basic hat, there are so many ways to change it up for different lessons or ages.
Fruit of the Spirit Pumpkin Hat. Cut nine leaves and write one fruit of the Spirit on each (Galatians 5:22-23): love, joy, peace, patience, kindness, goodness, faithfulness, gentleness, and self-control. Glue them all around the headband like a leafy crown. It’s a great pick if your fall theme is “growing” in faith.
Thankful Harvest Hat. Perfect for November. Kids write or draw one thing they’re thankful for on each leaf. Pair it with Psalm 100:4 and talk about entering God’s presence with thanksgiving.
Paper Plate Pumpkin. Short on cardstock? Paint a small paper plate orange and use it as the pumpkin. It’s sturdier and gives preschoolers a fun painting activity (just do it the week before so it has time to dry).
Harvest Patience Hat. Teach Galatians 6:9 about not giving up, because “in due season we shall reap.” Talk about how pumpkins take months to grow, and how good things in our lives often take time too.
Little Tips That Make a Big Difference
- Write names inside the band first. Twenty orange hats look exactly alike at pickup time.
- Set up stations for big groups: one table for gluing, one for vines, one adult on stapler duty.
- Keep glue sticks as the default. White glue is great for tissue paper but turns into a puddle fast with little ones.
- Take a group photo. Thirty kids in pumpkin hats is pure joy, and parents will love it (just follow your church’s photo policy).
- Send a note home with the verse and one question parents can ask, like “What did God put inside your pumpkin?”
Frequently Asked Questions
Is a pumpkin craft okay for Christian families who avoid Halloween?
Absolutely. Pumpkins are a harvest food first and foremost. This craft swaps the jack-o’-lantern face for a heart or cross and focuses on God’s light, thankfulness, and new life. It works beautifully for harvest festivals, fall festivals, and Thanksgiving lessons.
How long does the pumpkin hat craft take?
Plan on 20 to 30 minutes for the craft, plus about 5 minutes for the pumpkin talk. With pre-cut pieces, preschoolers can finish in about 15 minutes.
What age group is this best for?
It works well from about age 3 through 10. Younger kids need more pre-cutting and help with stapling, while older kids can design and write everything on their own.
Can I do this craft at home instead of at church?
Yes! It’s a lovely family devotion activity. Carve a real pumpkin together for the object lesson, then make hats while you talk about the verses.
A Little Light Goes a Long Way
I keep thinking about Eli and his crooked hat. He didn’t remember the exact verse reference. He didn’t remember my carefully planned opening question. But he remembered that God takes out the yucky stuff and puts His light inside.
Honestly? That’s the whole point.
You don’t need a big budget or a Pinterest-perfect classroom to plant something lasting in a child’s heart this fall. Sometimes all it takes is some orange paper, a curly pipe cleaner, and a few minutes to tell the oldest, best story there is. So grab your supplies, cut a few extra pumpkins, and let those little lights shine.
Your Turn
Are you trying this pumpkin hat craft with your Sunday school class, homeschool group, or your own kids at the kitchen table? I’d love to hear how it goes. Drop a comment below and tell me which variation you chose, or share the funniest thing a child said during the pumpkin talk. (Trust me, there’s always something.) And if this idea helped you, pass it along to another teacher who’s hunting for a meaningful fall craft this week.




One Comment