It’s 6 p.m. on a rainy October evening. The kids are bouncing off the walls, the Halloween bin is still in the garage, and somebody just announced (loudly) that they’re “SO bored.”
You open the kitchen cupboard looking for snacks and spot a stack of coffee filters. Forty minutes later, there’s a row of rainbow ghosts drying on water bottles, and by bedtime they’re glowing on the windowsill like a tiny, friendly haunted house.

That’s the magic of coffee filter ghosts. They’re cheap, almost impossible to mess up, and they look far fancier than the effort that goes into them. Let me walk you through exactly how to make them, plus the little tricks that separate a soggy blob from a ghost worth showing off.
Table of Contents
Key Takeaways
- You only need five things: coffee filters, washable markers, a black paint marker, water, and a battery-operated tea light.
- Washable markers are the secret. Their ink dissolves in water, which is what creates that dreamy tie-dye blend.
- Shape it while it’s wet. Drying the filter over a water bottle is what gives your ghost its body.
- Patience matters. Plan on a few hours of drying time (overnight is even better).
- Flameless lights only. Paper and real flames don’t mix. Ever.
Why This Craft Works So Well (A Tiny Bit of Science)
Here’s the thing most tutorials skip: why does this look so good?
Coffee filters are made to let water travel through paper fibers. When you drip water onto a filter covered in washable marker, the water spreads outward through those fibers and carries the ink along with it. Colors creep into each other, soften at the edges, and blend into gradients you could never draw by hand.
It’s basically the same idea as the paper chromatography experiment from school science class, just way more festive. And if you’ve got curious kids, that’s a fun little lesson you can sneak in while they think they’re “just crafting.”
What You’ll Need
Materials
- Coffee filters (the round, fluted basket style)
- Washable markers in a few colors
- A black oil-based paint marker for the face
- Water
- Battery-operated tea light candles
Equipment
- A baking sheet (or any surface you don’t mind getting colorful)
- An empty plastic water bottle, one per ghost if you’re making a batch
- An eyedropper
Quick tip: No eyedropper? A spray bottle on its gentlest mist setting or even a paintbrush dipped in water will do the job. Just go slowly so you don’t flood the filter.
How to Make Coffee Filter Ghosts, Step by Step
Step 1: Gather Everything First
I know, I know. It’s tempting to dive right in. But once the filters are wet, you won’t want to go hunting for the eyedropper with inky fingers. Set everything out on the table before you start.

Step 2: Color Your Filter
Lay a coffee filter flat on your baking sheet. Smooth out the ridges as best you can.
Pick your first washable marker and start coloring. Swirls, stripes, polka dots, scribbles… it honestly doesn’t matter. Then grab a second color, one that plays nicely with the first, and fill in the rest of the filter.

Choosing colors that blend well: Stick with neighbors on the color wheel. Purple and blue, orange and yellow, pink and red, or green and blue all melt into each other beautifully. Opposites like red and green or orange and blue tend to turn muddy brown when they meet. (Unless you’re going for a “swamp ghost” look, in which case, go for it!)
Step 3: Draw the Face
Now use your black paint marker to give your ghost some personality. Place the face in the middle of the filter, just a little below the center. That way it sits nicely on the “head” once you shape it.
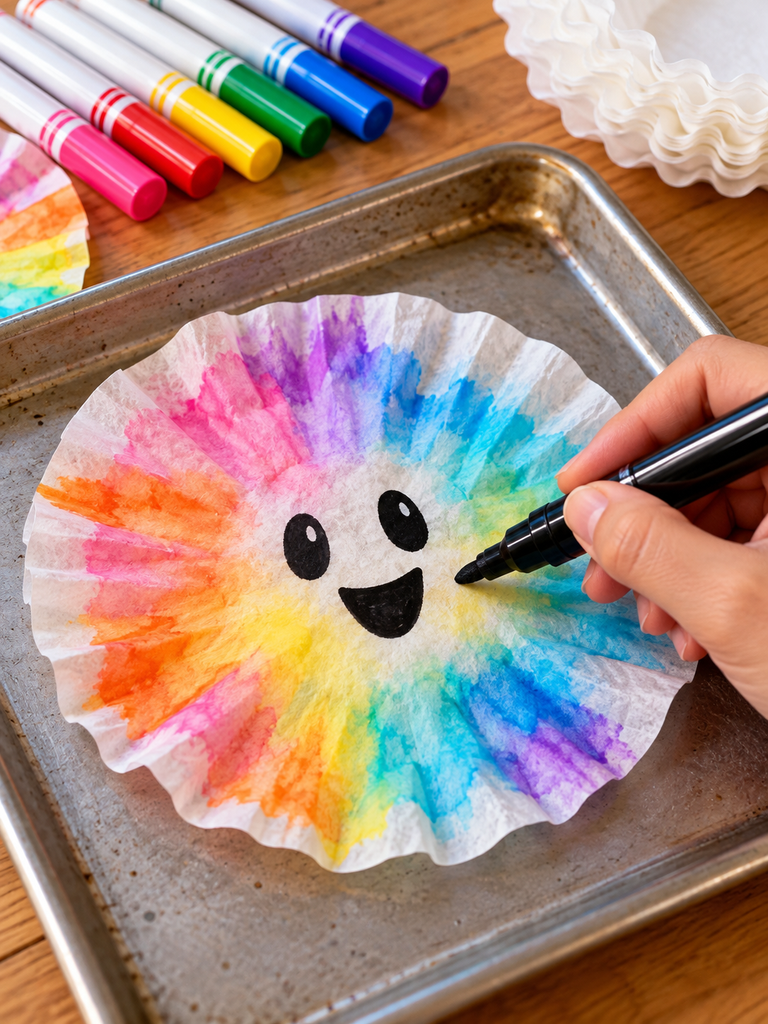
Why a paint marker? It won’t bleed when the water hits it. A regular permanent marker like a Sharpie can work in a pinch, but the edges often get a bit fuzzy once wet.
Want to play it extra safe? You can skip the face for now and add it after the ghost has dried, while it’s still sitting on the bottle. Just press gently so you don’t dent the shape.
Step 4: Shape the Ghost
Place the filter over the top of your water bottle (anything with a similar shape will work) and gently mold it around the bottle as much as you can. The face should sit right at the front.

Now for the fun part. Use the eyedropper to drip water onto the filter, little by little, until every part of it is damp. Watch the colors start to spread and swirl together. Kids usually gasp at this step, and honestly, so do I.
Step 5: Let It Dry Completely
Leave your ghost to dry right there on the bottle. This takes at least a few hours, depending on how soaked the filter is. If you used a lot of water, give it overnight.

Resist the urge to peel it off early. A half-dry ghost will slump and lose its shape, and there’s no fixing that once it sets.
Step 6: Light It Up
Once it’s fully dry, lift the ghost off the bottle. Switch on a battery-operated tea light, set it down, and pop your ghost right over the top.
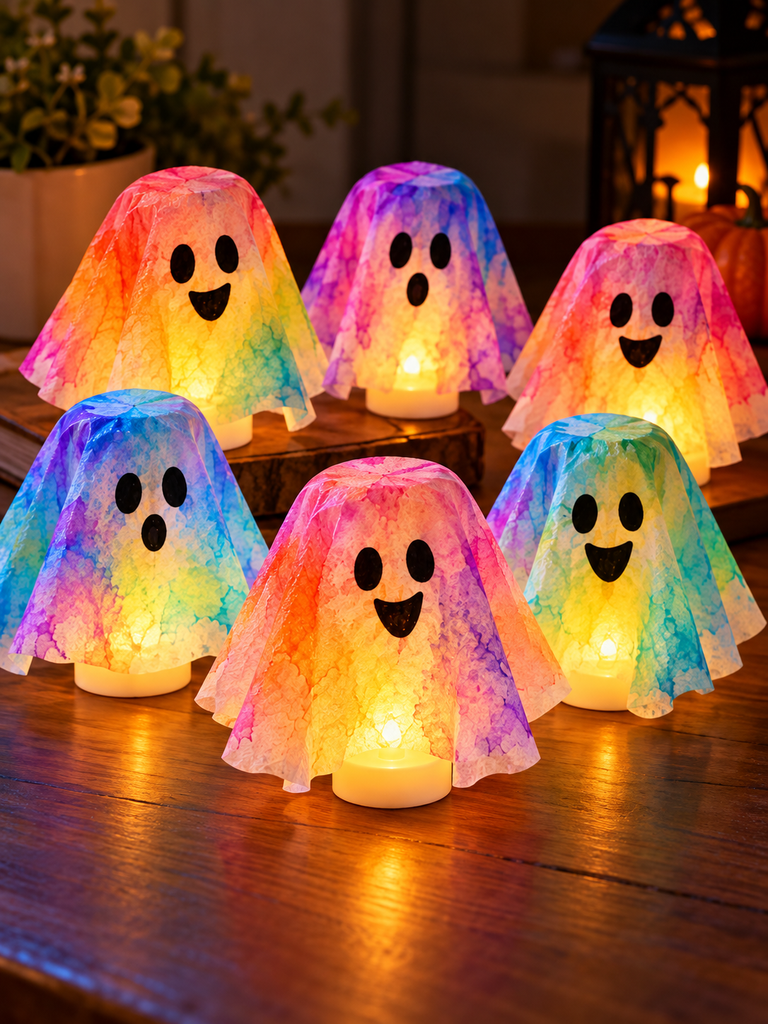
That’s it. Your ghost is done! Make a whole crew in different color combos, turn off the lights, and enjoy that soft, flickering glow.
Pro Tips for Picture-Perfect Ghosts
- Always dry them in shape. If you dry a filter flat, it won’t hold the ghost form. The bottle is doing the real work here.
- Less water is more. You want the filter damp, not dripping. Puddles under the bottle mean the colors will wash out and pale.
- Go bold with the markers. Water dilutes the color, so press firmly and cover the filter well. Light coloring turns into barely-there pastel.
- Protect your table. Washable ink is washable, but it’ll still drip off the filter onto whatever’s underneath. Keep that baking sheet under the bottles.
- Make a batch. Line up several bottles and work assembly-line style. One ghost looks cute; six ghosts look like a decoration.
Troubleshooting: When Your Ghost Gets a Little Too Spooky
The colors turned brown. You probably paired colors from opposite sides of the color wheel. Next time, try two neighboring shades.
The face bled everywhere. That’s a regular marker reacting to water. Switch to an oil-based paint marker or draw the face after drying.
The ghost collapsed. It came off the bottle before it was completely dry. Give the next one more time.
The colors look faded. Either too much water or not enough marker. Color more heavily and use fewer drops.
What Markers Should You Use?
For the body, washable markers are a must. That water-soluble ink is exactly what makes the tie-dye effect happen. Permanent markers simply won’t budge when wet.
If you don’t have washable markers, you’ve got options: diluted food coloring or liquid watercolor paint both work well. Just drip them on instead of drawing.
For the face, a black paint pen is your best friend because it holds its line even after water hits it.
Which Light Makes Them Glow Best?
Let’s be really clear on this one: use battery-operated tea lights only, never real candles. Coffee filters are thin paper. A real flame underneath is a genuine fire hazard, and that’s the kind of scary nobody wants on Halloween.
The good news? Flameless tea lights flicker just like the real thing, and they’re perfectly safe for kids to handle.
Want to try something different? Drape your ghosts over a string of fairy lights for a glowing ghost garland, or tuck a small LED balloon light inside for a brighter, more magical effect.
Fun Ways to Customize Your Ghosts
Once you’ve nailed the basic version, this is where it gets really fun:
- Add sparkle: Run a thin line of glue along the bottom edge and sprinkle on some glitter.
- Try new faces: Googly eyes or paper cut-outs give each ghost a goofy personality.
- Dress them up: Glue a tiny ribbon bow at the “neck” for an extra-charming touch.
- Give them feelings: Surprised, sleepy, silly, grumpy… a whole family of ghost expressions is way more fun than a row of identical ones.
- Mix the palette: Use a different color combo for every ghost so each one is truly one of a kind.
Where to Display Your Glowing Ghosts
These little guys look good almost anywhere, but a few spots really let them shine:
- Lined up along a fireplace mantel
- On a windowsill, where neighbors can see them glowing after dark
- As a centerpiece on a Halloween party table
- On a covered porch to greet trick-or-treaters (keep them out of rain and wind, since they’re still paper)
Is This Craft Good for Kids?
Absolutely. Toddlers can scribble the colors (with a grown-up handling the water), preschoolers can do most steps with a little help, and older kids can run the whole thing solo. Adults enjoy it too. There’s something oddly relaxing about watching the colors bloom.
It’s also low-mess compared to most painting projects, and the hands-on time is short. The drying does the heavy lifting, which makes it perfect for a weeknight activity or a classroom Halloween party.
The Bottom Line
Remember that bored, rainy evening from the start? This is the kind of craft that flips it around. A stack of coffee filters, a handful of markers, and a little patience, and suddenly you’ve made something that glows.
Simple, colorful, and full of charm, coffee filter ghosts prove you don’t need a big budget or fancy supplies to make Halloween feel magical. All you need is a little color, a little water, and a little light.
Your Turn!
Have you made coffee filter ghosts yet? I’d love to hear which color combo turned out to be your favorite, or what silly faces your kids came up with. Drop a comment below and tell me about your ghostly crew. And if you snap a photo of them glowing in the dark, share it and tag us so we can see your little haunting!