Every October, the same scene plays out in a lot of kitchens. A small person spots a pumpkin, eyes go wide, and the words come out: “Can we carve it? Can I do the knife part?”
And every October, a grown-up quietly calculates the odds of a trip to urgent care.
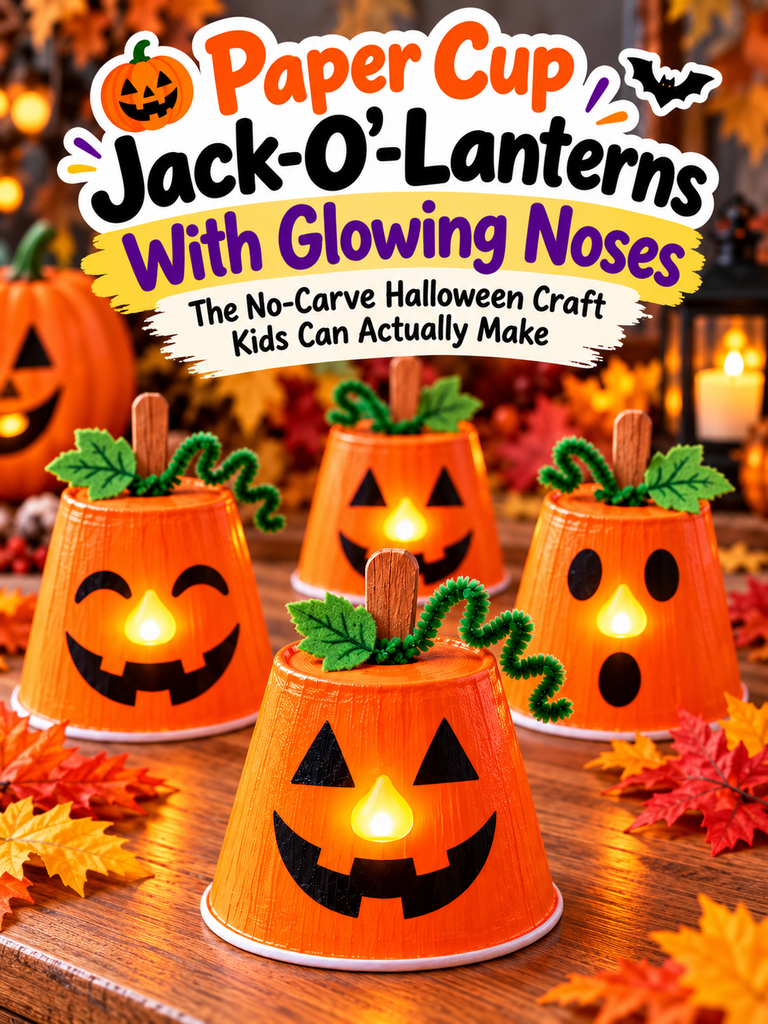
Here’s the thing: little kids don’t really care about carving. What they want is a pumpkin with a face that glows. That’s the magic part. So give them the magic and skip the knife. These paper cup jack-o’-lanterns light up from the inside (well, their noses do), take about half an hour, and cost almost nothing. They’re cheerful instead of creepy, which matters when your audience is four years old and still a little unsure about Halloween.
Table of Contents
Key Takeaways
- No carving, no open flame: a flameless LED tea light pushed through the cup becomes a glowing nose.
- Two levels: a simple version kids can do almost alone, and a “deluxe” version with a craft-stick stem and pipe-cleaner leaf (one adult-only step).
- About 30 minutes of hands-on time, plus drying time for two coats of paint (or zero drying if you buy orange cups).
- The secret to good-looking cups: paper cups have a slick coating, so prep the surface or your paint will streak.
- Scales easily from one kid at the kitchen table to a whole classroom.
Why This Craft Works So Well for Young Kids
Most Halloween crafts end up in a drawer by November. These don’t, because they actually do something. Switch on the tea light, turn off the lamp, and suddenly there’s a row of goofy orange faces with glowing noses grinning at you from the mantel.
They also hit a sweet spot for little hands. Painting, drawing a face and pushing a light through a hole are all things a preschooler can manage. The only fiddly part (the stem slit) is optional, and it’s a job for you anyway.
And honestly? They’re a lifesaver on a gray, rainy afternoon when everyone’s restless and the real pumpkin is still sitting uncarved on the porch.
Choose Your Version: Simple or Deluxe
Before you start, decide how far you want to take it.
The simple version is paint, face, light. That’s it. Perfect for toddlers, short attention spans, or making a dozen at once.
The deluxe version adds a craft-stick stem and a curly green pipe-cleaner leaf on top. It looks noticeably more “pumpkin-y,” but it needs a small slit cut with a craft knife. That step belongs to an adult, full stop.
My suggestion: let the kids make simple ones, and you add stems to the ones they want to “upgrade” at the end. Everybody wins.
What You’ll Need
- White paper cups (or orange cups to skip painting)
- Orange acrylic craft paint and a paintbrush
- Flameless LED tea light candles, one per cup
- A pencil
- A black permanent marker
- For the deluxe version: craft sticks, green pipe cleaners, scissors and a craft knife
Nice to have: a drop of dish soap or a thin coat of Mod Podge for priming (more on that below), plus newspaper or a plastic tablecloth, because orange paint has a way of traveling.
How to Make a Paper Cup Jack-O’-Lantern, Step by Step
One quick note before we begin: the cups sit upside down, rim on the table. The closed bottom of the cup becomes the top of your pumpkin, and the tea light hides underneath.
Step 1: Paint the cups orange (two coats)
Flip the cups over a hand or slip them onto an empty bottle so kids can paint the outside without smudging it. Brush on the orange paint and let it dry completely. Then add a second coat. One coat almost always looks patchy on white cups; the second one is what makes them look finished.

Short on patience (or time)? Use orange paper cups and skip this step entirely. For toddlers who can’t stand waiting, this is genuinely the better option.
Step 2: Poke the nose hole
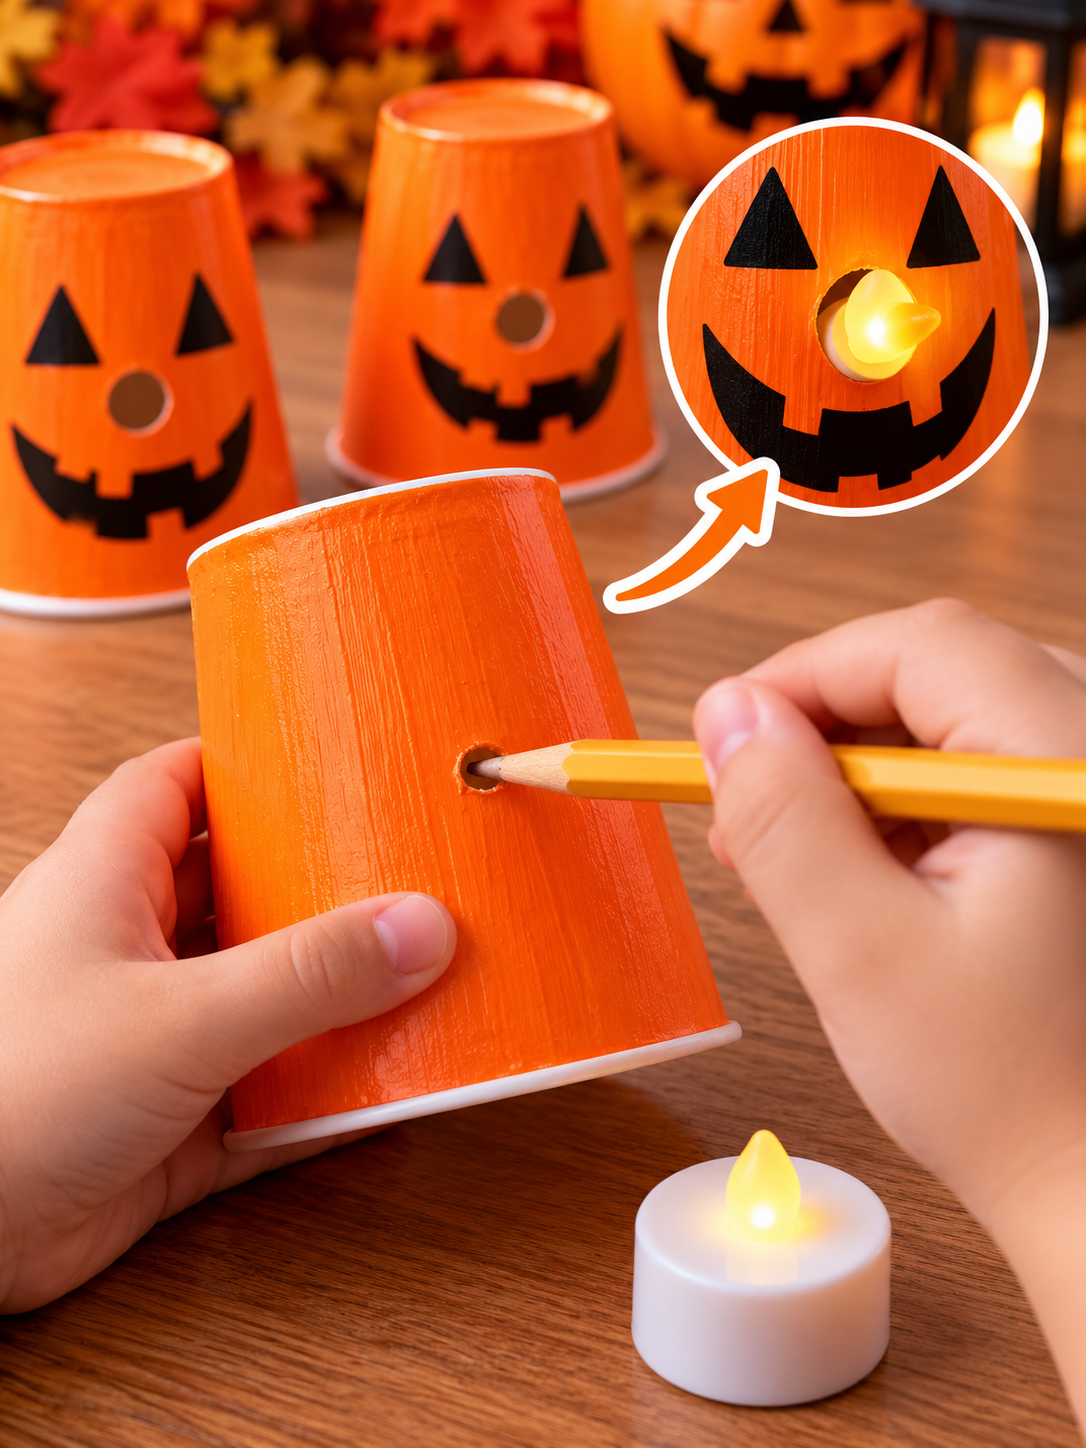
Once the paint is fully dry, use a sharp pencil to poke a small hole in the middle of the cup’s side. That’s where the nose goes. Start small and wiggle the pencil to widen it a little at a time. You want the tea light’s plastic “flame” to fit snugly, not fall through.
Step 3: Draw the face
Sketch the eyes and mouth lightly in pencil first, using the nose hole as your center point. When you’re happy with it, trace over the lines with a black marker and fill them in.
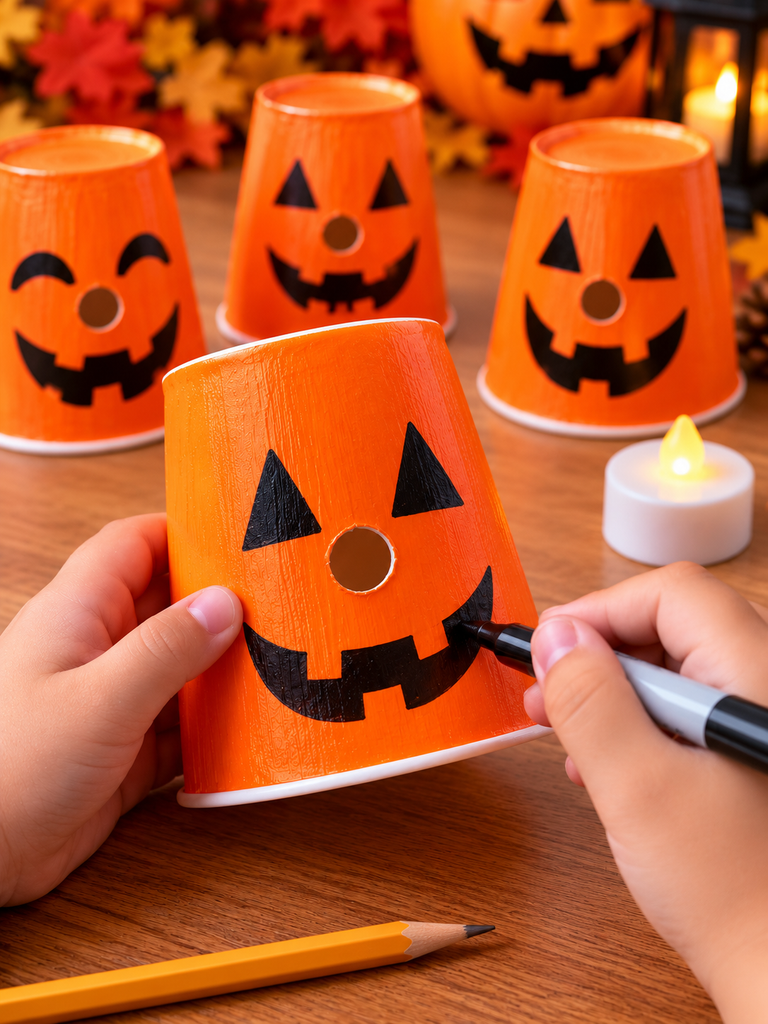
You can insert the tea light before drawing, but it’s much easier to draw on a cup that isn’t wobbling around with a candle stuck in it. Face first, light second.
Step 4: Add the glowing nose
Turn on the tea light, then slide its flame through the hole from the inside of the cup. The base stays hidden under the cup, and the little glowing bulb pops out right where the nose should be.
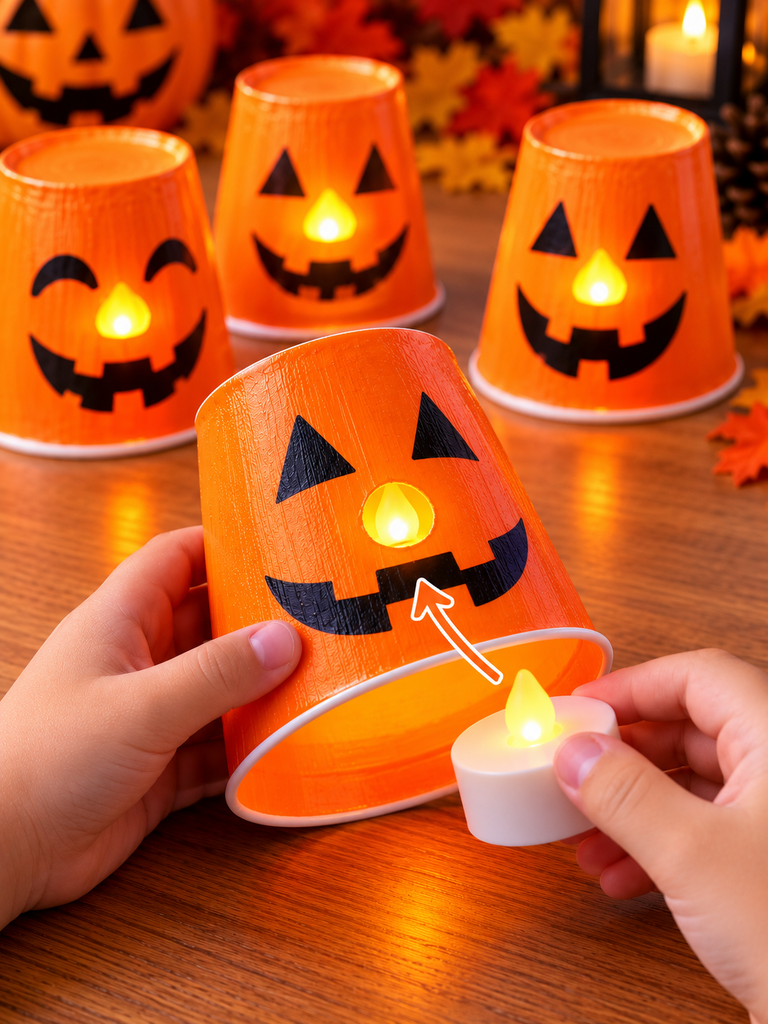
Step 5 (deluxe only): Add a stem and leaf
Here’s the adult-only part. Use a craft knife to cut a short slit in the top of the upside-down cup. Push a craft stick into the slit so it stands up like a stem. Then wrap a green pipe cleaner around the stick, curl the end into a little tendril, and snip off the extra with scissors.

That’s it. Turn the lights down and enjoy the show.
The Trick Most Tutorials Skip: Getting Paint to Stick
If you’ve ever painted a paper cup and watched the paint bead up and slide around, you’re not imagining it. Most paper cups have a thin waterproof coating, and acrylic paint doesn’t love it.
A few easy fixes:
- Add a drop of dish soap to the paint. It helps the paint grip the slick surface.
- Prime with Mod Podge or white glue thinned with a little water. Let it dry, then paint.
- Lightly scuff the cup with fine sandpaper before painting (a fun job for older kids).
Any one of these turns streaky, frustrating cups into smooth, bright orange ones.
Who Does What: Matching the Steps to Your Kid’s Age
Ages 2 to 3: Go with orange cups. You draw the face outline in pencil, they help trace or scribble with the marker, and they get the big job: pushing the light in and turning it on. (Trust me, that’s the highlight for them.)
Ages 4 to 5: They can paint, draw simple triangle eyes and a big smile, and add the nose. You handle the hole and any stems.
Ages 6 and up: Hand over nearly everything except the craft knife. Encourage them to design a whole family of pumpkins with different expressions.
Face Ideas When Everyone Says “I Don’t Know What to Draw”
Blank-cup paralysis is real. Keep a few ideas ready:
- The classic: triangle eyes and a jagged, gap-toothed grin.
- The sleepy pumpkin: two curved lines for closed eyes and a tiny “o” mouth.
- The surprised one: huge round eyes and a round mouth.
- The winker: one triangle eye, one sideways “v” for a wink.
- The silly one: crossed eyes and a tongue sticking out.
- Family portraits: one pumpkin for each family member, complete with glasses or a beard if needed.
A whole row with different expressions looks fantastic lined up on a windowsill or shelf.
Making These With a Whole Class or Party Group
This craft is surprisingly classroom-friendly. A few tips to keep it calm:
- Do the painting the day before (or use orange cups) so kids aren’t sitting around waiting for paint to dry.
- Pre-poke every nose hole yourself so no one stabs too hard and tears the cup.
- Write names inside the rim before you start. Thirty orange cups look exactly alike.
- Buy tea lights in bulk packs; they’re far cheaper that way and can be reused year after year.
- Save stems for the end and add them yourself while kids clean up.
Common Problems (and Quick Fixes)
The tea light keeps falling out. The hole is too big. Wrap a small strip of tape around the base of the plastic flame to make it thicker, or start over with a fresh hole on another side.
The marker smears. The paint wasn’t fully dry. Wait a bit longer, or seal the cup with a quick layer of Mod Podge before drawing.
The cup crumpled when we poked the hole. Support the inside of the cup with your fingers (or slide it over a bottle) while poking.
The stem won’t stand up. Make the slit a touch shorter so the craft stick fits tightly, or add a dab of glue.
Frequently Asked Questions
Can I use a real candle instead of an LED one?
No. Paper cups are flammable. Always use flameless, battery-powered tea lights for this craft.
How long does the craft take?
Hands-on time is around 25 to 30 minutes. Add drying time for two coats of paint, which depends on your paint and how thick it goes on. Using orange cups cuts the wait to zero.
Can I make these without paint?
Yes. Orange paper cups work perfectly, and you can also wrap white cups in orange tissue paper or construction paper.
Is this craft safe for toddlers?
The simple version is, with supervision. Keep the craft knife away from children, and keep an eye on small tea lights and batteries, which aren’t safe for kids who still put things in their mouths.
How do I store them for next year?
Remove the tea lights (and their batteries), then stack the cups loosely in a box so the stems don’t snap.
Little Lights, Big Smiles
Remember that kid begging to carve a pumpkin? They didn’t really want the knife. They wanted to make something with their own hands that glows in the dark and feels a little bit magical. That’s exactly what these paper cup jack-o’-lanterns deliver, without the mess, the sharp tools or the stress.
Grab a sleeve of cups, some orange paint and a pack of tea lights, and you’ve got an afternoon sorted and a mantel full of happy pumpkins.
Now I’d love to hear from you: what faces did your kids come up with? Share a photo or tell me about your favorite pumpkin in the comments. And if you’re planning a classroom version, let me know how it goes. Your tips might help the next teacher who tries it.