


The first chain I ever crocheted looked like a strand of dry spaghetti that had been through a washing machine. Some loops were so tight I couldn’t get the hook back in. Others were big enough to fit my thumb through. I stared at it and thought, this is the easy part?
Yes, it is. And that’s exactly why it’s worth getting right.

The chain stitch is where almost every crochet project begins. Blankets, beanies, amigurumi bunnies, market bags they nearly all start with a simple row of chains called the foundation chain. If you can make a neat, even chain, everything you build on top of it gets easier. If you can’t, you’ll be fighting your project from row one.
So let’s slow down and do this properly. By the end of this post you’ll know how to make a slip knot, hold your hook and yarn, make a chain stitch, count it correctly, and fix the most common beginner mistakes.
Table of Contents
Key Takeaways
- Every chain starts with a slip knot on your hook, and that knot doesn’t count as a stitch.
- One chain = yarn over, then pull through the loop on your hook. That’s the whole stitch.
- Count the V shapes on the front of the chain, never the loop sitting on your hook.
- Tight chains are the #1 beginner problem. Form each loop on the thick shaft of the hook, not the narrow throat.
- Practice in short bursts with smooth, light-colored medium yarn and a 5 mm hook.
What You’ll Need Before You Start
Here’s the good news: you don’t need much. A ball of yarn and a hook will do. But the right yarn and hook can save you a lot of frustration in your first week.
Yarn: Go for a medium-weight (worsted, category #4) yarn in a light, solid color. Smooth acrylic or cotton is ideal. Light colors let you actually see your stitches, and smooth fibers won’t split or snag. Save the fuzzy mohair and the black chenille for later. Trust me on this one.
Hook: A 5 mm hook (labeled H-8 in the US) pairs nicely with worsted yarn. Check your yarn label too; most list a recommended hook size right there.
Scissors: Any pair will do for snipping your yarn when you’re done.
That’s it. No pattern, no stitch markers, no fancy kit. Just you, a hook, and some yarn.
Getting to Know Your Hook (It Takes 30 Seconds)
Pick up your hook and look at it closely. You’ll notice a few distinct parts, and knowing them makes every instruction you’ll ever read clearer.
- The head: the little hooked tip that grabs the yarn.
- The throat: the narrow groove just below the head.
- The shaft: the smooth, straight section below the throat. Its width is what determines the hook size and the size of your loops.
- The grip: the flattened area where your thumb rests.
Why does this matter? Because the single biggest reason beginners crochet too tightly is that they make their loops up on the skinny throat instead of down on the shaft. Keep that in mind. We’ll come back to it.
Step 1: Make a Slip Knot
Every chain begins by anchoring the yarn to your hook with a slip knot. It’s an adjustable loop that tightens when you pull the tail.

- Pull out about 15 cm (6 inches) of yarn. This loose end is your tail. The yarn coming from the ball is the working yarn.
- Make a loop by crossing the working yarn over the tail, so it looks like a little pretzel or a cursive “e”.
- Reach through the loop and pull a bit of the working yarn through it, forming a new loop.
- Slide that new loop onto your hook and gently pull both yarn ends to snug it up.
The loop should sit comfortably on the hook’s shaft. It should slide up and down easily without falling off. If you can’t move it, it’s too tight. Loosen it and try again.
Quick test: pull the working yarn. If the loop gets smaller, you’ve made it correctly. If pulling the tail is what tightens it instead, that works too. Just know which end does what.
Step 2: Hold Your Hook and Yarn Comfortably
This is where many tutorials skip ahead too fast. Honestly, how you hold things affects your stitches more than almost anything else.

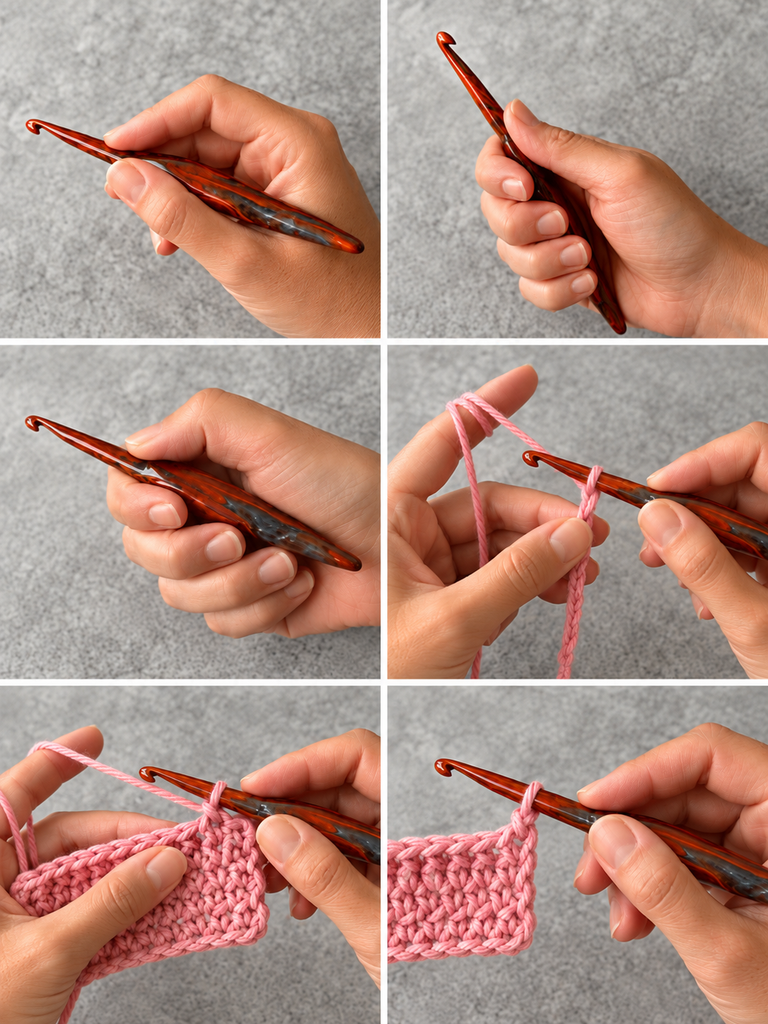
Holding the hook: There are two common grips, and neither is “correct.”
- Pencil grip: hold the hook the way you’d hold a pen, resting between your thumb and index finger.
- Knife grip: hold it like you’re cutting a steak, with your hand over the top of the hook.
Try both for a minute each. Go with whichever feels less awkward. Your hands will tell you.
Holding the yarn: Your other hand has two jobs. It holds the work steady, and it controls the tension of the yarn as it feeds toward the hook. A simple way to start:
- Drape the working yarn over your index finger.
- Let it run down across your palm, and loosely curl your pinky or ring finger around it.
- Pinch the tail (or, later, the bottom of your chain) between your thumb and middle finger.
Raise your index finger slightly and the yarn tightens. Lower it and the yarn relaxes. That little adjustment is your tension control. It’ll feel clumsy for the first few days, and that’s completely normal. Everybody fumbles here.
Step 3: Make Your First Chain Stitch
Here’s the moment. A chain stitch is just two movements:
- Yarn over (YO): With the slip knot on your hook, bring the working yarn over the hook from back to front, so it wraps around the shaft.
- Pull through: Turn the head of the hook slightly toward you, catch the yarn you just wrapped, and draw it through the loop already on your hook.
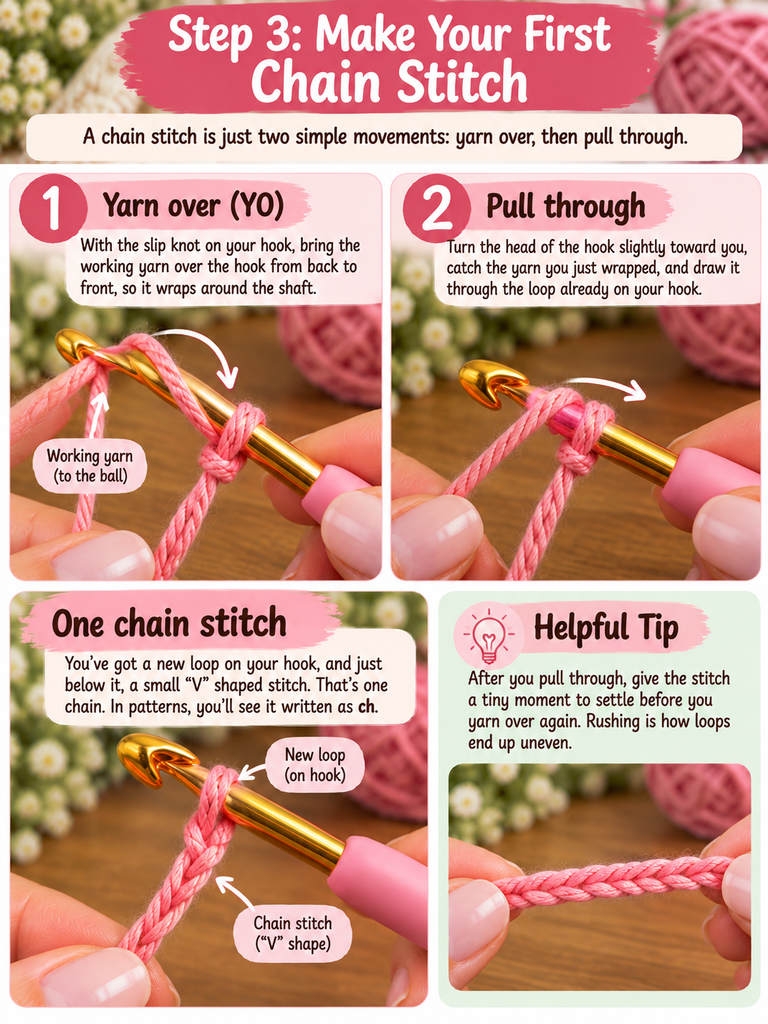
Look at that. You’ve got a new loop on your hook, and just below it, a small “V” shaped stitch. That’s one chain. In patterns, you’ll see it written as ch.
Here’s a tip that changed things for me: after you pull through, give the stitch a tiny moment to settle before you yarn over again. Rushing is how loops end up uneven.
Step 4: Keep Going and Find Your Rhythm
Repeat steps 1 and 2: yarn over, pull through. Yarn over, pull through.
As the chain grows, move your holding hand up. Pinch the chain just below the hook, about two or three stitches down. If you keep holding the very bottom while the chain gets longer, it’ll flop around and your tension will go wild.
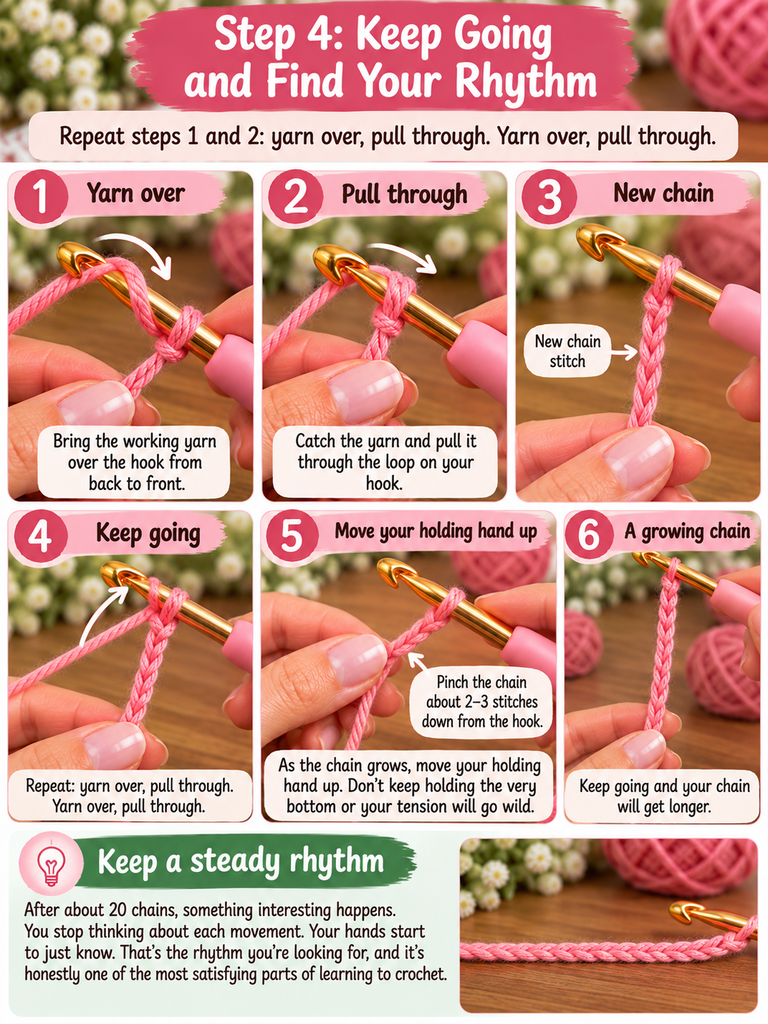
After about 20 chains, something interesting happens. You stop thinking about each movement. Your hands start to just know. That’s the rhythm you’re looking for, and it’s honestly one of the most satisfying parts of learning to crochet.
Step 5: Count Your Chains the Right Way
Picture this: a pattern tells you to chain 30. You count, start your first row, and three rows later the edges don’t match. Sound familiar? It usually comes down to counting.
Here’s how to count accurately:
- Lay the chain flat with the front facing you. The front shows a neat line of V shapes, one stacked above the next.
- Each V is one chain.
- Don’t count the loop on your hook. It’s a working loop, not a finished stitch.
- Don’t count the slip knot at the very bottom either.
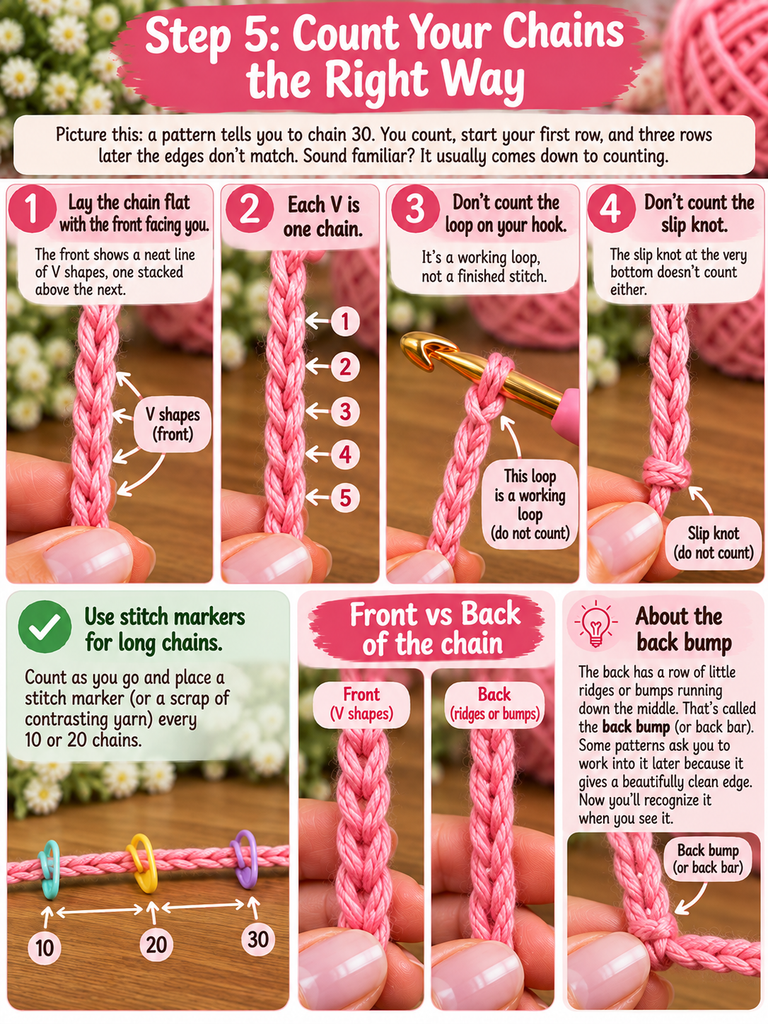
For long foundation chains, count as you go and place a stitch marker (or a scrap of contrasting yarn) every 10 or 20 chains. Recounting 150 chains from scratch because you lost your place at 112? I’ve done it. You don’t want to.
While you’re looking, flip the chain over. The back has a row of little ridges or bumps running down the middle. That’s called the back bump (or back bar). Some patterns ask you to work into it later because it gives a beautifully clean edge. Now you’ll recognize it when you see it.
Step 6: Fasten Off When You’re Done
If you’re just practicing, or making a chain as a finished piece (like a drawstring), you’ll need to secure the end so it doesn’t unravel.
- Cut the working yarn, leaving a tail of about 15 cm (6 inches).
- Yarn over with that tail and pull it all the way through the loop on your hook.
- Tug the tail gently to tighten. Done!

If you’re continuing into a project, you won’t fasten off here. You’ll just keep going with the next stitch your pattern calls for.
Common Chain Stitch Problems (and How to Fix Them)
Let’s be honest: your first chains won’t be perfect. Mine weren’t either. Here’s what usually goes wrong and what to do about it.
My chains are too tight. This is the big one. Before you pull each new loop all the way through, make sure it slides down onto the shaft of the hook, not the throat. Also check your yarn hand. If you’re gripping the working yarn like it owes you money, relax it a bit. Still too tight? Try going up a hook size just for the foundation chain. Lots of experienced crocheters do this.
My chains are uneven. Some big, some small? That’s a tension issue too, and it mostly fixes itself with practice. Focus on making every movement the same size, at the same speed. Slower is better right now.
The yarn keeps splitting. Your hook head might be catching between the plies. Rotate the hook so the head faces down slightly as you pull through. If it keeps happening, the yarn may simply be prone to splitting. A smoother yarn helps.
The chain twists. This is normal, especially on long chains. Before you start your next row, lay the chain flat and make sure all the V’s face the same direction.
The slip knot comes undone. You probably made a regular loop instead of a true slip knot. Pull the tail. If the loop disappears entirely, start over from Step 1.
A Quick Note for Left-Handed Crocheters
Everything above works the same for you, just mirrored. Hold the hook in your left hand and the yarn in your right. Your chain will grow in the opposite direction from right-handed tutorials, and that’s perfectly fine. Some lefties find it helpful to watch video tutorials in a mirror, or to look for teachers who are left-handed themselves.
A Simple Practice Plan That Actually Builds Skill
You might be wondering how much practice it really takes. Not as much as you’d think, as long as it’s focused. Try this over a few days:
- Day 1: Make three chains of 20. Pull them out and redo them. Focus only on the motion.
- Day 2: Make three chains of 50. Lay them side by side. Which looks most even?
- Day 3: Chain 30 without looking at the count, then count it. Were you right?
Want something to show for it? Chains make lovely little projects on their own: a bookmark with a tassel on the end, a drawstring for a pouch, a hair tie, or a garland of chains in different colors to hang on a shelf. Small wins keep you motivated.
Frequently Asked Questions
Does the slip knot count as a chain?
No. The slip knot just attaches the yarn to the hook. Start counting with the first V you create.
What’s a foundation chain?
It’s the starting row of chains that the rest of your project is built on. Patterns will tell you how many to make.
What’s a turning chain?
At the start of a new row, you’ll often make one or more chains to bring your yarn up to the height of the next row’s stitches. Your pattern will say how many.
How long until my chains look neat?
For most people, a few short practice sessions. Tension is a muscle-memory thing, and it improves faster than you’d expect.
Final Thoughts: The Chain Is Small, but It’s Everything
Remember that wobbly, spaghetti-looking chain I told you about? I kept it for a long time. Not because it was pretty it really wasn’t but because it reminded me that every beautiful blanket and every perfectly shaped amigurumi starts with this exact same humble stitch.
Yarn over. Pull through. That’s it. Do it enough times, slowly and with a bit of patience, and it becomes second nature. And once it does, the whole world of crochet opens up: single crochet, double crochet, granny squares, all of it.
So grab your hook, make that slip knot, and chain 20 right now. Don’t worry about making it perfect. Just make it.
Your Turn
I’d love to hear how your first chain went. Was it too tight, too loose, or surprisingly good? Drop a comment below and tell me what tripped you up, or share a photo of your practice chain. And if there’s a stitch you’d like me to walk through next, let me know. Single crochet is a great next step, and I’m happy to cover it in the same step-by-step way.


One Comment