Looking for easy arts and crafts for kids that don’t need a trip to the craft store? These 35 ideas use paper plates, empty rolls, old socks, stones, paint and a little imagination. Most take under an hour and cost almost nothing.
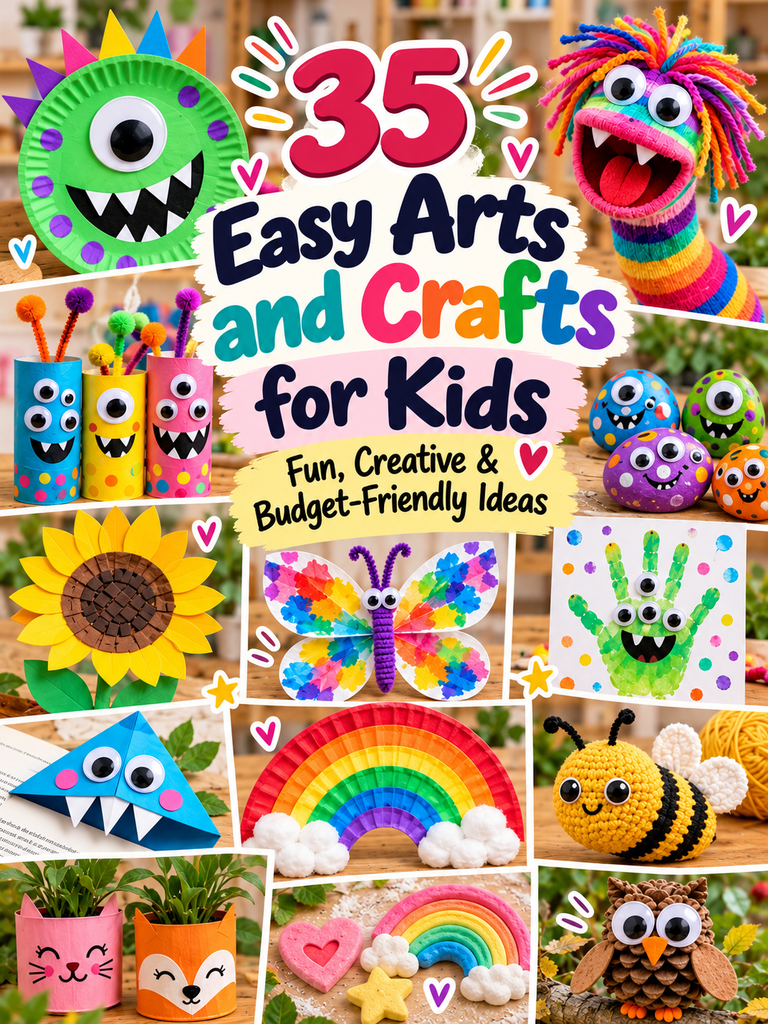
Every craft below comes with what you’ll need, the best age range and how long it takes. Where we have a full step-by-step tutorial or a printable PDF on Moodliva, you’ll find the link right under the idea.
Table of Contents
Your budget craft kit
You don’t need much to make all 35 crafts. Start a “craft box” and fill it through the week with things you would normally throw away.
| Save from the recycling | Buy once, use all year | Nice to have |
|---|---|---|
| Paper plates and paper cups | Child-safe scissors | Googly eyes |
| Toilet paper and kitchen rolls | Glue stick and white PVA glue | Pipe cleaners and pompoms |
| Cereal boxes and egg cartons | Washable paint and brushes | Felt and yarn scraps |
| Old socks, buttons, bubble wrap | Markers, crayons, colored pencils | Acrylic paint pens for rocks |
| Smooth stones, leaves, pinecones | Plain white paper and thin card | Tissue paper and contact paper |
Money-saving tip: no googly eyes? Cut circles from white paper and draw a black dot in each one. Kids love moving the dots around to make silly faces.
Monster crafts kids love (1–6)
Friendly monsters are the perfect craft theme: there is no wrong way to make one. Extra eyes, wonky teeth and crazy colours are all part of the fun. All six come from our Little Monsters craft series, each with a photo, a supplies list, 5 easy steps and a step-by-step picture page.
1. Paper Plate Monster
Paint a paper plate purple, add one giant googly eye, a black paper mouth with white triangle teeth and a row of paper spikes along the top. It is bold, silly and ready to hang on a bedroom door.
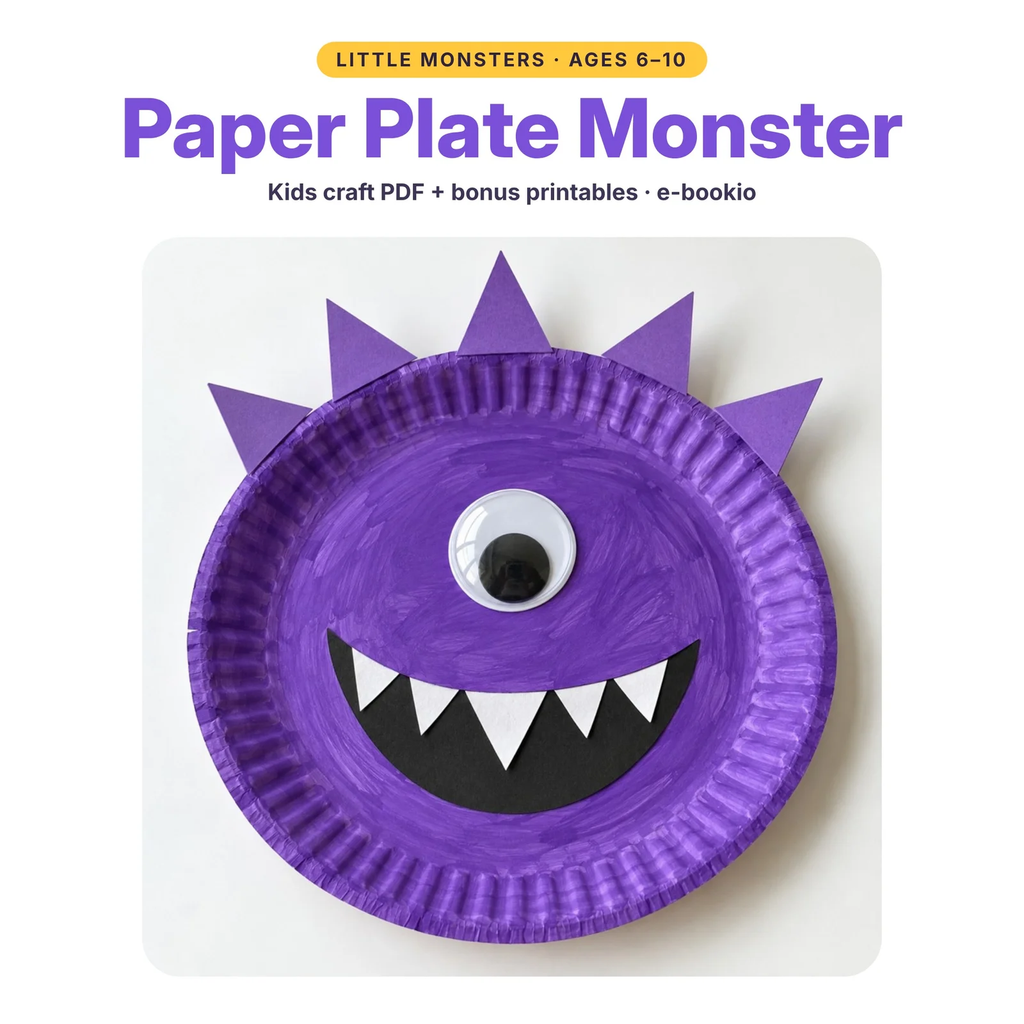
You’ll need: paper plate, washable paint, black, white and purple paper, a googly eye, glue · Ages: 4–10 · Time: 30 minutes + drying
2. Toilet Roll Monsters
Turn empty toilet paper rolls into a whole monster family. Paint each roll a bright colour, dab on polka dots with a cotton bud, then add googly eyes, little paper fangs and pipe-cleaner antennae topped with pompoms.

You’ll need: toilet paper rolls, paint, cotton buds, googly eyes, pipe cleaners, pompoms · Ages: 4–10 · Time: 20 minutes per monster + drying
3. Sock Puppet Monster
Give an odd sock a second life as a rainbow puppet with a big red felt mouth, zig-zag felt teeth, googly eyes and wild yarn hair. Then put on a puppet show from behind the sofa.
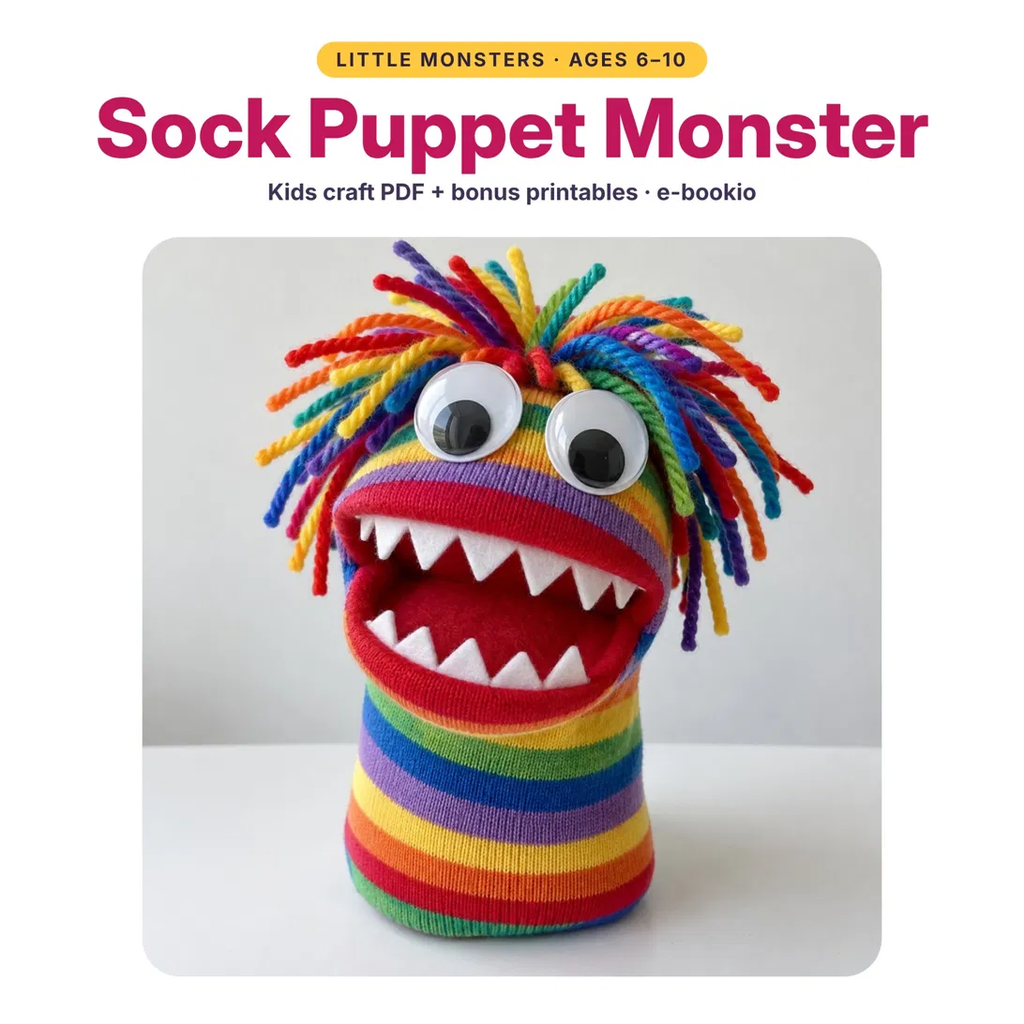
You’ll need: a clean old sock, red and white felt, 2 big googly eyes, yarn scraps, fabric glue · Ages: 6–10 (a grown-up helps with the glue gun) · Time: 45 minutes
4. Rock Monsters
Paint smooth stones in bright colours, dab on spots, then glue on googly eyes and draw a smile with tiny white fangs. Keep them on a shelf, give them as gifts or hide them in the garden for someone to find.

You’ll need: smooth stones, acrylic paint or paint pens, cotton buds, googly eyes · Ages: 5–10 · Time: 30 minutes + drying
Full tutorial: Rock Monsters
5. Handprint Monster Card
Paint a child’s hand, press it onto folded card and turn the print into a monster: the fingers become spiky hair, the palm becomes the face. Add googly eyes, a toothy smile and the words “You’re my favourite little monster!”
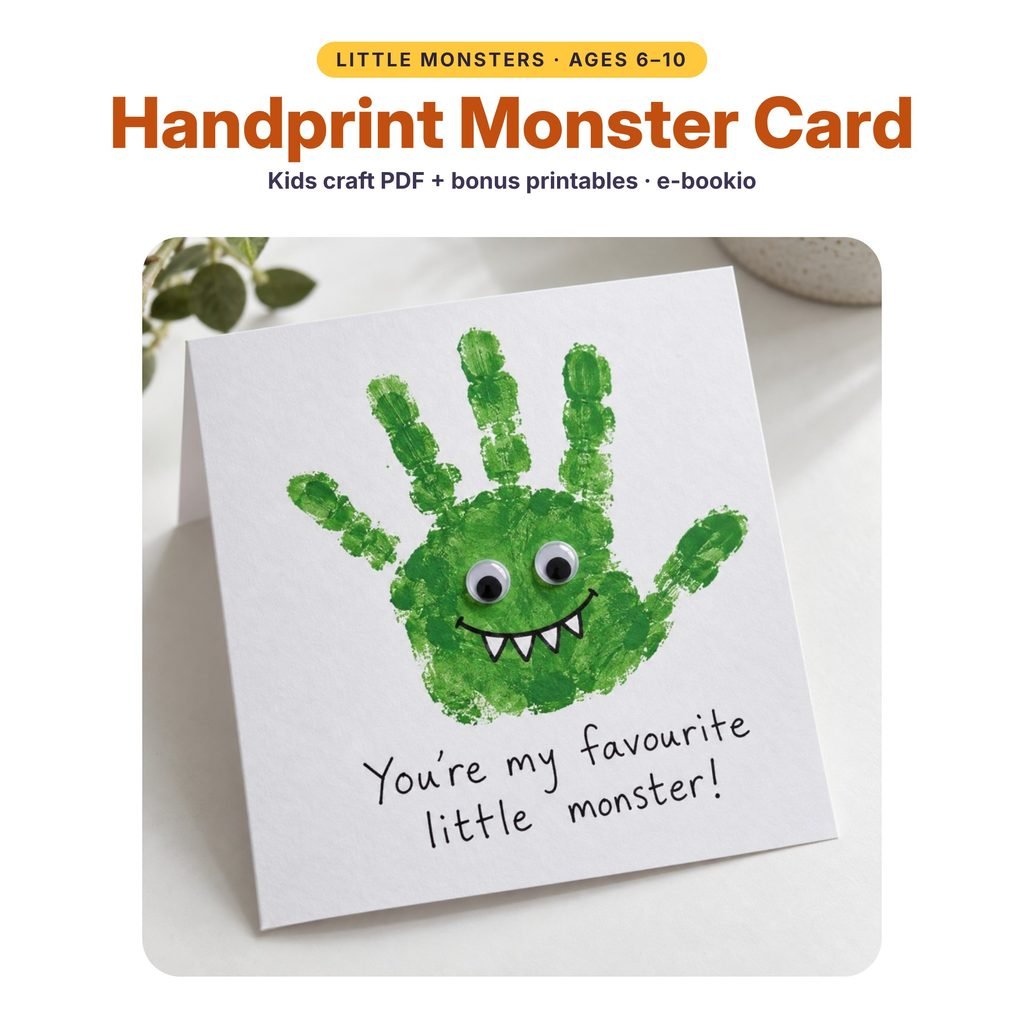
You’ll need: thin white card, washable paint, googly eyes, a black marker · Ages: 3–10 · Time: 20 minutes + drying
Full tutorial: Handprint Monster Card
6. Monster Corner Bookmarks
Fold a square of paper into a triangle pocket, then add eyes, teeth and spikes so the monster “eats” the corner of the page. A brilliant way to get reluctant readers excited about books.
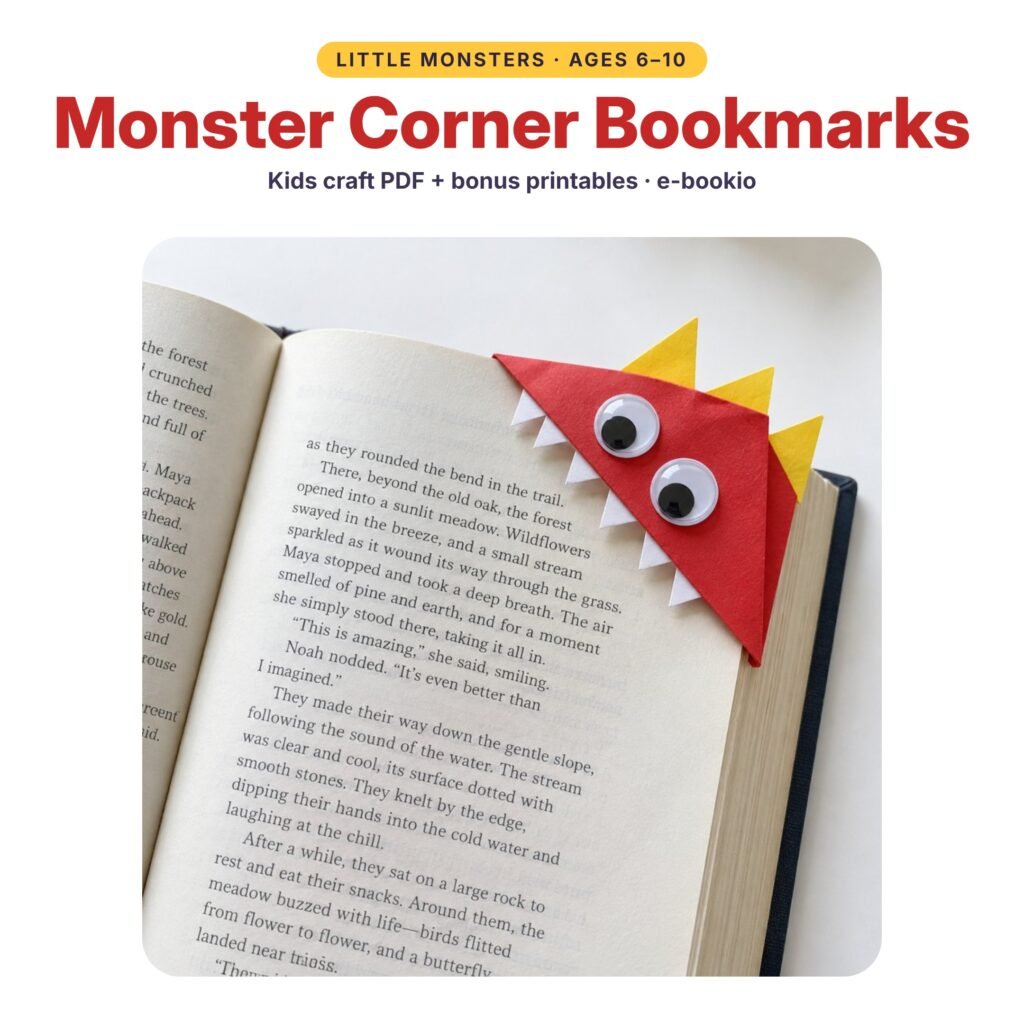
You’ll need: printed template or coloured paper, scissors, glue stick, googly eyes · Ages: 6–10 · Time: 15 minutes each
Full tutorial: Monster Corner Bookmarks
Want all six in one place? The complete Little Monsters Craft Book includes these crafts plus a printable kit: build-a-monster cut-outs, bookmark templates, a dice game, a colouring page and a certificate. Find it in the e-bookio shop.
Paper plate, paper roll and paper cup crafts (7–11)
Paper plates, cardboard tubes and paper cups are the cheapest craft supplies there are, and they turn into almost anything.
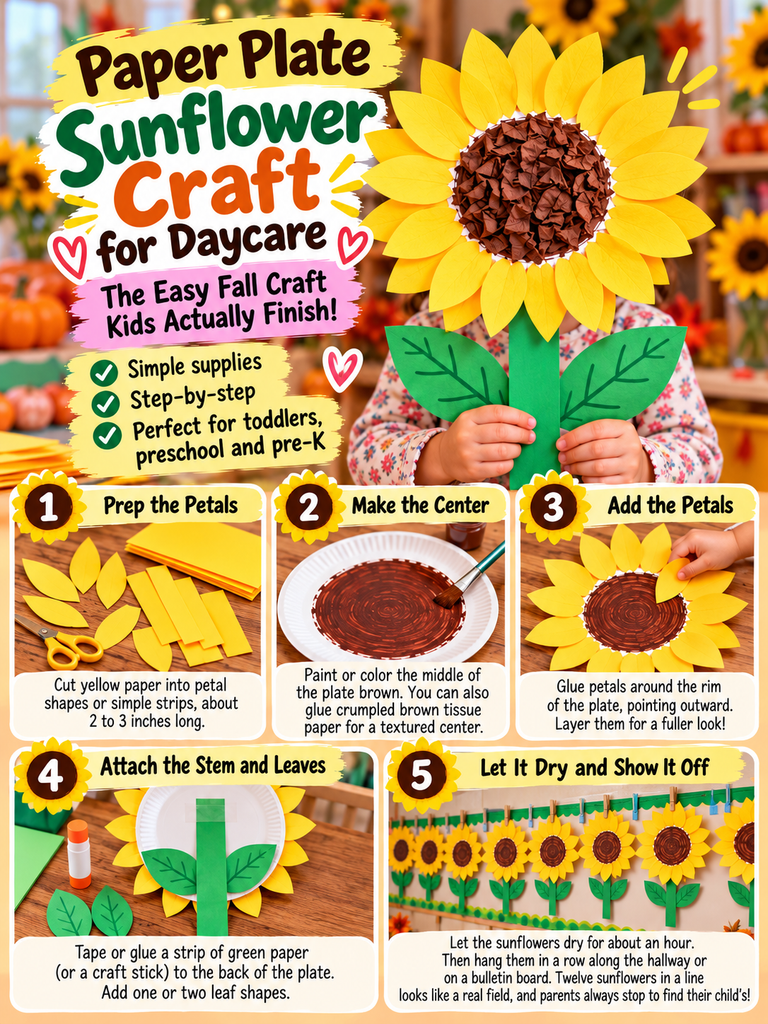
7. Paper Plate Sunflower
Glue yellow paper petals around a paper plate, colour a brown centre and add a green stem and leaves. A cheerful first craft for little hands.
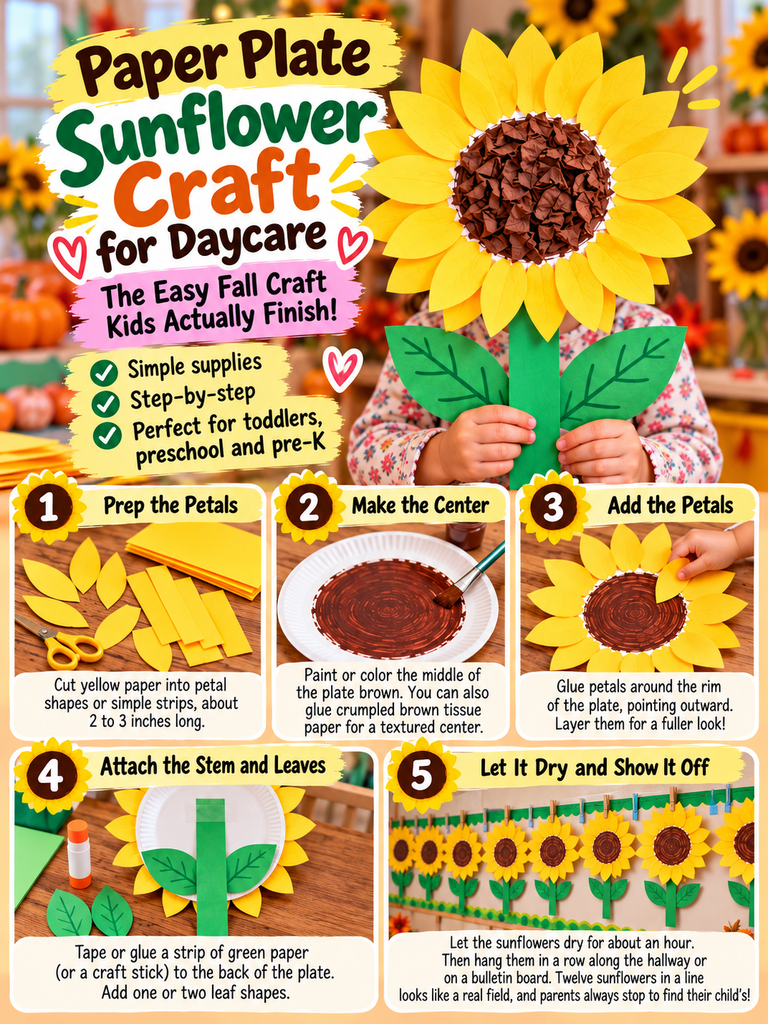
You’ll need: paper plate, yellow, green and brown paper or paint, glue · Ages: 1–5 · Time: 15–25 minutes + drying
Full tutorial: Paper Plate Sunflower Craft
8. Get Sock Puppet Monster
Paint a paper plate black, cut out scalloped wings and add googly eyes. A straw taped to the back lets the bat glide down a string.

You’ll need: paper plate, black paint, googly eyes, a drinking straw, tape, string · Ages: 3–12 · Time: about 30 minutes, mostly drying
Full tutorial: Paper Plate Flying Bat Craft
9. Paper Roll Apple Core
Paint a cardboard tube white, cap both ends with red cupcake liners and add a stick stem, a green leaf and drawn-on seeds. A fun one for back to school or autumn.

You’ll need: paper roll, red cupcake liners, white paint, green paper, a small stick, glue · Ages: 3–8 · Time: 15 minutes + drying
Full tutorial: Paper Roll Apple Core Craft
10. Paper Roll Scarecrow
Dress an empty paper roll in felt or paper clothes, give it googly eyes and glue on crinkle-cut paper shred for straw hair. A sweet mini decoration for fall.
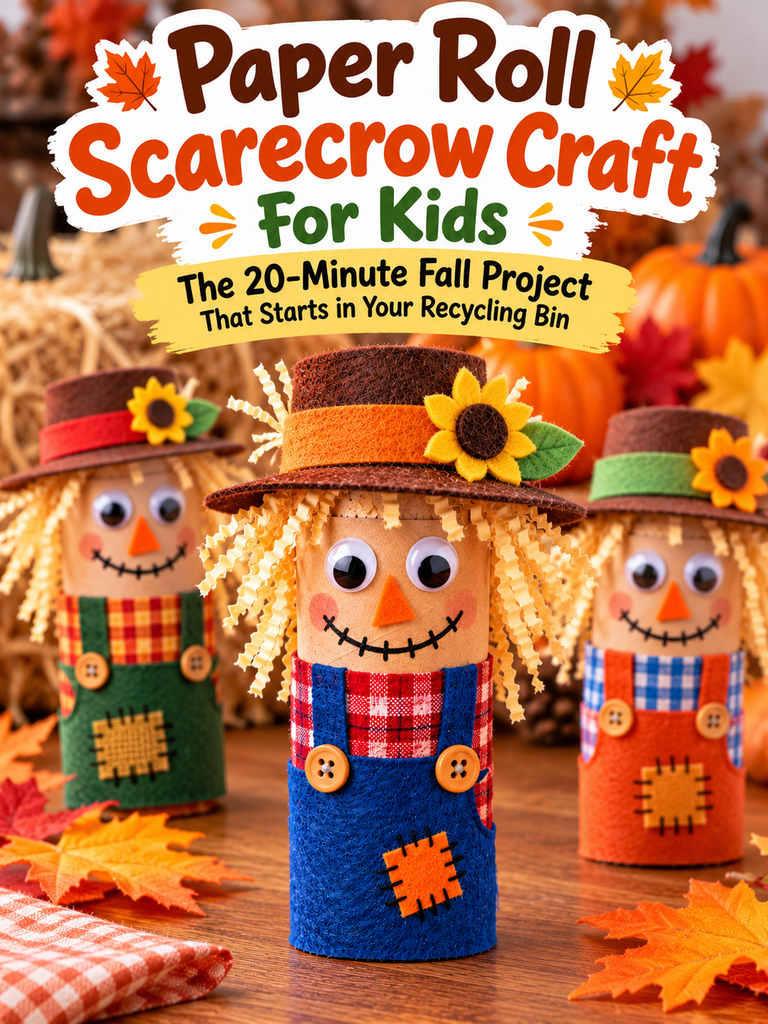
You’ll need: paper roll, felt or coloured paper, googly eyes, paper shred, glue · Ages: 3–10 · Time: about 20 minutes
Full tutorial: Paper Roll Scarecrow Craft
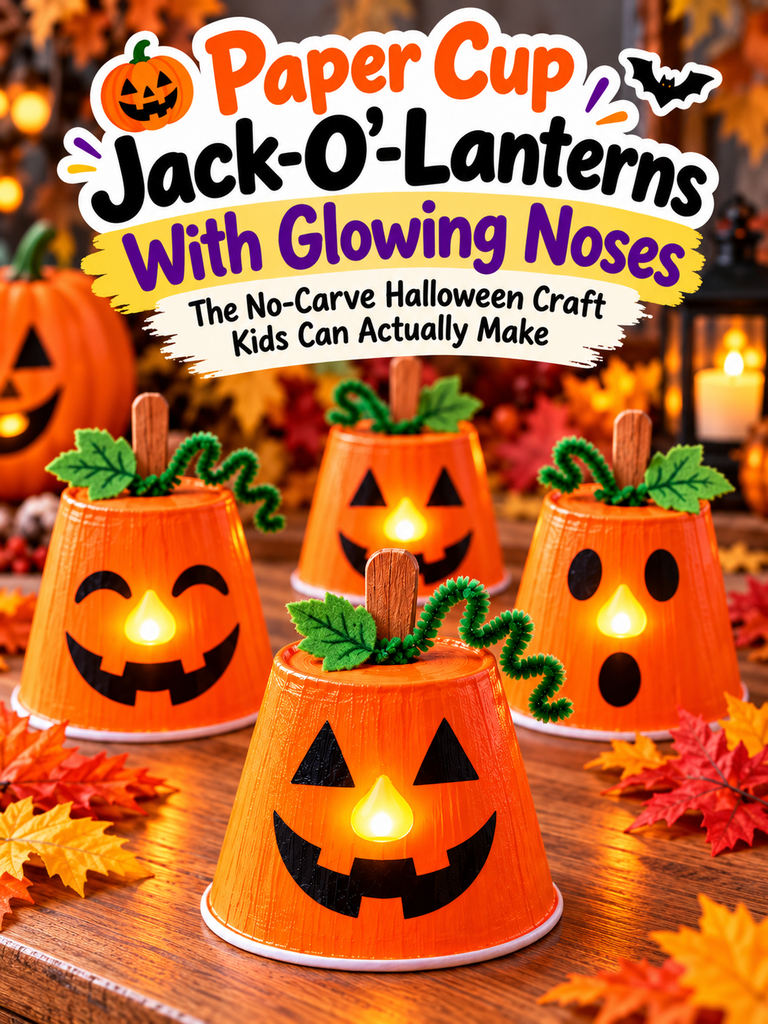
11. Paper Cup Jack-o’-Lanterns
Paint paper cups orange, draw jack-o’-lantern faces and push a flameless LED tea light through a hole to make a glowing nose. Safe, simple and perfect for Halloween.
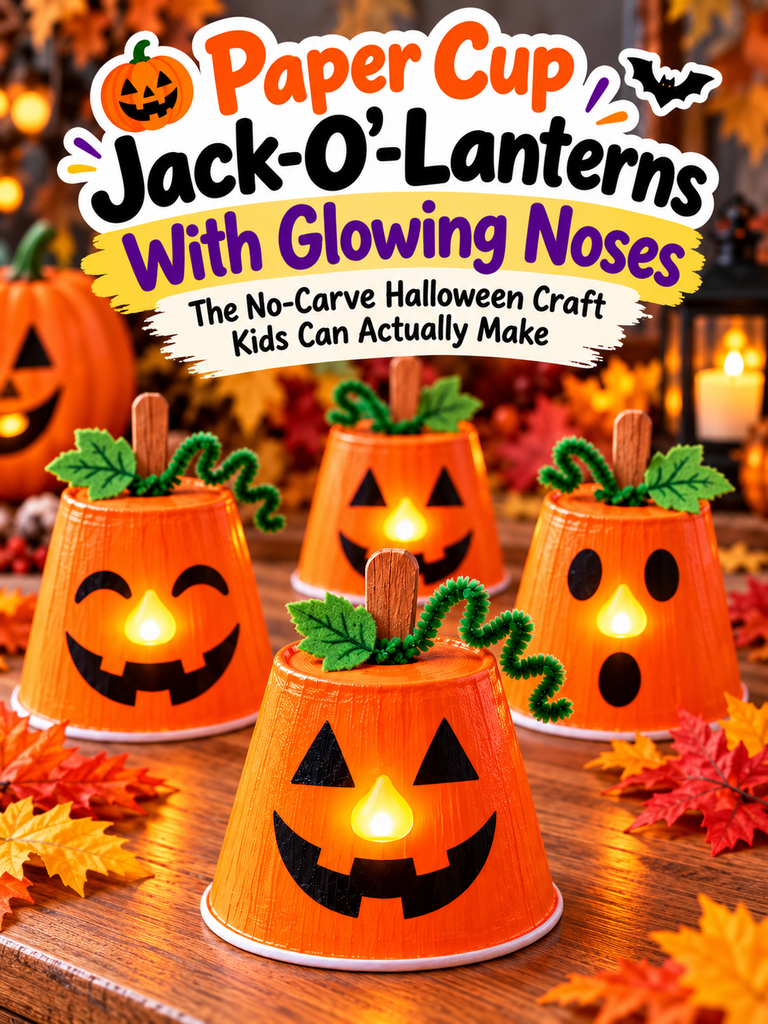
You’ll need: paper cups, orange paint, LED tea lights, a black marker · Ages: 2+ · Time: 25–30 minutes + drying
Full tutorial: Paper Cup Jack-o’-Lanterns
Paper and printable crafts (12–16)
A stack of paper, a pair of scissors and a printer can keep kids busy for a whole afternoon.
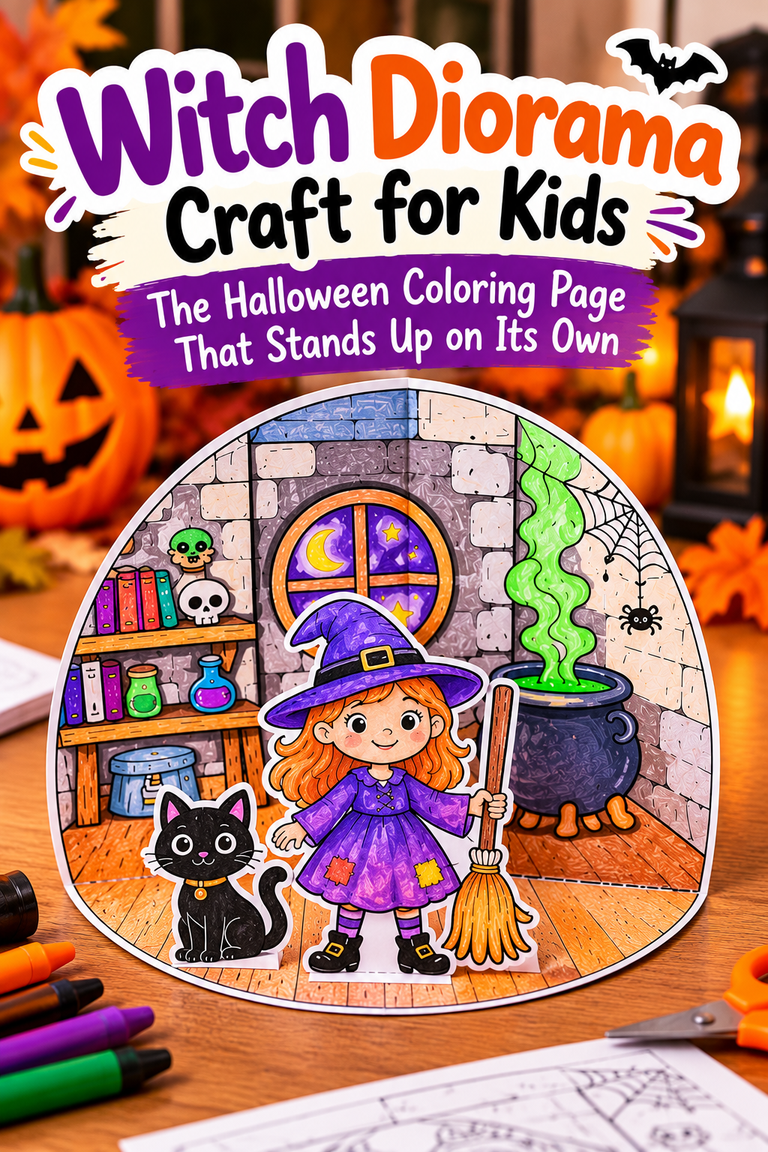
12. Witch Diorama
Kids colour a printable witch and her room, then cut, fold and glue the pieces into a little 3D scene that stands up on its own.
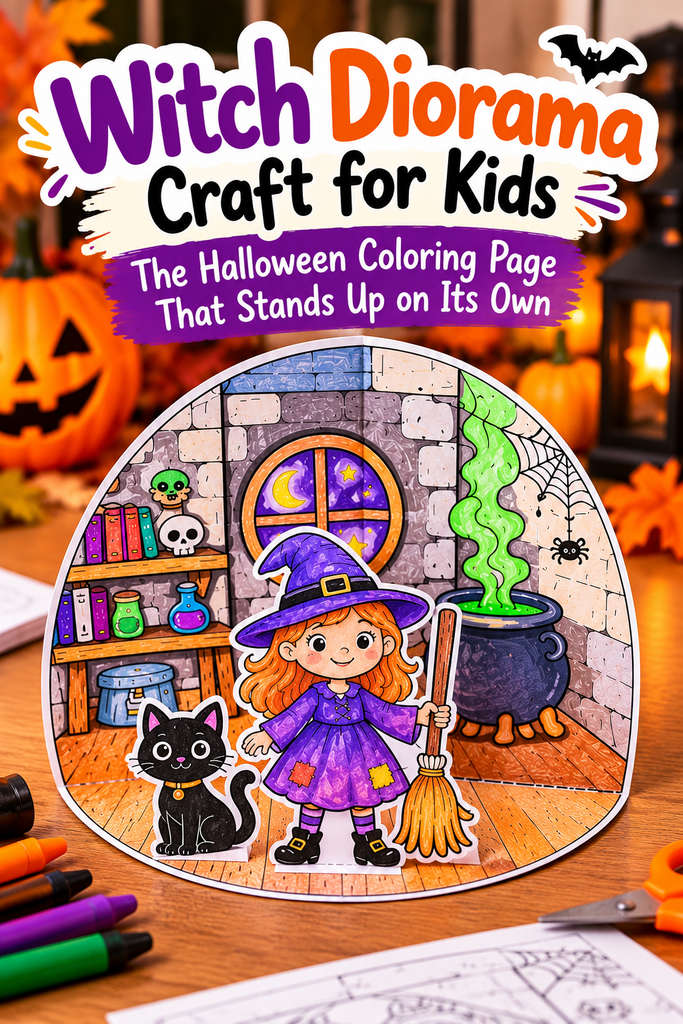
You’ll need: printable template, white paper or card, coloured pencils, scissors, glue stick · Ages: 4–10 (adults cut for toddlers) · Time: 30–45 minutes
Full tutorial: Witch Diorama Craft
13. Pumpkin Hat Headband
Make a wearable paper pumpkin headband with a heart or cross window filled with yellow tissue paper, plus leaves and curly pipe-cleaner vines. Lovely for a fall Sunday school lesson.

You’ll need: orange and green card, yellow tissue paper, green pipe cleaners, glue, a stapler · Ages: 3–10 · Time: 20–30 minutes
Full tutorial: Christian Pumpkin Hat Craft
14. Paper Chain Snake
Cut strips of coloured paper, loop them into a long chain and finish with a paper head, eyes and a forked red tongue. Great for practising scissor skills and patterns.
You’ll need: coloured paper, scissors, glue stick or tape, a marker · Ages: 3–8 · Time: 20 minutes
15. Origami Fortune Teller
Fold a square of paper into a classic fortune teller, number the flaps and write funny fortunes inside. It is a craft and a game in one.
You’ll need: one square sheet of paper, markers · Ages: 6–12 · Time: 15 minutes
16. Paper Bag Puppets
Use the flap of a paper lunch bag as the mouth, then add paper eyes, ears, hair and a tongue. Make a whole cast and put on a show.
You’ll need: paper lunch bags, coloured paper, glue, markers · Ages: 3–8 · Time: 20 minutes
Painting and printing crafts (17–22)
These process-art ideas are less about the finished result and more about mixing, smearing and discovering what happens.
17. No-Carve Pumpkin Painting
Skip the knives and paint pumpkins instead: faces, polka dots, monsters or galaxies. Our guide has 40 ideas grouped by skill level, plus tips for sealing the paint.
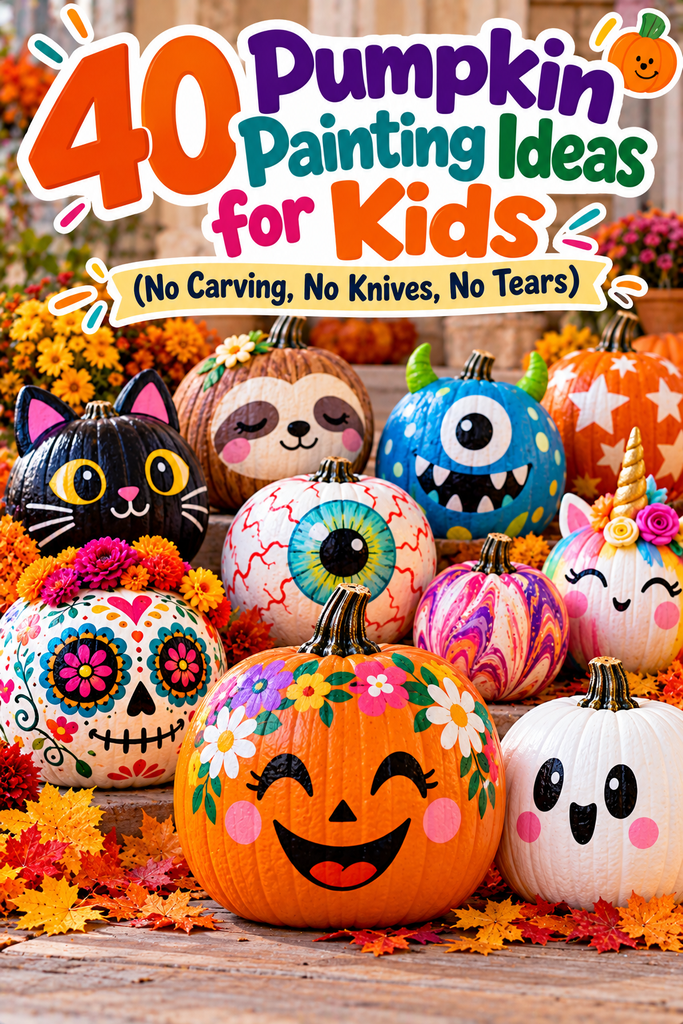
You’ll need: small pumpkins, washable or acrylic paint, brushes, sponges, paint pens · Ages: 2–14 · Time: 20–60 minutes
Full guide: Pumpkin Painting Ideas for Kids
18. Bubble Wrap Printing
Paint a piece of bubble wrap, press paper on top and peel it back to reveal a dotty print. Cut the prints into fish scales, dragon skin or snake patterns.
You’ll need: bubble wrap, washable paint, a brush, paper · Ages: 2–8 · Time: 15 minutes + drying
19. Shaving Cream Marbled Paper
Spread shaving cream on a tray, drip in food colouring and swirl it with a stick. Press paper on top, scrape the foam off and you get a marbled sheet ready for cards and bookmarks.
You’ll need: shaving cream, food colouring or liquid watercolour, a tray, card, a ruler · Ages: 4–10 · Time: 20 minutes
20. Salt Painting
Draw a picture in white glue, cover it with table salt and shake off the extra. Touch drops of watercolour to the salt lines and watch the colour travel.
You’ll need: white glue, table salt, watercolours or food colouring, thick paper · Ages: 4–10 · Time: 20 minutes + overnight drying
21. Potato Stamp Prints
A grown-up cuts a simple shape into half a potato (a star, a heart, a square). Kids dip it in paint and stamp patterns onto paper, gift wrap or a tote bag.
You’ll need: potatoes, a knife (grown-ups only), paint, paper or fabric · Ages: 3–10 · Time: 20 minutes
22. Tissue Paper Suncatcher
Stick small squares of tissue paper onto sticky contact paper, seal it with a second sheet and cut it into a heart, a circle or a butterfly. Hang it in a sunny window.
You’ll need: clear contact paper, tissue paper, scissors, string · Ages: 2–8 · Time: 20 minutes
Recycled crafts (23–27)
Raid the recycling bin before you go shopping. These crafts teach kids that “rubbish” can become something new.
23. Egg Carton Caterpillar
Cut a strip of egg cups from a carton, paint it in bright colours and add googly eyes and pipe-cleaner antennae.
You’ll need: a cardboard egg carton, paint, googly eyes, pipe cleaners · Ages: 3–8 · Time: 20 minutes + drying
24. Cardboard Tube Binoculars
Tape or glue two toilet rolls side by side, decorate them and add a yarn strap. Then head outside for a bird-spotting or bug-hunting adventure.
You’ll need: 2 toilet paper rolls, tape, paint or stickers, yarn, a hole punch · Ages: 3–8 · Time: 15 minutes
25. Milk Carton Bird Feeder
A grown-up cuts windows into a clean milk or juice carton. Kids decorate it, push a stick through as a perch, fill it with seed and hang it in a tree.
You’ll need: a clean carton, waterproof paint or tape, a stick, string, bird seed · Ages: 4–10 · Time: 30 minutes
26. Cardboard Box Costumes
Turn big boxes into a robot, a race car, a rocket, a dragon or a knight. Simple wearable pieces work for toddlers, full box costumes for older kids.

You’ll need: cardboard boxes, tape, washable paint, bottle caps and paper tubes · Ages: all ages · Time: 1–2 hours
Full guide: DIY Cardboard Halloween Costumes for Kids
27. Cereal Box Puzzle
Glue a child’s drawing (or the front of the box) onto cereal box card, draw wavy lines on the back and cut it into puzzle pieces.
You’ll need: an empty cereal box, a drawing or picture, glue stick, scissors · Ages: 5–10 · Time: 20 minutes
Nature crafts (28–30)
Start with a walk: collecting the materials is half the fun.
28. Leaf Rubbings
Place leaves under thin paper, vein side up, and rub over them with the side of a peeled crayon. The leaf shapes and veins appear like magic.
You’ll need: fresh leaves, thin paper, crayons with the paper peeled off · Ages: 3–10 · Time: 15 minutes
29. Nature Crown
Cut a strip of card to fit your child’s head, wrap it with double-sided tape and let them press on leaves, petals, feathers and grasses found outside.
You’ll need: a strip of card, double-sided tape or glue, things from nature · Ages: 3–8 · Time: 20 minutes + the walk
30. Pinecone Critters
Turn pinecones into owls, hedgehogs or little monsters with felt wings, googly eyes and pipe-cleaner feet.
You’ll need: dry pinecones, felt scraps, googly eyes, pipe cleaners, glue · Ages: 4–10 · Time: 20 minutes
Yarn and crochet crafts (31–33)
Yarn crafts build patience and fine motor skills, and older kids love learning a “grown-up” skill.
Yarn and crochet crafts (31–33)
Yarn crafts build patience and fine motor skills, and older kids love learning a “grown-up” skill.
31. Crochet Chain Bracelet
Learn the slip knot and the chain stitch, then crochet a long colourful chain and tie it into a bracelet or a necklace. It is the very first step of crochet.
You’ll need: chunky yarn, a large crochet hook (6–8 mm) or just fingers · Ages: 7+ · Time: 20–30 minutes
Step-by-step guides: How to Make a Slip Knot and How to Crochet a Chain
32. Yarn-Wrapped Letters
Cut a child’s initial from thick cardboard and wrap it round and round with colourful yarn, gluing the ends at the back. A lovely bedroom door decoration.
You’ll need: cardboard, yarn scraps, scissors, glue · Ages: 5–10 · Time: 30–45 minutes
33. Easy Crochet Flower
Once the chain feels easy, a small crochet flower is the perfect next project. Use it as a brooch, a hair clip or a card decoration.
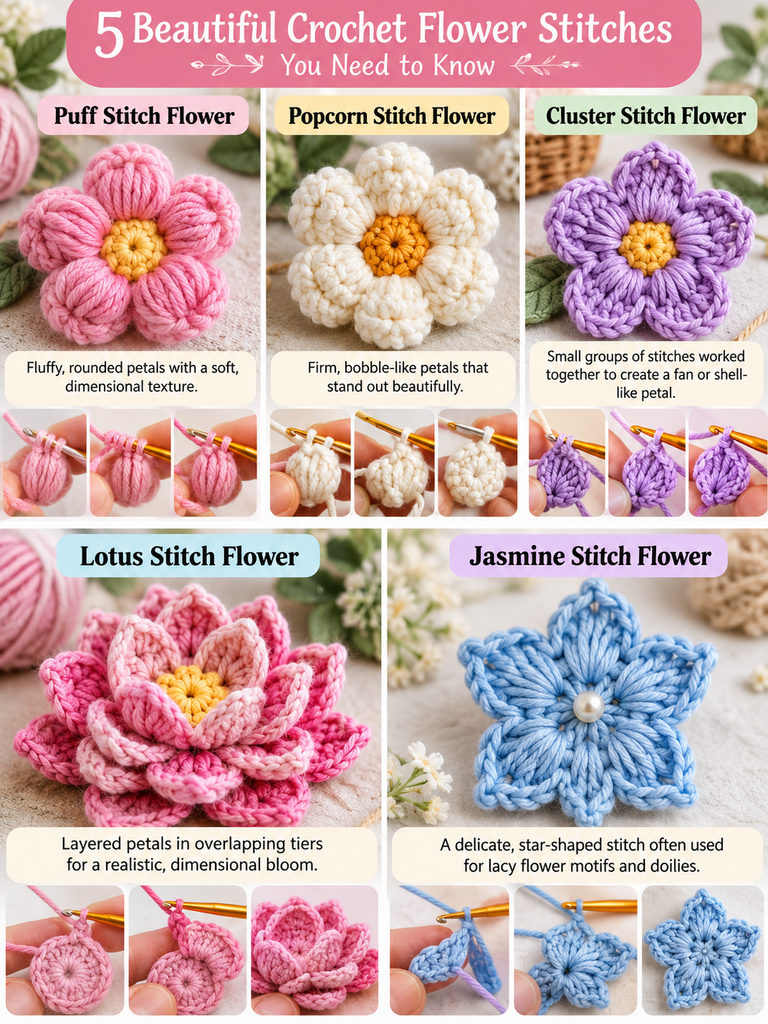
You’ll need: cotton yarn, a crochet hook, a yarn needle · Ages: 9+ with help · Time: about 30 minutes
Full tutorial: Easy Crochet Flower for Beginners
Dough and clay crafts (34–35)
Squishing, rolling and cutting dough is calming for kids, and both recipes use basic kitchen ingredients.
34. Homemade Play Dough
Mix 2 cups of flour, 1/2 cup of salt, 2 tablespoons of oil and about 1 cup of warm water with a few drops of food colouring. Knead until smooth and store it in an airtight box.
You’ll need: flour, salt, oil, warm water, food colouring · Ages: 2–8 · Time: 10 minutes to make, hours to play
35. Salt Dough Ornaments
Mix 2 cups of flour, 1 cup of salt and about 3/4 cup of water. Roll it out, cut shapes (or press a handprint), bake low and slow until hard, then paint. Perfect keepsakes for holidays and grandparents.
You’ll need: flour, salt, water, cookie cutters, paint, ribbon · Ages: 3–10 (an adult handles the oven) · Time: 30 minutes + 2–3 hours baking
Tips for crafting with kids
- Prepare first. Lay out supplies and cover the table with newspaper or an old cloth before you call the kids.
- Match the craft to the age. Toddlers love sticking and painting; kids aged 6–10 can cut, fold and follow numbered steps.
- Focus on the process. A wonky monster made alone is worth more than a perfect one an adult finished.
- Keep it safe. Use child-safe scissors and washable paint. Keep googly eyes, buttons and small stones away from children under 3.
- Plan for drying time. Paint needs about 30 minutes before you add eyes or glue. Read a book or play a game while you wait.
- Display the results. A shelf, a fridge or a “gallery wall” shows kids their work matters.
Frequently asked questions
What are the easiest crafts for young kids?
Paper plate crafts, handprint art, tissue paper suncatchers and bubble wrap printing. They need very little cutting and work for children as young as 2 or 3.
Which crafts are best for kids aged 6 to 10?
Older kids enjoy crafts with more steps: sock puppets, rock monsters, corner bookmarks, origami fortune tellers, cardboard costumes and a first crochet chain.
How can I do crafts with kids on a budget?
Save paper rolls, egg cartons, cereal boxes and odd socks, and buy only the basics: scissors, glue, washable paint and markers. Most crafts on this list cost less than $1 each.
Which crafts work well for a classroom or a party?
Toilet roll monsters, paper bag puppets, corner bookmarks and salt dough ornaments are easy to prepare in batches and need few special supplies.
How long do these crafts take?
Most take 15 to 45 minutes of hands-on time. Painted crafts need extra drying time, and salt dough needs 2 to 3 hours in the oven.
Start crafting today
You don’t need expensive kits to raise creative kids. Pick one idea from this list, gather a few things from the recycling bin and let them lead the way.
If your kids loved the monster crafts, the Little Monsters Craft Book has all six in one printable PDF, plus build-a-monster cut-outs, corner bookmark templates, a Roll-a-Monster dice game, a colouring page and an Official Monster Maker certificate. Each craft is also available on its own.