Last October, my six-year-old stood in the middle of the living room, staring at a pile of delivery boxes like they were treasure. “Can I be a robot?” he asked. “A real one. With buttons.”
I’d already priced the store-bought version. It was thin polyester, smelled faintly of chemicals, and cost more than our weekly groceries. So I grabbed a box cutter, a roll of tape, and said the words every parent eventually says: “How hard can it be?”

Three evenings later, he walked out the door as a silver robot with bottle-cap dials and a flashlight heart. Neighbors stopped us on the sidewalk. Another kid asked where we bought it. And my son, very seriously, told her, “We built it.”
That’s the magic of cardboard costumes. They’re cheap, sure. But the real value is in that sentence: we built it.
Table of Contents
Key Takeaways
- Cardboard costumes cost almost nothing and turn Halloween prep into a family project kids remember.
- The best designs are simple shapes worn over the body: boxes for robots and cars, cones for rockets, flat panels for wings and shells.
- Comfort and visibility matter more than detail. If your child can’t walk, sit or see, the costume has failed.
- Let kids handle the decorating. Adults handle the cutting and the hot glue.
- Keep cardboard costumes well away from candles and jack-o’-lanterns, and add reflective tape for evening walks.
Why Cardboard Beats the Costume Aisle Every Time
Here’s the thing nobody tells you about store-bought costumes: kids rarely remember them. They remember the ones they helped make.
Cardboard turns a costume into a story. Your child gets to choose the colors, decide where the buttons go, and argue (passionately) about whether a dragon needs three horns or four. That ownership is what makes them stand a little taller on Halloween night.
There are practical wins, too:
- It’s basically free. If you’ve ordered anything online this year, you probably already have enough boxes.
- It’s eco-friendly. When the season ends, the costume goes into the recycling bin instead of a landfill.
- It’s one of a kind. Nobody else at the school parade will show up in the same outfit.
- It builds real skills. Measuring, planning, problem-solving, and a healthy dose of patience.
Honestly? The crooked lines and visible tape are part of the charm. Kids aren’t looking for perfection. They’re looking for proof that they made something.
What You’ll Need Before You Start
You don’t need a craft store haul. Most of this is already sitting in a drawer somewhere:
- Cardboard boxes in a few sizes (one big enough to fit over your child’s torso is the star of the show)
- A box cutter or utility knife, for adult use only
- Child-safe scissors for the little helpers
- Packing tape, masking tape and duct tape in fun colors
- A low-temperature glue gun or strong craft glue
- Washable or non-toxic acrylic paint and brushes
- Recycled extras: bottle caps, paper towel tubes, egg cartons, aluminum foil, old ribbons
- Elastic or old fabric strips for shoulder straps
- Reflective tape for safety
One tip I learned the hard way: before painting, give the box a coat of white primer or plain white paint. Bright colors look muddy straight on brown cardboard, and printed logos tend to peek through.
7 Creative Cardboard Costume Ideas Kids Love
Each of these starts with a simple shape. Once you see the pattern, you’ll start spotting costume potential in every box that lands on your doorstep.
1. The Classic Robot
This is the gateway costume, and for good reason. You need one large box for the body and a smaller one for the head.
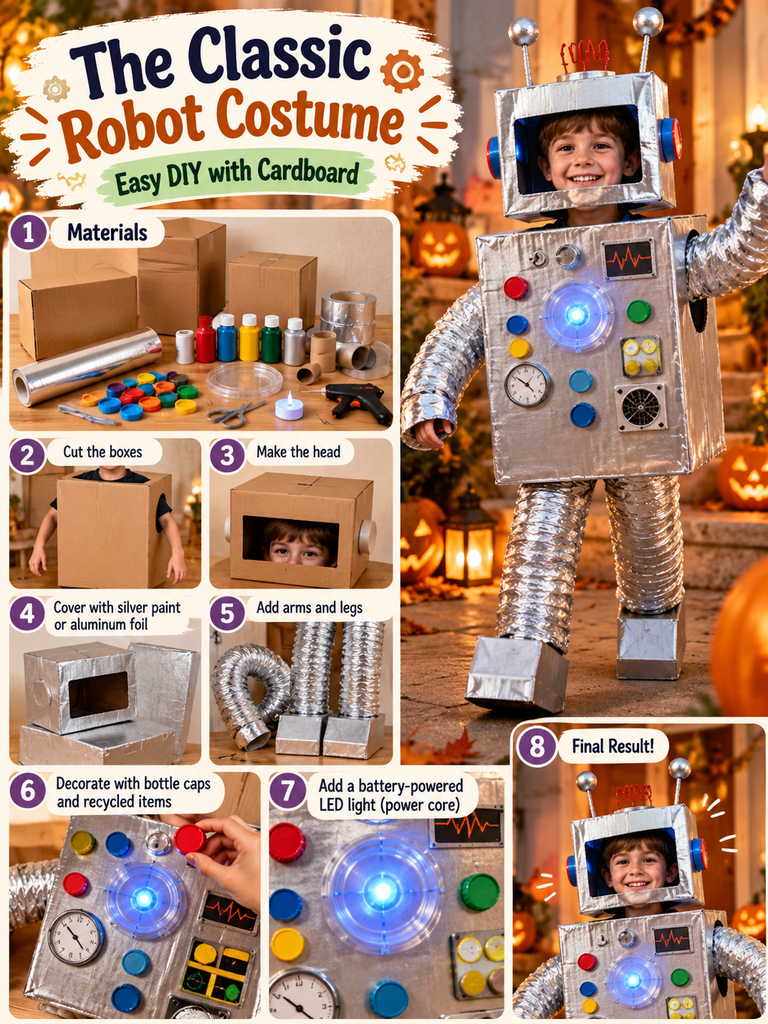
Cut holes for the head and arms in the big box, then cover everything in silver paint or aluminum foil. Bottle caps become dials, a juice lid becomes a speaker, and dryer vent tubing (or paper rolled into tubes) makes perfect bendy arms. For the head, cut a wide visor-style window instead of two small eye holes. Your child will thank you when they don’t trip on the first doorstep.
Make it pop: Tape a small battery-powered LED light inside a clear plastic lid on the chest. Instant “power core.”
2. The Race Car
Cut the flaps off a box, remove the bottom, and attach shoulder straps so your child “wears” the car around their waist. Paper plates make great wheels, and a plastic lid becomes the steering wheel.
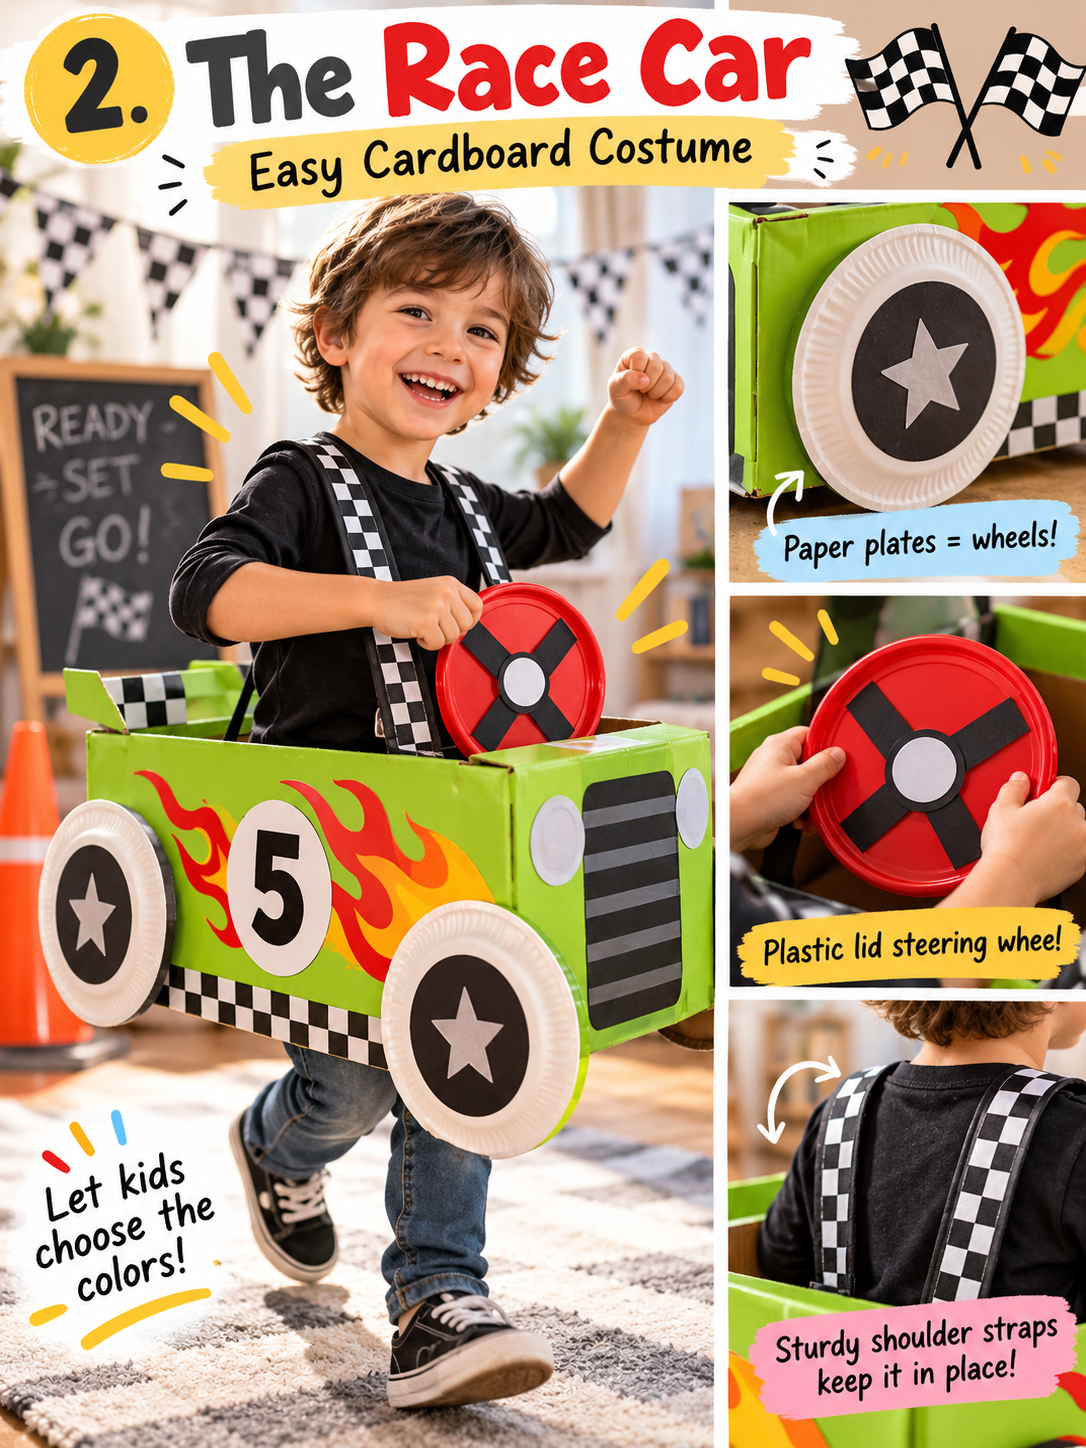
Let your kid design the racing number and the colors. Mine insisted on lime green with flames. It was glorious.
3. The Space Rocket
Roll a large piece of cardboard into a tall cylinder for the body, then add a cone on top. Two empty plastic bottles wrapped in foil become jet packs on the back, and red, orange and yellow tissue paper streamers make the “flames.”

Pair it with a homemade mission patch, and your little astronaut is ready for launch.
4. The Friendly Dragon
This one uses flat panels instead of a box. Cut two large wing shapes and attach them to a cardboard backpack panel with elastic straps. A row of triangles down the spine gives you scales, and egg carton cups painted green or purple make fantastic bumpy texture.
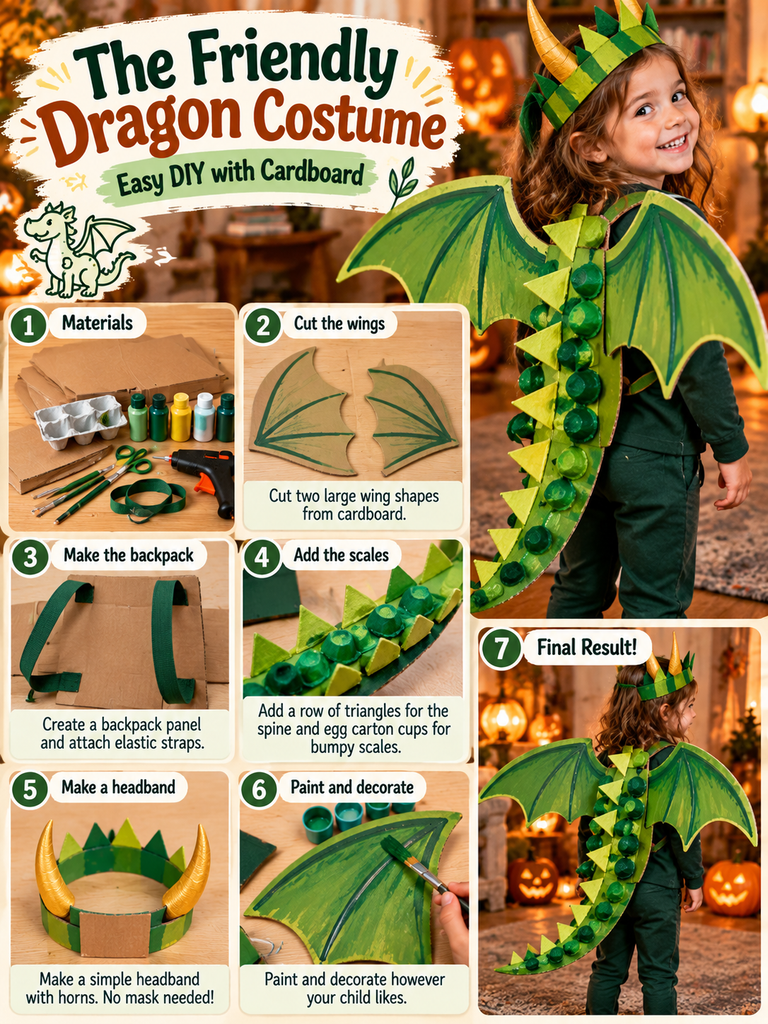
Finish with a simple cardboard headband with horns. No mask needed, which means no complaining about not being able to see.
5. The Knight in Shining Armor
A cardboard shield and sword are the fastest costume in this list. Cut a classic shield shape, add a handle on the back with a strip of thick cardboard, and paint a family crest on the front. (Ask your child what animal represents your family. The answers are wonderful.)

Add a simple chest plate cut from a flattened box and you have a full knight. Keep the sword short and rounded at the tip, so sword fights stay friendly.
6. The Turtle or Snail
A round shell made from a shallow box or layered cardboard circles, worn like a backpack, turns any green or brown outfit into a costume. Paint hexagon patterns for a turtle, or a spiral for a snail.
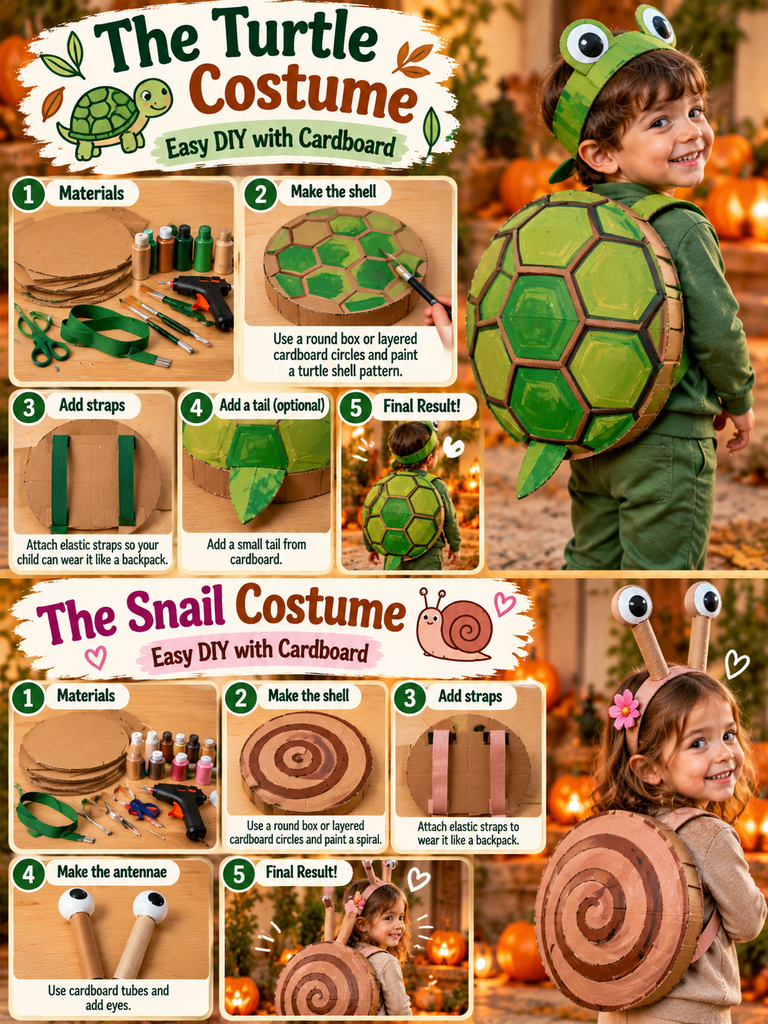
This is a great option for toddlers because it leaves arms, legs and face completely free.
7. The Crayon or Building Block
Want something a younger child can almost build alone? A tall cylinder painted in one bold color with a cone on top becomes a crayon. A rectangular box with paper-cup “studs” glued on top becomes a giant toy building block.
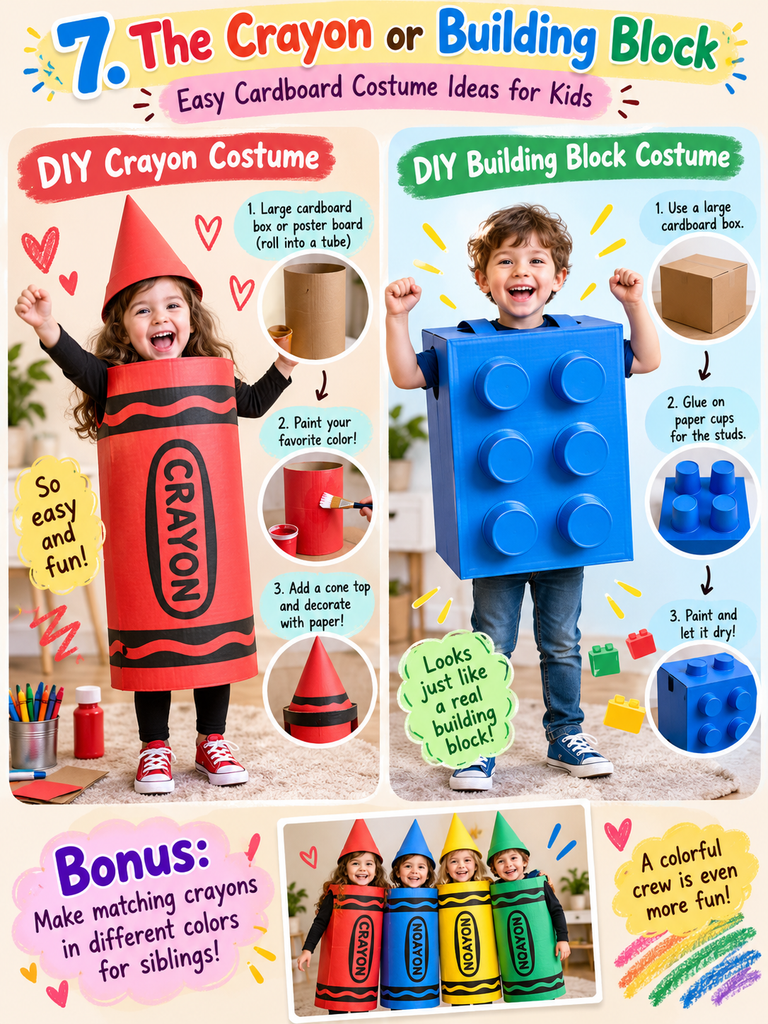
Bonus idea for siblings: make several crayons in different colors and send them out as a matching set.
How to Build Any Cardboard Costume Step by Step
Whatever design you choose, the process looks pretty much the same. Here’s the routine that works in our house:
- Measure your child first. Measure shoulder width, chest, and the distance from shoulder to knee. A costume that hits the knees will make walking miserable.
- Sketch the plan together. A quick drawing on paper keeps everyone on the same page and gives your child creative control.
- Cut the openings. Head, arms and any eye windows. Do a test fit now, before anything gets painted.
- Reinforce the stress points. Run duct tape along the edges of armholes and anywhere straps attach. These spots tear first.
- Prime and paint. One coat of white, then the fun colors. Let it dry overnight.
- Add details last. Buttons, scales, numbers, glitter. This is where kids should take the lead.
- Do a full dress rehearsal. Have your child walk around the house, climb stairs, and sit down. Fix anything that pinches or blocks their view.
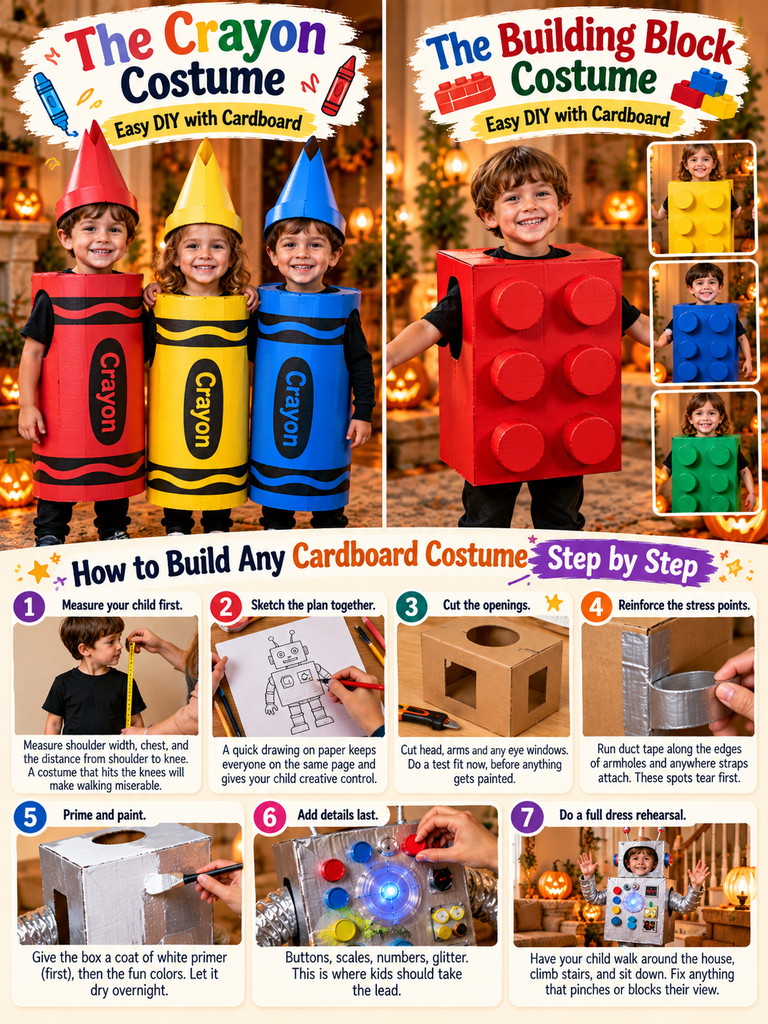
That rehearsal step is the one most people skip. Don’t. It’s the difference between a happy trick-or-treater and a kid in tears two houses into the night.
Safety First: What Every Parent Should Know
Cardboard costumes are wonderfully safe when you plan for a few things. Here’s my non-negotiable checklist:
- Keep it away from flames. Cardboard catches fire easily. Choose battery-powered lights for jack-o’-lanterns, and remind kids to steer clear of porch candles.
- Protect their vision. Wide openings beat small eye holes every time. Face paint is often safer than a cardboard mask.
- Make them visible. Add strips of reflective tape front and back, and send kids out with a flashlight or glow stick.
- Smooth the edges. Cover cut edges with tape so nobody gets scratched or paper-cut.
- Watch the weight. If the costume feels heavy after five minutes at home, it’ll feel twice as heavy an hour into the night.
- Leave the tools to adults. Box cutters and hot glue guns stay in grown-up hands. Kids get paint, stickers and safety scissors.
Turning Costume Night Into a Family Tradition
Something shifted in our house after that first robot. Now, “costume week” is its own little holiday. We clear the dining table, put on music, and spend a few evenings covered in paint.
Some of the best moments have had nothing to do with the finished costume. My daughter figured out on her own that folding cardboard along a ruler made cleaner bends. My son learned that duct tape fixes almost anything (a lesson he now applies to everything in the house, unfortunately).
If you have a few families nearby, try hosting a cardboard costume party. Everyone brings boxes, you supply the tape and paint, and the kids build side by side. It’s messy, loud, and exactly what Halloween should feel like.
Common Questions About Cardboard Costumes
How long does it take to make a cardboard costume?
Most simple designs take two or three short sessions: one for cutting and assembling, one for painting, and one for details. Spread it over a few evenings so the paint has time to dry.
What if it rains on Halloween?
Rain is cardboard’s biggest enemy. A coat of clear sealant or Mod Podge helps, and wrapping key parts in clear packing tape adds more protection. Keep a plan B ready, like a rain poncho decorated to match.
What age is right for cardboard costumes?
Every age can enjoy them, but the design should match the child. Toddlers do best with wearable pieces like shells, wings or headbands. Older kids can handle full box costumes and will want more say in the build.
Final Thoughts: The Costume Is Just the Beginning
When I think back to that first robot, I don’t remember the wonky arms or the dial that fell off halfway down the street. I remember my son explaining every single button to anyone who’d listen. I remember the pride.
That’s what a cardboard costume really gives your kids. Not just something to wear for one night, but a memory of creating something out of nothing, together.
So before you flatten the next delivery box, take a second look. There might be a dragon, a rocket, or a robot hiding in there.
Over to You
What’s your child dreaming of being this Halloween? Share your cardboard costume ideas, your proudest builds, or your funniest fails in the comments below. I read every single one, and honestly, some of my favorite ideas came from readers like you.
And if this post sparked a project, save it for your weekend build and send it to a fellow parent who’s staring at a pile of boxes right now.