Spiders get a bad reputation. Most people see one in the corner of the bathroom and reach for a shoe. But crochet one in soft black yarn, give it two shiny eyes, and something strange happens: the same people who shriek at the real thing suddenly want to hold it.
That’s the magic of this little guy. He’s round, a bit goofy, and about as scary as a teddy bear. He’s also one of the quickest amigurumi projects I know, which makes him perfect for those last-minute Halloween decorations, party favors, or a cozy evening when you just want to finish something.
If you’ve never made amigurumi before, don’t worry. This pattern uses only a handful of basic stitches, and I’ll walk you through every round.
Table of Contents
Key Takeaways
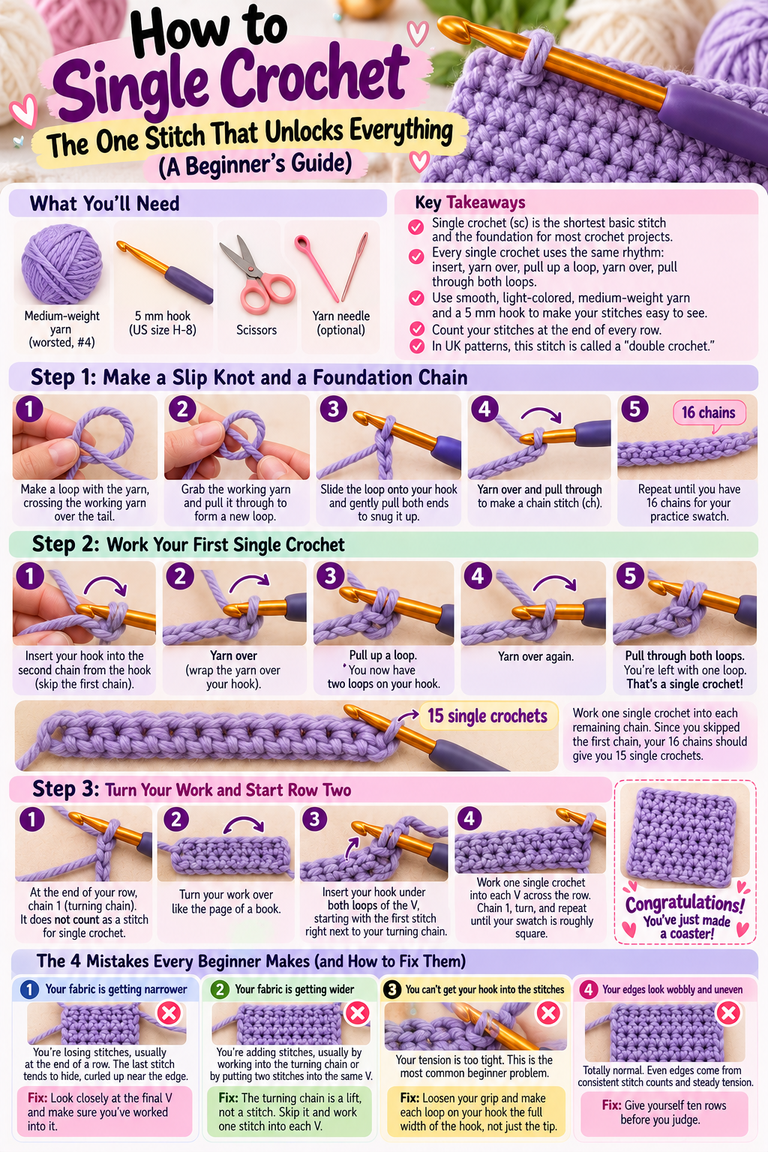
- Beginner-friendly: you only need a magic ring, single crochet, increases, and decreases.
- Fast: most crocheters finish in about 1 to 1.5 hours.
- Two body pieces + eight legs: a round abdomen, a smaller head, and legs made from pipe cleaners or crocheted strips.
- Scrap-friendly: a small amount of worsted weight yarn is all it takes.
- Easy to customize: change colors, add fangs, or turn it into a hanging decoration.
Why This Spider Is the Perfect Starter Amigurumi
Here’s the thing about amigurumi: the first project often decides whether you fall in love with it or give up. Pick something with fiddly arms, tiny ears, and a dozen color changes, and it’s easy to feel defeated.
A spider is the opposite. The body is just two balls. The legs are straight lines. There’s no color changing, no shaping tricks, and no complicated faces to embroider. Yet the finished piece still looks charming and full of personality.
It also teaches you the one skill every amigurumi pattern relies on: crocheting in a continuous spiral, increasing to build a ball, and decreasing to close it. Once you’ve made this spider, you’ve basically learned the foundation for hundreds of other toys.
What You’ll Need
Materials
- Worsted weight (#4) yarn in black, about 25 yards (roughly 23 m). Acrylic or cotton both work well.
- A 3.5 mm (E/4) crochet hook. Going down a size from the yarn label keeps the fabric tight so the stuffing doesn’t peek through.
- Two safety eyes, 8–10 mm, or a bit of white and black yarn for embroidered eyes.
- Polyester fiberfill.
- Four black pipe cleaners (chenille stems) for the legs, or extra yarn if you prefer crocheted legs.
- Optional: a scrap of white yarn for fangs, and red or orange yarn for a back marking.
Tools
- Stitch marker (a paperclip or a scrap of contrasting yarn works in a pinch)
- Yarn needle
- Scissors
Finished Size
With worsted yarn and a 3.5 mm hook, the body measures about 2.5 inches (6 cm) long, and the leg span with pipe cleaners is roughly 6 inches (15 cm). Your size may vary a little depending on your tension, and that’s completely fine. Spiders come in all sizes.
Abbreviations (US Terms)
- MR – magic ring
- ch – chain
- sc – single crochet
- inc – increase (2 sc in the same stitch)
- dec – decrease (single crochet two stitches together; the invisible decrease looks neatest)
- sl st – slip stitch
- FO – fasten off
- ( ) x6 – repeat what’s inside the brackets 6 times
- [ ] – total number of stitches at the end of the round
Work in continuous rounds without joining. Place your stitch marker in the first stitch of each round and move it up as you go. Trust me, it saves a lot of counting and frogging.
The Pattern
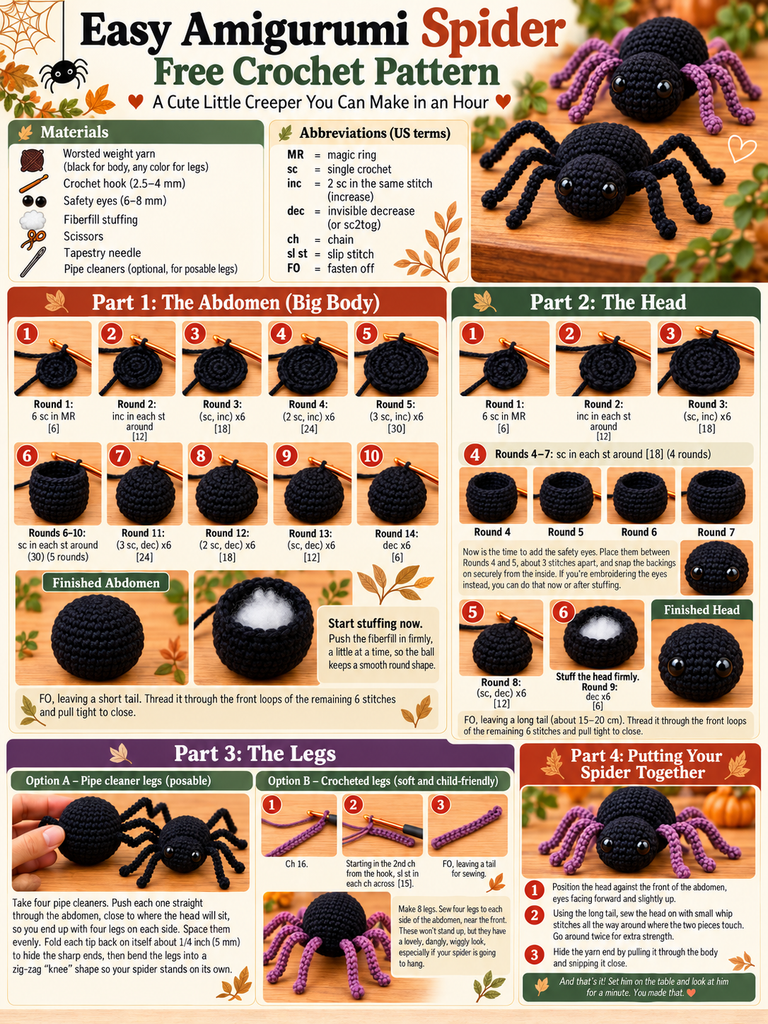
Part 1: The Abdomen (Big Body)
- Round 1: 6 sc in MR [6]
- Round 2: inc in each st around [12]
- Round 3: (sc, inc) x6 [18]
- Round 4: (2 sc, inc) x6 [24]
- Round 5: (3 sc, inc) x6 [30]
- Rounds 6–10: sc in each st around [30] (5 rounds)
- Round 11: (3 sc, dec) x6 [24]
- Round 12: (2 sc, dec) x6 [18]

Start stuffing now. Push the fiberfill in firmly, a little at a time, so the ball keeps a smooth round shape.
- Round 13: (sc, dec) x6 [12]
- Round 14: dec x6 [6]
FO, leaving a short tail. Thread it through the front loops of the last 6 stitches, pull tight to close the hole, and weave the end inside the body.
Part 2: The Head
- Round 1: 6 sc in MR [6]
- Round 2: inc in each st around [12]
- Round 3: (sc, inc) x6 [18]
- Rounds 4–7: sc in each st around [18] (4 rounds)
Now is the time to add the safety eyes. Place them between Rounds 4 and 5, about 3 stitches apart, and snap the backings on securely from the inside. If you’re embroidering the eyes instead, you can do that now or after stuffing.

- Round 8: (sc, dec) x6 [12]
Stuff the head firmly.
- Round 9: dec x6 [6]
FO, leaving a long tail (about 12 inches / 30 cm) for sewing. Close the opening the same way you did for the abdomen, but keep the tail out.
Part 3: The Legs
You’ve got two options here, and honestly, both look great.
Option A – Pipe cleaner legs (posable): Cut nothing; just take four pipe cleaners. Push each one straight through the abdomen, close to where the head will sit, so you end up with four legs sticking out on each side. Space them evenly and adjust until both sides match. Fold each tip back on itself about 1/4 inch (5 mm) to hide the sharp wire ends, then bend the legs into a zig-zag “knee” shape so your spider stands on its own.
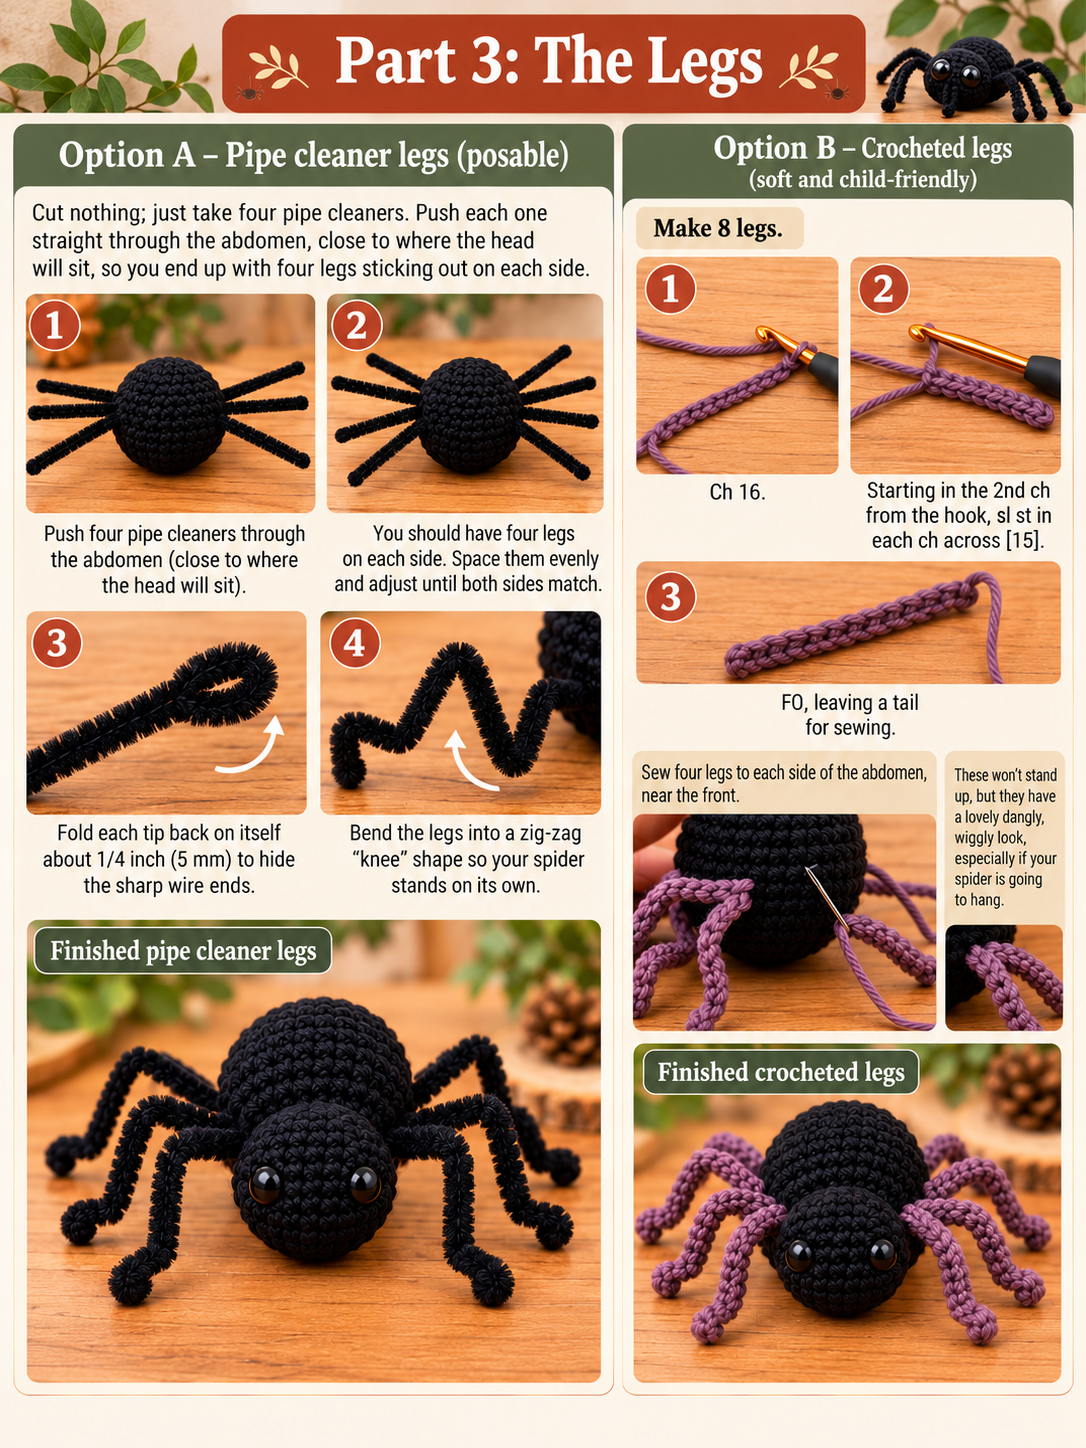
Option B – Crocheted legs (soft and child-friendly): Make 8.
- Ch 16.
- Starting in the 2nd ch from the hook, sl st in each ch across [15].
- FO, leaving a tail for sewing.
Sew four legs to each side of the abdomen, near the front. These won’t stand up, but they have a lovely dangly, wiggly look, especially if your spider is going to hang.
Part 4: Putting Your Spider Together
- Position the head against the front of the abdomen, eyes facing forward and slightly up.
- Using the long tail, sew the head on with small whip stitches all the way around where the two pieces touch. Go around twice for extra strength.
- Hide the yarn end by pulling it through the body and snipping it close.
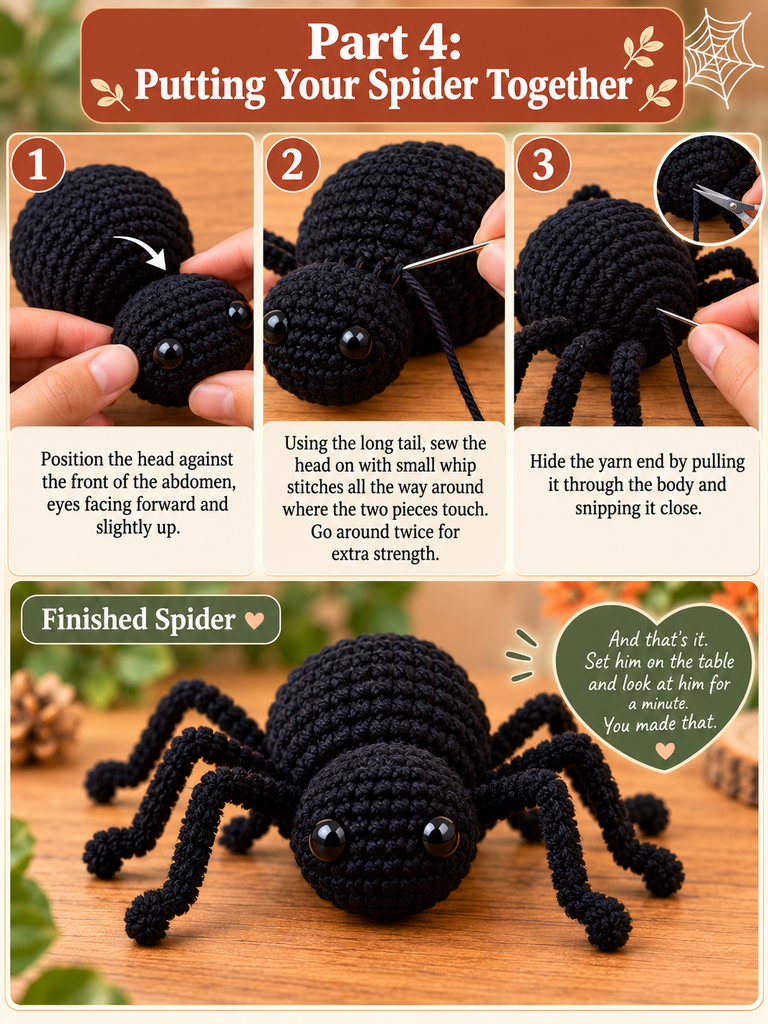
And that’s it. Set him on the table and look at him for a minute. You made that.
Little Touches That Give Your Spider Personality
The basic spider is cute on its own, but a few tiny details can take it from “nice” to “I need to make ten more.”
- Fangs: With white yarn, embroider two short vertical stitches just below the eyes. Instantly mischievous.
- A hanging thread: Attach black yarn to the top of the abdomen and ch 40 (or as long as you like). Hang him from a door frame, a window, or a Halloween wreath.
- A back marking: Embroider a small hourglass, a stripe, or a little heart in red or orange on top of the abdomen.
- Rosy cheeks: A touch of pink chalk pastel or a few stitches of pink yarn under each eye make him look sweet instead of spooky.
- Unexpected colors: Who said spiders have to be black? Purple, lime green, and orange spiders look amazing in a group.
Common Problems (and How to Fix Them)
“I can see the stuffing through the stitches.”
Your fabric is a bit loose. Try a hook one size smaller, and make sure you’re using the yarn-under technique for single crochet if you know it. It gives a tighter, neater stitch.
“My ball looks lumpy.”
That’s almost always the stuffing. Add it in small pieces instead of big clumps, and roll the piece between your hands to even it out before closing.
“My stitch count is off.”
We’ve all been there. Usually the culprit is the first or last stitch of the round. Count after every round in the increase section. It feels slow, but it’s much faster than ripping back five rounds.
“The head keeps flopping forward.”
Stuff the head more firmly and sew around the join twice. A firm head on a firm body stays put.
A Quick Safety Note
If you’re making this spider for a baby or a child under three, skip the safety eyes and the pipe cleaners. Embroider the eyes with yarn and use the crocheted legs instead. Safety eyes can come loose with a determined toddler, and pipe cleaners hide a wire inside. A fully yarn-made spider is just as lovable and much safer for little hands.
Frequently Asked Questions
Is this pattern really suitable for beginners?
Yes. If you can make a magic ring and a single crochet, you can make this spider. Increases and decreases are explained above, and there are no color changes.
Can I use a different yarn weight?
Absolutely. Use the same pattern with any yarn, just pick a hook that’s a size or two smaller than the label suggests. Chunky yarn makes a big, squishy spider; DK or sport weight makes a tiny one.
How long does it take to make?
Most people finish in about an hour to an hour and a half. Once you’ve made one, the second goes even faster.
Can I sell spiders made from this pattern?
Many pattern designers allow you to sell finished items made from their free patterns, often with a credit link back to the original. If you’re using this pattern, a mention of where you found it is always appreciated.
Wrapping It Up
Remember that spider in the bathroom corner? The one nobody wanted to touch? This is its friendlier cousin. Round, soft, and made with your own two hands in less time than it takes to watch a movie.
Make one for your desk, a handful for a Halloween party, or a whole family dangling from your front window. Every one will come out a little different, and that’s exactly the charm of handmade.
Your Turn
I’d genuinely love to see how your spider turns out. Did you go classic black or try a wild color? Did you add fangs, or keep him sweet and innocent? Share a photo or tell me about your version in the comments below. And if you’ve got a question while you’re working, ask away. Chances are someone else is wondering the same thing.
Happy hooking, and happy haunting!