


Your first row of crochet will probably look terrible.
That’s not a pessimistic prediction. It’s a promise, and honestly, it’s good news. Almost everyone who crochets today started with a lumpy, crooked strip of yarn that looked nothing like the photo on the pattern. The hook felt like a chopstick in the wrong hand, the yarn kept slipping, and at some point they wondered whether they were “just not crafty.”
Then, somewhere around row five or six, something clicked. The hands stopped thinking and started remembering.
The stitch that gets you there is the single crochet. It’s short, sturdy and forgiving, and it’s the building block for blankets, scarves, baskets and those adorable stuffed toys (amigurumi) you’ve probably seen all over social media. Learn this one well, and every other stitch becomes a variation on something you already know.
Let’s get your hands moving.
Table of Contents
Key Takeaways
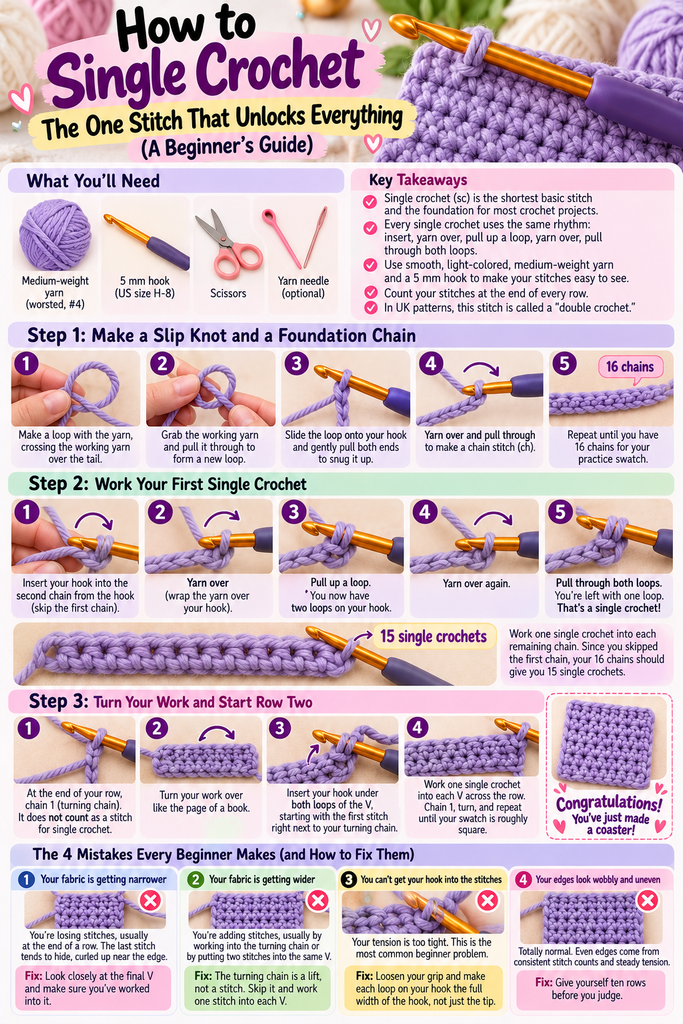
- The single crochet (sc) is the shortest basic stitch and the foundation for most crochet projects.
- Every single crochet uses the same rhythm: insert, yarn over, pull up a loop, yarn over, pull through both loops.
- Start with smooth, light-colored, medium-weight yarn and a 5 mm hook. Your stitches will be much easier to see.
- Count your stitches at the end of every row. It’s the simplest way to keep your edges straight.
- In UK patterns, this same stitch is called a “double crochet.” Knowing that will save you a lot of confusion.
What Exactly Is a Single Crochet?
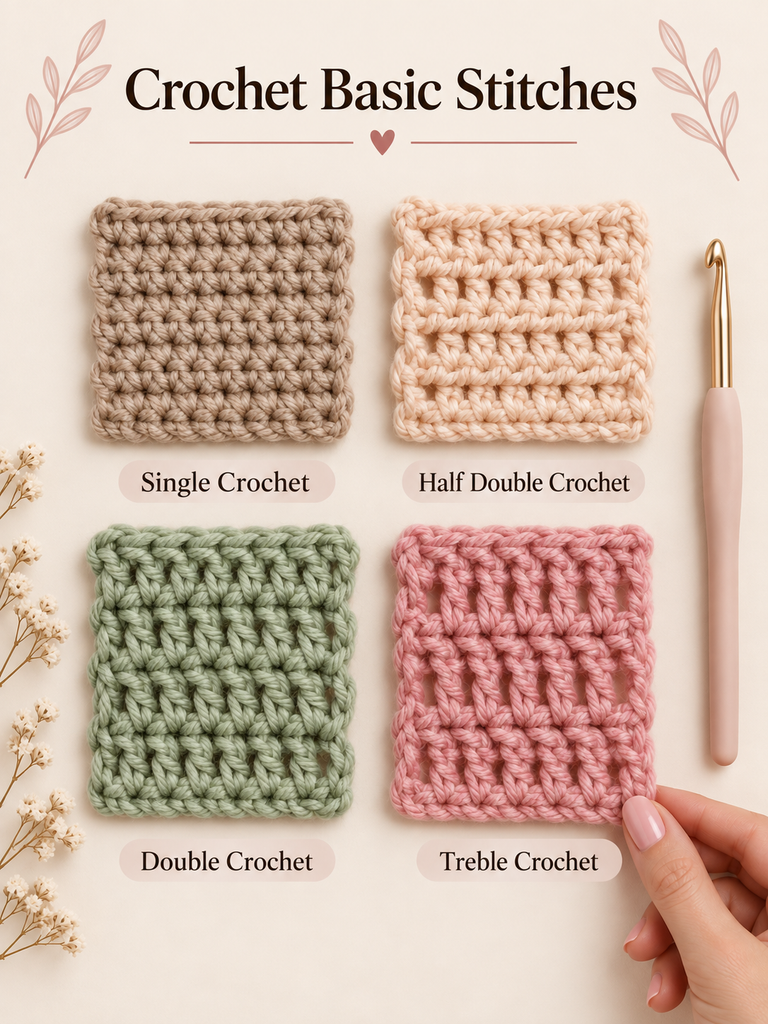
Think of crochet stitches like building blocks of different heights. The single crochet is the shortest of the basic blocks. Taller stitches (half double, double, treble) just add extra “yarn overs” to stretch the same basic movement upward.
Because it’s so short, single crochet creates a dense, tight fabric with very few gaps. That’s why it’s the go-to stitch for things that need structure: coasters, bags, baskets and stuffed toys that shouldn’t leak their filling.
In patterns, you’ll see it abbreviated as sc.
A quick but important note: crochet has two naming systems. What American patterns call a single crochet, British and Australian patterns call a double crochet (dc). It’s the exact same stitch with a different name. If a pattern ever seems strangely tall or strangely tight, check whether it was written in US or UK terms. This guide uses US terms throughout.
What You’ll Need Before You Start
You don’t need much, but the right choices here make a huge difference to how frustrated (or not) you’ll feel in the first hour.
- Yarn: A medium-weight yarn (often labeled “worsted” or with the number 4 on the label). Choose something smooth, like a basic acrylic or cotton, in a light, solid color.
- Hook: A 5 mm hook (US size H-8) pairs nicely with medium-weight yarn. Check your yarn label too, as most list a recommended hook size.
- Scissors and, optionally, a yarn needle for weaving in the ends later.
Why light-colored yarn? Because you need to see your stitches to learn them. Dark yarn, fuzzy yarn and variegated yarn all hide the little “V” shapes you’ll be aiming for. Save the gorgeous black mohair for project number five.
Step 1: Make a Slip Knot and a Foundation Chain
Every crochet project starts with a slip knot, a loop that sits on your hook and can be tightened by pulling the tail.
- Make a loop with the yarn, crossing the working yarn (the end attached to the ball) over the tail.
- Reach through the loop, grab the working yarn and pull it through to form a new loop.
- Slide that loop onto your hook and gently pull both ends to snug it up. It should glide along the hook, not strangle it.

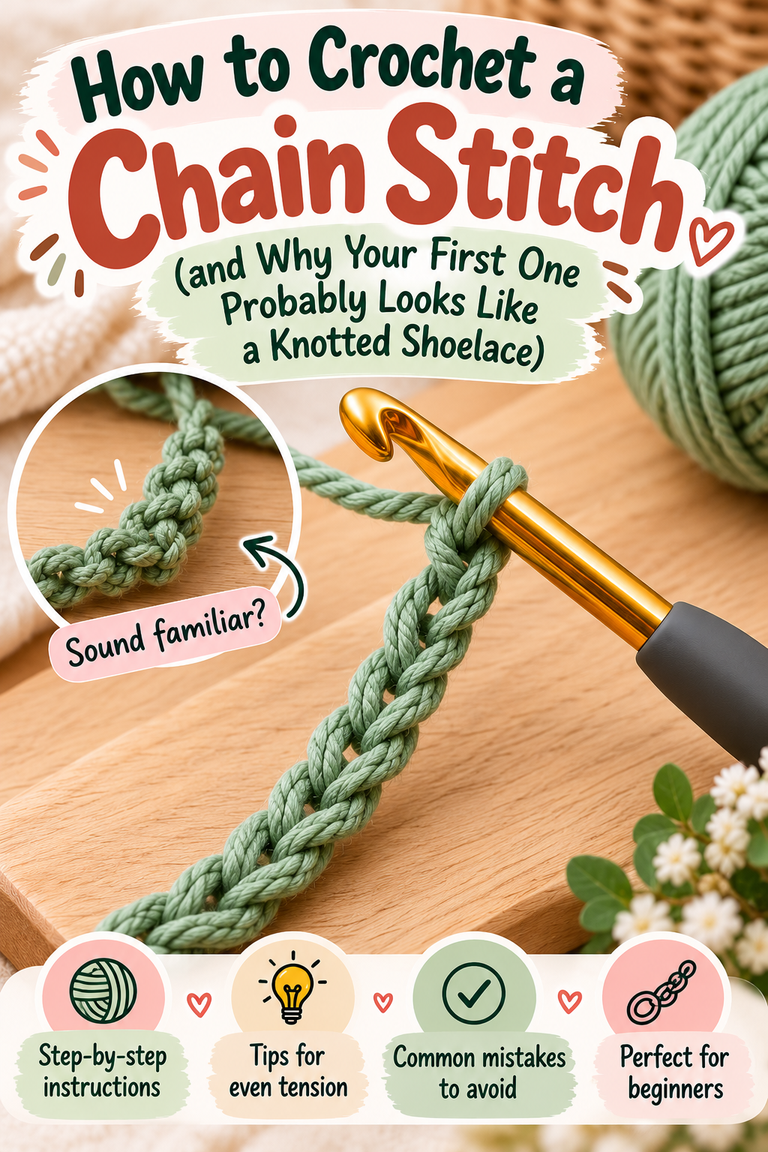
Now make a chain. Wrap the yarn over your hook from back to front (this is called a yarn over), then pull it through the loop on your hook. That’s one chain stitch (ch). Repeat until you have 16 chains for your practice swatch.
Here’s the thing most tutorials don’t mention: beginners almost always chain too tightly. If your chain looks like a tense little rope, relax your grip. A slightly loose chain is much easier to work into on the next step.
Step 2: Work Your First Single Crochet
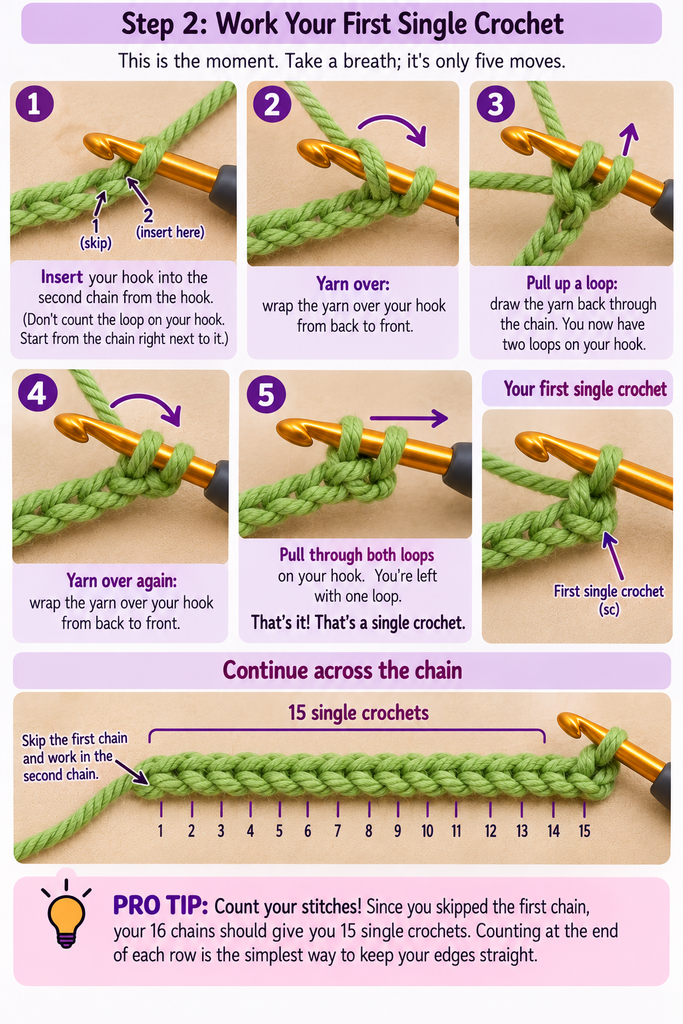
This is the moment. Take a breath; it’s only five moves.
- Insert your hook into the second chain from the hook. (Don’t count the loop that’s on your hook. Start counting from the chain right next to it.)
- Yarn over: wrap the yarn over the hook from back to front.
- Pull up a loop: draw the yarn back through the chain. You now have two loops on your hook.
- Yarn over again.
- Pull through both loops on your hook. You’re left with one loop.
That’s it. That’s a single crochet.
Say the rhythm out loud a few times if it helps: in, over, pull, over, through. It sounds silly, but saying it out loud really does help your hands learn the pattern faster.
Now work one single crochet into each remaining chain across. Since you skipped the first chain, your 16 chains should give you 15 single crochets. Count them. Seriously, count them.
Step 3: Turn Your Work and Start Row Two
Row two is where most beginners get tangled up, so let’s walk through it slowly.
At the end of your row, chain 1. This little chain is called a turning chain. It lifts your yarn up to the height of the next row. For single crochet, the turning chain does not count as a stitch.

Now turn your work over like the page of a book, so the end you just finished is now on the right side (if you’re right-handed).
Look at the top of your row. You’ll see a series of sideways “V” shapes, like a little braid. Each V is the top of a stitch. Insert your hook under both loops of the V, starting with the very first stitch right next to your turning chain, and single crochet into it.
Work one sc into each V across the row. At the end, count again. Still 15? Wonderful. Chain 1, turn, and do it again.
Keep going until your swatch is roughly square. Congratulations: you’ve just made a coaster.
The 4 Mistakes Every Beginner Makes (and How to Fix Them)
You’re not alone in any of these. Every one of them has happened to every crocheter at some point.
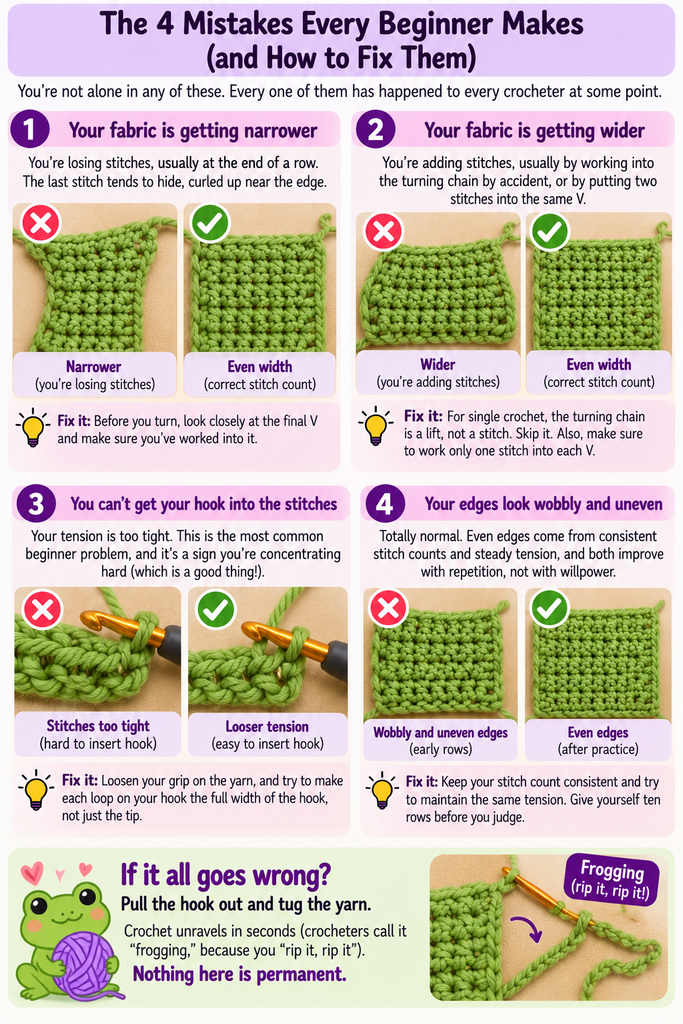
1. Your fabric is getting narrower
You’re losing stitches, usually at the end of a row. The last stitch tends to hide, curled up near the edge. Before you turn, look closely at the final V and make sure you’ve worked into it.
2. Your fabric is getting wider
You’re adding stitches, usually by working into the turning chain by accident, or by putting two stitches into the same V. Remember: for single crochet, the turning chain is a lift, not a stitch. Skip it.
3. You can’t get your hook into the stitches
Your tension is too tight. This is the most common beginner problem, and it’s a sign you’re concentrating hard (which is a good thing!). Loosen your grip on the yarn, and try to make each loop on your hook the full width of the hook, not just the tip.
4. Your edges look wobbly and uneven
Totally normal. Even edges come from consistent stitch counts and steady tension, and both improve with repetition, not with willpower. Give yourself ten rows before you judge.
And if it all goes wrong? Pull the hook out and tug the yarn. Crochet unravels in seconds (crocheters call it “frogging,” because you “rip it, rip it”). Nothing here is permanent.
Practice Tips That Actually Speed Things Up
- Practice in short sessions. Twenty focused minutes beats a frustrated two-hour marathon.
- Use a stitch marker (or a bobby pin) in the first and last stitch of each row so you never lose your edges.
- Watch your hands, not a screen. Glance at a video for the motion, then pause it and try it yourself.
- Make something useful early. A coaster or a simple dishcloth gives you a reason to keep practicing and a small win to show off.
Where Single Crochet Takes You Next
Once the basic stitch feels natural, small changes create completely different textures:
- Back loop only (BLO): Insert your hook under just the back loop of each V. This creates stretchy ridges, perfect for hat brims and cuffs.
- Working in the round: Single crochet worked in a continuous spiral is the backbone of amigurumi toys.
- Taller stitches: The half double crochet and double crochet use the same rhythm with an extra yarn over at the start.
That’s what makes single crochet so important. It’s not just one stitch; it’s the motion every other stitch is built on.
Frequently Asked Questions
How long does it take to learn single crochet?
Most people can make a recognizable single crochet within one sitting. Making them neat and even usually takes a few practice swatches, often just a week or two of casual practice.
Is single crochet the same as double crochet?
In US terms, no. They’re different heights. But a US single crochet is called a “double crochet” in UK terms, which is why the names cause so much confusion.
Does the turning chain count as a stitch in single crochet?
No. For single crochet, chain 1 at the end of the row, turn, and work your first stitch into the very first stitch of the row.
Why is my single crochet so tight?
Usually because you’re gripping the yarn too hard. Relax your hand, keep the loops on your hook full-width, or try a hook one size larger.
Your First Row Is Supposed to Be Messy
Remember that lumpy, crooked first row I promised you at the start? I hope you made it. Because that row is proof that you started, and the next one will be a little better, and the one after that a little better still.
The single crochet isn’t glamorous. But it’s the stitch every blanket, every basket and every tiny crocheted octopus begins with. Master this simple in, over, pull, over, through, and you’ve learned the language every other pattern is written in.
So grab your hook, chain 16 and give yourself ten rows.
Over to you: How did your first swatch turn out? Share a photo or tell us in the comments which step tripped you up the most. Chances are someone else is stuck on the exact same thing, and your question might be the one that helps them. And if you’d like a simple first project to practice your new stitch, subscribe and we’ll send you our beginner-friendly coaster pattern.



One Comment