Lavender and Lemon Floral Almond Nails

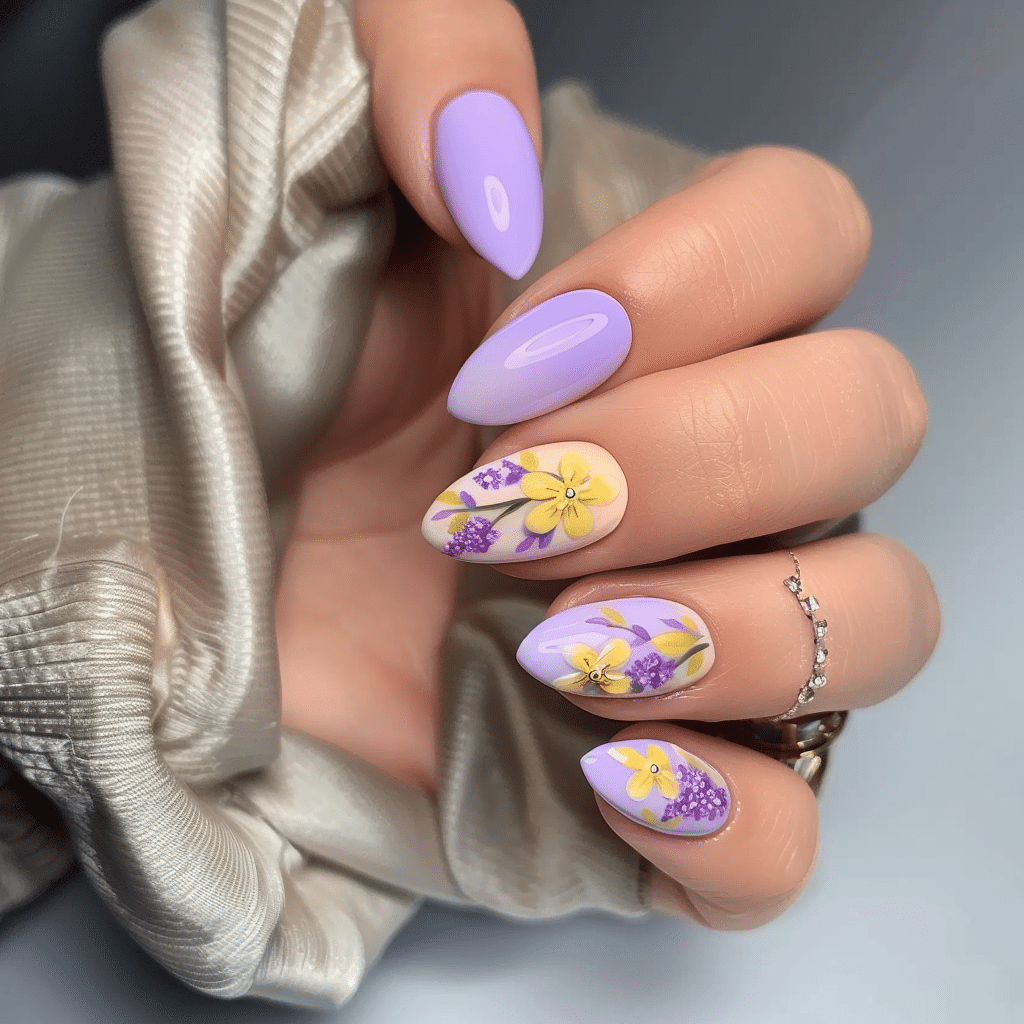
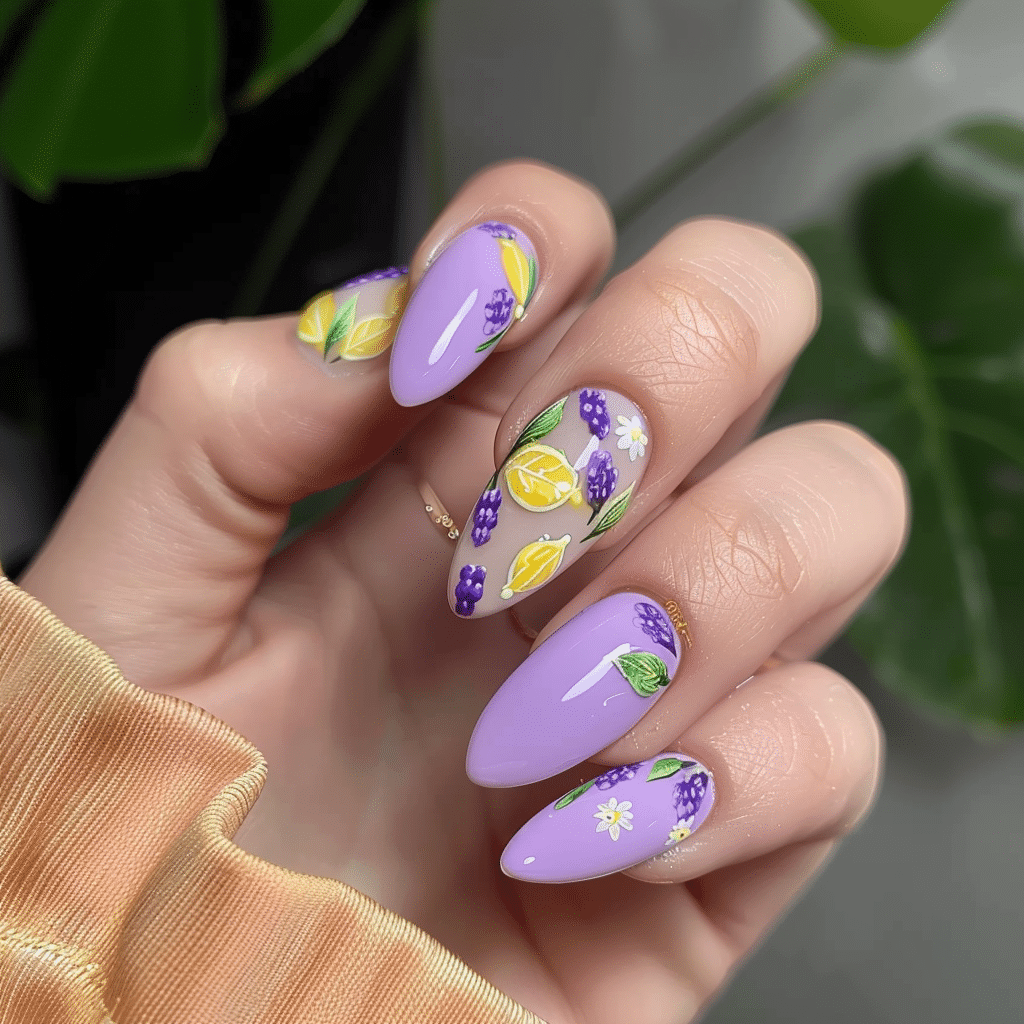
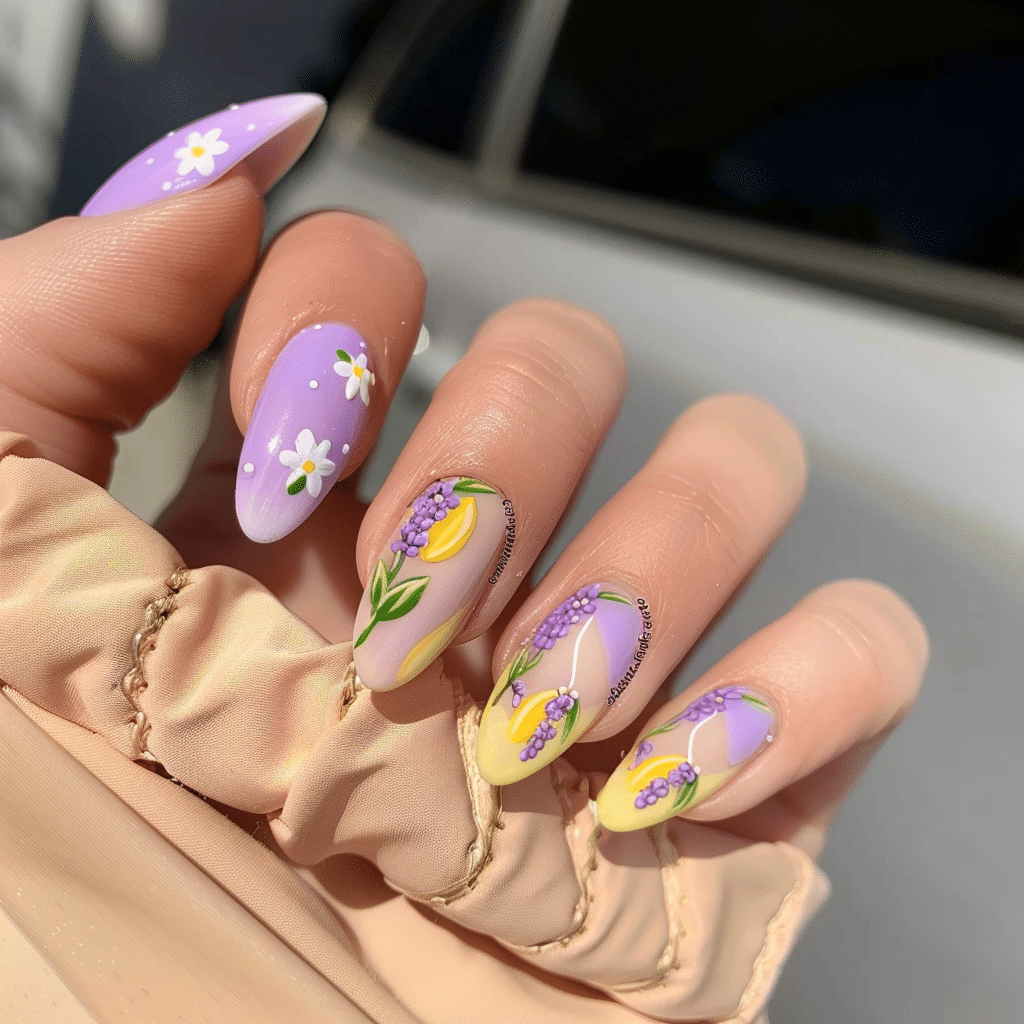
Lavender and Lemon Floral Almond Nails represent a sophisticated gel nail design that combines the elegant almond nail shape with soft pastel colors and delicate floral artwork.
This spring-inspired manicure style features gentle lavender purple tones paired with fresh lemon yellow accents, creating a feminine and cheerful appearance. The almond shape elongates fingers while providing the perfect canvas for intricate floral nail art that works beautifully for both casual and formal occasions.
| Topic | Details |
|---|---|
| Category | Nail Art / Gel Nails |
| Skill Level | Intermediate to Advanced |
| Time Needed | 90 to 120 minutes |
| Tools Needed | UV/LED lamp, gel polishes, nail art brushes, dotting tools |
| Best For | Spring events, weddings, garden parties, everyday elegance |
Table of Contents
Why This Nail Technique Works
The combination of lavender and lemon colors creates a visually appealing contrast that draws from color theory principles used throughout the beauty industry. Lavender, a cool-toned pastel, provides a calming base that complements most skin tones, while lemon yellow adds warmth and brightness without overwhelming the design. This color pairing evokes feelings of spring freshness and natural beauty, making it psychologically uplifting for both the wearer and observers.
The almond nail shape serves as the ideal foundation for this floral design because it provides sufficient surface area for detailed artwork while maintaining an elegant, tapered silhouette. Unlike square or stiletto shapes, almond nails balance strength with femininity, reducing the risk of breakage while creating an elongated finger appearance. The curved sides and pointed tip naturally guide the eye along the nail length, making it perfect for showcasing gradient backgrounds and delicate floral elements.
Gel polish technology ensures this intricate nail art remains chip-free and vibrant for two to three weeks. The self-leveling properties of quality gel formulas create smooth, professional finishes that enhance the appearance of hand-painted florals. The UV-cured nature of gel polish allows each layer to set completely before adding subsequent details, preventing color bleeding and maintaining crisp lines essential for realistic flower petals and leaves.
Tools and Products Needed for Lavender and Lemon Floral Almond Nails
| Product | Purpose | Alternatives |
|---|---|---|
| UV/LED Nail Lamp | Cures gel polish layers | 48W or higher LED lamp |
| Gel Base Coat | Protects natural nail and ensures adhesion | Rubberized base coat for flexibility |
| Lavender Gel Polish | Primary background color | Light purple or lilac gel polish |
| Lemon Yellow Gel Polish | Accent color and floral centers | Pastel yellow or buttercream gel polish |
| White Gel Polish | Floral petals and highlights | Opaque white gel paint |
| Green Gel Polish | Leaves and stems | Sage green or olive gel polish |
| Detail Nail Art Brush | Creates fine lines and petals | Striping brush or liner brush |
| Dotting Tool Set | Creates flower centers and dots | Bobby pin or toothpick |
| Gel Top Coat | Seals design and adds shine | No-wipe glossy top coat |
| Nail File (180 grit) | Shapes nails into almond form | Crystal or glass nail file |
| Nail Buffer | Smooths nail surface | 240-grit buffing block |
| Cuticle Oil | Hydrates cuticles and nail beds | Jojoba or vitamin E oil |
| Isopropyl Alcohol | Cleanses nails before application | Nail prep solution or dehydrator |
For professional-quality gel nail products and application tools, visit Gel Nails by Lina for expert recommendations and detailed product guides.
Step-by-Step Application Guide
Nail Preparation
- Wash hands thoroughly with soap and dry completely to remove oils and debris.
- Push back cuticles gently using a wooden or rubber cuticle pusher at a 45-degree angle.
- File nails into the almond shape by creating a tapered point at the center of the free edge.
- Round the sides of each nail symmetrically to meet the center point for the classic almond silhouette.
- Buff the nail surface lightly using a 240-grit buffer to remove shine and create texture for adhesion.
- Wipe each nail with isopropyl alcohol using a lint-free pad to eliminate dust and oils.
- Allow nails to air dry completely for thirty seconds before applying any gel products.
Base Coat Application
- Apply a thin layer of gel base coat from cuticle to free edge using smooth strokes.
- Cap the free edge by brushing the base coat across the nail tip for added durability.
- Cure nails under the UV/LED lamp for the time specified by the product manufacturer.
- Check for any uncured sticky areas and ensure complete polymerization before continuing.
Gel Polish Layers
- Decide which nails will receive lavender base and which will receive lemon yellow base color.
- Apply the first thin coat of lavender gel polish to selected nails using controlled brush strokes.
- Cure lavender nails under the lamp for sixty seconds or according to product instructions.
- Apply lemon yellow gel polish to remaining accent nails with thin, even application.
- Cure yellow nails completely before assessing color opacity and coverage.
- Apply second coats to both lavender and lemon nails for full color saturation.
- Cure all nails thoroughly to create a solid base for floral artwork.
Floral Design Application
- Dip a fine detail brush into white gel polish and wipe excess on a palette.
- Paint five small teardrop petals in a circular pattern on lavender base nails to create simple flowers.
- Use a dotting tool with lemon yellow gel to place small centers in each white flower.
- Cure floral details for thirty to forty-five seconds to set the design.
- Add delicate green leaves using the detail brush with small comma-stroke motions.
- Paint thin stems connecting flowers using the tip of the liner brush with green gel polish.
- Create smaller accent flowers on lemon yellow nails using lavender or white gel polish.
- Add tiny white or yellow dots between flowers for a whimsical scattered effect.
- Cure all artwork completely before proceeding to the final sealing step.
Curing Process
- Ensure fingers are positioned flat inside the lamp chamber for even light exposure.
- Cure each layer according to gel manufacturer specifications, typically thirty to sixty seconds.
- Avoid moving fingers during the curing cycle to prevent smudging or incomplete polymerization.
- Check that all gel layers feel completely dry and hard after curing before adding new layers.
Finishing and Top Coat
- Apply a generous layer of gel top coat over the entire nail design from cuticle to tip.
- Cap the free edge thoroughly with top coat to seal and prevent chipping.
- Cure top coat for the full recommended time, usually sixty to ninety seconds.
- Remove the sticky inhibition layer if present using isopropyl alcohol and a lint-free wipe.
- Apply cuticle oil around each nail bed and massage gently to hydrate the surrounding skin.
- Buff any rough edges gently if needed using a fine-grit file in one direction only.
For additional guidance on perfecting your gel nail application technique, explore the comprehensive tutorials at Gel Nails by Lina.
Pro Nail Technician Tips
- Work with thin gel polish layers rather than thick coats to prevent wrinkling, shrinking, or incomplete curing that compromises the manicure longevity.
- Clean your detail brushes immediately after each color use with isopropyl alcohol or gel cleanser to maintain bristle flexibility and precision.
- Allow each floral element to cure separately before adding adjacent details to prevent colors from bleeding into one another and losing definition.
- Avoid flooding the cuticle area by leaving a tiny gap between gel polish and the cuticle line to prevent lifting and premature peeling.
- Cure nail art in stages rather than all at once to build dimension and depth in your floral designs without overwhelming the gel formula.
- Store gel polishes away from direct sunlight and heat sources to maintain color consistency and proper viscosity for smooth application.
- Practice floral designs on a nail wheel or practice tips before attempting intricate patterns on client nails to build confidence and technique.
Common Gel Nail Mistakes
| Mistake | Why It Happens | How to Fix |
|---|---|---|
| Thick gel layers causing wrinkling | Applying too much product at once prevents proper light penetration during curing | Remove thick layer and reapply multiple thin coats instead |
| Floral designs bleeding together | Not curing between colors allows wet gel to mix and lose detail | Cure each color element before adding adjacent details |
| Premature lifting at cuticles | Skipping proper nail prep or flooding cuticle area with gel polish | Ensure thorough dehydration and leave small gap at cuticle line |
| Dull or cloudy finish | Touching nails before final cure or using expired top coat product | Reapply fresh top coat and cure fully without touching |
| Nail art looking flat | Not building layers or adding highlights and shadows to flowers | Add white highlights and darker accents to create dimension |
| Uneven almond shape | Filing too quickly or not checking symmetry between both hands | File slowly and compare nail shapes side by side frequently |
Nail Design Variations
| Style | Description | Best Occasion |
|---|---|---|
| French Lavender Tips | Classic French manicure with lavender tips instead of white and lemon accent nail | Professional settings, everyday wear |
| Ombre Lavender to Lemon | Gradient fade from lavender at cuticle to lemon yellow at tips with small florals | Summer events, beach vacations |
| Pressed Flower Effect | Realistic dried flower appearance using sheer lavender base with detailed botanical art | Weddings, garden parties, spring celebrations |
| Minimalist Single Bloom | One large statement flower per nail on alternating lavender and lemon backgrounds | Modern professional settings, minimalist aesthetics |
| Chrome Lavender Accent | Matte lavender base with chrome powder accent nail and lemon floral details | Evening events, special occasions |
| Negative Space Floral | Clear base with lavender and lemon florals concentrated at tips or cuticle area | Fashion-forward events, editorial looks |
Nail Care and Maintenance for Lavender and Lemon Floral Almond Nails
Maintaining the beauty and longevity of your Lavender and Lemon Floral Almond Nails requires consistent daily care practices. Apply cuticle oil twice daily, especially before bedtime, to keep the nail beds hydrated and prevent the gel from lifting at the edges. Massage the oil gently into the cuticles and surrounding skin to promote healthy nail growth and maintain flexibility in the nail plate beneath the gel coating.
Wear protective gloves when performing household chores, washing dishes, or using cleaning products that contain harsh chemicals. Extended water exposure and chemical contact can weaken the bond between the gel layers and cause premature chipping or peeling. The almond shape, while elegant, has a pointed tip that can be more vulnerable to breakage, so exercise caution during activities that put pressure on the fingertips.
Avoid using your nails as tools to open cans, scratch off labels, or pry objects apart. This mechanical stress concentrates force at the weakest points of the almond shape and can cause cracks that propagate through the gel layers. If you notice any lifting at the edges, resist the urge to peel or pick at the gel, as this removes layers of your natural nail and causes significant damage.
Schedule fills or removal appointments every two to three weeks to maintain nail health and prevent overgrown gel from creating pressure points. As your natural nails grow, the balance point of the almond shape shifts, which can lead to increased breakage risk if not properly maintained. Professional nail technicians can assess the condition of your natural nails and recommend appropriate maintenance schedules based on your individual growth rate.
How to Remove Gel Nails Safely
Safe gel nail removal protects your natural nails from damage and maintains their strength for future manicures. Begin by gently filing the shiny top coat layer with a coarse nail file to break the seal and allow acetone to penetrate the gel layers more effectively. Avoid aggressive filing that reaches the natural nail underneath the gel coating.
Soak cotton pads or balls in pure acetone and place one on each nail, ensuring complete coverage of the gel surface. Wrap each fingertip securely with aluminum foil to hold the acetone-soaked cotton in place and create heat that accelerates the gel breakdown process. Allow nails to soak for fifteen to twenty minutes without disturbing the wraps.
Remove foil wraps one finger at a time and gently push softened gel polish toward the free edge using a wooden cuticle stick. Never force or scrape gel that has not fully dissolved, as this removes layers of the natural nail plate. If gel remains firmly attached, rewrap the nail and soak for an additional five minutes before attempting removal again.
Consider giving your natural nails a break of at least one week between gel manicures to allow them to breathe and recover. During this rest period, apply strengthening treatments and keep nails moisturized to support healthy regrowth and prevent brittleness.
Nail Health and Safety
Maintaining healthy nails while enjoying gel manicures requires attention to proper application and removal techniques. Over-filing the nail surface during preparation removes too much of the protective nail plate, creating thin, weak nails prone to breaking and peeling. Always use gentle pressure when buffing and stop once the shine is removed without creating visible grooves or white patches on the nail surface.
Monitor your nails for signs of fungal or bacterial infections, which can develop when moisture becomes trapped between the gel and natural nail. Symptoms include discoloration, foul odor, pain, or separation of the nail from the nail bed. If you notice these signs, remove the gel polish immediately and consult a dermatologist for appropriate treatment before applying new gel products.
Ensure adequate ventilation in your nail workspace to avoid inhaling fumes from gel products and acetone. While gel polish produces fewer strong odors than traditional acrylic systems, proper air circulation prevents headaches and respiratory irritation. Professional nail salons should have ventilation systems that exchange air regularly throughout the service area.
Frequently Asked Questions
How long do gel nails last?
Gel nails typically last two to three weeks with proper application and care before requiring fills or removal. The longevity depends on factors including nail growth rate, daily activities, and adherence to maintenance practices. Lavender and Lemon Floral Almond Nails may show visible regrowth slightly earlier than simpler designs due to the defined color contrast at the cuticle line. Applying cuticle oil daily and wearing gloves during wet work extends the manicure lifespan significantly.
How to remove gel nails safely at home?
Remove gel nails safely by filing the top coat, soaking nails in pure acetone for fifteen to twenty minutes, and gently pushing softened gel off with a wooden cuticle stick. Never peel or force gel polish off, as this removes layers of your natural nail and causes lasting damage. Wrap each fingertip with acetone-soaked cotton and aluminum foil to create the optimal environment for gel breakdown. After removal, moisturize thoroughly and allow nails to rest before applying new gel polish.
What is the difference between gel nails and acrylic nails?
Gel nails cure under UV or LED light and offer a more natural, flexible finish, while acrylic nails air-dry and create a harder, more durable enhancement. Gel formulas produce less odor during application and tend to cause less damage during removal when proper techniques are followed. Acrylic nails allow for greater length extensions and structural strength but require more aggressive filing for removal. Gel polish works better for natural nail overlays and artistic designs like Lavender and Lemon Floral patterns.
Why do my gel nails peel after a few days?
Gel nails peel prematurely due to inadequate nail preparation, oil contamination, or improper application technique. Skipping the dehydration step leaves natural oils on the nail surface that prevent gel adhesion and cause lifting. Applying gel polish too close to the cuticle allows moisture to seep underneath and break the bond. Ensure thorough cleaning with isopropyl alcohol, leave a tiny gap at the cuticle line, and apply thin gel layers that cure completely to prevent peeling.
How can I make my gel nails last longer?
Make gel nails last longer by applying cuticle oil twice daily, wearing gloves during household chores, and avoiding using nails as tools. Proper nail preparation before application creates the foundation for extended wear, so never skip the dehydration and light buffing steps. Cap the free edge with each gel layer, including base coat and top coat, to seal the nail tip against water penetration. Schedule professional maintenance appointments every two to three weeks to address any lifting before it spreads and compromises the entire manicure.
Conclusion
Lavender and Lemon Floral Almond Nails offer a stunning combination of elegant shape, fresh spring colors, and delicate artistic details perfect for any season. This gel nail design requires intermediate to advanced skills but delivers professional results that last for weeks with proper care. The soft pastel palette flatters all skin tones while the almond shape elongates fingers beautifully. Whether you create this look at home or in a professional salon, following proper preparation, application, and maintenance techniques ensures your manicure remains vibrant and chip-free. Embrace this charming floral nail art trend and enjoy the confidence that comes with perfectly manicured nails that showcase your personal style and attention to detail.
Visit Gel Nails by Lina for more inspiration, detailed tutorials, and expert recommendations on achieving salon-quality gel nail designs at home.