The first time I picked up a crochet hook, I held it like I was trying to stop it from escaping. Knuckles white. Shoulders up near my ears. Twenty minutes later I had a lumpy, too-tight chain about the length of my thumb and a hand that ached for the rest of the evening.

Sound familiar? If you’re here, you’ve probably got a hook in one hand, a ball of yarn in the other, and a nagging feeling that you’re “doing it wrong.”
Here’s the good news: there’s no single correct way to hold a crochet hook. There are, however, a couple of grips that work beautifully for most people, and a few small habits that make the difference between a relaxing hobby and a frustrating one. Let’s walk through all of it.
Table of Contents
Key Takeaways
- The two most common grips are the pencil grip and the knife grip. Neither is “better.” Pick the one that feels natural.
- Hold the hook at the flat thumb rest, not right up near the hook head.
- Your other hand matters just as much. It controls the yarn tension and steadies your work.
- Keep the hook’s throat facing you (or slightly downward) so it catches the yarn easily.
- A relaxed grip is the secret to even stitches and pain-free crocheting.
First, Get to Know Your Crochet Hook
Before we talk about fingers, let’s take ten seconds to look at the tool itself. Knowing the parts makes every tutorial you’ll ever read a lot easier to follow.
- Head (or point): the tip that slides into stitches.
- Throat: the little groove just below the head. This is what grabs the yarn.
- Shaft: the smooth section behind the throat. Its width decides the size of your loops, and therefore your hook size.
- Thumb rest (grip): the flattened area, usually stamped with the size. This is where your fingers belong.
- Handle: the rest of the hook, which rests against your hand.
If you’re still shopping, a 5 mm (H-8) hook paired with a smooth, light-coloured worsted-weight yarn is a forgiving place to start. Light yarn makes it far easier to see your stitches, and that alone saves a lot of squinting.
Grip #1: The Pencil Grip
Picture yourself signing a birthday card. That’s essentially the pencil grip.
- Hold the hook between your thumb and index finger, right on the thumb rest.
- Let your middle finger rest gently underneath for support.
- Allow the handle to lean back over the web of your hand, between thumb and index finger, just like a pen.

The pencil grip gives you fine, delicate control, which is why a lot of people who work with thread or small amigurumi pieces swear by it. Your movements come mostly from your fingers and wrist.
Good fit if: you like precise, small movements, or the knife grip just feels clumsy to you.
Grip #2: The Knife Grip
Now imagine cutting into a steak. Your hand goes over the handle rather than under it. That’s the knife grip.
- Lay the hook in your palm with the handle resting against the base of your hand.
- Place your thumb and middle finger on either side of the thumb rest.
- Rest your index finger along the top of the hook, pointing toward the head.
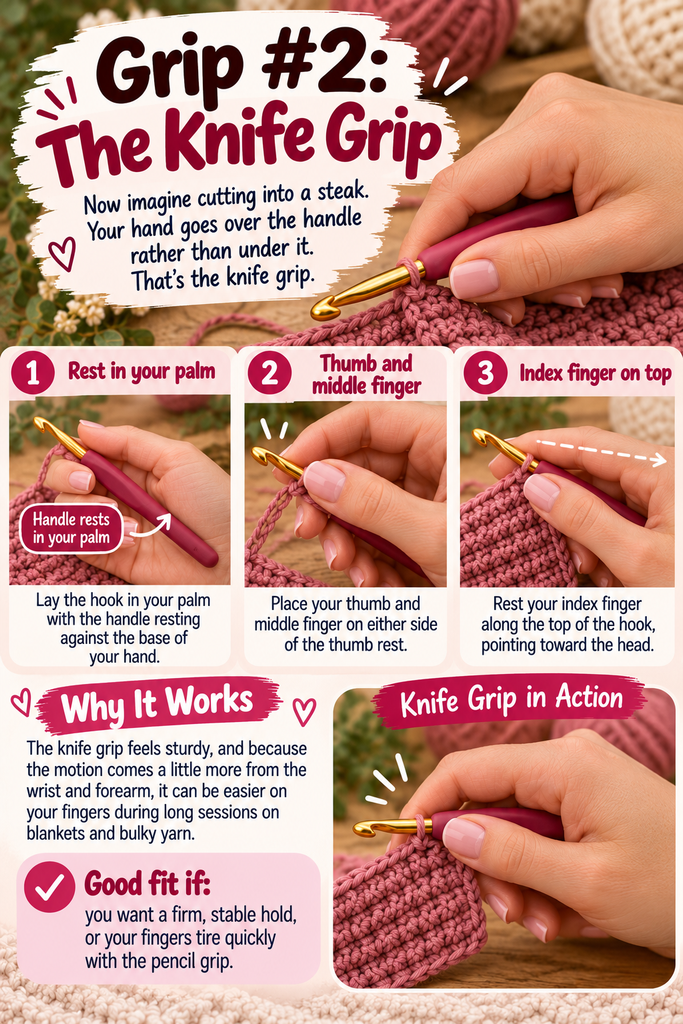
Honestly, this is the grip I settled into after a few weeks of switching back and forth. It feels sturdy, and because the motion comes a little more from the wrist and forearm, I find it easier on my fingers during long sessions on blankets and bulky yarn.
Good fit if: you want a firm, stable hold, or your fingers tire quickly with the pencil grip.
So… Which Grip Should You Choose?
Here’s the thing nobody tells beginners: experienced crocheters are split pretty evenly between these two, and plenty use a quirky hybrid of their own. Your stitches won’t know the difference.
Try this little experiment. Crochet a chain of 20 with the pencil grip, then 20 more with the knife grip. Notice which one makes your shoulders drop and your breathing slow down. That’s your grip. Trust it.
The only “wrong” grip is one that hurts.
Don’t Forget Your Other Hand (It’s Doing Half the Work)
This is where most beginners get stuck, and frankly, it’s the part that confused me most. Your non-hook hand has two jobs: feeding the yarn at a steady tension and holding your work in place.
A simple, popular way to set it up:
- Let the yarn coming from the ball pass between your pinky and ring finger, or wrap it once loosely around your pinky.
- Bring it across your palm and drape it over your index finger.
- Raise your index finger slightly so there’s a little “runway” of yarn between that finger and your hook.
- Pinch your work just below the active loop with your thumb and middle finger.
Think of your fingers as a gentle tap, not a clamp. The yarn should glide through with a bit of resistance, the way a garden hose slides through a loosely closed hand. Too tight, and your stitches turn rock-hard. Too loose, and they go sloppy and uneven.
Don’t love wrapping the pinky? Totally fine. Some people weave the yarn over and under their fingers, others just let it run over the index finger. Play around until the yarn moves smoothly.
Which Way Should the Hook Face?
Small detail, big difference. When you’re working, the throat of the hook should face you, or point slightly downward. That angle lets the hook “scoop” the yarn and slide back out of the stitch without snagging.
If the throat faces up or away from you, you’ll find the hook catching on loops and splitting the yarn. When things suddenly feel sticky, check your hook’s angle before anything else. Nine times out of ten, that’s the culprit.
A Quick Note for Left-Handed Crocheters
Lefties, you’re not doing anything wrong by being left-handed! Both the pencil and knife grips work exactly the same way. Simply hold the hook in your left hand and tension the yarn with your right.
Your work will naturally move in the opposite direction from a right-handed crocheter’s, so mirrored tutorials or videos filmed by left-handed makers can be a real lifesaver. Holding a small mirror beside a right-handed video works in a pinch, too.
Common Beginner Mistakes (and Easy Fixes)
The death grip. Squeezing the hook is the number-one cause of cramps and tight stitches. Every few rows, pause and wiggle your fingers. If you could pull the hook out of your hand easily, you’re holding it just right.
Holding too close to the head. It feels like more control, but it crowds the throat and makes it hard to pull loops through. Slide your fingers back to the thumb rest.
Ignoring the yarn hand. If your stitches vary wildly in size, the issue is usually tension, not your hook hand.
Making stitches on the throat instead of the shaft. Loops sitting on the narrow throat come out too small. Always slide new loops onto the shaft before the next step.
Crocheting for hours on day one. Your hands are learning a brand-new movement. Short practice sessions of 15–20 minutes build muscle memory without the soreness.
Little Comfort Tricks That Go a Long Way
- Try an ergonomic hook. Hooks with chunky, cushioned handles can be a game-changer if you have arthritis or tired hands.
- Sit well. A supportive chair, good light, and your elbows relaxed at your sides make a surprising difference.
- Stretch. Gently roll your wrists and open and close your hands between rows.
- Practice with chains. A long chain is the perfect low-pressure way to get comfortable with both hands working together.
Frequently Asked Questions
Is it bad to switch between the pencil and knife grip?
Not at all. Many crocheters switch depending on the project, using the pencil grip for fine thread and the knife grip for chunky yarn.
Why do my hands hurt when I crochet?
Usually it’s a too-tight grip, tension in the shoulders, or long sessions without breaks. Relax your hold and take regular pauses. If the pain sticks around, it’s worth checking with a doctor.
How long does it take to feel natural?
For most people, a few practice sessions. Somewhere around your third or fourth evening, you’ll notice you’ve stopped thinking about your hands at all.
Final Thoughts: Relax, It Gets Easier
Remember that white-knuckled beginner from the start of this post? These days, I can crochet a whole row while chatting, watching a film, or sipping tea, and the grip I once fought with now feels as natural as holding a spoon.
You’ll get there too. Pick a grip, let your yarn hand find its rhythm, keep your hold gentle, and give yourself permission to make a few wobbly chains along the way. Every crocheter you admire started exactly where you are right now.
Now I’d love to hear from you: are you team pencil grip or team knife grip? Or have you invented a hold all your own? Share it in the comments below. And if this guide helped you, pass it along to a friend who’s just picking up their first hook.