Here’s something nobody tells you before the baby shower: the giant diaper bag gets left in the car by month two.
What parents actually grab on the way out the door is something small. A couple of diapers, a travel pack of wipes, maybe a tube of diaper cream. Something that slips into a tote, a backpack, or the basket under the stroller and doesn’t make them feel like they’re hauling luggage to the grocery store.

That’s exactly what this quilted diaper pouch is for. It’s a zippered, padded pouch with boxed corners so it stands up on its own, and it comes together in an afternoon. If you’ve sewn a zipper even once, you can make this. If you haven’t? Honestly, this is a friendly place to learn.
Table of Contents
Key Takeaways
- Finished size: about 10″ wide at the zipper, 8″ wide at the base, 7″ tall, and 2″ deep — roomy enough for 4–5 newborn-to-size-3 diapers plus a travel wipes pack.
- Skill level: confident beginner. You’ll quilt a simple panel, install one zipper, and box four corners.
- Fabric needed: roughly two fat quarters (or scraps), batting, and a 12″ zipper.
- Big tip: quilt your fabric before you cut the final panels. It keeps everything square and saves you from wonky edges.
- Gift-worthy: make two or three in coordinating prints and you’ve got a handmade baby shower gift that actually gets used.
Why a Quilted Diaper Pouch Beats a Plain Zipper Bag
You could sew a flat, unlined zipper pouch in twenty minutes. So why bother quilting it?
Three reasons. First, structure. A quilted panel holds its shape, so the pouch doesn’t collapse into a sad little puddle in the bottom of a bag. Second, durability. Baby gear gets washed constantly, and the stitching that holds a quilt sandwich together also keeps the layers from shifting and bunching in the dryer. Third (and let’s be real, this one matters), it just looks nicer. That soft, slightly crinkled texture you get after the first wash is what makes people ask, “Wait, you made this?”
The boxed corners are the other secret. They give the pouch a flat bottom, which means it sits upright on a changing table or the back seat while you fish out what you need with one hand. If you’ve ever tried to change a diaper with a squirmy baby, you know one-handed access isn’t a luxury.
Materials You’ll Need
Nothing exotic here. Most quilters can pull this whole project from the scrap bin.
- Outer fabric: one fat quarter (18″ x 22″) of quilting cotton
- Lining fabric: one fat quarter of quilting cotton, or laminated cotton if you want a wipe-clean interior
- Batting: a 13″ x 20″ piece of low-loft cotton or cotton-blend batting (fusible fleece works too)
- Optional backing: a 13″ x 20″ piece of muslin to sit behind the batting while you quilt
- Zipper: one 12″ or longer nylon coil zipper (you’ll trim it to fit)
- Optional extras: a 3″ x 12″ strip of fabric for a wrist strap, and a 1″ D-ring or swivel clip
- Coordinating thread, a zipper foot, a walking foot (strongly recommended), clips or pins, and a rotary cutter and mat
A quick word on fabric choice. Bright, busy prints are your friend here. They hide the inevitable smudge of diaper cream far better than a pale solid ever will. I learned that one the hard way.
Cutting Guide
All seam allowances are 1/2″ unless noted. Before you cut anything, I’d recommend prewashing your cottons. This pouch is going to be laundered a lot, and you don’t want the outer fabric shrinking away from the lining down the road.
From the outer fabric
- One rectangle, 13″ x 20″ (this gets quilted, then trimmed)
From the lining fabric
- Two rectangles, 11″ x 9″
From the batting (and muslin, if using)
- One rectangle, 13″ x 20″
Optional wrist strap
- One strip, 3″ x 12″
Notice the outer piece is cut oversized? That’s on purpose. Quilting always draws the fabric in a little, so we quilt first and trim second. You’ll get two clean 11″ x 9″ outer panels out of that one quilted rectangle.
Step 1: Make and Quilt the Outer Panel
Layer your pieces like a sandwich: muslin on the bottom (if you’re using it), batting in the middle, and outer fabric on top, right side up. Smooth everything flat and pin or spray-baste the layers together.
Now quilt. A simple 1″ diagonal crosshatch is classic and forgiving. Straight vertical lines spaced 1/2″ to 3/4″ apart look modern and clean. Use a walking foot if you have one; it feeds all three layers evenly so the top fabric doesn’t creep ahead of the batting.
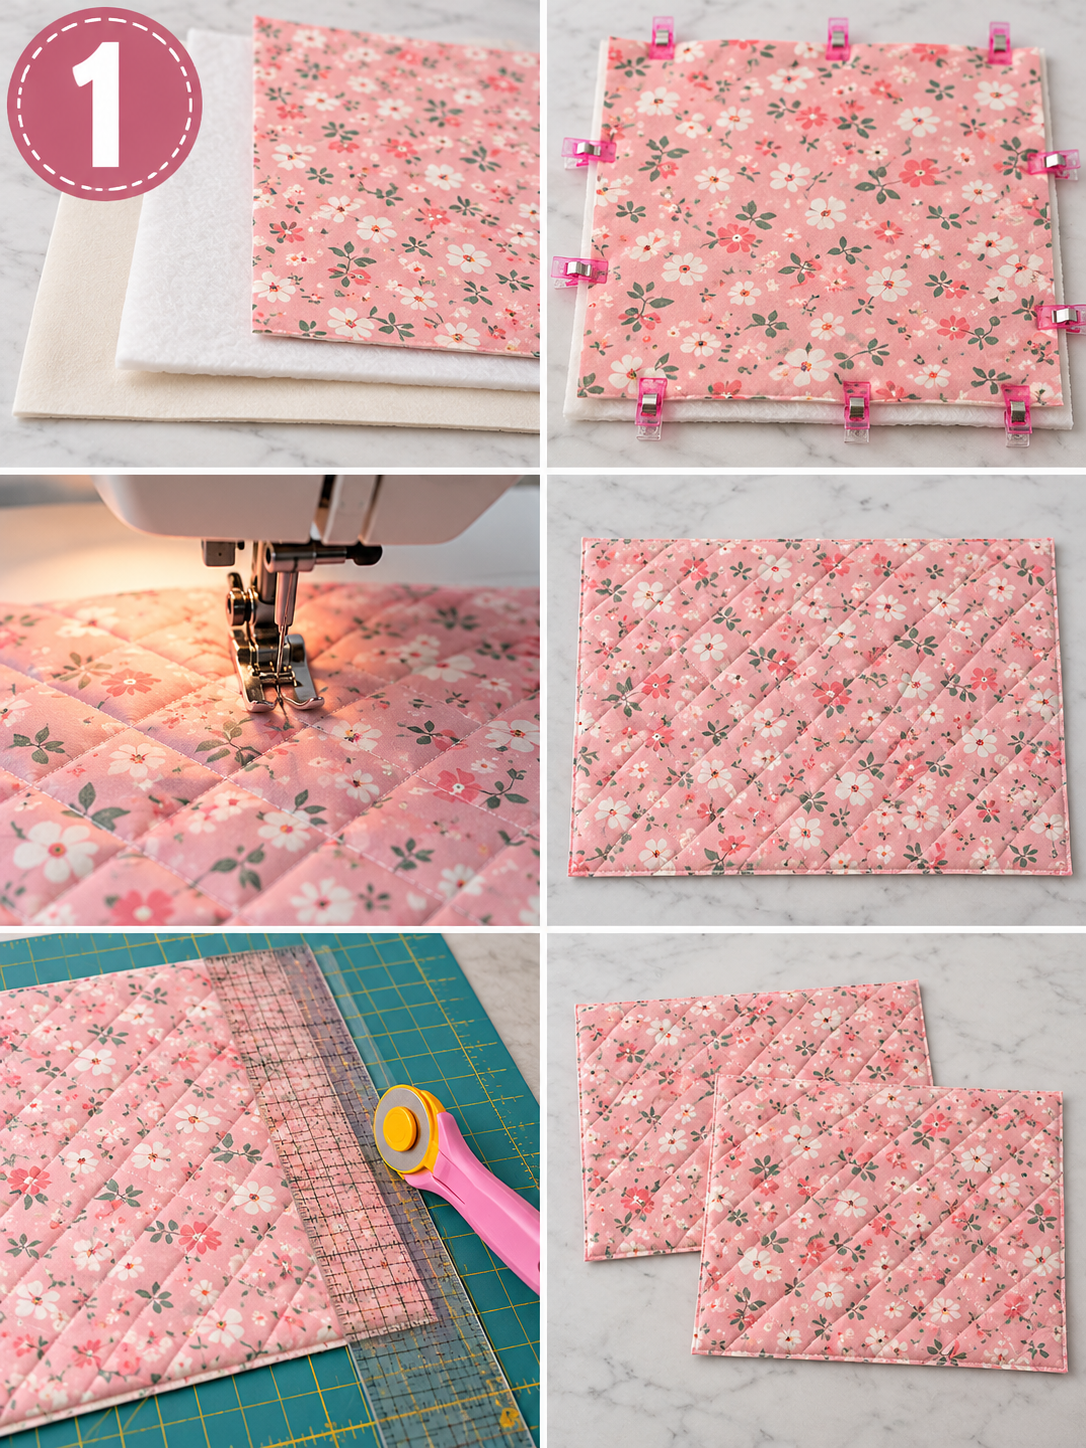
Here’s the thing about quilting lines: they don’t need to be perfect. Once the pouch is washed, the batting puffs up and the little wobbles disappear into the texture. Don’t rip out a line because it drifted a sixteenth of an inch. Nobody will ever know.
When you’re done, press lightly and trim the quilted piece into two outer panels, each 11″ x 9″.
Step 2: Prep the Zipper
Trim your zipper so it’s roughly 12″ long, keeping the pull centered. If you’re trimming a coil zipper, sew a few bar-tack stitches back and forth across the coil just inside your cut point so the pull can’t slide off the end.
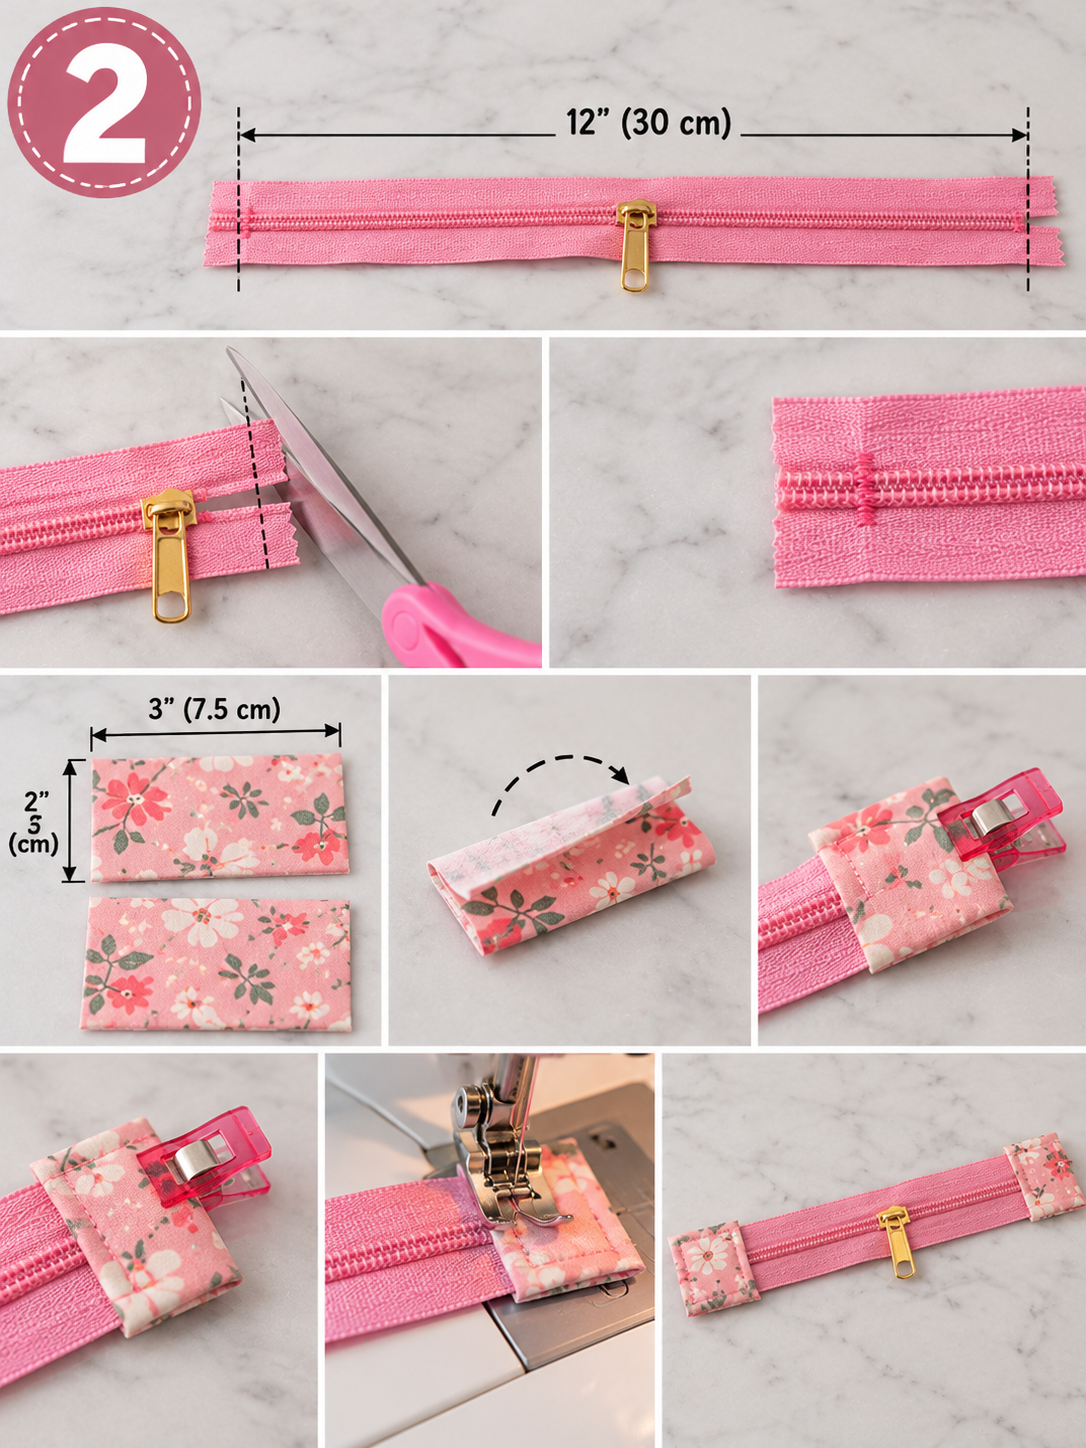
Want a more professional finish? Fold two small 2″ x 3″ fabric scraps into zipper tabs and stitch them over each end of the zipper. It’s optional, but it makes the corners of the pouch sit flatter and gives it that store-bought polish.
Step 3: Install the Zipper
This is the step that makes people nervous. Take a breath. It’s really just a stack of three layers.
- Lay one outer panel right side up with the 11″ edge at the top.
- Place the zipper face down along that top edge, lining up the zipper tape with the raw edge.
- Lay one lining panel face down on top, matching the top edge. You now have outer, zipper, lining — with the zipper sandwiched in the middle.
- Clip the layers together and stitch with your zipper foot, about 1/4″ from the edge. When you get near the pull, stop with the needle down, lift the presser foot, and slide the pull out of the way.
- Fold the outer and lining away from the zipper so they sit wrong sides together. Press (gently, and never directly on the coil if you’re using laminated cotton).
- Topstitch about 1/8″ from the fold through all layers. This keeps the fabric from getting caught in the zipper teeth later.

Repeat on the other side of the zipper with the remaining outer and lining panels.
Step 4: Open the Zipper (Seriously, Don’t Skip This)
Before you sew another stitch, open the zipper at least halfway.
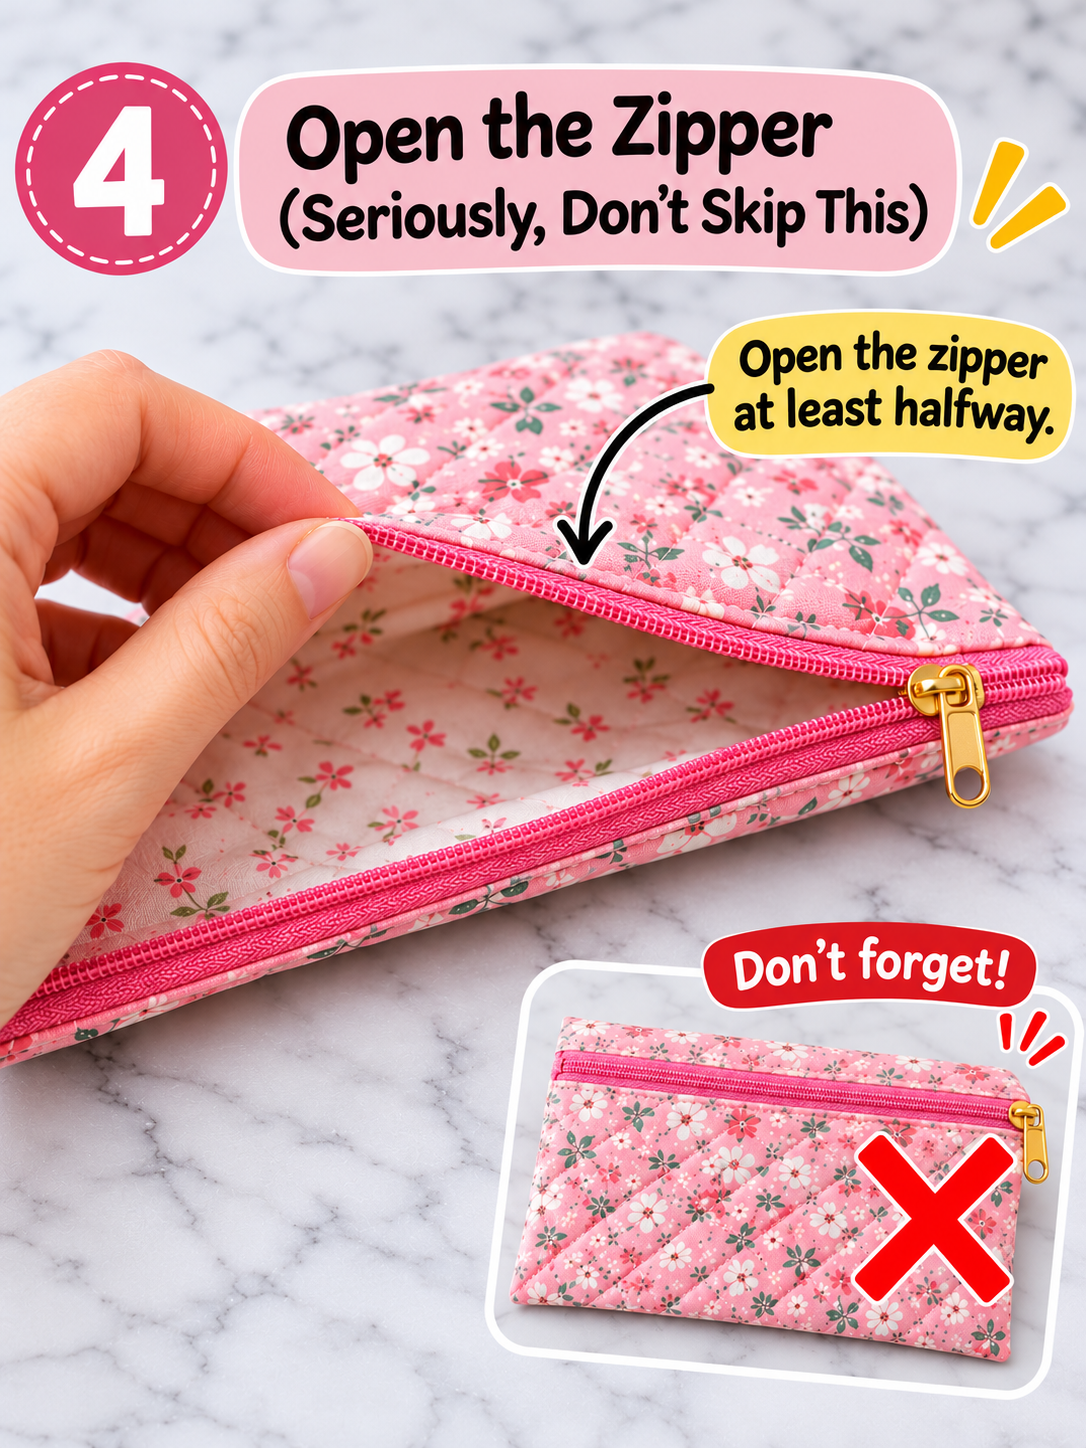
If you forget, you’ll sew the whole pouch closed with no way to turn it right side out. Ask me how many times I’ve done that. Actually, don’t. Just unzip it.
Step 5: Sew the Side and Bottom Seams
Open the pouch so the two outer panels are right sides together and the two lining panels are right sides together. Push the zipper teeth toward the lining side, and make sure the zipper ends (or tabs) are pointing toward the lining too.
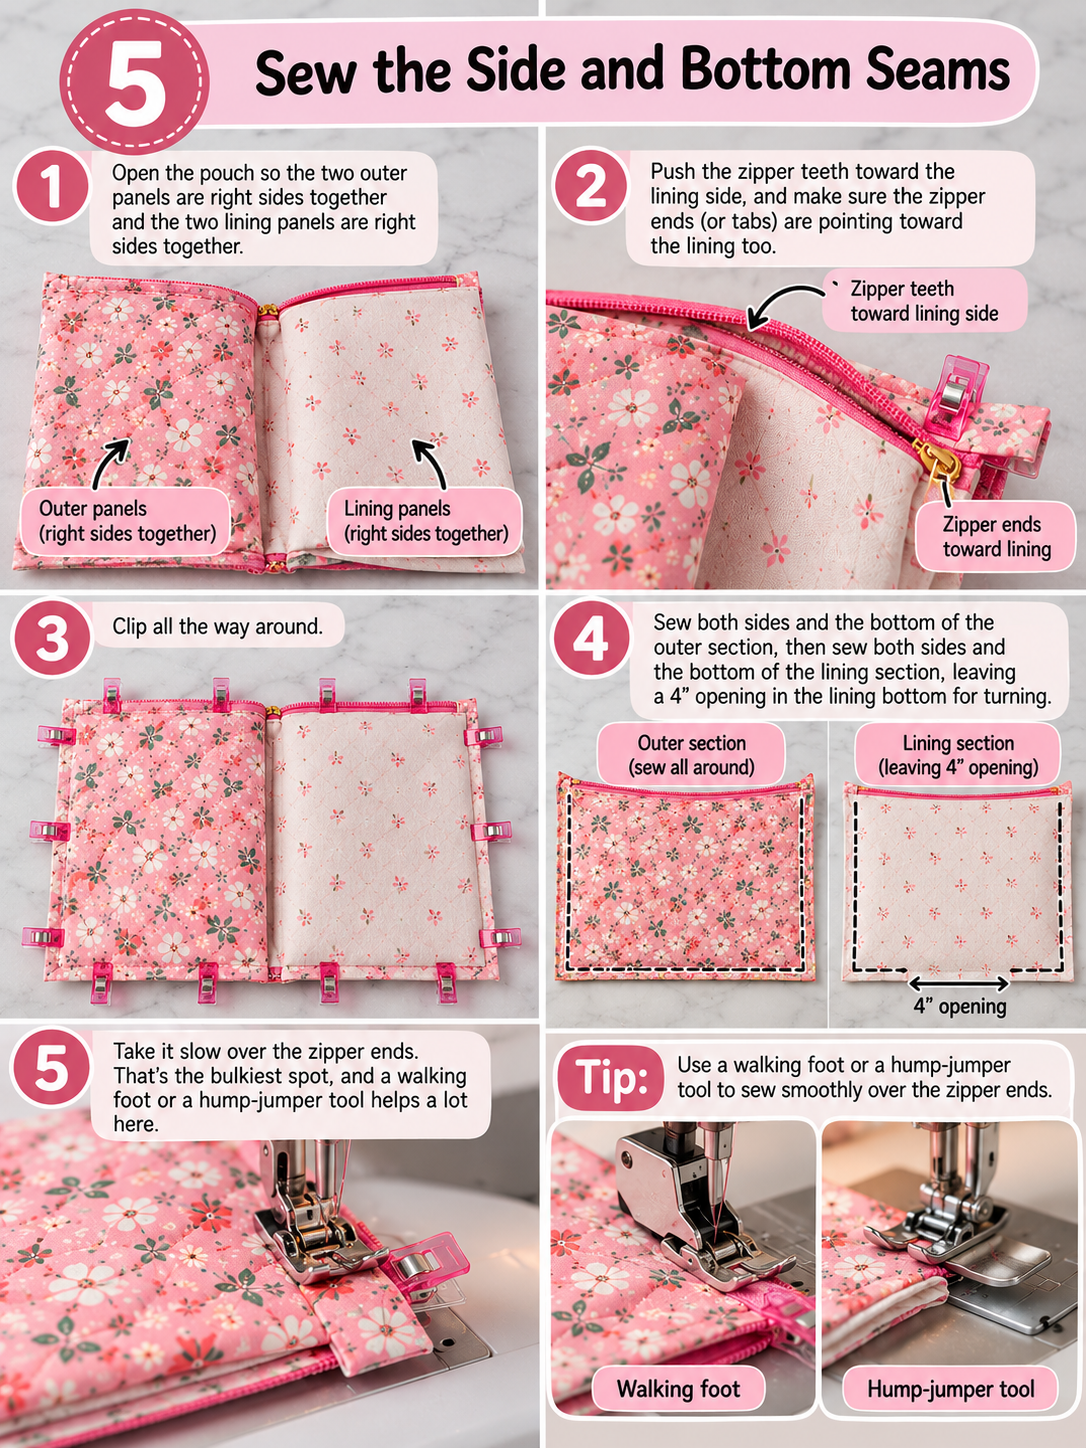
Clip all the way around. Sew both sides and the bottom of the outer section, then sew both sides and the bottom of the lining section, leaving a 4″ opening in the lining bottom for turning.
Take it slow over the zipper ends. That’s the bulkiest spot, and a walking foot or a hump-jumper tool helps a lot here.
Step 6: Box the Corners
This is where the pouch goes from flat to fabulous.
At each of the four bottom corners (two outer, two lining), cut out a 1 1/2″ square, measuring from the raw edges. Then pinch each corner open so the side seam lines up with the bottom seam, forming a straight raw edge. Stitch across with a 1/2″ seam allowance and backstitch at both ends.
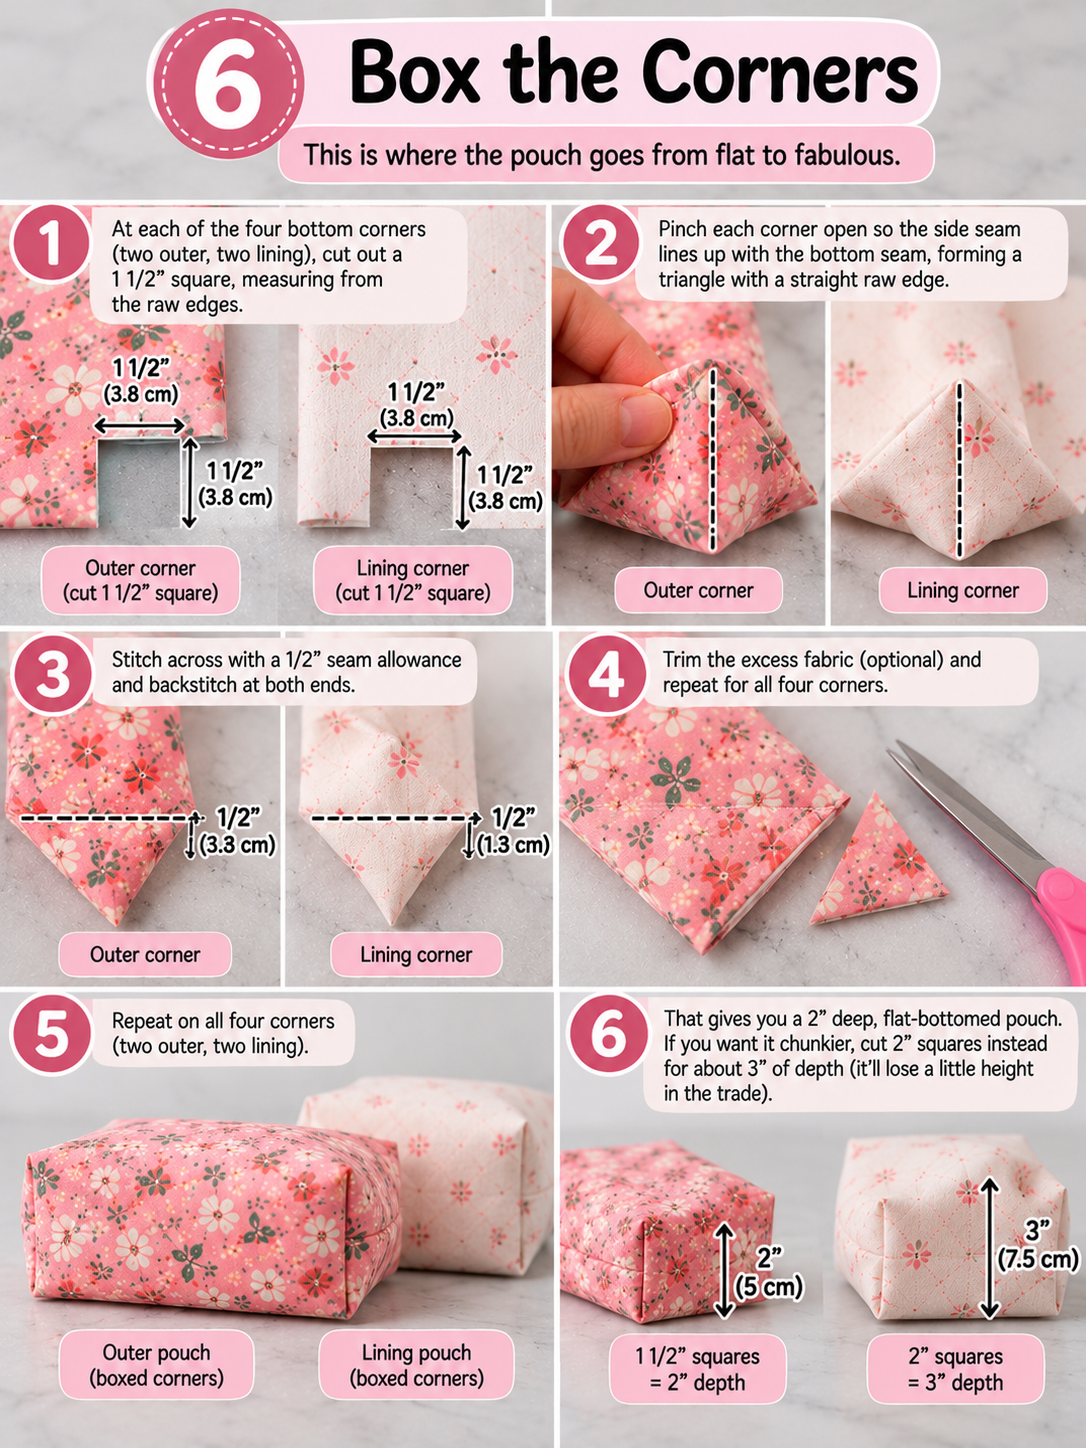
That gives you a 2″ deep, flat-bottomed pouch. If you want it chunkier, cut 2″ squares instead for about 3″ of depth (it’ll lose a little height in the trade).
Step 7: Turn, Close, and Finish
Reach through the gap in the lining and pull the whole pouch right side out through the open zipper. Use a chopstick or point turner to gently push out the corners.
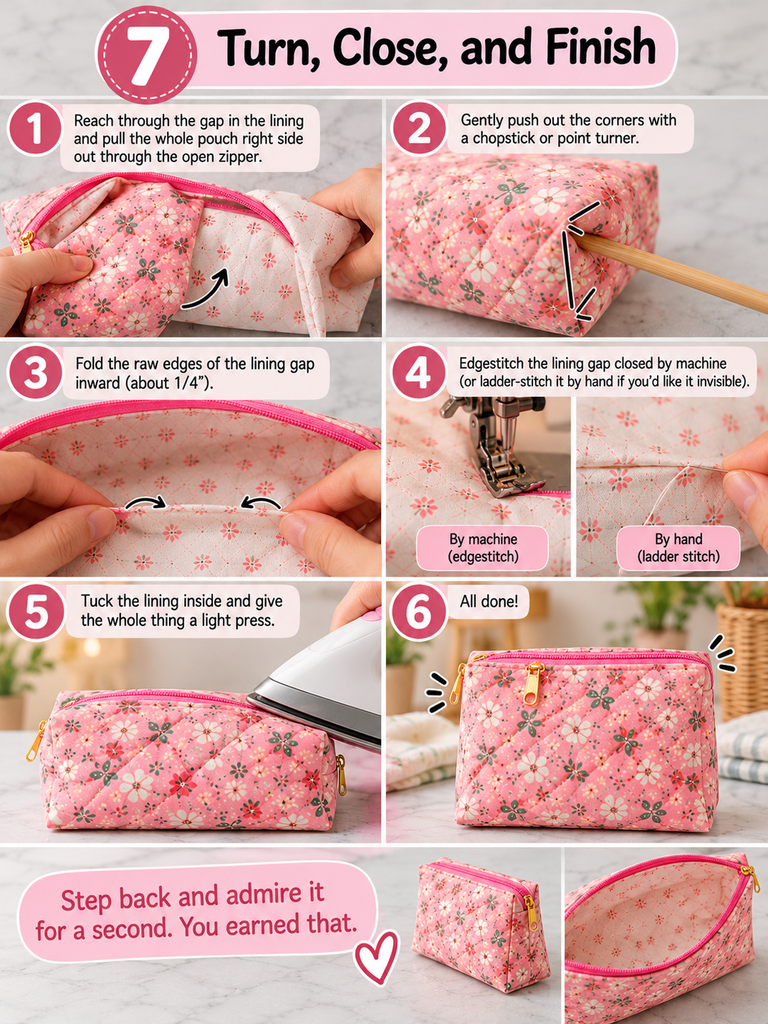
Fold the raw edges of the lining gap inward and edgestitch it closed by machine, or ladder-stitch it by hand if you’d like it invisible. Tuck the lining inside, give the whole thing a light press, and you’re done.
Step back and admire it for a second. You earned that.
Optional Upgrade: Add a Wrist Strap or Stroller Clip
A strap makes this pouch twice as useful. Parents can clip it to a stroller handle, hook it on a car seat, or just loop it over a wrist while carrying a baby on the other arm.
Fold the 3″ x 12″ strip in half lengthwise, press, open it up, fold both raw edges into the center crease, then fold in half again and edgestitch both long sides. Slide on a D-ring or swivel clip, fold the strip in half, and baste the raw ends to one side of the outer panel just below the zipper before you sew Step 5. It’ll be caught neatly in the side seam.
Tips I Wish Someone Had Told Me Sooner
- Test-fit with real diapers. Diaper sizes vary by brand. Before you make a batch for gifts, sew one and stuff it with the diapers and wipes you’d actually use. Adjust the panel width by an inch if needed.
- Laminated lining is worth it. If the pouch might hold a damp swim diaper or a leaky cream tube, a wipe-clean lining is a game changer. Just use clips instead of pins so you don’t leave holes.
- Batch-cut for gifts. Cutting and quilting three panels at once takes barely longer than one. Assembly-line sewing is how you knock out holiday and shower gifts without losing your weekend.
- Match the zipper to the lining, not the outer. It peeks out less than you’d think, and a fun contrasting zipper pull is a nice little surprise.
- Wash once before gifting. That first wash gives the quilting its soft, crinkly look. It’s when the pouch really comes alive.
Frequently Asked Questions
How many diapers fit in this pouch?
At the finished size, most parents can fit 4–5 diapers in sizes newborn through 3, plus a standard travel pack of wipes. Larger sizes take up more room, so plan on 3–4.
Can I make this without a walking foot?
Yes. Lengthen your stitch slightly, lower your presser foot pressure if your machine allows it, and go slowly. Spray basting the quilt sandwich also helps keep layers from shifting.
What’s the best batting for a diaper pouch?
Low-loft cotton or cotton-blend batting gives you that soft, crinkled finish after washing. Fusible fleece is a great alternative if you want a smoother, slightly stiffer pouch and want to skip pinning.
Is this pattern good for selling at craft fairs?
Absolutely. Zippered pouches are consistent sellers, and baby items are popular gifts. Make them in sets — a diaper pouch plus a matching smaller pouch for pacifiers — and they tend to move even faster.
Can I resize it for other uses?
Definitely. Shrink the panels to 8″ x 6″ for a pacifier or toiletry pouch, or enlarge them to 13″ x 10″ for a full change kit with a spare outfit. The construction steps stay exactly the same.
A Small Project That Ends Up Doing a Big Job
Remember that enormous diaper bag sitting in the back of the car? This little quilted pouch is the thing that replaces it on most outings. It’s quick to sew, forgiving for beginners, and endlessly customizable with whatever fabric you love most.
And there’s something special about handing a new parent a gift you made with your own two hands — especially one they’ll reach for every single day, long after the shower decorations are packed away.
So pull out those fat quarters you’ve been saving. This is the project they’ve been waiting for.
Your Turn
Have you made a diaper pouch before, or is this your first zipper project? I’d love to hear which fabric you’re planning to use — or which baby it’s for. Drop a comment below, and if you sew one up, share a photo. Nothing makes my day like seeing your version come to life.