The first heart tote I ever sewed came out lopsided. One lobe was noticeably fatter than the other, the point at the bottom looked more like a thumb, and I carried it everywhere anyway. Three different strangers asked me where I bought it that month.
That’s the funny thing about a heart shaped bag. It doesn’t have to be perfect to make people smile. But with a good template and a few tricks I learned the hard way, it absolutely can be close to perfect, and that’s what this guide is here to give you.
Whether you’re new to sewing curves or you’ve got a stash of fabric begging for a fun project, this heart tote bag sewing pattern walks you through everything: drafting the template, choosing fabric, sewing a fully lined bag, and turning it into a little piece of wearable fabric art.
Table of Contents
Key Takeaways
- You can draft the whole heart template yourself with paper, a pencil, and one fold, no printer needed.
- The bag is fully lined, with the opening following the top curves of the heart, so it looks clean inside and out.
- Fusible fleece or medium-weight interfacing is what keeps the heart shape from collapsing into a sad pillowcase.
- The two trickiest spots are the bottom point and the top dip; clipping and short stitches solve both.
- Once you’ve made one, the same pattern scales into kids’ purses, gift bags, and patchwork or painted art pieces.
Why a Heart Tote Is Worth Your Afternoon
Let’s be honest: the world doesn’t need another plain rectangle tote. You probably have five of them balled up in a kitchen drawer right now.
A heart shaped tote is different. It’s a bag, sure, but it’s also a statement. It works as a Valentine’s gift, a birthday present for a friend who loves pink, a market-stall bestseller, or simply a cheerful thing to carry your book and water bottle to the park.
It’s also a surprisingly good skill-builder. Sewing a heart teaches you curves, an inside point, an outside point, lining, and turning, all in one compact project. If you’ve been nervous about anything that isn’t a straight line, this is a friendly place to start.
What You’ll Need
Here’s the shopping list for one finished bag, roughly 14 inches wide and 13 inches tall (about 35 x 33 cm):
- Outer fabric: 1/2 yard (0.5 m) of cotton canvas, duck cloth, denim, or sturdy quilting cotton
- Lining fabric: 1/2 yard (0.5 m) of quilting cotton
- Structure: 1/2 yard (0.5 m) of fusible fleece or medium-weight fusible interfacing
- Straps: 2 yards (about 1.8 m) of 1-inch cotton webbing, or an extra fat quarter of fabric to make your own
- Matching thread
- A large sheet of paper (wrapping paper, packing paper, or taped printer pages, at least 16 x 15 inches)
- Pencil, ruler, fabric scissors, and pins or sewing clips
- Optional: a magnetic snap, and a scrap of fabric for an inside pocket
A quick note on fabric: if you’re using quilting cotton for the outside, don’t skip the fleece. Quilting cotton on its own is lovely but floppy, and a heart only reads as a heart when it holds its shape.
Step 1: Draw Your Heart Template
You might be wondering why I don’t just tell you to print a template. You can, of course. But drawing your own takes five minutes and guarantees a perfectly symmetrical heart, because of one simple trick: the fold.
- Fold your paper in half. The fold will become the center line of the heart.
- Measure 13 inches down the fold and mark it. That’s the bottom point.
- Measure 7 inches out from the fold, about 4.5 inches down from the top. That’s the widest part of the heart.
- Sketch the half-heart: start at the fold about 2 inches below the top (that’s the dip), curve up and over into a rounded lobe, swing out to your widest mark, then sweep down in a gentle curve to the bottom point on the fold.
- Add a 3/8-inch (1 cm) seam allowance all around, then cut through both layers while the paper is still folded.
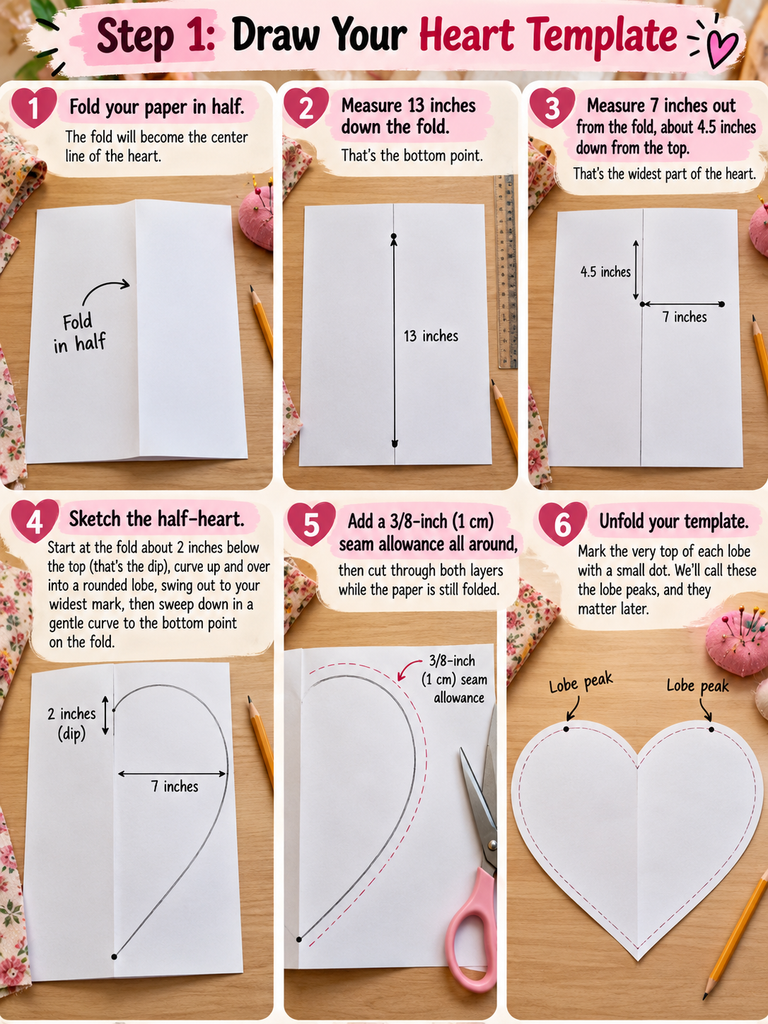
Unfold it and there’s your heart. Mark the very top of each lobe with a small dot. We’ll call these the lobe peaks, and they matter later.
Here’s the thing about the dip: don’t make it too sharp. A soft V is much easier to sew and turn than a deep, narrow notch. If yours looks dramatic, round it off a little.
Step 2: Cut Your Pieces
Using your template, cut:
- 2 hearts from the outer fabric
- 2 hearts from the lining fabric
- 2 hearts from fusible fleece or interfacing (trim the 3/8-inch seam allowance off these to reduce bulk)
- If making fabric straps: 2 strips, each 4 x 24 inches (10 x 61 cm)
- If using webbing: 2 pieces, each 24 inches long (adjust for shoulder or hand-carry)
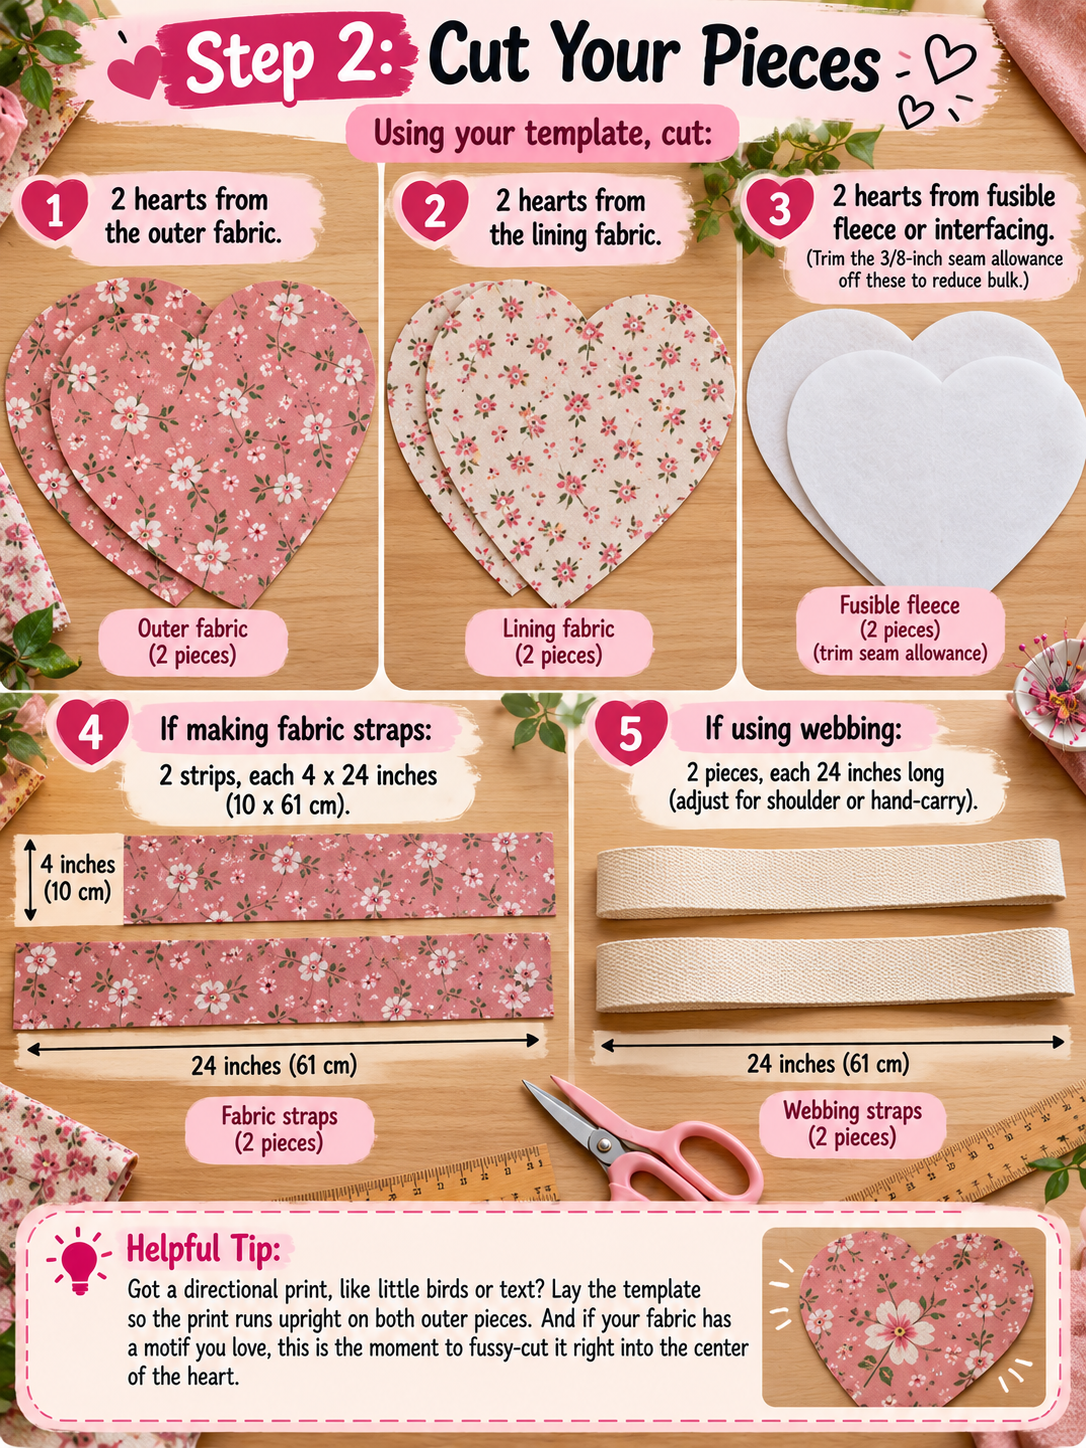
Got a directional print, like little birds or text? Lay the template so the print runs upright on both outer pieces. And if your fabric has a motif you love, this is the moment to fussy-cut it right into the center of the heart. That small decision is what makes a handmade bag look intentional.
Step 3: Fuse, Then Add the Extras
Center the fleece on the wrong side of each outer heart and press it with a hot iron, following the manufacturer’s instructions. Use a pressing cloth if your fleece tends to stick.
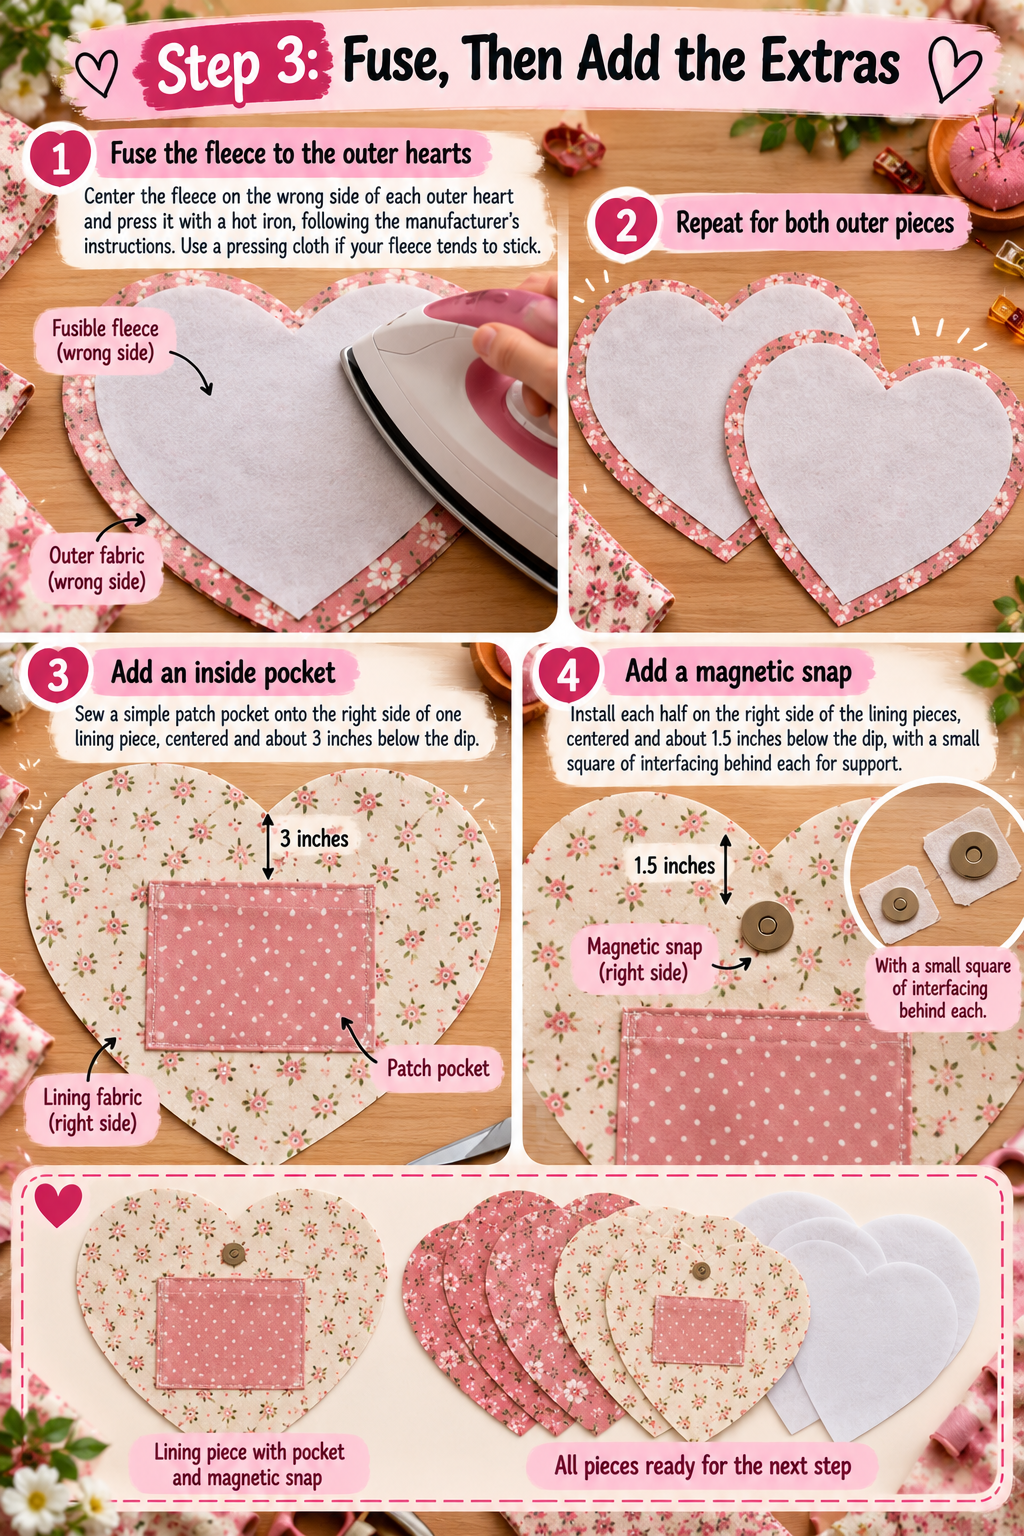
Now is the easy time to add any extras, before anything is sewn together:
- Inside pocket: sew a simple patch pocket onto the right side of one lining piece, centered and about 3 inches below the dip.
- Magnetic snap: install each half on the right side of the lining pieces, centered and about 1.5 inches below the dip, with a small square of interfacing behind each for support.
Step 4: Make the Straps
If you’re using webbing, you can skip ahead. Lucky you.
For fabric straps, fold each 4-inch strip in half lengthwise and press. Open it, fold both long edges in to meet the center crease, press again, then fold in half once more. You’ll have a 1-inch strap with no raw edges showing. Topstitch along both long sides, about 1/8 inch from the edge.
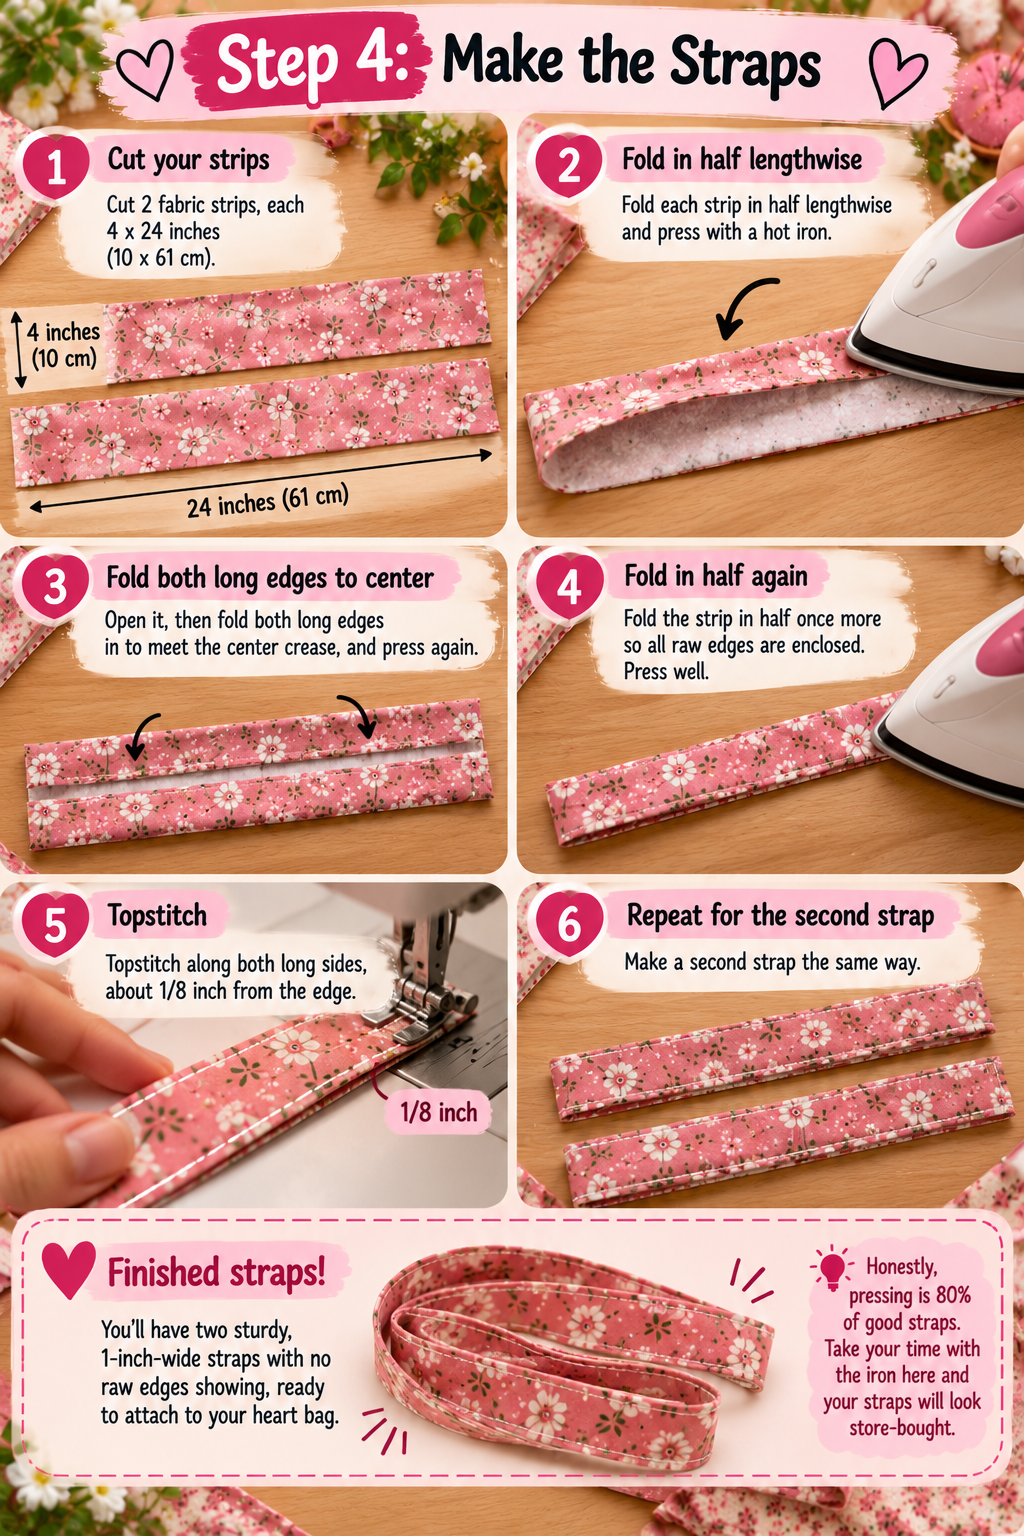
Honestly, pressing is 80% of good straps. Take your time with the iron here and your straps will look store-bought.
Step 5: Sew the Outer Heart
Place the two outer hearts right sides together and pin or clip the edges. Clips are kinder than pins if you’re working with canvas or thick fleece.
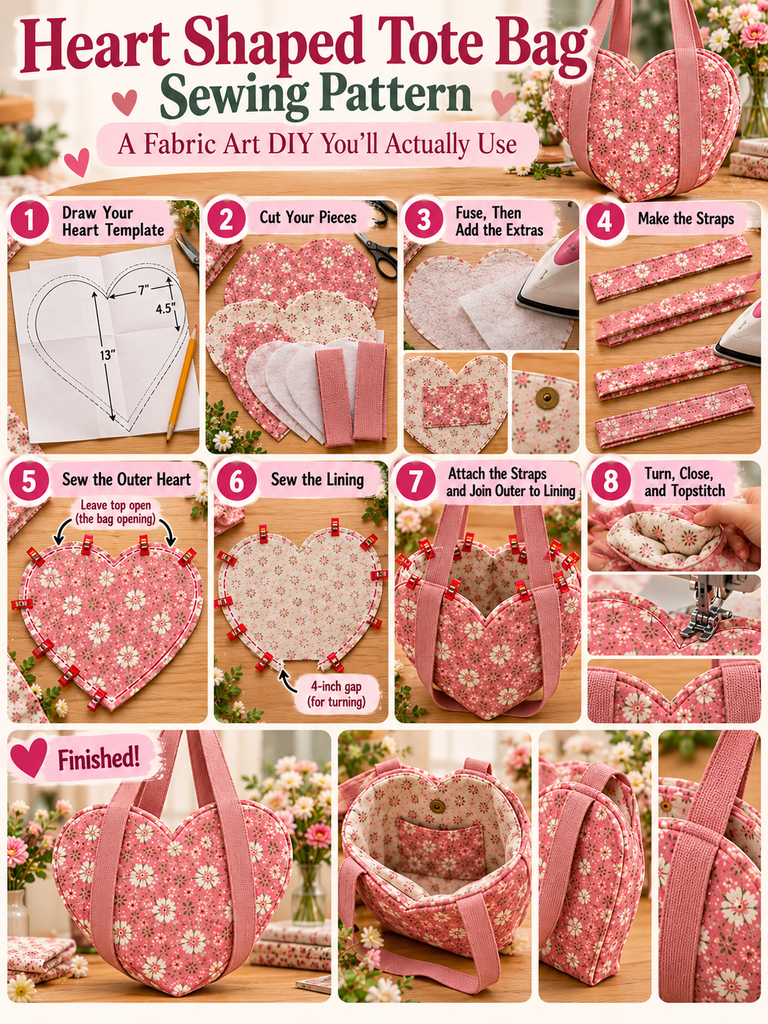
Start sewing at one lobe peak, go down the outer curve, around the bottom point, and back up the other side to the second lobe peak. Leave the top curves and the dip open. That’s the mouth of your bag.
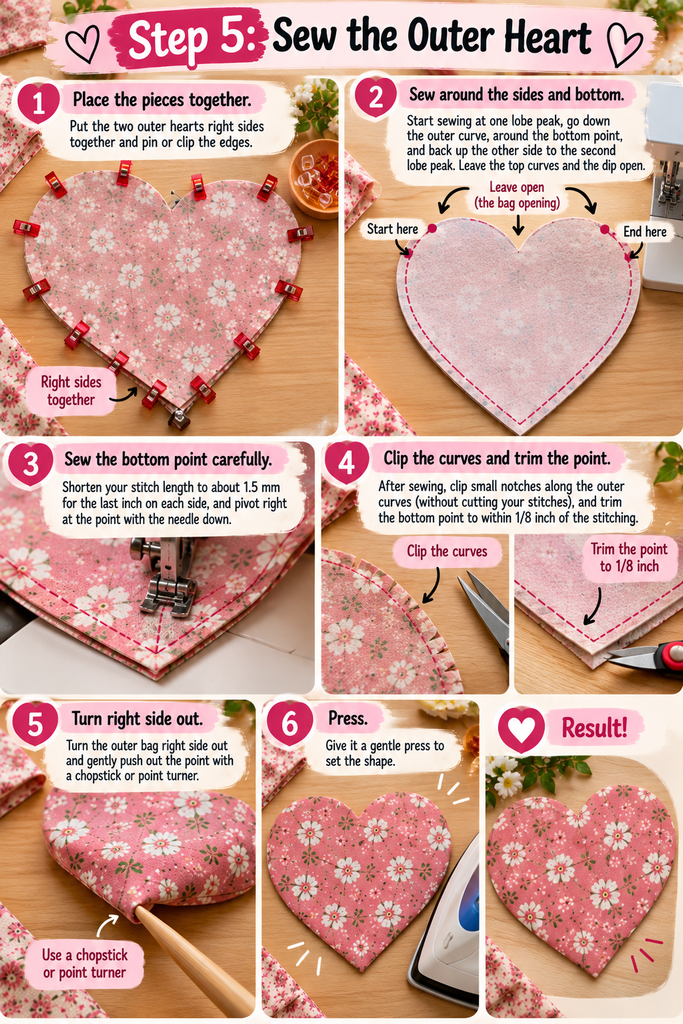
Two tips that will save your sanity:
- At the bottom point, shorten your stitch length to about 1.5 mm for the last inch on each side, and pivot right at the point with the needle down.
- After sewing, clip small notches along the outer curves (without cutting your stitches), and trim the bottom point to within 1/8 inch of the stitching. This is what turns a lumpy point into a crisp one.
Turn the outer bag right side out and gently push out the point with a chopstick or point turner. Press.
Step 6: Sew the Lining
Repeat the same seam with the two lining pieces, right sides together, from lobe peak to lobe peak. This time, leave a 4-inch gap on one straight-ish side of the heart. You’ll turn the whole bag through this opening later.
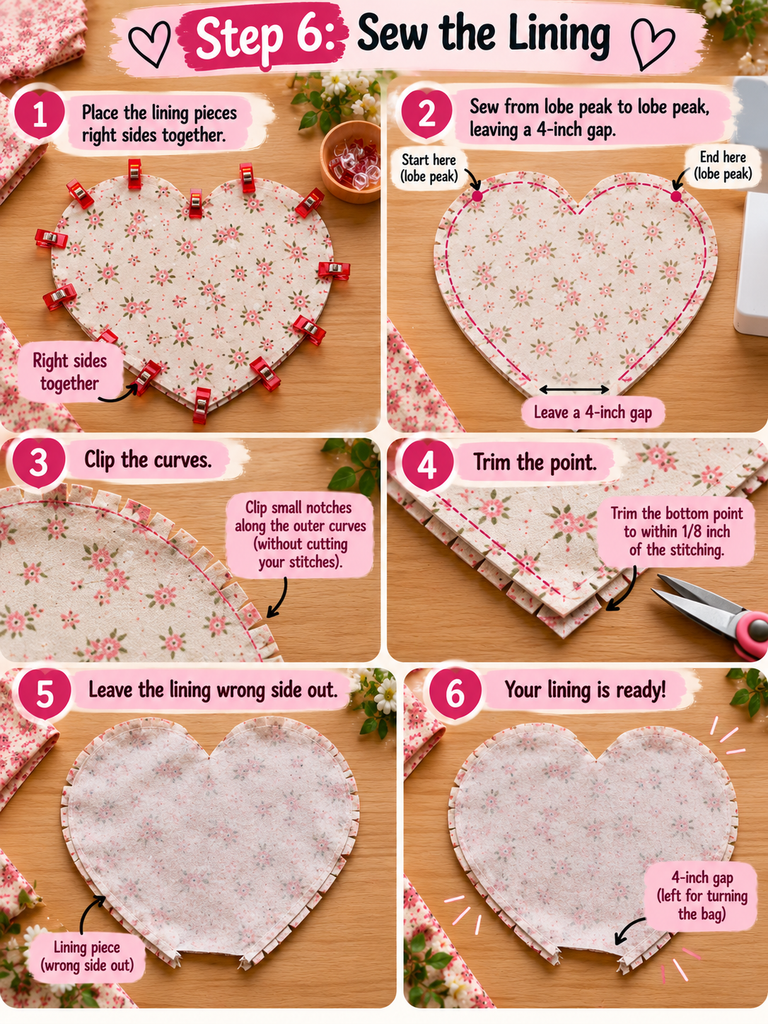
Clip the curves and trim the point just like before, but leave the lining wrong side out.
Step 7: Attach the Straps and Join Outer to Lining
This is where it all comes together, and it’s my favorite moment of the whole project.
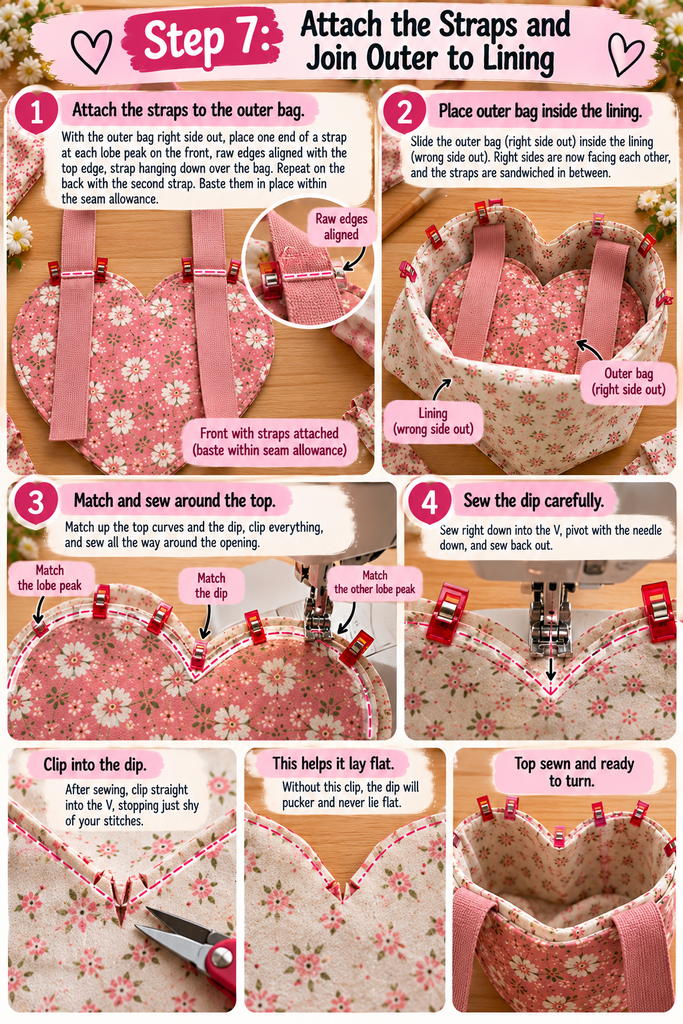
- With the outer bag right side out, place one end of a strap at each lobe peak on the front, raw edges aligned with the top edge, strap hanging down over the bag. Repeat on the back with the second strap. Baste them in place within the seam allowance.
- Slide the outer bag (right side out) inside the lining (wrong side out). Right sides are now facing each other, and the straps are sandwiched in between.
- Match up the top curves and the dip, clip everything, and sew all the way around the opening.
- The dip: sew right down into the V, pivot with the needle down, and sew back out. Then clip straight into the V, stopping just shy of your stitches. Without this clip, the dip will pucker and never lie flat.
Step 8: Turn, Close, and Topstitch
Reach in through the gap in the lining and pull the whole bag through. It’ll look like a crumpled mess for a moment. That’s completely normal.
Push the lining down inside the bag, work the curves out with your fingers, and press the top edge so the lining sits slightly below the outer fabric. Then pull the lining back out just far enough to stitch the turning gap closed, either by machine close to the edge or by hand with a ladder stitch.
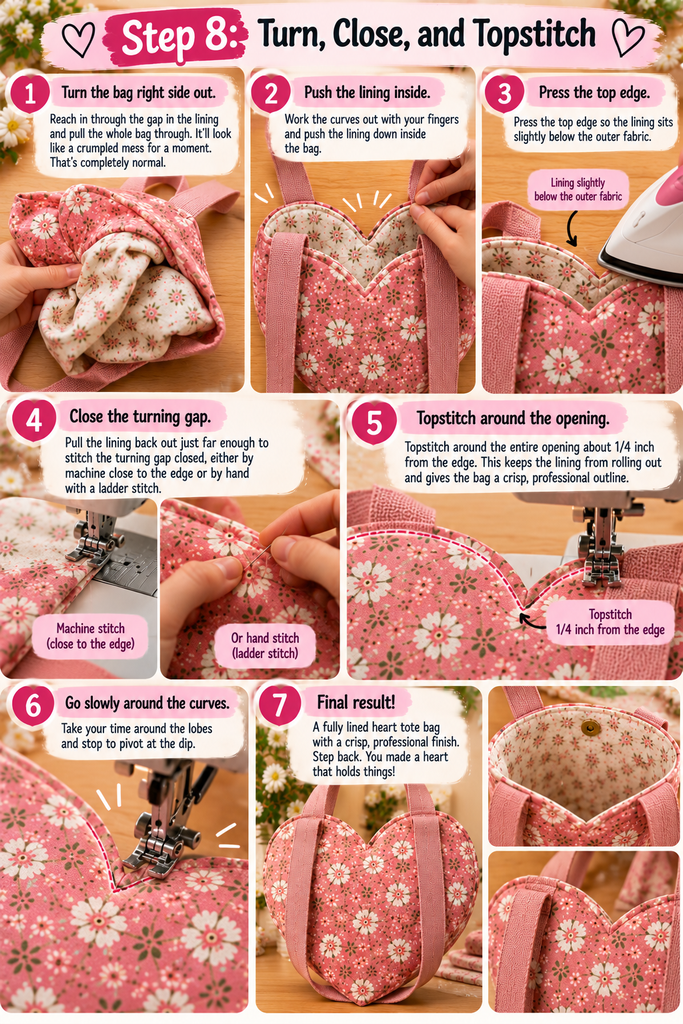
To finish, topstitch around the entire opening about 1/4 inch from the edge. This keeps the lining from rolling out and gives the bag a crisp, professional outline. Go slowly around the lobes and stop to pivot at the dip.
Step back. You made a heart that holds things.
Turning Your Tote Into Fabric Art
Here’s what I find most exciting about this pattern: the heart is basically a canvas. Once you’re comfortable with the construction, the outer panels are where the art happens.
- Patchwork hearts: sew scraps into a larger panel first, then cut your heart from it. Old jeans, shirt fabric, or leftover quilting squares all work beautifully.
- Fabric paint: paint or stamp the front panel before you assemble the bag, and heat-set the paint according to the label.
- Embroidery: add initials, a date, or a tiny flower bouquet to the front heart. Stitch it before fusing the fleece so the back stays tidy.
- Appliqué: layer a smaller contrasting heart on the front for a “heart within a heart” look.
- Quilting: stitch straight diagonal lines or echo the heart shape across the outer panels after fusing the fleece. It adds texture and even more structure.
One bag can be a quiet everyday tote. The next can be a full-on gallery piece. Same pattern, completely different personality.
Easy Variations on the Pattern
Mini heart purse. Shrink the template to about 60% and swap the long straps for a single short handle or a crossbody strap. Kids go wild for these.
Boxed heart tote. Want more room inside? Instead of sewing the two hearts directly together, add a 3-inch-wide strip (a gusset) between them, running from lobe peak to lobe peak around the bottom. It gives the bag real depth, so it can carry a lunch box or a stack of notebooks.
Gift-wrap alternative. Sew a few small, unlined versions in festive fabric and use them instead of paper gift bags. The gift-wrap becomes part of the gift.
Common Mistakes (And How to Avoid Them)
The heart looks wonky. Almost always a template issue. Re-draw on folded paper and check that both outer pieces were cut from the same template, facing the same way.
The bottom point is round and bulky. Trim closer to the stitching and use a point turner gently. Shorter stitches at the tip also help.
The dip puckers. You need that clip right into the V. Be brave, just don’t cut through the stitches.
The bag collapses when empty. Upgrade from lightweight interfacing to fusible fleece, or fuse interfacing to the lining too.
The straps pull away. Reinforce them by stitching a small square with an X inside it where each strap meets the top edge, during your final topstitching.
Frequently Asked Questions
Is this heart tote bag pattern good for beginners?
Yes. If you can sew a straight seam and you’re willing to go slowly on the curves, you can make this bag. Expect your first one to take an afternoon; the second will go much faster.
What’s the best fabric for a heart shaped bag?
Cotton canvas or duck cloth gives the most structure on its own. Quilting cotton is perfect for colorful prints but needs fusible fleece to keep its shape. Denim is great for a sturdy, casual look.
Can I wash my heart tote?
Generally, yes. Wash it cold on a gentle cycle and air dry to protect the fleece and the shape. If you’ve painted the fabric, check the paint label first.
Can I sell bags made from this pattern?
Since you drafted the template yourself, the bags are yours to make and sell. Heart totes are a popular item at craft fairs and seasonal markets, especially around Valentine’s Day and Mother’s Day.
Final Thoughts: Make It Yours
I still have that lopsided first heart tote. It lives on a hook by my sewing table, partly as a reminder of how far a few good techniques can take you, and partly because I just like looking at it.
That’s really the point of a project like this. A heart shaped tote bag isn’t about perfection. It’s about making something useful with your own hands that carries a little bit of joy around with it, literally.
So pick your fabric, fold that sheet of paper, and draw your heart. Your first one might be slightly wonky. Carry it anyway. Somebody will ask where you got it.
Over to you: are you going for a classic red canvas heart, a patchwork scrap-buster, or something painted and wild? Tell me in the comments, and if you sew one, share a photo. I’d genuinely love to see what you make.