
The first time I saw this little red toadstool dangling from a gold clasp, I stopped scrolling. A tall, pointy cap dotted with tiny white beads, a cream ruffle peeking out underneath, a curly green leaf hugging one side… It looked like something you’d find growing at the edge of a fairy-tale forest, not on someone’s car keys.
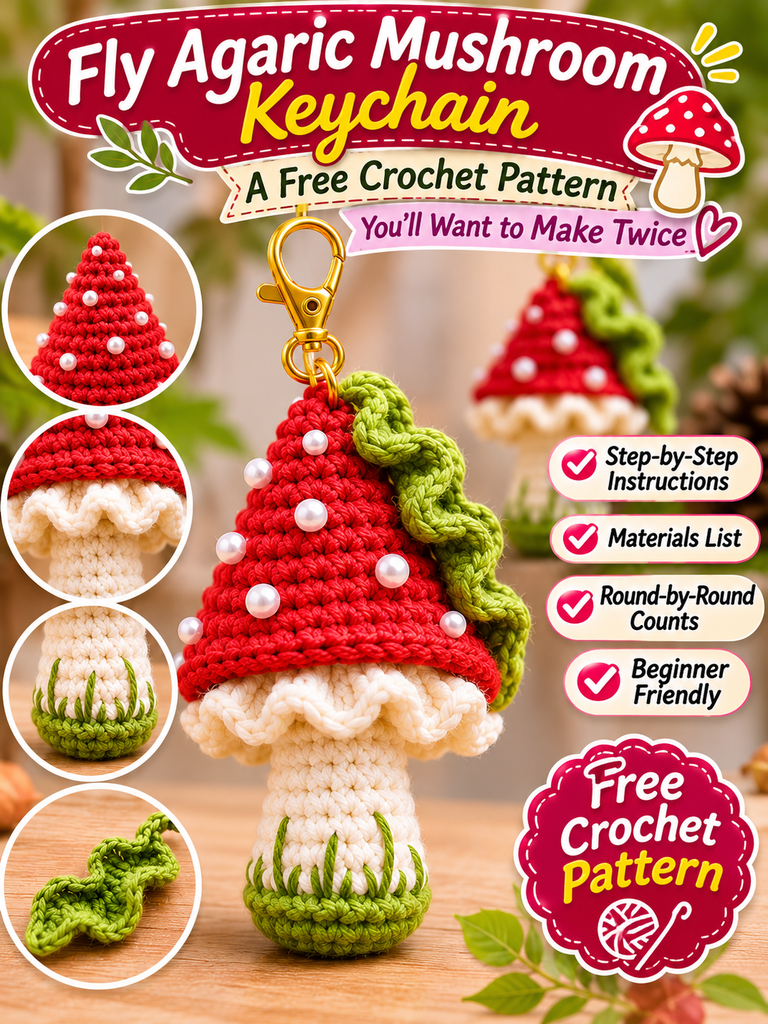
So naturally, I had to make one. Then another one for my sister. Then a third because the second one “wasn’t quite right” (it was fine, I just wanted an excuse).
If you’ve got a free evening, a bit of leftover cotton yarn and a love for all things cottagecore, this is the project for you. Below you’ll find everything: the materials, the stages, round-by-round counts, and the small tricks that make the difference between a slightly sad mushroom and one that stands proud.
Table of Contents
Key Takeaways
- This is a beginner-friendly amigurumi worked mostly in single crochet, in continuous rounds.
- The project has four parts: a cone-shaped cap, a stem with a rounded base, a ruffled skirt and a wavy leaf.
- Finished size is about 12–13 cm (5 in) tall, not counting the keyring.
- Expect 2 to 3 hours from first stitch to finished keychain.
- The white “spots” are seed beads, but French knots work perfectly if you’re making it for a child.
Why the Fly Agaric Never Goes Out of Style
The fly agaric (Amanita muscaria) is probably the most recognizable mushroom in the world. Red cap, white spots, the classic storybook toadstool. In real life, it’s toxic and should never be eaten. In yarn form, though? Completely harmless and wildly charming.
Across much of Europe, it’s also considered a good-luck symbol, and you’ll often spot it on Christmas cards and tree ornaments. That’s exactly why this keychain makes such a lovely gift. It works as a bag charm, a little holiday ornament, or a “thinking of you” present for the friend who already owns three mushroom mugs.
What I love most about this particular design is the shape. Most crochet mushrooms have a round, squat cap. This one goes tall and pointy, almost like a wizard’s hat, which gives it a playful, whimsical look.
Materials You’ll Need
- Yarn: cotton or cotton-blend in sport or light DK weight. You’ll need red for the cap, white or ivory for the stem and skirt, and green for the leaf and base. Small amounts of each, so it’s a great scrap-buster.
- Hook: 2.0–2.5 mm. Go a size smaller than the label suggests so no stuffing peeks through.
- Seed beads: about 25–30 small white or pearl beads (or white yarn for French knots).
- Keyring with a lobster clasp or swivel hook.
- Polyester fiberfill
- Stitch marker
- Tapestry needle and a thin beading needle with white sewing thread
- Scissors
Abbreviations (US Terms)
- MR – magic ring
- ch – chain
- sl st – slip stitch
- sc – single crochet
- hdc – half double crochet
- dc – double crochet
- inc – 2 sc in the same stitch
- dec – single crochet 2 together (invisible decrease recommended)
- BLO / FLO – back loop only / front loop only
- (…) x6 – repeat what’s inside the brackets 6 times
- (18) – total stitch count at the end of the round
All parts are worked in continuous spiral rounds unless I say otherwise. Don’t join with a slip stitch at the end of each round. Just move your stitch marker up as you go.
Stage 1: The Pointy Red Cap
This is the star of the show, so take your time here. The secret to that sharp wizard-hat point is increasing slowly at the top and faster toward the bottom. Rush the increases and you’ll end up with a dome instead of a cone.
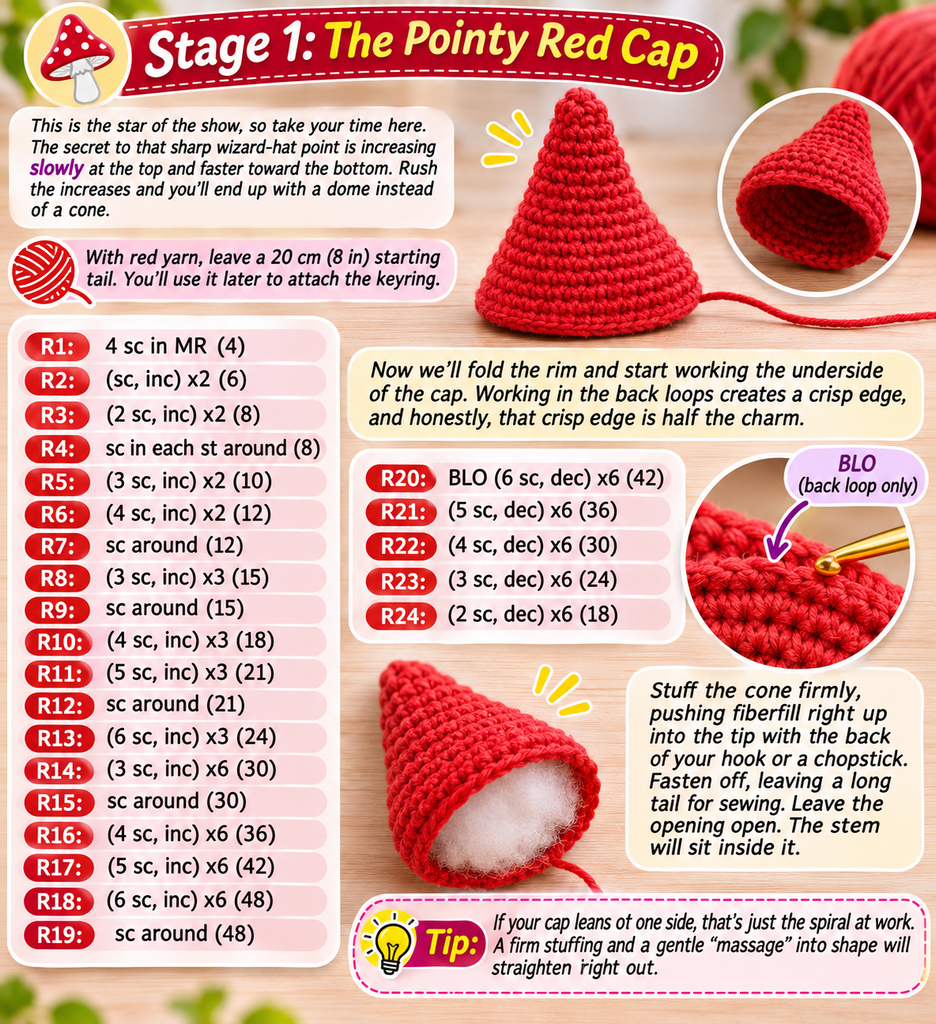
With red yarn, leave a 20 cm (8 in) starting tail. You’ll use it later to attach the keyring.
- R1: 4 sc in MR (4)
- R2: (sc, inc) x2 (6)
- R3: (2 sc, inc) x2 (8)
- R4: sc in each st around (8)
- R5: (3 sc, inc) x2 (10)
- R6: (4 sc, inc) x2 (12)
- R7: sc around (12)
- R8: (3 sc, inc) x3 (15)
- R9: sc around (15)
- R10: (4 sc, inc) x3 (18)
- R11: (5 sc, inc) x3 (21)
- R12: sc around (21)
- R13: (6 sc, inc) x3 (24)
- R14: (3 sc, inc) x6 (30)
- R15: sc around (30)
- R16: (4 sc, inc) x6 (36)
- R17: (5 sc, inc) x6 (42)
- R18: (6 sc, inc) x6 (48)
- R19: sc around (48)
Now we’ll fold the rim and start working the underside of the cap. Working in the back loops creates a crisp edge, and honestly, that crisp edge is half the charm.
- R20: BLO (6 sc, dec) x6 (42)
- R21: (5 sc, dec) x6 (36)
- R22: (4 sc, dec) x6 (30)
- R23: (3 sc, dec) x6 (24)
- R24: (2 sc, dec) x6 (18)
Stuff the cone firmly, pushing fiberfill right up into the tip with the back of your hook or a chopstick. Fasten off, leaving a long tail for sewing. Leave the opening open. The stem will sit inside it.
Tip: If your cap leans to one side, that’s just the spiral at work. A firm stuffing and a gentle “massage” into shape will straighten it right out.
Stage 2: The Stem with a Grassy Base
The stem is worked from the bottom up. It starts in green so the base looks like it’s sprouting from a patch of moss.
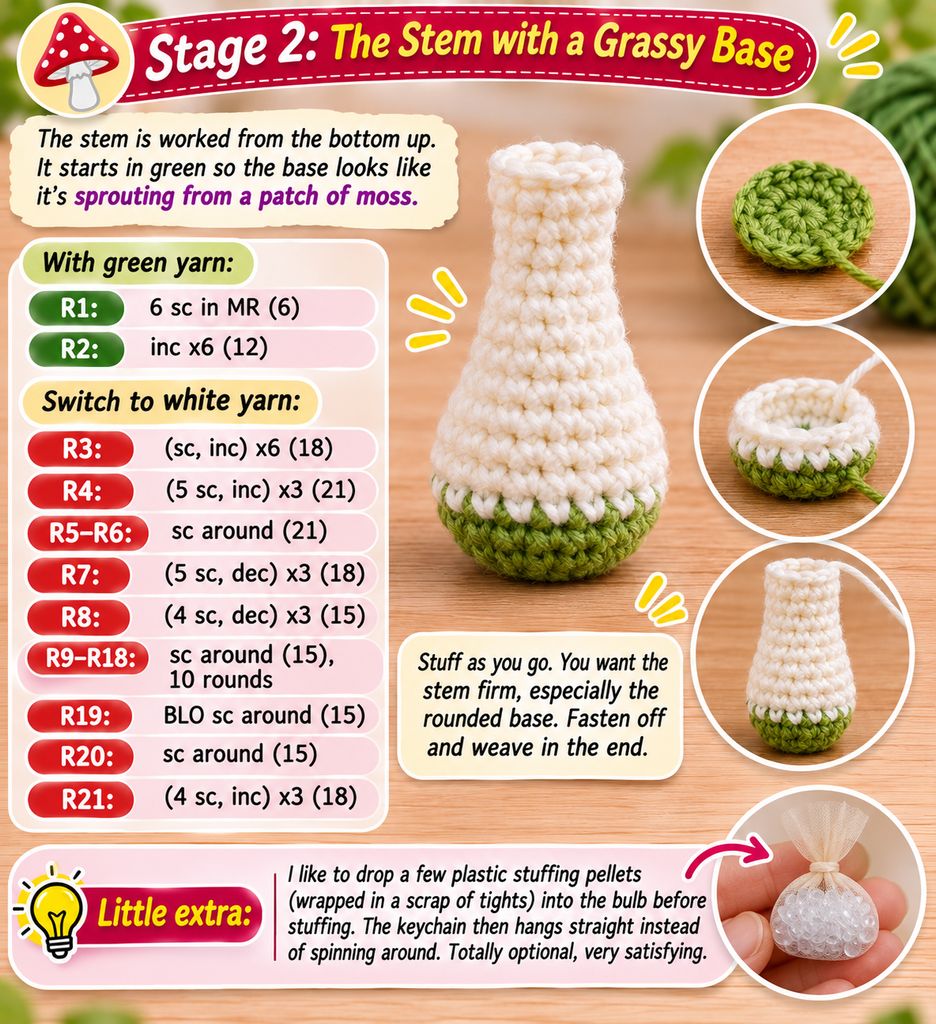
With green yarn:
- R1: 6 sc in MR (6)
- R2: inc x6 (12)
Switch to white yarn:
- R3: (sc, inc) x6 (18)
- R4: (5 sc, inc) x3 (21)
- R5–R6: sc around (21)
- R7: (5 sc, dec) x3 (18)
- R8: (4 sc, dec) x3 (15)
- R9–R18: sc around (15), 10 rounds
- R19: BLO sc around (15)
- R20: sc around (15)
- R21: (4 sc, inc) x3 (18)
Stuff as you go. You want the stem firm, especially the rounded base. Fasten off and weave in the end.
Little extra: I like to drop a few plastic stuffing pellets (wrapped in a scrap of tights) into the bulb before stuffing. The keychain then hangs straight instead of spinning around. Totally optional, very satisfying.
Stage 3: The Ruffled Skirt
See those unused front loops left over from Round 18 of the stem? That’s where the skirt grows from. On a real fly agaric, this ring is called the annulus. On ours, it’s the bit that makes everyone go “aww.”
Hold the stem upside down (base pointing up). Join white yarn in any front loop of Round 18.
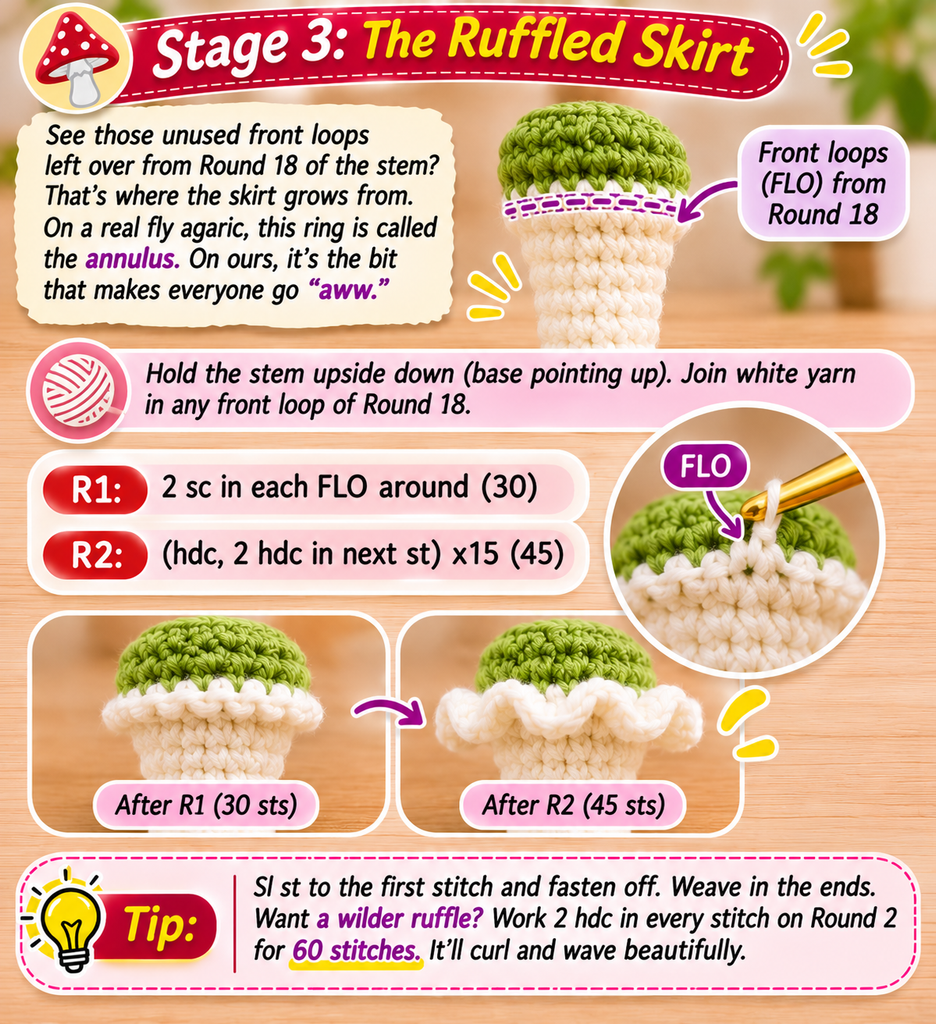
- R1: 2 sc in each FLO around (30)
- R2: (hdc, 2 hdc in next st) x15 (45)
Sl st to the first stitch and fasten off. Weave in the ends. Want a wilder ruffle? Work 2 hdc in every stitch on Round 2 for 60 stitches. It’ll curl and wave beautifully.
Stage 4: The Wavy Green Leaf
This leaf is what makes the design feel alive. It’s worked flat, along both sides of a foundation chain.
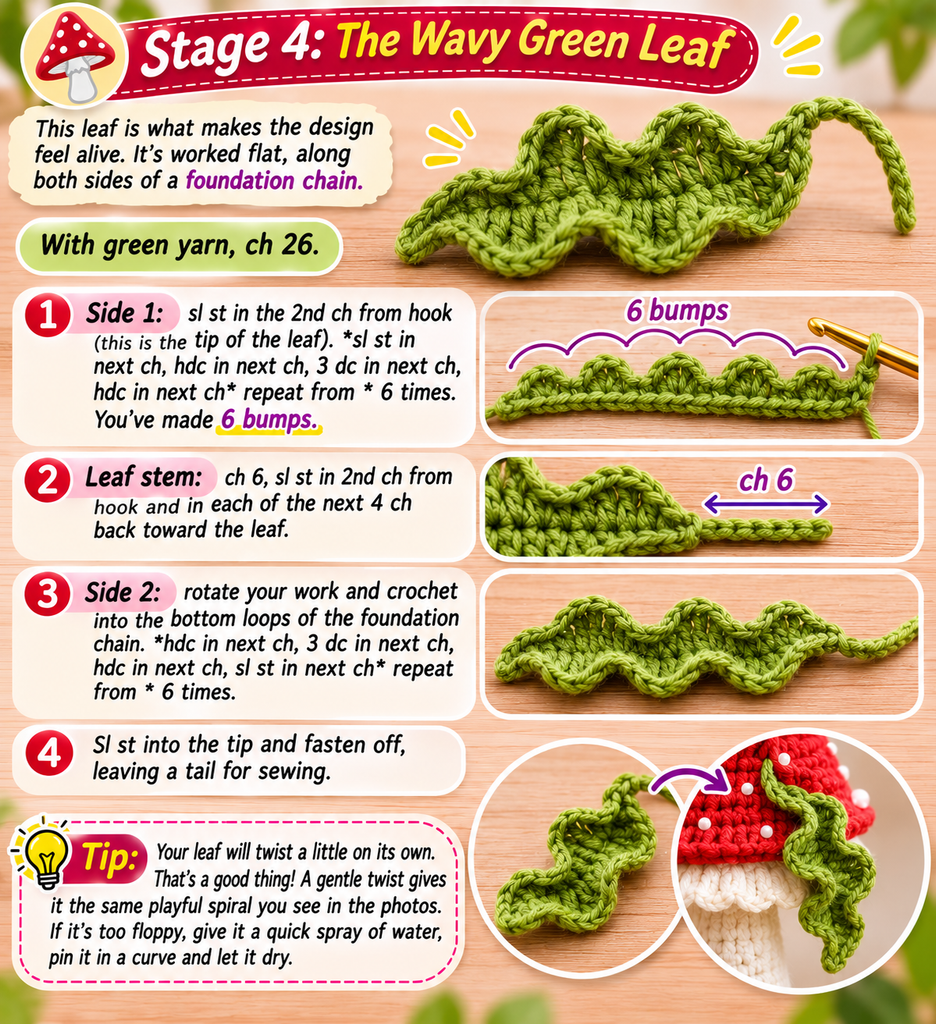
With green yarn, ch 26.
- Side 1: sl st in the 2nd ch from hook (this is the tip of the leaf). *sl st in next ch, hdc in next ch, 3 dc in next ch, hdc in next ch* repeat from * 6 times. You’ve made 6 bumps.
- Leaf stem: ch 6, sl st in 2nd ch from hook and in each of the next 4 ch back toward the leaf.
- Side 2: rotate your work and crochet into the bottom loops of the foundation chain. *hdc in next ch, 3 dc in next ch, hdc in next ch, sl st in next ch* repeat from * 6 times.
- Sl st into the tip and fasten off, leaving a tail for sewing.
Your leaf will twist a little on its own. That’s a good thing! A gentle twist gives it the same playful spiral you see in the photos. If it’s too floppy, give it a quick spray of water, pin it in a curve and let it dry.
Stage 5: Adding the White Spots
Here’s where your mushroom gets its personality. Thread a beading needle with white sewing thread, secure it inside the cap, and sew on seed beads one at a time, about 25–30 in total.
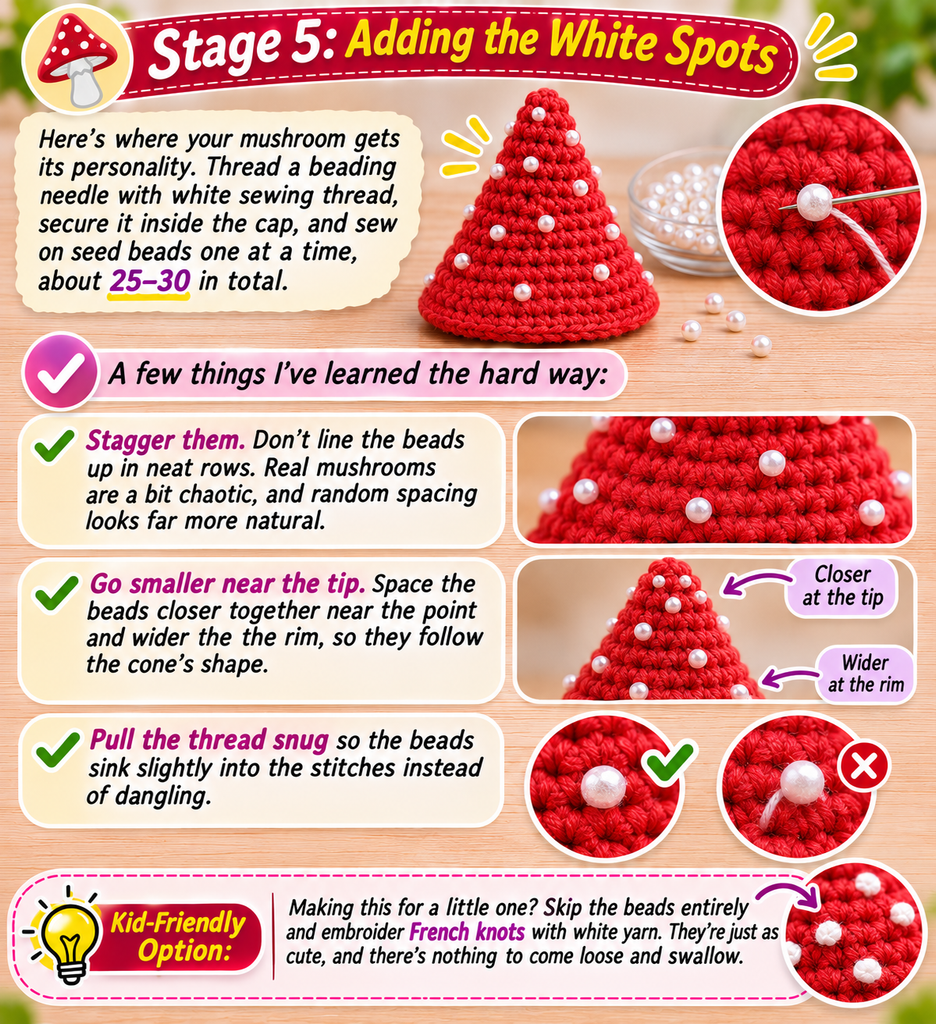
A few things I’ve learned the hard way:
- Stagger them. Don’t line the beads up in neat rows. Real mushrooms are a bit chaotic, and random spacing looks far more natural.
- Go smaller near the tip. Space the beads closer together near the point and wider near the rim, so they follow the cone’s shape.
- Pull the thread snug so the beads sink slightly into the stitches instead of dangling.
Making this for a little one? Skip the beads entirely and embroider French knots with white yarn. They’re just as cute, and there’s nothing to come loose and swallow.
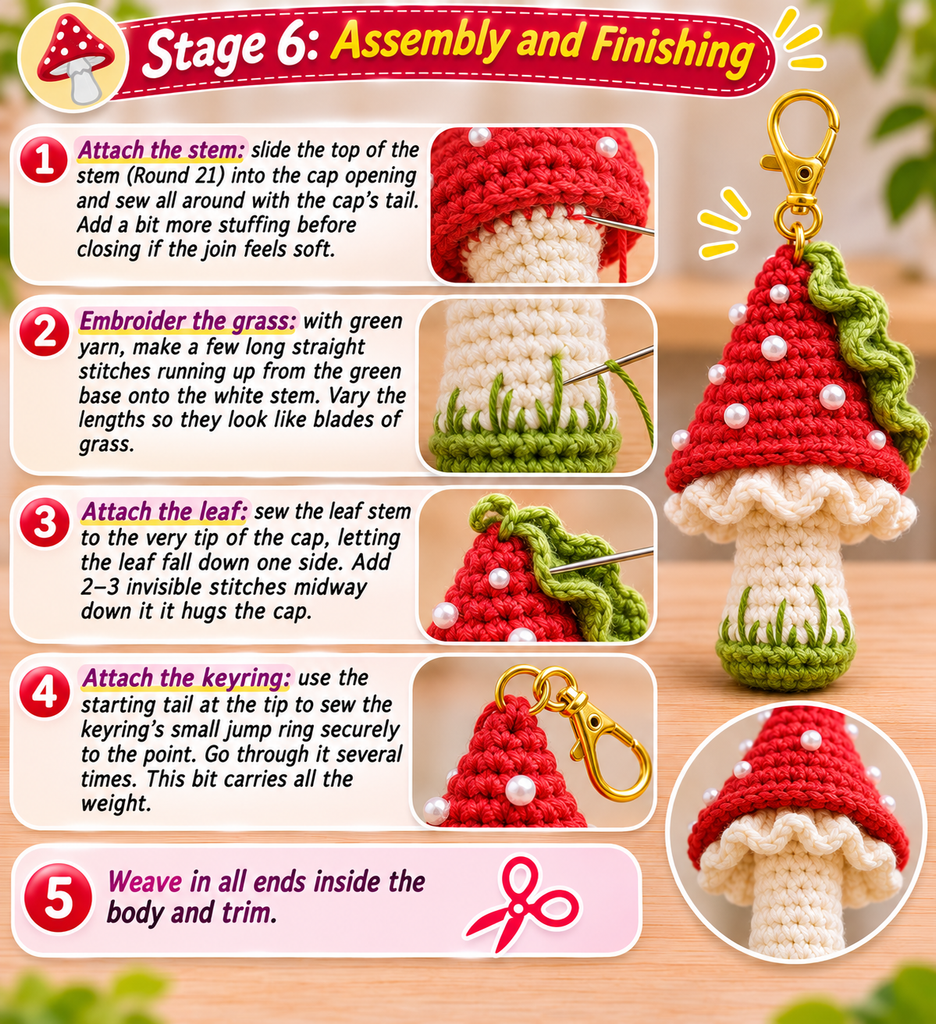
Stage 6: Assembly and Finishing
- Attach the stem: slide the top of the stem (Round 21) into the cap opening and sew all around with the cap’s tail. Add a bit more stuffing before closing if the join feels soft.
- Embroider the grass: with green yarn, make a few long straight stitches running up from the green base onto the white stem. Vary the lengths so they look like blades of grass.
- Attach the leaf: sew the leaf stem to the very tip of the cap, letting the leaf fall down one side. Add 2–3 invisible stitches midway down so it hugs the cap.
- Attach the keyring: use the starting tail at the tip to sew the keyring’s small jump ring securely to the point. Go through it several times. This bit carries all the weight.
- Weave in all ends inside the body and trim.
Common Problems (and Quick Fixes)
“My cap looks like a dome, not a cone.” You’re probably crocheting too loosely, or you added extra increases. Go down a hook size and double-check your counts on Rounds 1–13.
“I can see stuffing between the stitches.” Same fix: smaller hook. Amigurumi loves a tight fabric.
“My leaf curls like a pig’s tail.” Your chain was tighter than your stitches. Next time, make the foundation chain with a hook one size bigger, then switch back.
“The skirt is flat and boring.” Use the 60-stitch version of Round 2, or switch to dc instead of hdc for more drama.
Make It Your Own
Once you’ve made one, you’ll start seeing variations everywhere. Here are some I’ve tried or have on my list:
- A brown or orange cap for a more autumnal, woodland feel.
- Gold beads instead of white for a festive Christmas ornament. Just swap the keyring for a ribbon loop.
- A mini version using fingering-weight yarn and a 1.75 mm hook for earrings or zipper pulls.
- A trio of mushrooms in different heights, grouped on one ring. Very cottage garden.
Final Thoughts
There’s something quietly joyful about this little toadstool. It’s quick, it uses up scraps, and it brings a smile every single time you reach for your keys. Mine has survived two months of being tossed into handbags and it still looks just as perky as the day I stitched the last bead.
Start with the cap, take your time with those slow increases, and don’t stress about perfection. Every handmade mushroom has its own personality, and that’s exactly the point.
Now it’s your turn! Will you go classic red and white, or are you already picturing a gold-spotted holiday version? Tell me in the comments. And if you make one, share a photo. I’d genuinely love to see your little mushroom out in the world.