Ocean Vibe Nails: Complete Guide to Beach-Inspired Gel Nail Art

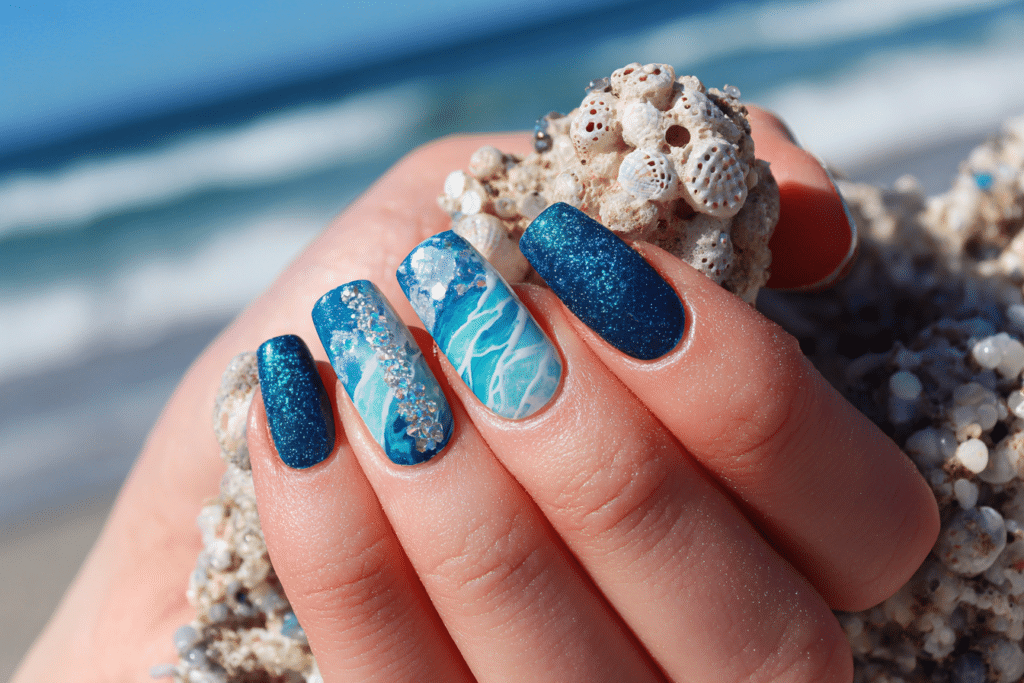
Ocean Vibe Nails capture the serene beauty of coastal waters through stunning gel polish designs featuring blue hues, wave patterns, and marine-inspired elements.
This popular nail art style combines professional gel techniques with creative aquatic themes to create manicures that evoke the tranquility of ocean shores. The trend has gained momentum among nail enthusiasts seeking fresh, summery looks that transition beautifully across all seasons.
| Topic | Details |
|---|---|
| Category | Gel Nails / Nail Art |
| Skill Level | Intermediate |
| Time Needed | 90-120 minutes |
| Tools Needed | UV/LED lamp, gel polish, nail art brushes, base coat, top coat |
| Best For | Beach lovers, summer events, vacation manicures, anyone seeking calming nail art |
Table of Contents
Why Ocean Vibe Nails Work
Ocean Vibe Nails succeed because they tap into universal appreciation for natural beauty while offering endless creative possibilities. The combination of blue, turquoise, teal, and seafoam green shades creates visually soothing effects that complement all skin tones. These colors reflect light similarly to water surfaces, producing dimensional effects that make nails appear professionally crafted and artistically sophisticated.
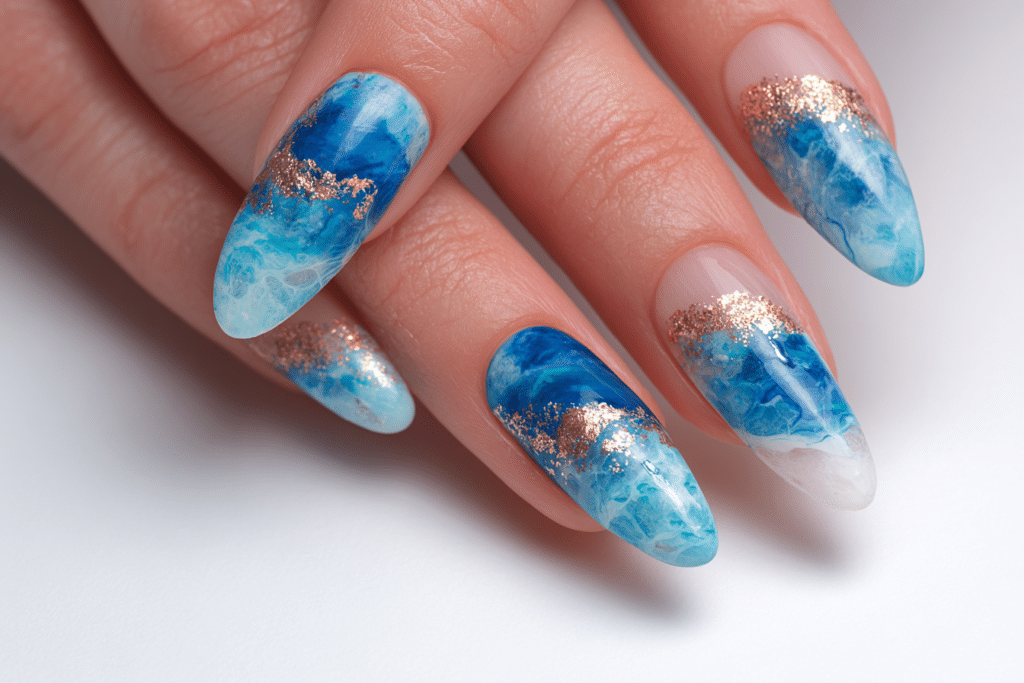
The gel polish medium enhances ocean-themed designs through its superior color saturation and glossy finish that mimics the reflective quality of water. Professional nail technicians favor this style because gel formulas allow seamless blending of multiple shades to create realistic wave effects, ombre transitions, and depth illusions. The curing process locks in intricate details like foam patterns, glitter accents representing sand or sunlight, and marble effects resembling ocean currents.
From a psychological perspective, ocean-inspired nail art provides wearers with a portable connection to nature’s calming elements. The therapeutic association with water environments makes these designs particularly appealing for clients seeking stress-relief through beauty rituals. Professional manicures featuring aquatic themes also demonstrate technical skill through their layered complexity and artistic execution, positioning them as premium nail art choices.
Tools and Products Needed for Ocean Vibe Nails
| Product | Purpose | Alternatives |
|---|---|---|
| UV/LED Lamp | Cures gel polish layers properly | 48W LED lamp, dual-purpose UV/LED combination lamp |
| Base Coat | Protects natural nail and ensures adhesion | Ridge-filling base, strengthening base coat |
| Gel Polish (Blue shades) | Creates ocean color palette | Regular polish with gel top coat (less durable) |
| White Gel Polish | Adds wave foam and highlights | Acrylic paint for nail art details |
| Nail Art Brushes | Creates detailed wave patterns and designs | Dotting tools, striping brushes, sponges |
| Nail File (180 grit) | Shapes nails and smooths edges | Glass file, electric nail file |
| Nail Buffer | Creates smooth surface for polish adhesion | 240-grit buffer block |
| Cuticle Oil | Maintains nail health and flexibility | Vitamin E oil, jojoba oil |
| Top Coat (no-wipe) | Seals design with high-shine finish | Regular gel top coat with cleansing required |
| Glitter or Shimmer Gel | Adds sparkle effects mimicking sunlight | Loose glitter with clear gel medium |
For professional-quality results and additional gel nail supplies, visit Gel Nails by Lina for expert recommendations and product selections.
Step-by-Step Application Guide for Ocean Vibe Nails
Nail Preparation
- Remove any existing polish using acetone-soaked cotton pads and allow nails to dry completely for five minutes.
- Shape nails using a 180-grit file, moving in one direction to prevent splitting and create your desired nail shape.
- Gently push back cuticles using a wooden or rubber cuticle pusher, avoiding aggressive techniques that damage the nail matrix.
- Buff the nail surface lightly with a 240-grit buffer to remove shine and create microscopic texture for better adhesion.
- Cleanse nails thoroughly with alcohol or nail cleanser to remove oils, dust, and debris that interfere with gel bonding.
- Apply pH balancing dehydrator if working with naturally oily nail beds to maximize gel polish longevity.
Base Coat Application
- Apply a thin layer of gel base coat, starting slightly away from the cuticle to prevent flooding.
- Cap the free edge by running the brush along the nail tip to seal and prevent chipping.
- Cure the base coat under your UV/LED lamp according to manufacturer specifications, typically 30-60 seconds.
- Check for complete curing by ensuring the surface feels firm and not tacky when touched gently.
Gel Polish Layers for Ocean Effects
- Apply the lightest blue shade as your base color in a thin, even layer covering the entire nail.
- Cure this first color layer for the recommended time, usually 60 seconds under LED or 120 seconds under UV.
- Add a second shade of darker blue or teal to two-thirds of the nail, blending at the transition line.
- Use a clean brush or sponge to blend where colors meet, creating a seamless ombre transition effect.
- Cure this gradient layer fully before proceeding to prevent smudging or color mixing during subsequent steps.
- Apply additional depth using a third darker shade at the tips if creating a multi-toned ocean effect.
Creating Wave and Foam Details
- Load a thin nail art brush with white gel polish to paint curved horizontal lines representing waves.
- Add irregular wavy patterns rather than perfect curves to mimic natural ocean wave movement authentically.
- Create foam effects by dabbing white gel along wave lines using a dotting tool or stippling brush.
- Cure each artistic layer separately if working with multiple detailed elements to prevent accidental smudging.
- Add shimmer or fine glitter to specific areas representing sunlight reflections on water surfaces.
Finishing and Top Coat Application
- Apply a thin layer of gel top coat over the entire design, ensuring complete coverage without flooding cuticles.
- Cap the free edge again with top coat to seal all layers and maximize wear time.
- Cure the top coat layer according to product instructions, typically 60-90 seconds for no-wipe formulas.
- If using a regular gel top coat, cleanse the tacky inhibition layer with alcohol after curing.
- Apply cuticle oil around each nail to hydrate the surrounding skin and add professional finishing touches.
Pro Nail Technician Tips for Ocean Vibe Nails
- Work with thin gel layers rather than thick applications to prevent wrinkling, shrinking, or incomplete curing that compromises the manicure durability.
- Allow each color to cure completely before adding the next shade to maintain color clarity and prevent muddy blending in your ocean design.
- Use a lint-free wipe dampened with alcohol between layers to remove any dust particles that create bumps in your finished surface.
- Create more realistic ocean effects by studying actual water photographs and replicating the irregular patterns rather than following symmetrical designs.
- Extend gel polish longevity by applying cuticle oil daily, which maintains nail flexibility and prevents the lifting that occurs with dehydrated nails.
- Store gel polishes away from direct sunlight and heat sources, as temperature fluctuations affect consistency and curing properties over time.
Common Gel Nail Mistakes with Ocean Vibe Nails
| Mistake | Why it Happens | How to Fix |
|---|---|---|
| Thick gel layers causing wrinkling | Applying too much product at once prevents proper light penetration during curing | Use thin coats and cure each layer separately, building color gradually through multiple applications |
| Colors bleeding together | Not curing each shade completely before adding the next allows uncured gel to mix | Ensure full cure time between colors and work quickly when blending intentionally |
| Design lacking dimension | Using only one or two shades creates flat appearance without depth | Incorporate at least three shades from light to dark and add white highlights for contrast |
| Gel lifting at cuticles | Polish applied too close to cuticle area or inadequate nail preparation | Leave a tiny margin near cuticles and ensure thorough dehydration and buffing during prep |
| Dull finish after top coat | Under-curing top coat or touching nails before complete polymerization | Add 30 extra seconds to top coat cure time and avoid contact for two minutes post-curing |
Ocean Vibe Nails Design Variations
| Style | Description | Best Occasion |
|---|---|---|
| Classic Ocean Ombre | Gradient transition from sandy beige to deep ocean blue across all nails | Beach vacations, summer parties, resort wear |
| Tropical Wave Art | Detailed white foam waves over turquoise base with palm tree accents on accent nails | Destination weddings, tropical themed events |
| Minimalist Ocean Tips | Nude base with blue-toned French tips featuring subtle wave lines | Professional settings, everyday wear, office-appropriate nail art |
| Glitter Ocean Sunset | Orange to purple gradient with gold shimmer representing sunset over water | Evening events, date nights, special celebrations |
| Mermaid Scale Effect | Iridescent scales created with stencils over ocean-colored base | Fantasy themed parties, creative expression, social media content |
| Marble Ocean Swirl | Multiple blue shades swirled together creating natural stone-like patterns | Sophisticated events, formal occasions, artistic expression |
| Coastal French Design | Traditional French manicure with ocean blue tips and seashell accent details | Weddings, bridal showers, elegant summer events |
Explore more design inspiration and techniques at Gel Nails by Lina for your next ocean-themed manicure creation.
Nail Care and Maintenance for Ocean Vibe Nails
Maintaining Ocean Vibe Nails requires consistent hydration and protective habits to extend wear time beyond the typical two to three weeks. Apply cuticle oil at least twice daily, focusing on the cuticle area and surrounding skin to prevent dryness that leads to lifting. The oil penetrates beneath the gel edges, maintaining nail flexibility that prevents cracking or separation from the natural nail bed.
Protect your ocean-themed manicure by wearing gloves during household cleaning, dishwashing, or gardening activities that expose nails to harsh chemicals and excessive moisture. Avoid using your nails as tools to open containers, scrape surfaces, or peel labels, as these actions create stress points where gel polish cracks or chips. When showering or bathing, the prolonged water exposure softens natural nails temporarily, making them more susceptible to damage during the first hour after water contact.
Schedule professional maintenance or careful at-home touch-ups when you notice any lifting at the cuticle area or free edge. Addressing small imperfections immediately prevents moisture and bacteria from entering beneath the gel layer, which can lead to nail infections or green nail syndrome. Between manicures, maintain nail health by taking biotin supplements, staying hydrated, and consuming protein-rich foods that support strong nail growth from within.
How to Remove Ocean Vibe Nails Safely
- File the shiny top coat layer gently using a 180-grit file to break the seal and allow acetone penetration.
- Soak cotton pads in pure acetone and place one pad directly on each nail surface.
- Wrap each fingertip securely with aluminum foil squares to hold cotton in place and trap heat that accelerates breakdown.
- Wait 10-15 minutes while the acetone dissolves the gel polish layers without forcing or prying.
- Remove foil wraps and cotton pads, then gently push softened gel polish off using a wooden cuticle stick.
- Avoid scraping or forcing gel removal if polish resists, as this damages the nail plate underneath.
- Re-wrap any nails with remaining gel for an additional five minutes of acetone soaking.
- Buff nails gently with a fine-grit buffer to smooth any remaining residue or rough patches.
- Wash hands thoroughly with soap and water to remove all acetone traces from skin and nails.
- Apply intensive cuticle oil and hand cream immediately after removal to restore moisture lost during the acetone process.
Nail Health and Safety for Ocean Vibe Nails
Maintaining nail health while enjoying Ocean Vibe Nails requires balancing aesthetic desires with protective practices that preserve natural nail integrity. Over-buffing during preparation removes excessive layers of the nail plate, creating thin, weak nails prone to breakage and sensitivity. Professional nail technicians recommend light buffing that removes only the shine without creating heat or visible thinning of the nail surface.
Proper curing time prevents under-polymerized gel that remains partially liquid beneath the surface, potentially causing allergic reactions or contact dermatitis with repeated exposure. Always use lamps with appropriate wattage for your specific gel polish brand and replace bulbs according to manufacturer recommendations to maintain effective curing power. If you experience burning sensations during curing, remove your hand immediately and resume curing in short intervals, as this indicates excessive heat generation.
Sanitization remains crucial for preventing bacterial and fungal infections during Ocean Vibe Nails application. Ensure all tools contact only properly cleaned surfaces, never share nail implements between individuals without sterilization, and discontinue service if you notice any cuts, infections, or inflammation around the nail area.
Frequently Asked Questions
How long do Ocean Vibe Nails last?
Ocean Vibe Nails typically last two to three weeks when applied correctly using quality gel products and proper technique. Longevity depends on factors including natural nail growth rate, daily hand activities, and consistent aftercare with cuticle oil. Clients who work with their hands extensively or expose nails to water frequently may experience shorter wear times of 10-14 days. Proper nail preparation and thin gel layers significantly extend durability compared to thick applications that crack or lift prematurely.
Can I create Ocean Vibe Nails with regular polish?
You can create ocean-inspired designs with regular nail polish, but the results lack the dimensional depth and longevity of gel formulas. Traditional polish dries through evaporation rather than curing, resulting in shorter wear time of three to five days compared to gel’s two to three weeks. The blending techniques that create realistic water effects work better with gel’s longer working time before curing, while regular polish dries quickly and makes seamless gradients more challenging to achieve for beginners.
Why do my Ocean Vibe Nails peel after a few days?
Gel nails peel prematurely due to inadequate nail preparation, oil contamination, moisture exposure, or application too close to cuticles. Skipping the buffing step leaves the nail surface too smooth for proper gel adhesion, while residual oils from lotions or natural sebum create barriers between gel and nail. Applying polish directly against the cuticle allows natural oils to seep underneath, causing lifting that progresses to peeling. Ensure thorough cleansing, light buffing, and leaving a tiny margin around cuticles to prevent this common issue.
How do Ocean Vibe Nails differ from acrylic nails?
Ocean Vibe Nails use gel polish cured under UV/LED light, while acrylic nails involve liquid monomer and powder polymer that air-dry into hard extensions. Gel polish maintains flexibility similar to natural nails and appears more natural with its glossy finish, whereas acrylics create rigid, thick enhancements suitable for length additions. Gel applications preserve more natural nail integrity with less aggressive preparation, while acrylics require more substantial buffing and can cause greater damage with improper removal.
How can I make my Ocean Vibe Nails last longer?
Extend Ocean Vibe Nails longevity by applying cuticle oil twice daily, wearing gloves during wet work, and avoiding using nails as tools. Proper nail preparation including dehydration and light buffing creates the foundation for extended wear, while thin gel layers cure more completely than thick applications. Schedule fills or removal before significant lifting occurs to prevent moisture damage, and maintain overall nail health through adequate hydration and nutrition that supports strong natural nail growth underneath your gel manicure.
Conclusion
Ocean Vibe Nails offer a beautiful way to express your love for coastal aesthetics while enjoying the durability and shine of professional gel manicures. By following proper application techniques, using quality products, and maintaining consistent nail care, you can achieve salon-worthy results that last for weeks. Whether you prefer subtle ocean-inspired gradients or detailed wave art with intricate details, this versatile style adapts to any skill level and occasion. Explore the creative possibilities of ocean-themed nail art and bring the calming beauty of the sea to your fingertips with your next gel manicure at Gel Nails by Lina.