Chocolate Brown Almond Nails with Nude Swirl Accent

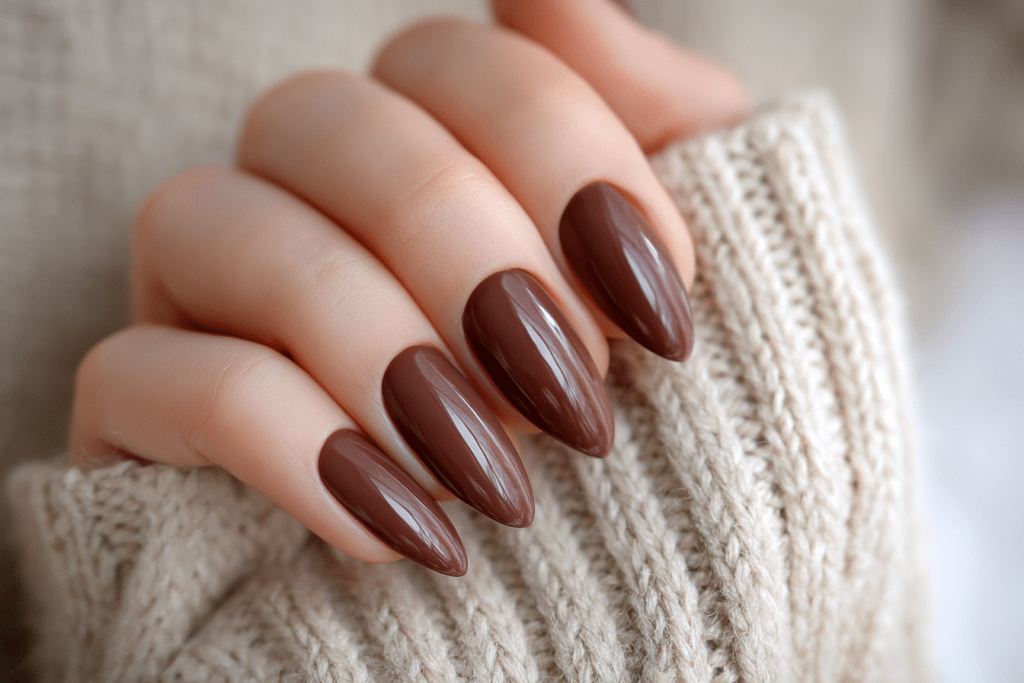
Chocolate brown almond nails with nude swirl accent represent a sophisticated nail design that combines rich earthy tones with elegant geometric patterns.
This timeless manicure style features tapered almond-shaped nails in deep chocolate brown gel polish, complemented by at least one accent nail showcasing delicate nude swirl patterns. The combination creates a balanced look that transitions seamlessly from professional settings to evening events.
| Topic | Details |
|---|---|
| Category | Nail Art / Gel Nails |
| Skill Level | Intermediate |
| Time Needed | 60-90 minutes |
| Tools Needed | UV/LED lamp, gel polish, swirl brush, dotting tool |
| Best For | Individuals seeking elegant, versatile nail art suitable for any season |
Table of Contents
Why This Nail Technique Works
The chocolate brown almond nails with nude swirl accent design works exceptionally well because it combines flattering nail shape with complementary color theory. Almond-shaped nails naturally elongate the fingers while providing enough surface area for artistic expression without being overly dramatic. The tapered shape also offers superior strength compared to stiletto nails, making this style practical for daily activities while maintaining an elegant appearance.
The color combination of chocolate brown and nude creates visual harmony through the use of analogous warm tones. Chocolate brown brings depth and sophistication, while nude shades provide contrast without overwhelming the overall design. The swirl accent adds artistic interest and breaks up solid color, creating a focal point that draws the eye. This technique leverages negative space effectively, allowing the nude base to interact with brown swirls in a way that feels organic and intentional.
From a technical standpoint, gel polish formulas adhere perfectly to properly prepared almond nails because the shape distributes product evenly across the nail surface. The swirl technique uses thin layers of contrasting polish manipulated with specialized tools, creating dimension without adding excessive thickness. This maintains the structural integrity of the gel manicure while achieving complex visual effects that last throughout the entire wear period.
Tools and Products Needed
| Product | Purpose | Alternatives |
|---|---|---|
| UV/LED Lamp | Cures gel polish layers | 48-watt LED lamp for faster curing |
| Gel Base Coat | Creates adhesion layer | Builder gel for extra strength |
| Chocolate Brown Gel Polish | Main color application | Dark espresso or cocoa shades |
| Nude Gel Polish | Base for accent nails | Beige, cream, or soft pink tones |
| Gel Top Coat | Seals and protects design | No-wipe top coat for glossy finish |
| Nail File (180 grit) | Shapes almond nail structure | Glass file for gentle shaping |
| Nail Buffer | Smooths nail surface | Fine grit buffer block |
| Cuticle Oil | Hydrates surrounding skin | Vitamin E or jojoba oil |
| Swirl Brush or Dotting Tool | Creates swirl patterns | Thin detail brush or toothpick |
| Alcohol Wipes | Cleanses nail surface | Isopropyl alcohol with lint-free pads |
| Cuticle Pusher | Prepares nail bed | Wooden or metal pusher |
For premium gel polish options and professional nail tools, visit Gel Nails by Lina for curated product recommendations that deliver salon-quality results.
Step-by-Step Application Guide
Nail Preparation
- Sanitize hands thoroughly using antibacterial wash and dry completely before beginning any nail work.
- Push back cuticles gently using a cuticle pusher, working from the center outward to avoid tearing delicate skin.
- File nails into almond shape by creating a tapered point, filing from sides toward the center at an angle.
- Buff the nail surface lightly using a fine-grit buffer to remove shine and create optimal adhesion texture.
- Clean nails with alcohol wipes to remove all dust, oils, and residue that could interfere with gel adhesion.
- Apply cuticle oil to surrounding skin, keeping product away from the nail plate itself.
Base Coat Application
- Apply a thin layer of gel base coat to all nails, starting from the cuticle and pulling toward the free edge.
- Cap the free edge by running the brush along the nail tip to seal and prevent lifting.
- Cure the base coat under UV/LED lamp according to manufacturer specifications, typically 30-60 seconds.
- Check for any missed spots or uneven coverage before proceeding to color application.
Gel Polish Layers
- Apply chocolate brown gel polish to all nails except the accent nails, using thin even coats.
- Cure the first brown layer for 30-60 seconds under the lamp.
- Apply a second coat of chocolate brown gel polish for full opacity and rich color depth.
- Cure the second brown layer completely before moving to accent nails.
- Apply nude gel polish to designated accent nails in one or two thin coats.
- Cure the nude base layer, ensuring complete polymerization before creating swirl designs.
- Place small dots of chocolate brown gel polish on the nude accent nail surface without curing.
- Add smaller dots of nude polish between the brown dots to create swirl material.
- Use a swirl brush or dotting tool to drag through the polish dots in circular or figure-eight motions.
- Create organic swirl patterns by varying pressure and direction while the gel remains uncured.
- Cure the swirl design immediately once satisfied with the pattern to lock in the artistic effect.
Curing Process
- Verify that all nails receive adequate exposure to UV/LED light during each curing cycle.
- Position hands flat in the lamp with fingers spread to ensure even light distribution.
- Cure thumb separately if your lamp design requires repositioning for complete coverage.
- Allow gel polish to cool for 10-15 seconds after curing before touching or applying additional layers.
Finishing and Top Coat
- Apply gel top coat to all nails in a generous but controlled layer, covering the entire surface.
- Cap the free edge again with top coat to seal the manicure and extend longevity.
- Cure the top coat layer for the full recommended time, usually 60 seconds for complete hardness.
- Wipe away the sticky residue layer using alcohol wipes if using a standard top coat formula.
- Apply cuticle oil generously to all fingers, massaging into cuticles and surrounding skin.
- Clean any polish on skin using a small brush dipped in acetone for professional-looking edges.
For more detailed tutorials and design inspiration, explore the extensive nail art gallery at Gel Nails by Lina featuring seasonal collections and trending styles.
Pro Nail Technician Tips
- Work with extremely thin gel polish layers when creating swirl designs to prevent the pattern from becoming muddy or blending together unintentionally during manipulation.
- Allow chocolate brown gel polish to cure fully before applying top coat, as darker pigments sometimes require extended curing time to achieve complete polymerization and prevent smudging.
- Create swirl patterns on one accent nail at a time rather than attempting multiple nails simultaneously, ensuring each design receives focused attention before curing.
- Maintain consistent nail length across all fingers when filing almond shapes, as uneven lengths disrupt the visual harmony of the overall manicure design.
- Store chocolate brown gel polish upside down for 24 hours before use to ensure even pigment distribution and prevent streaky application that requires excessive layering.
- Dehydrate the nail plate thoroughly after washing hands by allowing nails to air dry for five minutes before applying base coat for maximum adhesion and longevity.
Common Gel Nail Mistakes
| Mistake | Why It Happens | How to Fix |
|---|---|---|
| Thick Gel Layers | Applying too much product in single coat to achieve opacity faster | Use multiple thin layers instead, curing between each application for proper polymerization |
| Improper Curing | Insufficient lamp wattage or expired UV bulbs failing to cure gel completely | Replace lamp bulbs regularly and cure for full recommended time per product instructions |
| Skipping Nail Prep | Rushing through cleaning and buffing steps to save time during application | Always sanitize, buff, and dehydrate nails thoroughly before applying any gel product |
| Flooding the Cuticle | Applying gel polish too close to cuticle area, causing lifting and premature failure | Leave 1-2mm gap between gel polish and cuticle, using careful application technique |
| Swirls Too Blended | Over-manipulating the swirl design or using too much polish creates muddy appearance | Use minimal polish amounts and make deliberate, confident strokes without excessive blending |
Chocolate Brown Nail Design Variations
| Style | Description | Best Occasion |
|---|---|---|
| French Chocolate Tips | Nude base with chocolate brown French tips instead of traditional white | Professional office environments and business meetings |
| Chrome Chocolate Accent | Solid chocolate brown nails with one chrome-powder accent nail | Evening events and holiday parties |
| Ombre Brown to Nude | Gradual color transition from chocolate brown at cuticle to nude at tip | Weddings and formal celebrations |
| Minimalist Line Art | Chocolate brown base with delicate nude geometric line designs | Everyday wear and casual outings |
| Seasonal Autumn Swirls | Brown and nude swirls with gold foil accents for fall aesthetic | Autumn events and seasonal transitions |
| Marble Effect | Brown and nude colors swirled to create natural marble stone appearance | Versatile for any occasion |
Nail Care and Maintenance
Maintaining chocolate brown almond nails with nude swirl accent requires consistent care to preserve both the artistic design and nail health. Apply cuticle oil twice daily, focusing on the cuticle area and underneath the free edge where nails tend to dry out most rapidly. This hydration prevents lifting at the cuticle line and keeps the gel manicure looking fresh throughout the entire wear period. Quality cuticle oil also maintains skin elasticity around the nails, reducing hangnails and preventing painful tears.
Protect your manicure by wearing gloves during household cleaning tasks or when working with harsh chemicals that can break down gel polish bonds. Avoid using nails as tools to open packages or scrape surfaces, as this creates stress points that lead to cracking or lifting. The almond shape naturally provides strength, but excessive pressure on the pointed tip can still cause breakage.
Monitor your nails weekly for any signs of lifting, particularly around the cuticle area or free edge. Address small lifted sections immediately by gently filing away the lifted gel and applying a thin layer of top coat to seal the area temporarily until you can perform proper maintenance. Keep nails at a manageable length to prevent accidental catches that could tear the entire nail enhancement.
How to Remove Gel Nails Safely
- File the top coat layer gently using a coarse nail file to break the seal and allow acetone penetration.
- Saturate cotton pads with pure acetone and place one on each nail, covering the entire nail surface.
- Wrap each finger in aluminum foil, securing tightly to create heat that accelerates gel breakdown.
- Allow nails to soak for 10-15 minutes without disturbing the wraps to ensure complete gel softening.
- Remove one wrap at a time and gently push softened gel off the nail using a wooden cuticle pusher.
- Avoid scraping or forcing gel off if it resists, as this damages the natural nail plate underneath.
- Re-wrap any nails where gel remains stubborn and soak for an additional five minutes.
- Buff nails lightly after removal to smooth any remaining residue without aggressive filing.
- Wash hands thoroughly to remove acetone residue that can dry out skin and nails.
- Apply cuticle oil and hand cream generously to rehydrate nails and surrounding skin after acetone exposure.
Professional nail technicians recommend allowing nails to rest for at least three to five days between gel manicures to restore natural moisture balance and prevent long-term damage from continuous gel application.
Nail Health and Safety
Maintaining nail health while enjoying chocolate brown almond nails with nude swirl accent requires awareness of proper application techniques and safety protocols. Over-filing the natural nail plate during preparation removes protective layers that guard against infection and moisture loss. File only the shine from the nail surface without creating heat or thinning the nail excessively. Proper nail preparation should never cause pain or leave nails feeling tender.
Monitor for signs of nail infection, including redness, swelling, pain around the cuticle area, or unusual nail discoloration beneath the gel polish. These symptoms indicate bacterial or fungal growth that requires immediate attention. Remove gel polish immediately if infection signs appear and consult a healthcare provider for appropriate treatment before applying new enhancements.
Limit UV lamp exposure by applying broad-spectrum sunscreen to hands 20 minutes before gel manicure appointments. While UV lamps emit relatively low radiation levels, consistent exposure over time may increase skin aging and other concerns. Consider LED lamps as alternatives, as they cure gel polish faster with reduced UV exposure duration.
Frequently Asked Questions
How long do gel nails last with proper application?
Gel nails typically last two to three weeks with proper application and maintenance before requiring a fill or removal. The longevity depends on nail growth rate, daily activities, and how well you protect your manicure from harsh chemicals and excessive water exposure. Chocolate brown almond nails with nude swirl accent designs maintain their appearance throughout this period when applied using correct techniques and quality products.
How to remove gel nails safely at home without damage?
Remove gel nails safely by soaking them in pure acetone for 10-15 minutes after filing off the top coat layer. Wrap each nail in acetone-soaked cotton secured with aluminum foil to create heat that accelerates gel breakdown. Never peel or force gel polish off, as this removes layers of your natural nail and causes significant damage that takes months to repair.
What is the difference between gel nails vs acrylic nails?
Gel nails use gel polish cured under UV or LED light, creating a flexible, glossy finish that looks more natural than acrylic. Acrylic nails use liquid monomer and powder polymer that air-dry into a harder, more durable enhancement suitable for extreme length. Gel nails generally cause less damage to natural nails and emit fewer strong odors during application compared to traditional acrylic systems.
Why do gel nails peel after only a few days?
Gel nails peel prematurely when nail preparation is inadequate, such as skipping dehydration steps or failing to remove all oils from the nail surface. Other causes include applying gel polish too close to the cuticle, using thick gel layers that do not cure completely, or exposing nails to excessive water immediately after application. Proper preparation and application technique prevents early peeling and extends manicure longevity.
How can I make my gel nails last longer?
Make gel nails last longer by applying cuticle oil daily, wearing gloves during cleaning tasks, and avoiding prolonged water exposure that weakens gel bonds. Keep nails at a moderate length to prevent accidental breakage and avoid using nails as tools for opening or scraping. Schedule regular maintenance appointments to address lifting before it spreads and compromises the entire manicure.
Conclusion
Chocolate brown almond nails with nude swirl accent offer a sophisticated and versatile manicure option that suits any season or occasion. This elegant design combines practical almond nail shaping with artistic swirl techniques that showcase your personal style. By following proper preparation, application, and maintenance procedures, you can achieve salon-quality results that last for weeks. Embrace this timeless nail art style and enjoy the confidence that comes with beautifully manicured nails that complement your individual aesthetic perfectly.
Discover more stunning nail design tutorials and professional tips at Gel Nails by Lina, where beauty meets expertise in every manicure.