Last December I counted the people on my “I should really get them something” list. Teachers, neighbors, my hairdresser, the women from my Thursday sewing group, three nieces, and a coworker I’d drawn for Secret Santa. Fourteen names. Fourteen small gifts that had to feel thoughtful without draining my bank account or my sanity.

The answer turned out to be a tiny zippered pouch, just big enough for a lip gloss, a balm, and maybe a couple of hair ties. I made twelve of them in one Saturday afternoon from fabric I already owned. And here’s the part that surprised me: those little pouches got more “Wait, you made this?” reactions than anything I’d bought in years.
If you’ve been looking for an easy Christmas gift sewing project that looks far more polished than the effort it takes, this is the one. Let’s make some.
Table of Contents
Key Takeaways
- A finished lip gloss pouch measures about 4.5″ x 3.5″, and it uses fabric scraps small enough that one fat quarter makes several.
- Your first pouch will take around 30 minutes. Once you get the rhythm, batch sewing brings it closer to 15 minutes each.
- The single most important step is opening the zipper halfway before you sew the sides. Forget it and you can’t turn the pouch right side out.
- A key ring tab or swivel clip turns it from “small bag” into something people actually clip to their keys, backpack, or purse strap.
- Fill it with a lip gloss or balm and it’s a complete, ready-to-give gift.
Why Lip Gloss Pouches Make the Perfect Handmade Christmas Gift
Think about where your lip gloss lives right now. Probably at the bottom of a bag, rolling around with receipts, loose change and a pen that leaked in 2023. Everyone has that problem, which is exactly why this gift works. It’s small, it’s useful, and it solves something people didn’t realize was bugging them.
For the person sewing, there are a few big wins:
- It’s scrap-friendly. Those fabric pieces too pretty to throw away but too small for anything? This is their moment.
- It fits everyone. Teens, teachers, grandmas, coworkers. A festive print reads “Christmas,” a neutral one works all year.
- It ships and stuffs easily. It fits in a card envelope, a stocking, or tied to the outside of a bigger present.
Honestly, the zipper is the only thing that scares people off. If that’s you, stick with me. By the end of this post, you’ll have installed it the easy way, with no hand basting and no tears.
What You’ll Need
Everything below is for one pouch. Multiply by however many people are on your list.
- Outer fabric: 2 pieces, 5″ wide x 4″ tall (quilting cotton is perfect)
- Lining fabric: 2 pieces, 5″ wide x 4″ tall
- Lightweight fusible interfacing: 2 pieces, 5″ x 4″ (optional, but it gives the pouch a crisper shape)
- Zipper: one nylon coil zipper, 7″ or longer. Longer is easier, and you’ll trim the excess.
- Tab: a strip of fabric 1.5″ x 3″, or a 3″ piece of ribbon
- Hardware: a small split key ring, swivel clasp, or lanyard hook
- Matching thread, a zipper foot, pins or clips, scissors, and an iron
A quick tip from experience: buy zippers in bulk. A pack of 20 or more nylon coil zippers costs a fraction of what you’d pay for singles at the craft store, and you’ll be glad to have spares when you inevitably decide to make “just a few more.”
Cutting and Prep: Five Minutes That Save You Thirty
If you’re making more than one, cut everything at once. Stack your outer fabrics, your linings and your interfacing into neat little kits. It feels slow, but it’s the difference between an assembly line and a scavenger hunt.
Fuse the interfacing to the wrong side of each outer piece now, following the manufacturer’s heat instructions. If your print has a direction (snowmen, trees, little reindeer), double-check that both outer pieces are right side up with the 5″ edge along the top. I’ve sewn a pouch with an upside-down Santa. Learn from me.
Step-by-Step: How to Sew a Lip Gloss Pouch
Step 1: Make the Key Ring Tab
Fold the 1.5″ x 3″ strip in half lengthwise and press. Open it, fold both long edges in to meet the center crease, then fold in half again so the raw edges are hidden. You’ll have a skinny strip about 3/8″ wide. Topstitch along both long edges.

Slide your key ring or clasp onto the strip, fold it in half so the raw ends meet, and stitch across close to the ends to hold it together. Set it aside. (Using ribbon? Skip straight to the folding and stitching.)
Step 2: Attach the Zipper to the First Side
This is the “zipper sandwich,” and it’s simpler than it sounds.
- Lay one outer piece right side up.
- Place the zipper on top, face down, with its edge lined up along the top 5″ edge of the fabric. Let the zipper pull hang off one end and the extra length hang off the other.
- Lay one lining piece on top, right side down, lining up the top edge again.
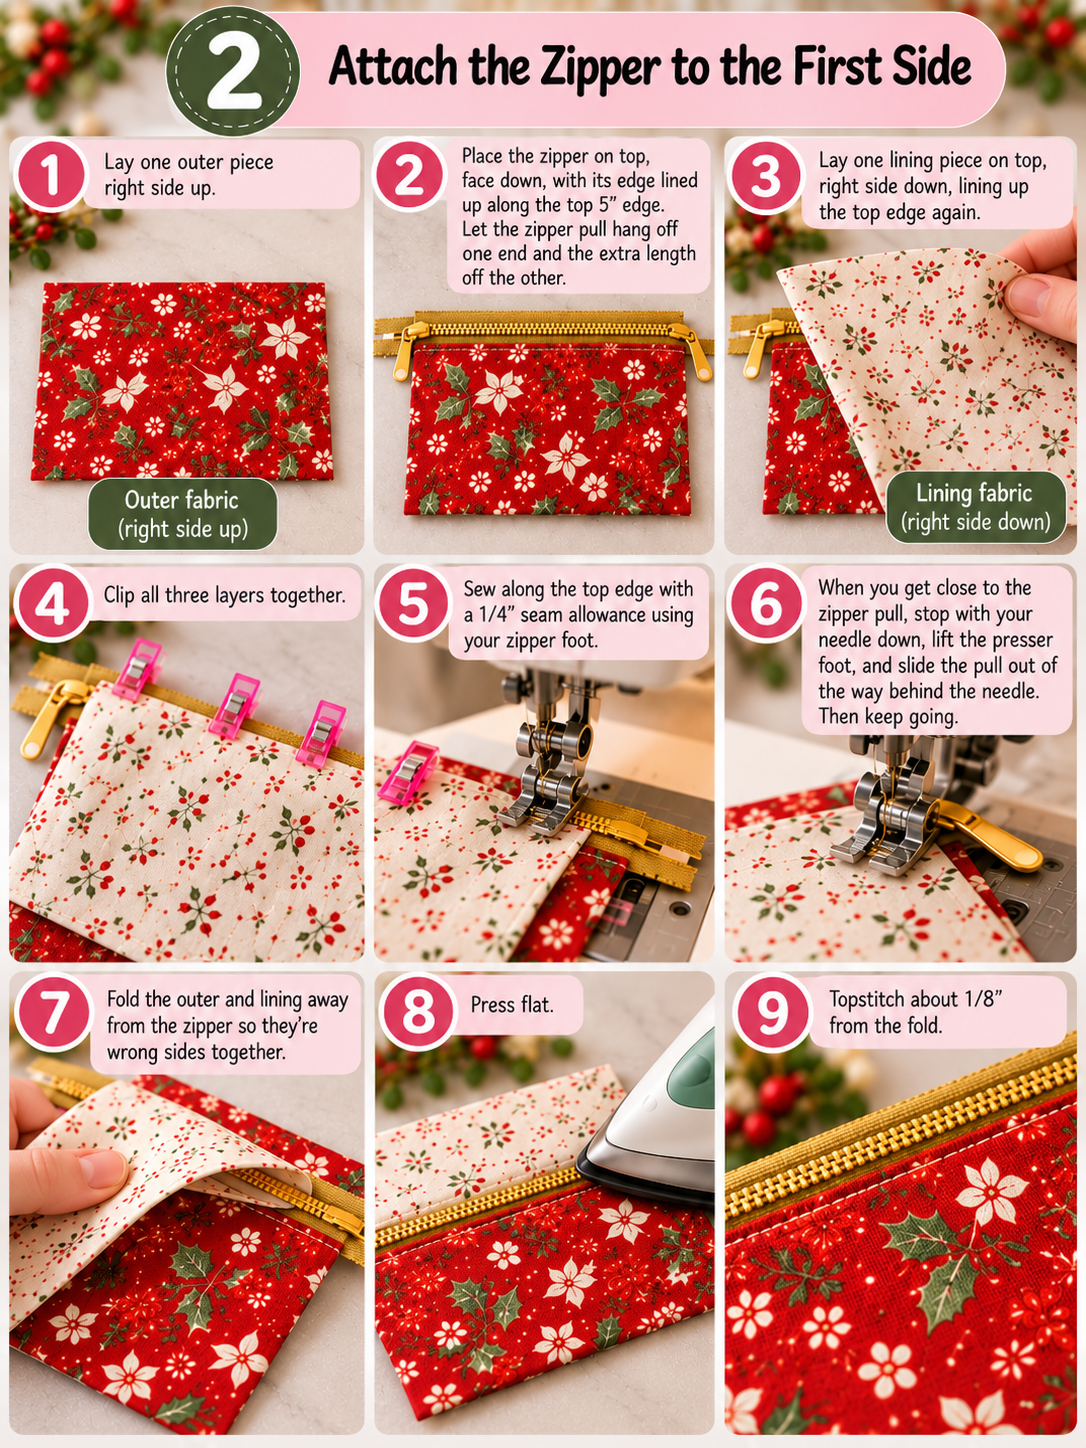
Clip all three layers together. Switch to your zipper foot and sew along the top edge with a 1/4″ seam allowance. When you get close to the zipper pull, stop with your needle down, lift the presser foot, and slide the pull out of the way behind the needle. Then keep going.
Fold the outer and lining away from the zipper so they’re wrong sides together, press flat, and topstitch about 1/8″ from the fold. That topstitching keeps the fabric from getting caught in the zipper teeth later.
Step 3: Attach the Second Side
Repeat the sandwich on the other side of the zipper with your remaining outer and lining pieces. Make sure the second outer piece lines up with the first (same orientation, edges matching). Sew, press, topstitch.
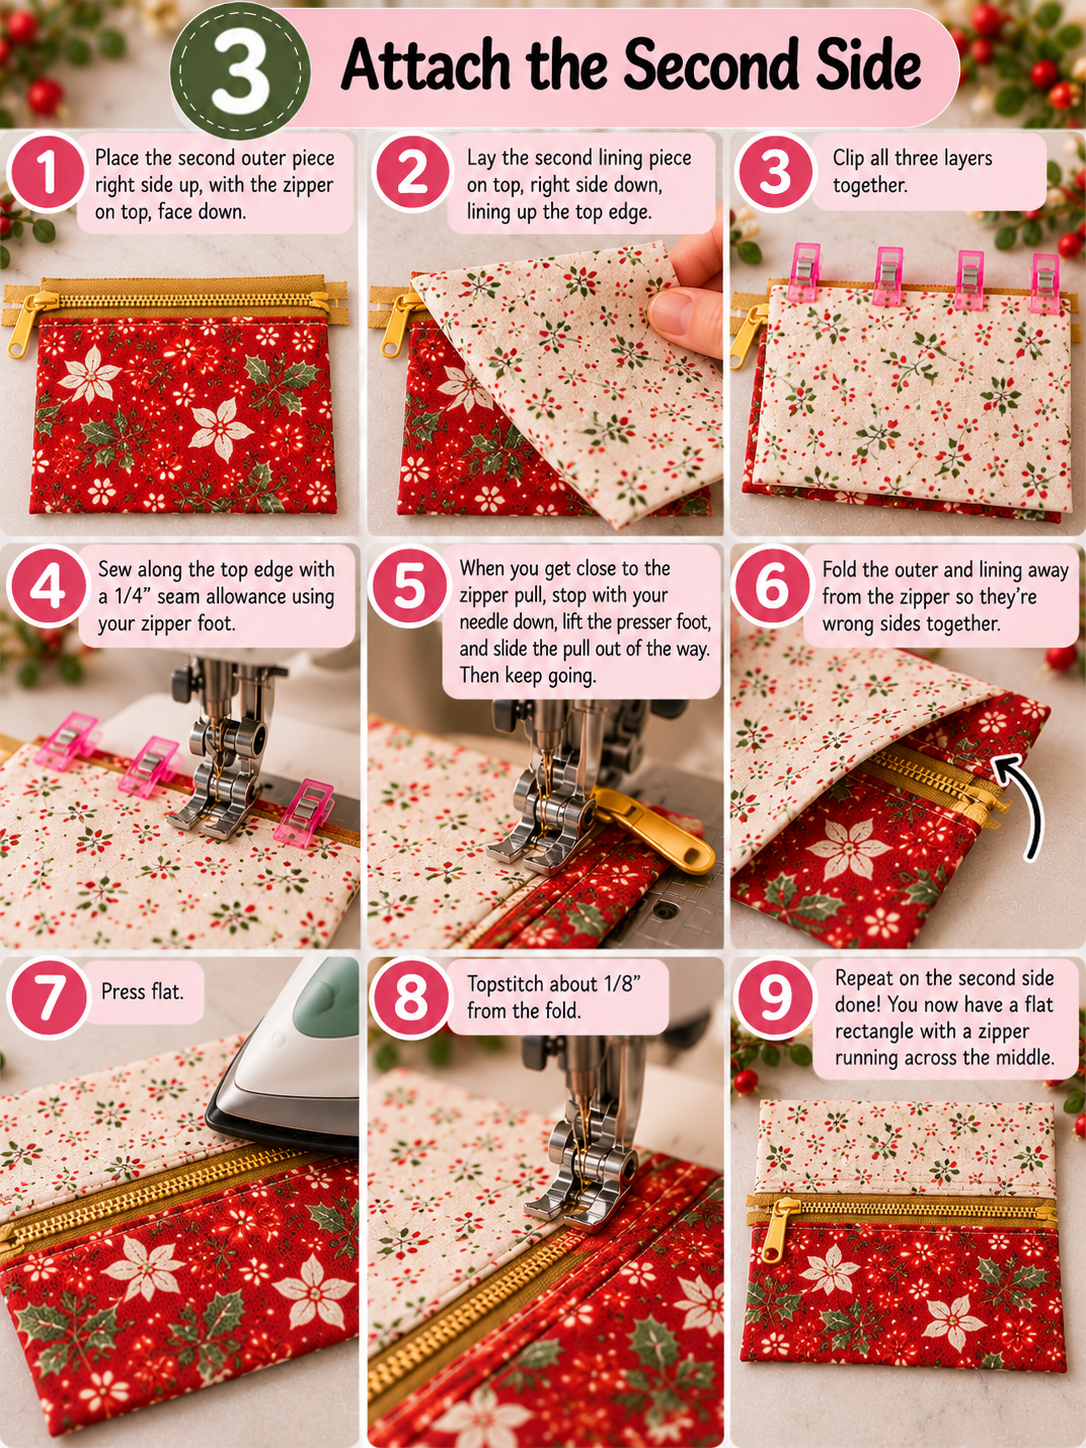
You should now have a strange-looking flat rectangle with a zipper running across the middle. Perfect. That’s exactly what it’s supposed to look like.
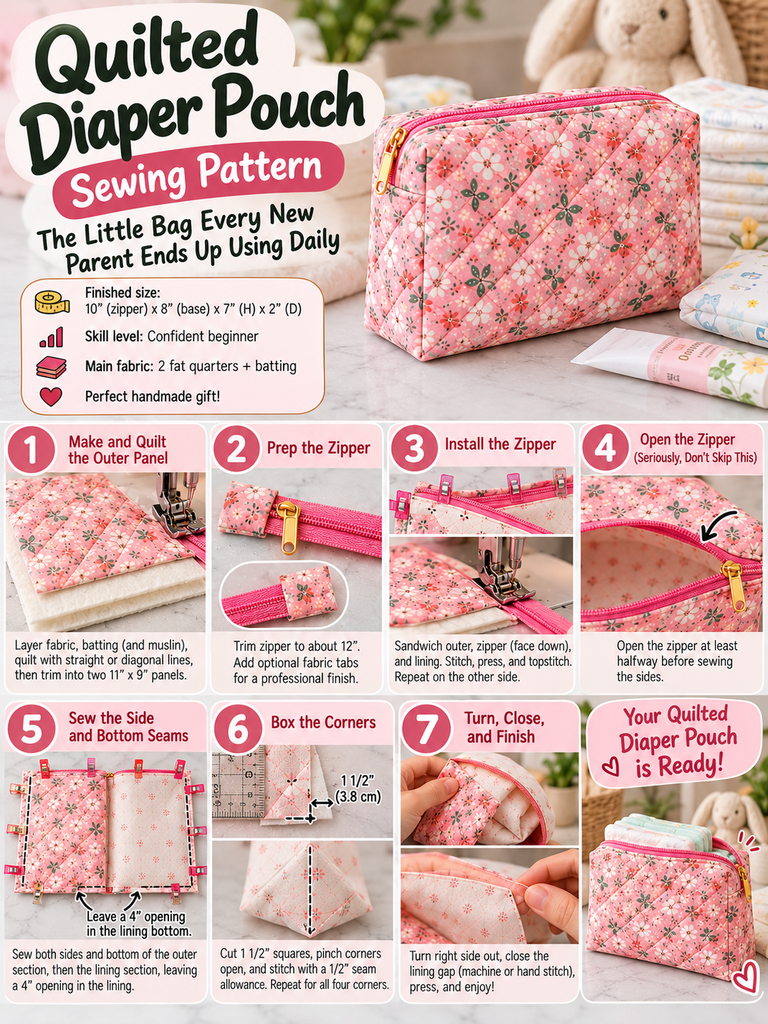
Step 4: Open the Zipper Halfway (Don’t Skip This!)
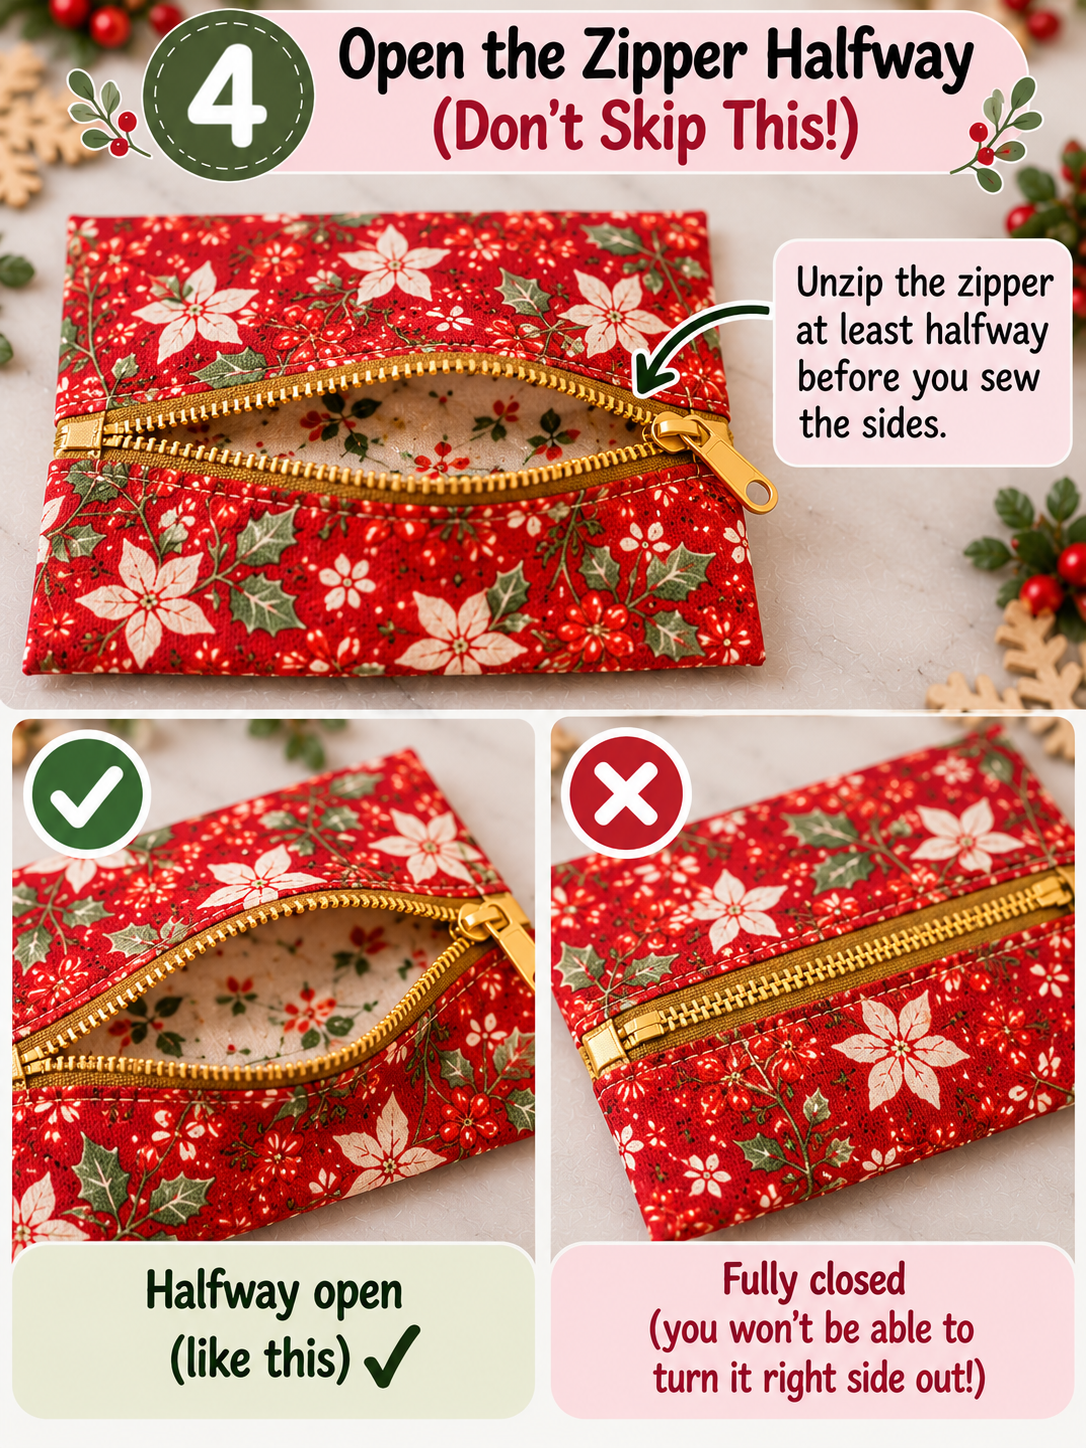
I’m giving this its own step because it’s the one everybody forgets at least once. Unzip the zipper at least halfway. If it’s closed when you sew the sides, you’ll have sealed your pouch shut with no way to turn it right side out. Ask me how I know.
Step 5: Pin, Add the Tab, and Sew Around
Open the piece so the two outer pieces are right sides together on one side, and the two lining pieces are right sides together on the other. The zipper sits in the middle, with the teeth folded toward the lining.
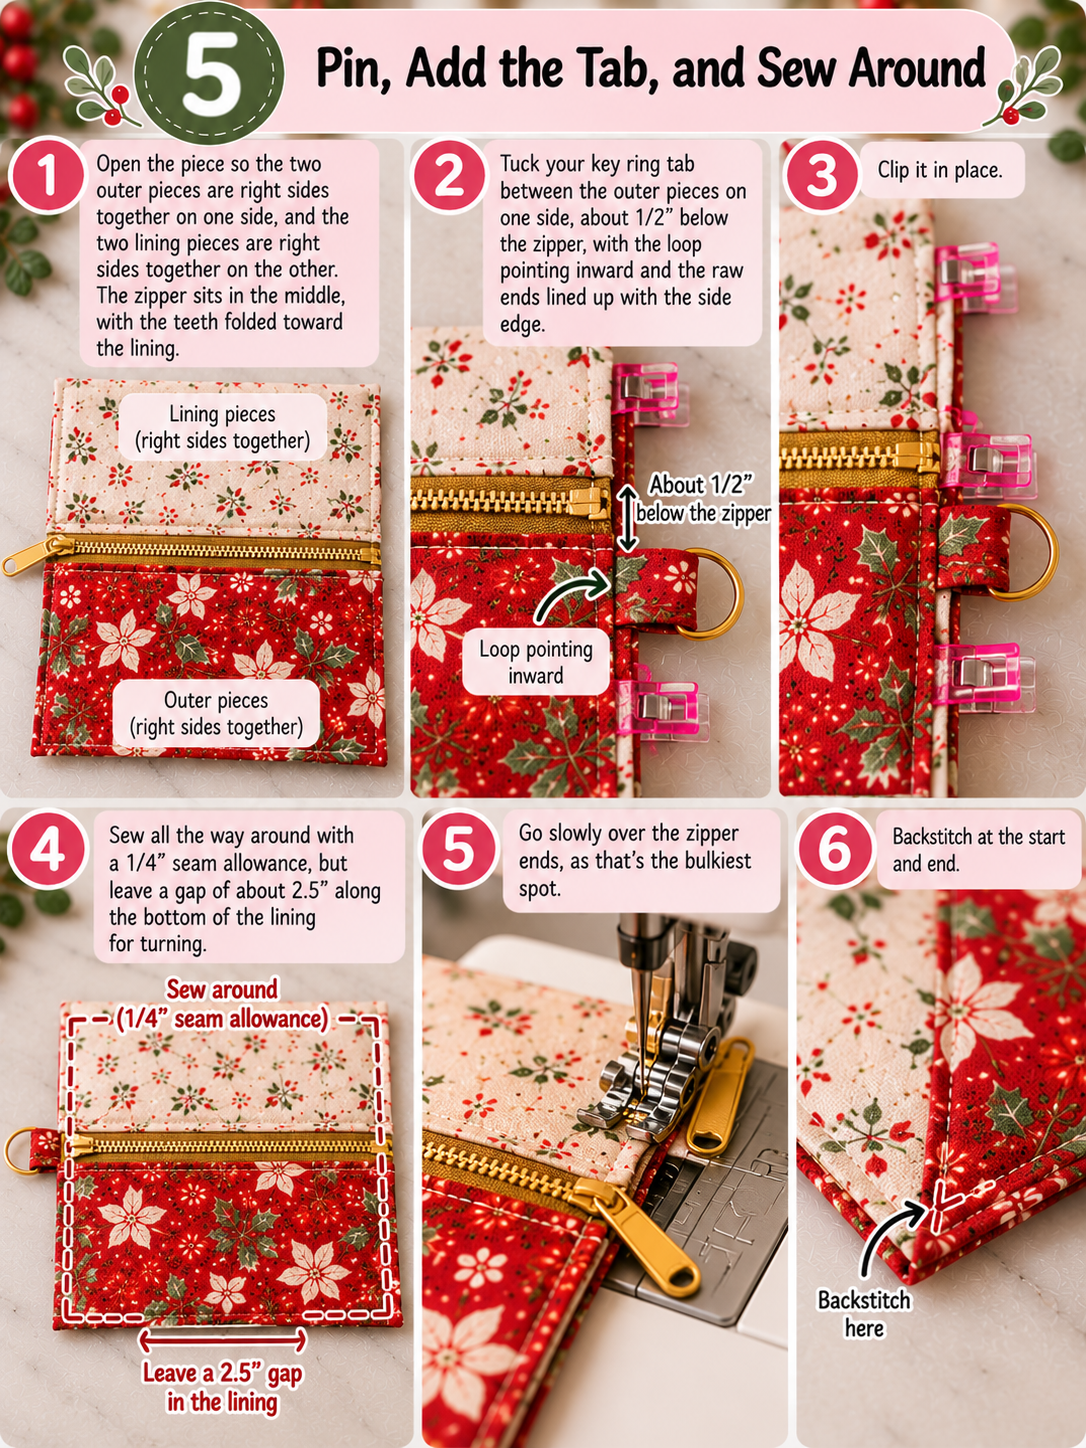
Tuck your key ring tab between the outer pieces on one side, about 1/2″ below the zipper, with the loop pointing inward and the raw ends lined up with the side edge. Clip it in place.
Now sew all the way around with a 1/4″ seam allowance, but leave a gap of about 2.5″ along the bottom of the lining for turning. Go slowly over the zipper ends, as that’s the bulkiest spot. Backstitch at the start and end.
Step 6: Trim and Turn
Trim off the extra zipper length (make sure the pull is safely inside the pouch first!). Clip the corners diagonally without cutting through your stitches. This keeps them sharp instead of lumpy.

Reach through the gap in the lining and pull everything out. Use a chopstick or point turner to gently push out the corners.
Step 7: Close the Gap and Finish
Fold in the raw edges of the lining gap and either edgestitch it shut on the machine or close it by hand with a ladder stitch for an invisible finish. Push the lining down into the pouch, give the whole thing a good press, and zip it closed.

That’s it. Go ahead, admire it for a minute. You earned that.
Batch Sewing Tips: Making a Dozen Without Losing Your Mind
Here’s the counterintuitive bit: making ten pouches doesn’t take ten times as long as making one. If you work in stages instead of finishing one at a time, you save a surprising amount of time.
- Chain sew. Do Step 2 on every pouch, one after another, without cutting the thread in between. Then press them all. Then topstitch them all.
- Make tabs in one long strip. Cut a single long strip, fold and topstitch it in one go, then cut it into 3″ lengths.
- Keep the zipper foot on. Most of this project can be sewn with it, so you’re not swapping feet every five minutes.
- Put on a Christmas movie. Not technically a sewing tip, but it is the secret ingredient.
Common Problems (and How to Fix Them)
“My zipper ends look bulky and messy.” Sew slowly across the zipper tape at the sides, and make sure the zipper teeth are folded toward the lining when you pin. If you’re using a metal zipper, switch to nylon coil. You can sew right over it, and it trims cleanly.
“My corners won’t poke out.” Clip them closer to the stitching (about 1/16″ away) before turning, and use a blunt tool to push them out from the inside.
“The fabric keeps getting caught in the zipper.” That topstitching in Steps 2 and 3 fixes it. If you skipped it, you can still add it now, as long as the pouch is open.
“I sewed it with the zipper closed.” We’ve all been there. Unpick a couple of inches of the side seam near the zipper, open it up, and resew. Five minutes and you’re back on track.
Ways to Make Each Pouch Feel Personal
Once you’ve got the basic method down, small changes make every pouch feel like it was made with one specific person in mind:
- Match the fabric to the person. Florals for your gardening friend, plaids for your dad’s partner, glitter-adjacent prints for the nine-year-old niece.
- Add an initial. A simple machine-embroidered letter or iron-on vinyl monogram on the front takes it up a notch.
- Use a contrast lining. A bright surprise when someone unzips it is one of my favorite little details.
- Fill it before you wrap it. A lip gloss, a tinted balm, a mini hand cream or a few hair ties. Now it’s a complete gift, not a bag waiting for a job.
- Attach a handwritten tag. Clip it right to the key ring. People keep those.
Who Will Love This Gift?
Pretty much anyone, but especially teachers (who never have enough places to stash lip balm), teens and tweens (who will clip it to a backpack immediately), coworkers, Secret Santa recipients, and anyone you want to thank without making a big fuss. They also make great additions to a holiday craft fair table if you’re the type who sells your work.
A Small Gift That Says a Lot
Back to that list of fourteen names. Months later, I spotted my hairdresser’s pouch clipped to her keys, a little faded and clearly well-used. Nobody remembers the gift card you gave them two Christmases ago. But a little pouch that someone made by hand, that they use every single day? That sticks.
This project is proof that handmade gifts don’t need to be big or complicated to mean something. A couple of scraps, a zipper, half an hour, and you’ve made something useful that carries a bit of you with it.
So pull out that scrap bin this weekend. Make one to practice, then make a stack.
Your Turn
I’d genuinely love to see what you make. Which fabrics are you using for your pouches this year: classic red and green, or something totally unexpected? Tell me in the comments, and if you sew a batch, share a photo and tag me. And if this tutorial helped, pass it along to a sewing friend who’s still staring at their gift list wondering where to start.