Every sewist has that drawer. You know the one. It’s stuffed with fat-quarter offcuts, the last ten inches of a fabric you loved too much to throw away, and a few zippers you bought “just in case.”
A while back, I pulled out a piece of moss-green linen from mine and thought: this wants to be a leaf. Not a rectangle. Not another boxy pouch. A leaf. That little idea turned into one of my favorite small projects, and today I’m sharing exactly how to make it.
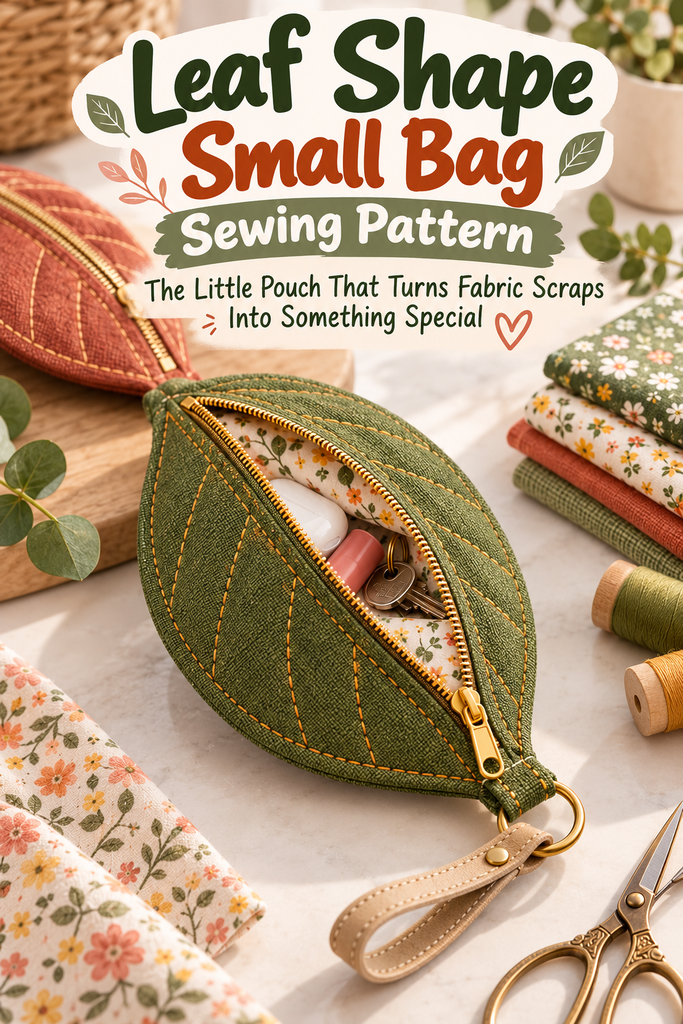
This leaf shape small bag is about the size of your hand. It holds earbuds, lip balm, a few cards, or a set of keys. And the best part? The zipper runs straight down the middle of the back panel, so it looks just like the leaf’s central vein. Clever, practical, and honestly a bit of a conversation starter.
Table of Contents
Key Takeaways
- Finished size: about 8″ long × 5″ wide (20 × 13 cm), perfect for small essentials.
- The secret trick: the zipper is a straight line through the back panel, so you never have to sew a zipper around a curve.
- Skill level: confident beginner. If you’ve sewn one zipper pouch before, you’re ready.
- Scrap-friendly: each pattern piece fits on a fat quarter, with room to spare.
- Make it yours: topstitched “veins,” a little stem loop, and fabric choice turn it from a spring leaf into an autumn one.
Why a Leaf? (And Why It Works So Well as a Bag)
Here’s the thing about novelty shapes: a lot of them look adorable in photos and then turn into a nightmare at the sewing machine. Sharp points that won’t turn out. Curves that pucker. Zippers that refuse to cooperate.
The leaf is different. Its outline is two gentle curves meeting at a point on each end. That means smooth seams, very little easing, and only one truly pointed tip to fuss over. The base of the leaf is softer, which is exactly where the stem loop goes.
And because nature already gave the leaf a strong center line, we can borrow it. That midrib becomes our zipper placement. Function and design, doing the same job. I love it when that happens.
What You’ll Need
Nothing fancy here. Most of this is probably already in your sewing room.
- Outer fabric: one piece about 10″ × 14″ (25 × 35 cm). Quilting cotton, linen, light canvas, or cork fabric all work.
- Lining fabric: the same size again. A contrasting print makes opening the pouch feel like a little surprise.
- Interfacing: medium-weight fusible interfacing or thin fusible fleece, same size as the outer fabric.
- Zipper: one 9″ (23 cm) nylon coil zipper. Coil zippers can be sewn right over, which matters later.
- Stem loop: a 4″ (10 cm) strip of fabric or ribbon, plus an optional key ring, D-ring, or wrist strap.
- Thread: all-purpose thread to match, and a contrast thread if you want visible veins.
- Tools: paper for the template, pencil, fabric scissors, pins or clips, zipper foot, and an iron.
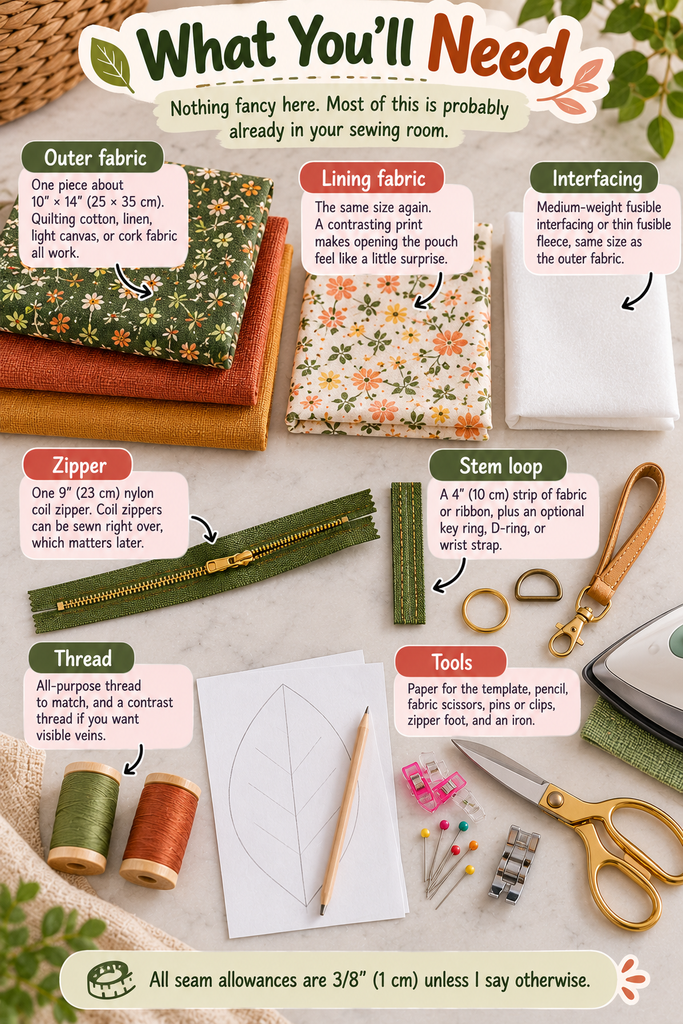
All seam allowances are 3/8″ (1 cm) unless I say otherwise.
Step 1: Draft Your Leaf Template (It Takes Five Minutes)
You don’t need a printer for this pattern. You just need a sheet of paper and a pencil.
Fold a piece of paper in half lengthwise. Along the fold, mark a line 8¾” (22 cm) long. That’s your leaf’s length, including seam allowance. From the fold, measure out 2¾” (7 cm) at a point roughly 40% of the way up from the bottom. That’s the widest part of your half-leaf.
Now draw one smooth curve from the bottom of the fold, out through that widest point, and up to the top of the fold, tapering to a point. Make the top end slimmer and sharper (the tip) and the bottom end a little rounder (the base). Cut along the curve, unfold, and there’s your leaf.
Not happy with the shape? Draw it again. Seriously, this is the moment to play. A slimmer template gives you a willow-style leaf; a rounder one feels more like a beech or birch.
Make the back panel template
Trace your full leaf onto a new piece of paper. Draw a straight line down the center from tip to base. Cut along that line to get two halves, then add 3/8″ (1 cm) of seam allowance to each straight edge. These two pieces are your back panels, and that center line is where the zipper will live.
Step 2: Cut Your Pieces
Using your templates, cut:
- Front: 1 full leaf from outer fabric, 1 from lining, 1 from interfacing
- Back: 1 left half and 1 right half from outer fabric, the same from lining, and the same from interfacing

Quick tip from experience: if your fabric has a direction (stripes, a print, or a texture like corduroy), lay the leaf so the “grain” runs from base to tip. It reads like real leaf veins and looks far more intentional.
Fuse interfacing to the wrong side of every outer piece before you go any further.
Step 3: Stitch the Leaf Veins
This step is optional, but it’s the one that makes people pick the bag up and look closer.
On the front outer piece, lightly mark a center line from base to tip with chalk or a disappearing marker. Then add four or five angled lines on each side, branching up and out toward the edge. Stop each one about ½” (1.3 cm) short of the edge so it doesn’t get caught in the seam.
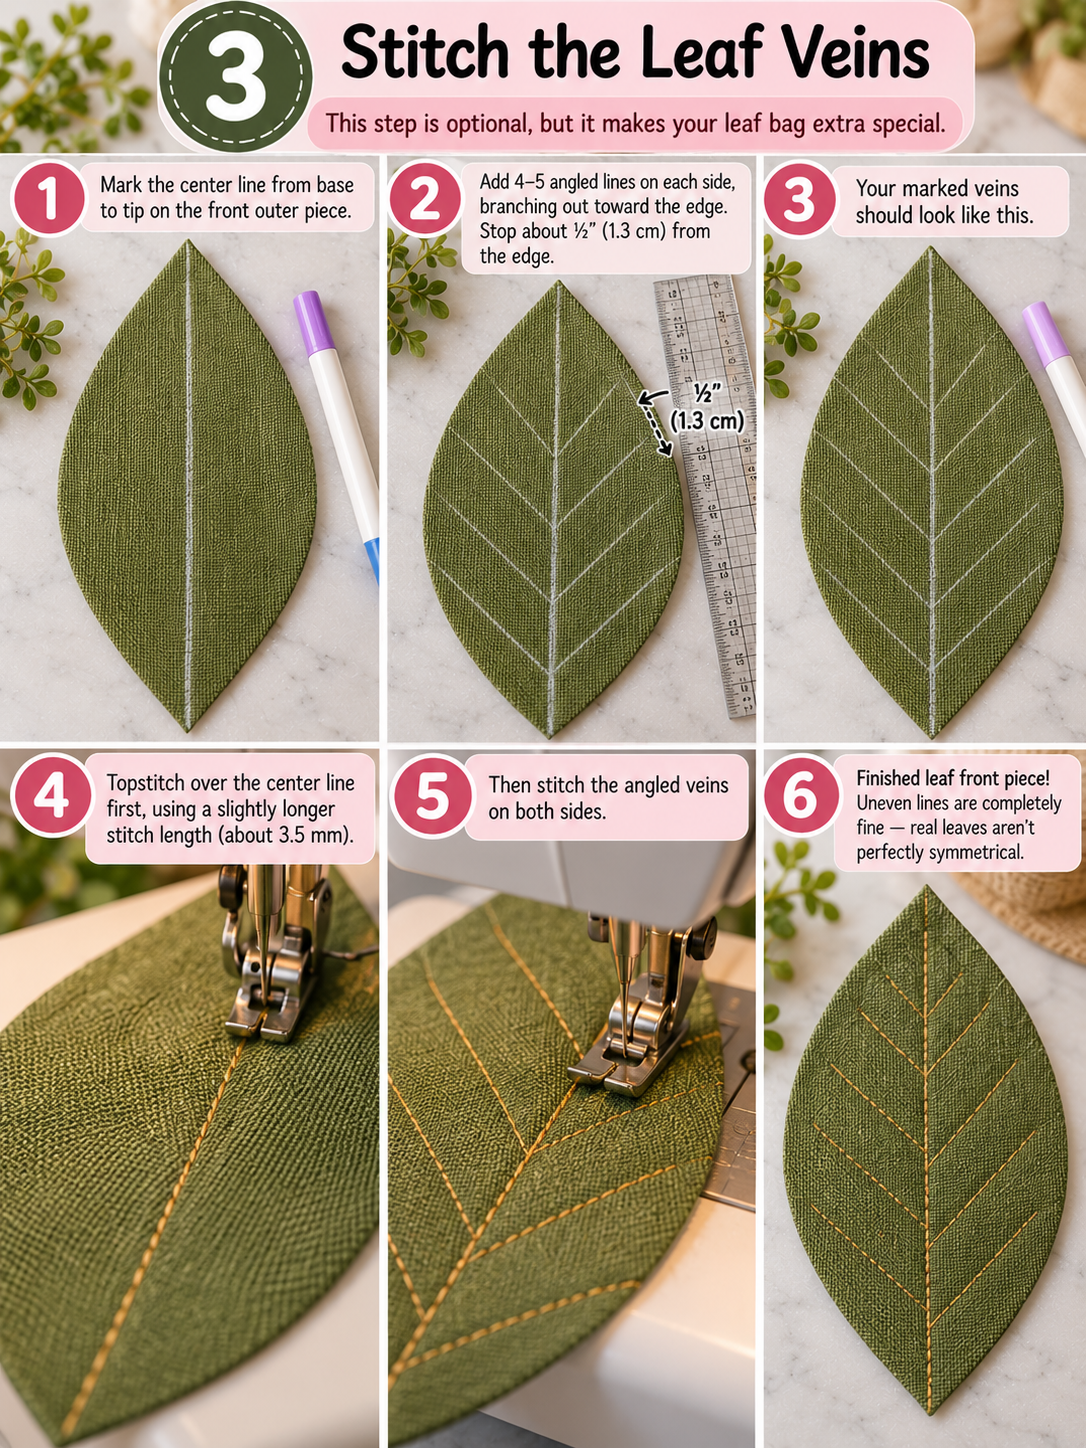
Topstitch over every line with contrast thread, using a slightly longer stitch length (around 3.5 mm). If you want bolder veins, stitch each line twice. Uneven lines are completely fine here; real leaves aren’t symmetrical either.
Step 4: Insert the Zipper (The Easy Way)
This is where the leaf shape small bag sewing pattern really earns its keep. Because the zipper sits in a straight seam, it’s just like any basic zipper pouch.
- Lay the left back outer piece right side up. Place the zipper face down along its straight edge, centered so the zipper extends past both ends.
- Put the left back lining on top, right side down, edges aligned. You now have a sandwich: outer, zipper, lining.
- Using your zipper foot, stitch along the straight edge. Fold the outer and lining away from the zipper, wrong sides together, and press.
- Repeat with the right back pieces on the other side of the zipper tape.
- Topstitch close to the zipper on both sides for a crisp finish.

Now, a very important move: open the zipper about halfway. You’ll need that gap to turn the bag later. Forget this, and you’ll be reaching for the seam ripper. (Ask me how I know.)
Finally, baste across both zipper ends right along the leaf outline and trim the excess zipper even with the fabric edge. A coil zipper cuts cleanly, so this is no problem.
Step 5: Prepare the Front and the Stem Loop
Place the front lining and front outer wrong sides together and baste around the edge within the seam allowance. This treats them as one layer, which keeps the assembly simple.
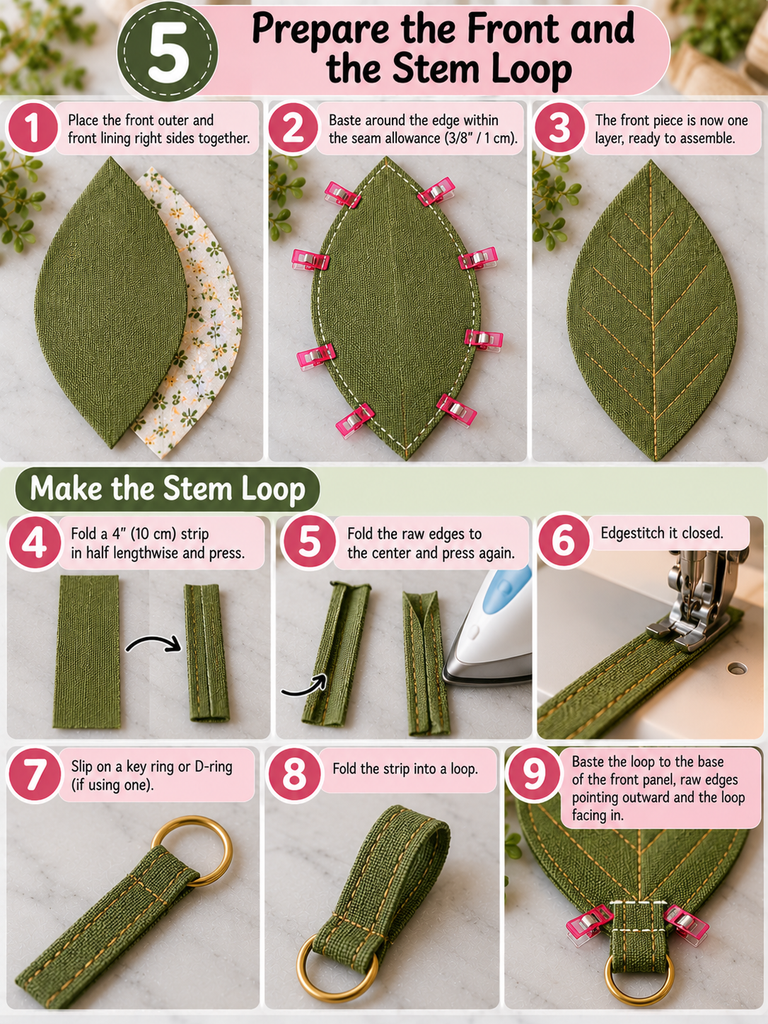
For the stem, fold your 4″ strip in half lengthwise, press, fold the raw edges to the center, and press again. Edgestitch it closed. Slip on your key ring or D-ring if you’re using one, fold the strip into a loop, and baste it to the base of the front panel, raw edges pointing outward and the loop facing in.
Step 6: Assemble the Leaf
Lay the front panel and the back panel right sides together, matching tip to tip and base to base. Pin or clip all the way around, using plenty of clips on the curves.
Sew around the entire outline with a 3/8″ (1 cm) seam. Slow down at the tip: stop with the needle down a stitch before the point, pivot, take one tiny stitch across, pivot again, and continue. That small flat stitch gives the fabric somewhere to go when you turn it, and your point comes out sharp instead of bulky.
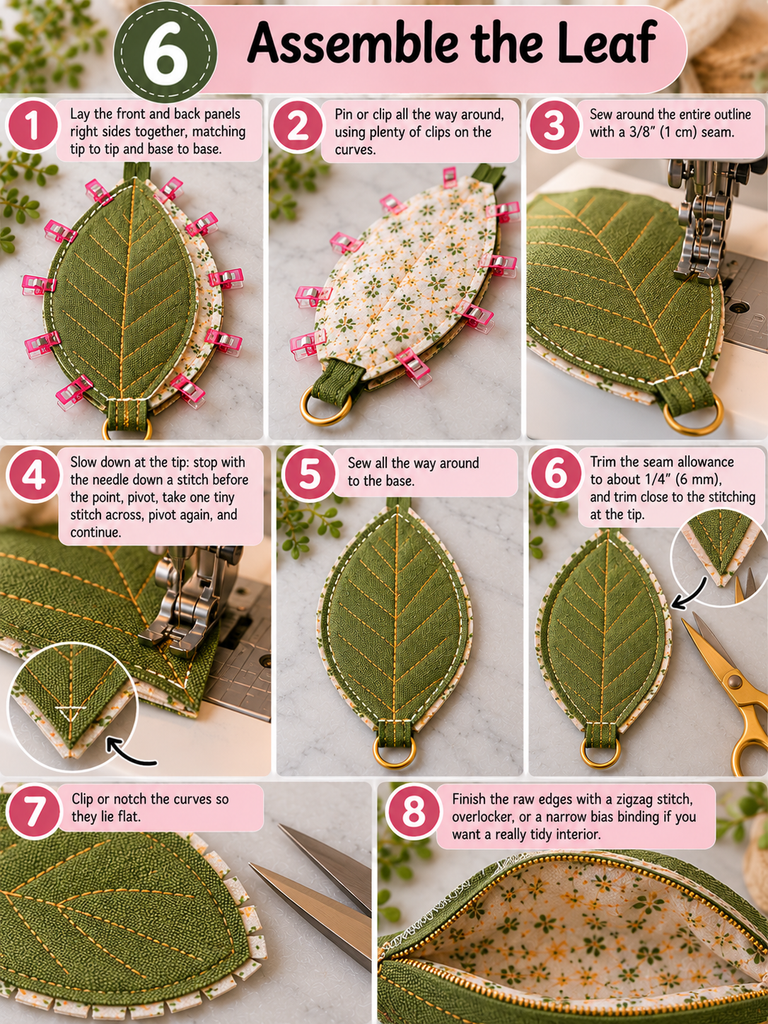
Then finish the inside:
- Trim the seam allowance to about ¼” (6 mm), and trim close to the stitching at the tip.
- Clip or notch the curves so they lie flat.
- Finish the raw edges with a zigzag stitch, overlocker, or a narrow bias binding if you want a really tidy interior.
Step 7: Turn, Shape, and Press
Turn the bag right side out through the open zipper. Use a chopstick or point turner to gently push out the tip. Don’t stab at it; work it out slowly.

Roll the seam between your fingers so it sits right on the edge, then press with steam. If you’re using cork or vinyl, skip the iron and finger-press instead.
Clip on your keys or a wrist strap, and you’re done. Most people finish this in an afternoon, and once you’ve made one, the second takes about half the time.
Common Problems (and How to Fix Them)
My tip is rounded and lumpy. Trim more seam allowance at the point and use that one-stitch pivot trick. Thick fabrics may need you to skip interfacing in the very tip area.
The curves look puckered. You probably need more clips into the seam allowance. More, smaller clips beat a few deep ones.
The zipper ends look messy. Make sure they’re basted flat before assembly, and sew slowly when your needle crosses the coil. A slightly larger needle (90/14) helps.
The bag feels floppy. Switch from regular interfacing to fusible fleece, or use a sturdier outer fabric like canvas.
Ways to Make It Your Own
Once you’ve got the basic leaf shape small bag down, the variations are endless. A few I keep coming back to:
- Seasonal sets: greens for spring, rust and mustard for autumn. Make a little “pile” of them as a gift.
- Crossbody version: add a D-ring at the base and another near the tip, and clip on a long strap.
- Size up: enlarge your template to about 12″ (30 cm) long and you have a pencil case or a cosmetic bag.
- Quilted leaf: quilt the front panel in vein-like lines instead of topstitching for a soft, padded feel.
- Craft-fair friendly: they’re small, fast, and use scraps, which makes them great for markets and handmade gift stalls.
Frequently Asked Questions
Can a total beginner sew this leaf bag?
Yes, with a little patience. The zipper goes into a straight seam, which is the easiest kind. The only slightly tricky bit is the pointed tip, and the pivot method above takes care of that.
Can I use a metal zipper instead?
You can, but you’ll need to remove the metal teeth from the parts that cross the seam line, or you risk breaking a needle. A nylon coil zipper is much easier for this shape.
Do I need a printable PDF pattern?
Not at all. The fold-and-draw method gives you a symmetrical leaf in minutes, and you can adjust the shape however you like.
What’s the best fabric for a leaf-shaped pouch?
Medium-weight cotton or linen with interfacing is the most forgiving. Cork and faux leather look amazing but are harder to turn, so try them on your second or third leaf.
Final Thoughts: Small Bag, Big Smile
Remember that drawer of scraps I mentioned at the start? It’s a lot emptier now. My little moss-green leaf ended up hanging from my bag, carrying earbuds and a lip balm, and people ask about it more often than anything else I’ve sewn.
That’s the quiet magic of a project like this. It doesn’t take much fabric, much time, or much skill. But it takes something ordinary, a zipper pouch, and gives it a story.
So grab a sheet of paper, fold it in half, and draw your first leaf tonight.
Your Turn
Have you tried sewing novelty-shaped bags before, or will this be your first? I’d love to hear which fabric you’re planning to use, and whether your leaf is going to be a spring green or an autumn red. Drop a comment below, and if you make one, share a photo. Nothing makes my day like seeing a whole forest of these little leaves out in the world.