Here’s a scene you might recognize. It’s the last week of October, the kids are bouncing off the walls, and you hand out a Halloween coloring page. Eight minutes later, half the class waves a finished sheet at you and asks, “Now what?”
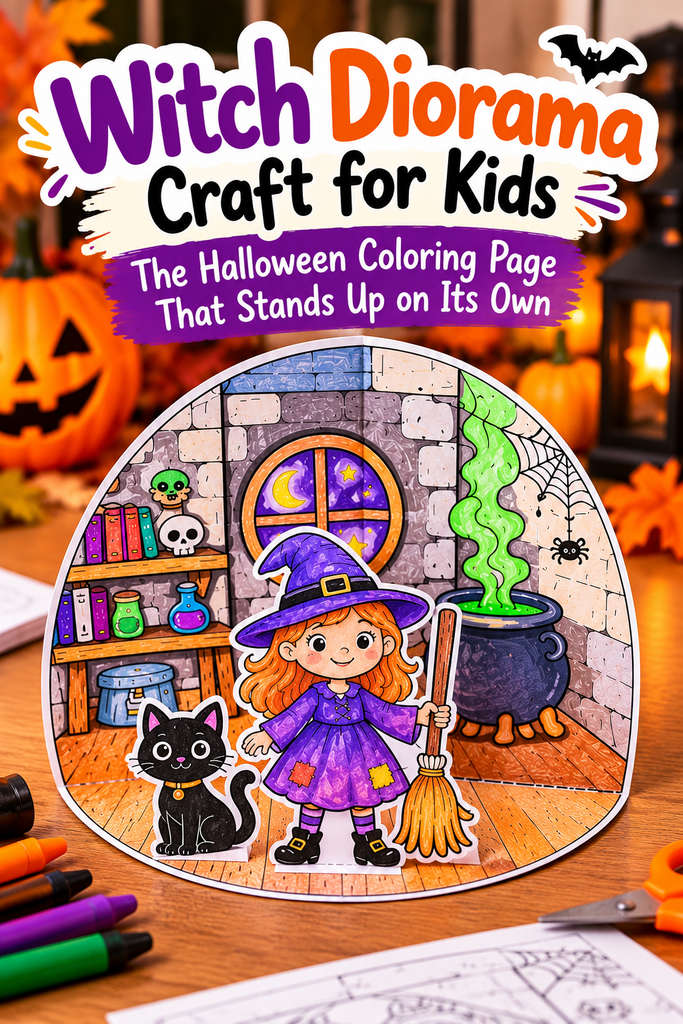
That “now what” moment is exactly why I love this witch diorama craft. Kids still get to color, which they adore, but then they cut, fold and glue the pieces into a little 3D room that stands up on the table. Same calm, focused coloring time, plus a second act that keeps their hands busy and gives them something they actually want to take home.
Whether you’re a teacher planning the days before Halloween or a parent looking for a rainy-afternoon project, let me walk you through everything: what’s on the template, what you need, how to put it together, and a handful of tricks to make it work for toddlers all the way up to older elementary kids.
Table of Contents
Key Takeaways
- It’s a coloring page with a bonus: once kids finish coloring, they assemble it into a 3D diorama.
- The supply list is tiny: the printable template, white paper or cardstock, colored pencils, scissors and glue.
- The witch is friendly, not frightening: she’s smiling, so it works for little ones who scare easily.
- It fits preschool through elementary: use it in the days leading up to Halloween or at the class party.
- It pairs perfectly with Room on the Broom: read the book, then build the witch’s world.
What’s Inside the Witch Diorama Template?
The printable has two parts: the witch herself and her room. She’s standing with her broom in hand, right in front of her cozy little space. Look to one side and you’ll spot a shelf of books and potion bottles. On the other side, there’s a bubbling cauldron and, of course, her cat.
What I really appreciate is that she has a big, warm smile on her face. If you’ve ever handed a slightly creepy Halloween picture to a four-year-old and watched their lip start to wobble, you’ll understand why that matters. This is a witch kids want to hang out with, not one they want to hide from.
And because there’s so much going on in the room (books, bottles, cauldron, cat), every child ends up with a different result. One kid makes everything purple and green. Another gives the cat orange stripes. That variety is half the fun when you line them all up on the windowsill.
Why a Diorama Beats a Plain Coloring Page
Let’s be honest: coloring pages are a classroom staple for a reason. They’re quiet, cheap and easy. But they’re also flat, and they usually end up crumpled at the bottom of a backpack.
Turning the page into a 3D scene changes how kids see their own work. Suddenly it’s not “a sheet I colored,” it’s “my witch’s house.” A few other things happen along the way too:
- Fine motor practice: cutting along a line and folding on a crease are great workouts for small hands.
- Following steps in order: fold first, then cut, then glue. Kids learn that the sequence matters.
- A taste of spatial thinking: watching a flat circle turn into a standing room is a genuine “whoa” moment for younger kids.
- Storytelling: once the witch is standing in her room, kids start inventing what she’s brewing. Let them.
Supplies You’ll Need
This post contains affiliate links. I may receive commissions for purchases made through links in this post at no cost to you.
- Witch diorama craft template (the witch and her room)
- White paper
- Colored pencils
- Scissors
- Glue
Paper or cardstock? Honestly, regular printer paper works fine. I printed mine on plain paper and it held up well. Cardstock makes the room a bit sturdier and helps the witch stand straighter, so if you plan to display the dioramas for a few weeks, it’s worth it. For a one-afternoon activity with a big group, plain paper keeps things simple and cheap.
A quick word on coloring tools: colored pencils are the safest bet because they won’t soak through the paper or make the glue tabs soggy. Markers look bright but can bleed on thin paper, and crayons can make the surface waxy, which glue doesn’t love.
How to Make a Witch Diorama Craft, Step by Step
The whole thing comes together in a handful of steps. Here’s how it goes:
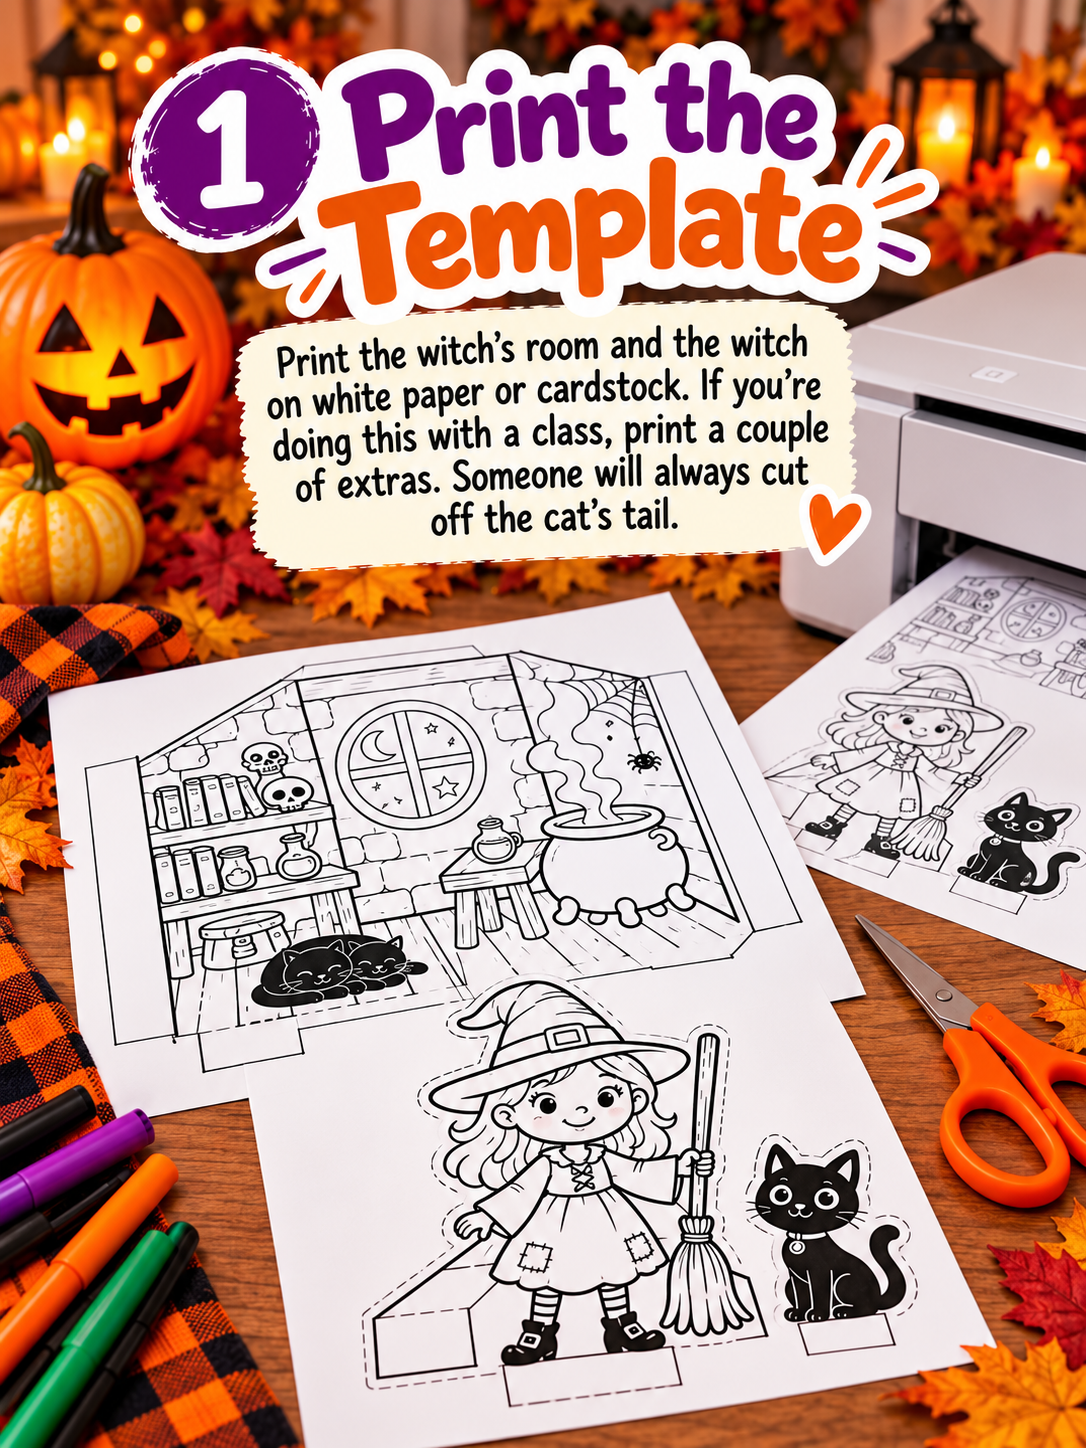
1. Print the template
Print the witch’s room and the witch on white paper or cardstock. If you’re doing this with a class, print a couple of extras. Someone will always cut off the cat’s tail.
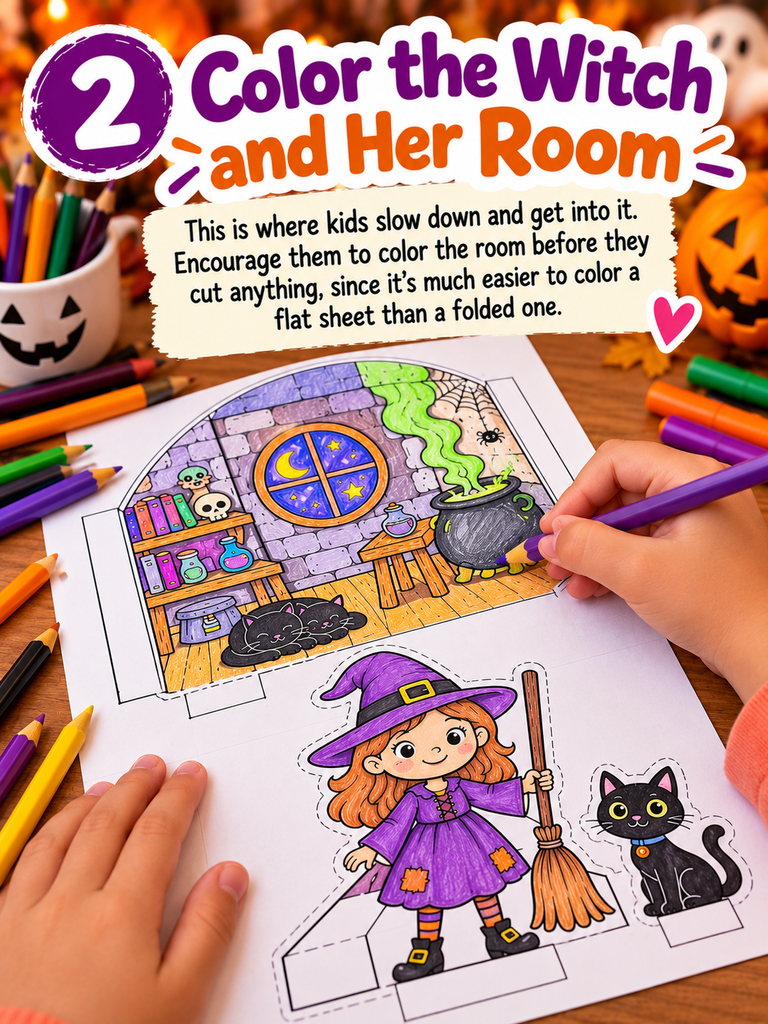
2. Color the witch and her room
This is where kids slow down and get into it. Encourage them to color the room before they cut anything, since it’s much easier to color a flat sheet than a folded one.
3. Fold the circle in half
The room is printed on a circle. Fold it in half along the middle line and press the crease down firmly. A sharp crease makes the diorama stand much better later.

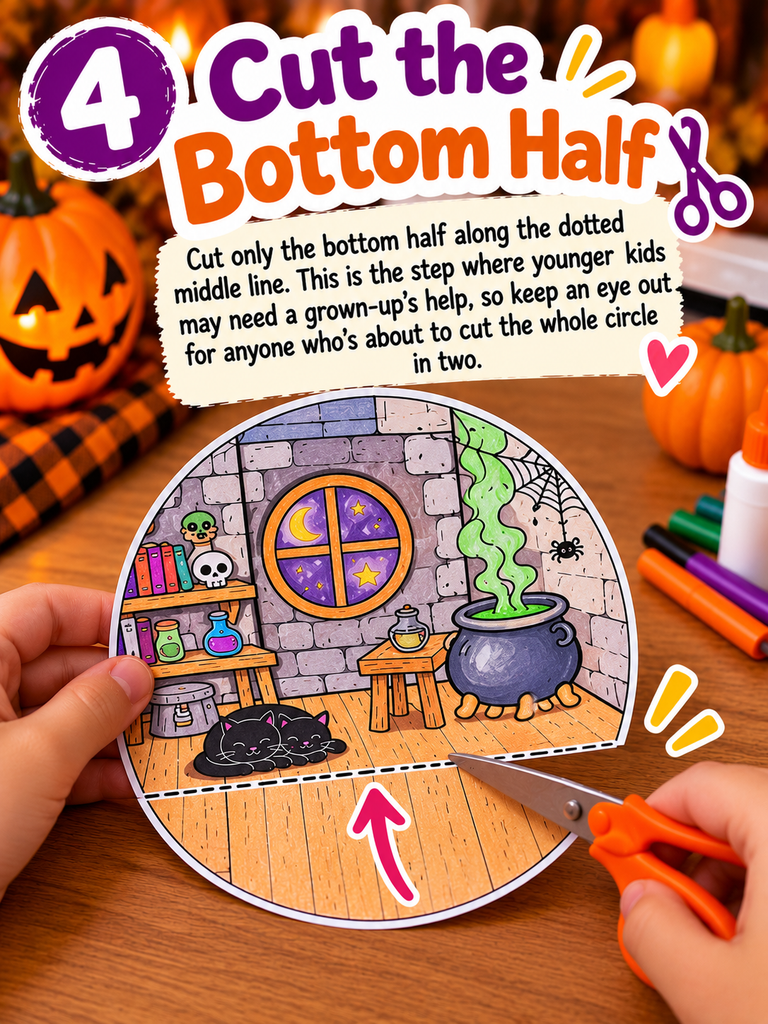
4. Cut the bottom half along the dotted line
Cut only the bottom half along the dotted middle line. This is the step where younger kids may need a grown-up’s help, so keep an eye out for anyone who’s about to cut the whole circle in two.
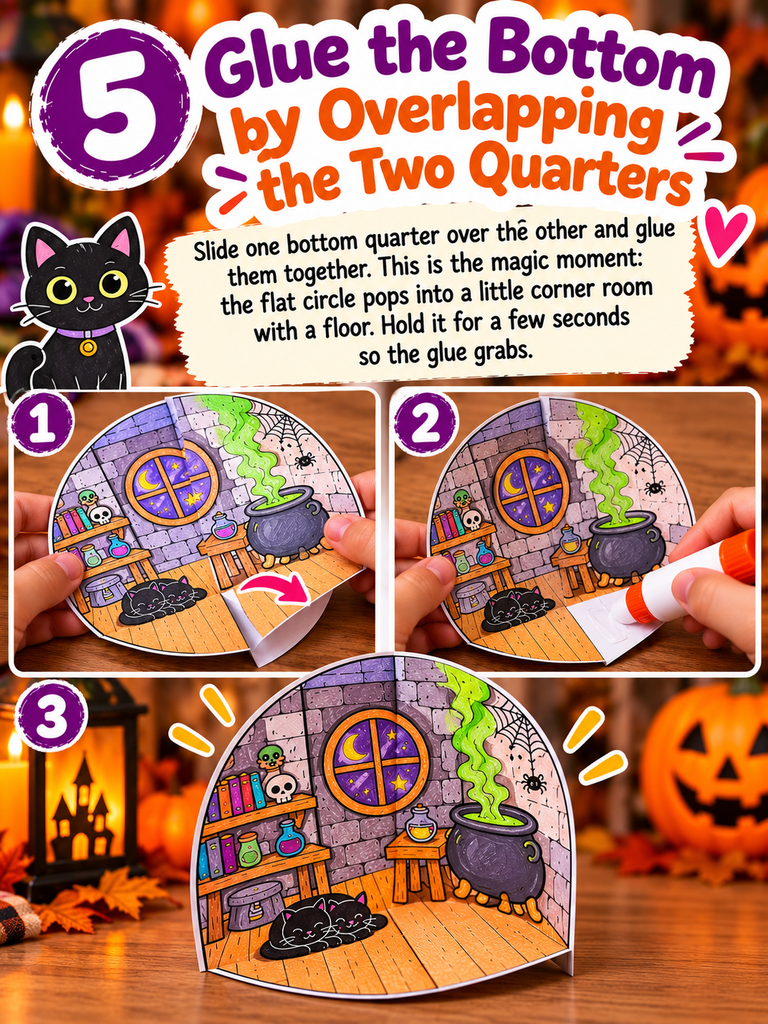
5. Glue the bottom by overlapping the two quarters
Slide one bottom quarter over the other and glue them together. This is the magic moment: the flat circle pops into a little corner room with a floor. Hold it for a few seconds so the glue grabs.
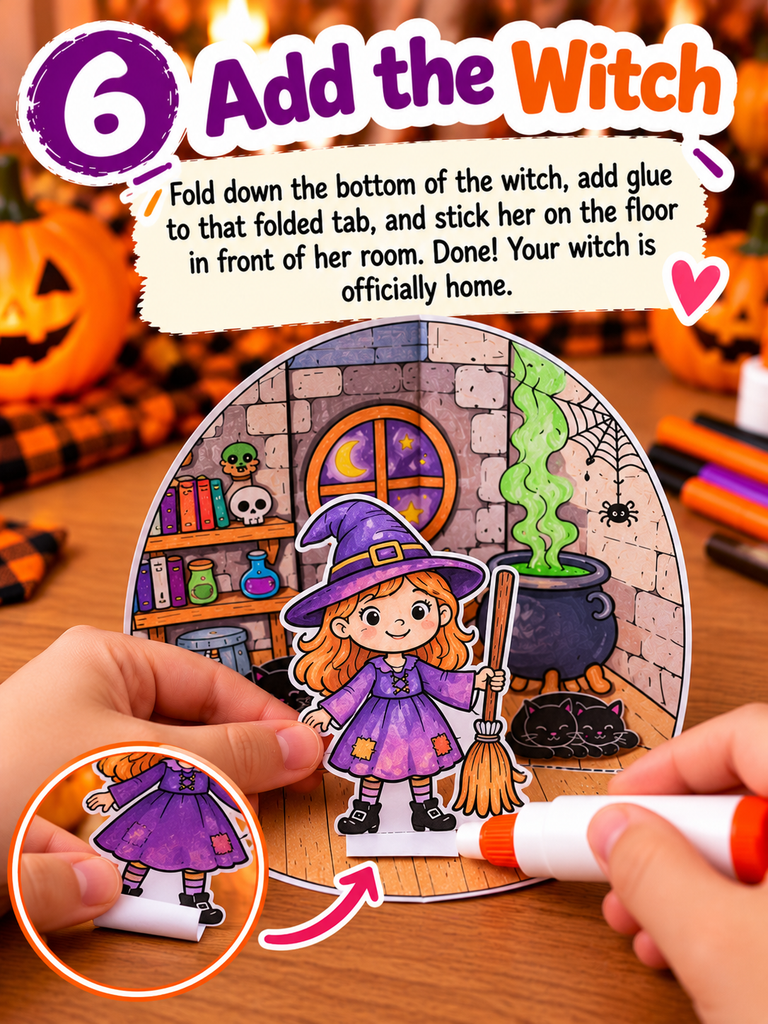
6. Add the witch
Fold down the bottom of the witch, add glue to that folded tab, and stick her on the floor in front of her room. Done! Your witch is officially home.
Tips to Make It Work for Every Age
One of the best things about this craft is how easily it stretches. Here’s how I’d adjust it:
Toddlers and young preschoolers: let them focus on coloring. Pre-cut the pieces yourself, then do the folding and gluing together, with them pressing down on the glued parts. They’ll still feel like they built it.
Preschool and kindergarten: they can color and glue on their own, and many can handle the cutting with a bit of guidance. Show them the dotted line first and say, “We only cut to the middle, like a pizza slice.”
Elementary kids: hand it over completely. Then challenge them: add extra details to the room, give the cat a name, or write a few sentences about what the witch is cooking in her cauldron.
A few more practical tips I’ve picked up:
- Glue sticks are your friend. Liquid glue on plain paper can wrinkle it and takes longer to dry.
- Witch keeps tipping over? Re-crease her bottom fold, or glue a small strip of cardstock behind her as a stand.
- Do a demo first. Build one in front of the group before anyone picks up scissors. Seeing the circle turn into a room makes every step click.
- Write names on the back before coloring. Trust me, twenty-five purple witches look a lot alike.
Read It With Room on the Broom
If you’re using this craft at daycare or preschool, pair it with Room on the Broom, one of my favorite books to read with kids in October. The story follows a kind witch who keeps making room for new friends on her broom, so it lines up beautifully with a smiling witch holding her broom.
Try this: read the book first, then build the dioramas, then ask kids to retell part of the story using their finished witch. It turns a craft into a little literacy lesson, and nobody even notices they’re learning.
When to Use This Craft
This witch works almost anywhere in October:
- As a Halloween art project in the days leading up to the holiday
- As a station at the Halloween classroom party, alongside games and other activities
- As a quiet-time activity at home when the sugar rush needs to settle
- As a homemade decoration for a shelf, windowsill or desk
Frequently Asked Questions
What age is the witch diorama craft for?
It’s designed for preschoolers and elementary school-aged kids. Toddlers can join in too if an adult handles the cutting.
Do I need cardstock?
No. Plain white paper works fine. Cardstock just makes the finished diorama a little sturdier.
Is the witch scary?
Not at all. She has a big smile, and the whole template is designed to be kid-friendly.
How can I make it last longer as a decoration?
Print on cardstock, use colored pencils rather than markers, and let the glue dry fully before moving it around.
More Halloween Crafts Kids Will Love
If your crew enjoyed building a witch’s room, here are a few more ideas to keep the October fun going:
- Paper plate witch: with yarn hair and a fun hat, this one leaves lots of room for creativity. You can swap supplies for whatever you have at hand, like paper eyes instead of googly eyes, a painted mouth instead of a red pipe cleaner, or skipping the nose if you don’t have a small wood slice.
- Frankenstein paper plate craft: toddlers can paint his hair with black paint, while preschoolers and older kids can thread yarn through holes in the plate for a nice extra touch.
- 35 pumpkin painting ideas: ideas for the whole family, from adorable fingerprint art to cute ghosts wearing glasses.
Your Witch Is Home. Now It’s Your Turn.
Remember that “now what?” from the beginning? With this witch diorama craft, the answer is: now you build her a home. A few minutes of coloring, a couple of folds, a dab of glue, and a flat page becomes a tiny world that kids are genuinely proud of.