Pastel Daisy Easter Nails: Spring Nail Art Guide

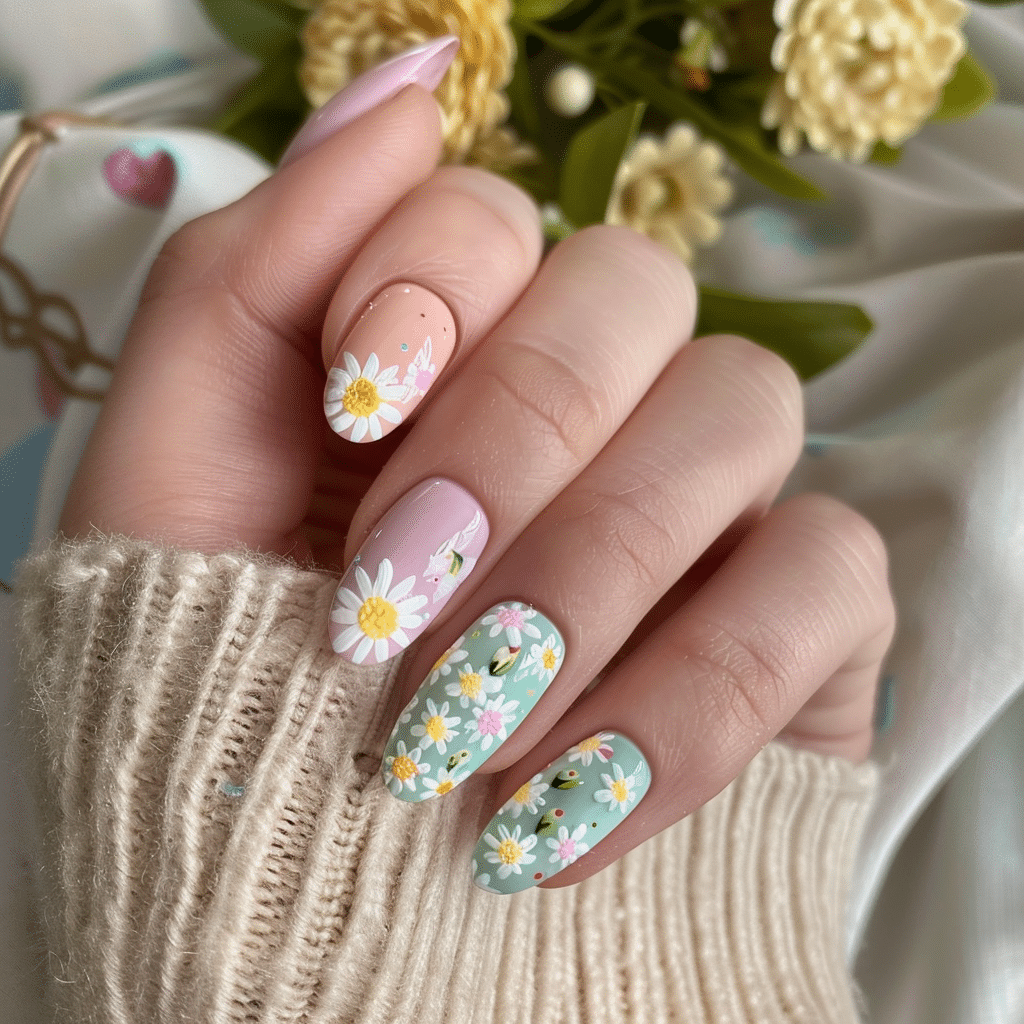
Pastel Daisy Easter Nails combine soft spring colors with cheerful floral accents to create the perfect seasonal manicure.
This gel nail design features delicate daisy artwork on pastel bases in shades of lavender, mint, baby blue, and blush pink. The technique works beautifully for Easter celebrations and transitions seamlessly through the entire spring season with proper application and care.
| Topic | Details |
|---|---|
| Category | Nail Art |
| Skill Level | Intermediate |
| Time Needed | 75-90 minutes |
| Tools Needed | UV/LED lamp, gel polish, dotting tools, thin nail brush |
| Best For | Spring events, Easter celebrations, floral nail art enthusiasts |
Table of Contents
Why Pastel Daisy Easter Nails Technique Works
Pastel gel polishes provide the perfect canvas for daisy nail art because their soft pigmentation creates gentle contrast without overwhelming delicate floral designs. The semi-transparent nature of quality pastel gels allows for buildable opacity, which helps nail technicians achieve even coverage while maintaining the light, airy aesthetic essential for spring nail designs. These shades complement all skin tones and provide a sophisticated alternative to bold Easter colors.
Daisy designs work exceptionally well on gel nails because the extended working time allows precise placement of petals and details before curing. The gel medium maintains its consistency without drying prematurely, giving artists complete control over brush strokes and dotting techniques. When sealed with a quality top coat, these designs remain chip-free and vibrant throughout the entire wear period, typically lasting two to three weeks with proper nail care maintenance.
The combination of pastel bases with white daisy petals and yellow centers creates visual interest through subtle color play. This design strategy draws the eye without appearing juvenile, making it appropriate for professional settings while still celebrating the playful spirit of spring. The floral elements add dimension to otherwise simple manicures, transforming basic pastel nails into wearable art that showcases technical skill and creative vision.
Tools and Products Needed
| Product | Purpose | Alternatives |
|---|---|---|
| UV/LED Lamp | Cures gel polish layers | 48W or higher LED lamp |
| Gel Base Coat | Protects natural nail and provides adhesion | Rubber base coat for added strength |
| Pastel Gel Polish Set | Provides lavender, mint, pink, and blue shades | Individual pastel colors |
| White Gel Polish | Creates daisy petals | White gel paint for precision |
| Yellow Gel Polish | Forms daisy centers | Yellow acrylic paint sealed with top coat |
| Thin Nail Art Brush | Paints fine petal details | Striping brush or liner brush |
| Dotting Tool Set | Creates daisy centers and dots | Bobby pins or toothpicks |
| Gel Top Coat | Seals design and adds shine | Matte top coat for different finish |
| Nail File (180 grit) | Shapes natural nails | Glass nail file |
| Nail Buffer | Smooths nail surface | 240 grit buffer block |
| Cuticle Oil | Hydrates cuticles and surrounding skin | Vitamin E oil or jojoba oil |
| Nail Dehydrator | Removes oils for better adhesion | Rubbing alcohol on lint-free wipe |
| Lint-Free Wipes | Cleanses tacky layer | Cotton pads (not ideal but workable) |
For more gel nail supplies and professional products, visit Gel Nails by Lina for curated recommendations and technique guides.
Step-by-Step Application Guide for Pastel Daisy Easter Nails
Nail Preparation
- Remove any existing nail polish using acetone and lint-free wipes to ensure a clean surface.
- Shape your nails using a 180-grit file, moving in one direction to prevent splitting and damage.
- Gently push back cuticles using a wooden or rubber cuticle pusher without cutting live tissue.
- Buff the nail surface lightly with a 240-grit buffer to create slight texture for better adhesion.
- Clean nails thoroughly with nail dehydrator or alcohol to remove all oils and debris.
- Apply a thin layer of pH-balancing primer if working with oily nail beds prone to lifting.
Base Coat Application
- Apply a thin, even layer of gel base coat, leaving a small margin from the cuticle area.
- Cap the free edge by running the brush along the nail tip to prevent chipping.
- Cure under UV/LED lamp according to manufacturer instructions, typically 30-60 seconds for LED.
- Check for any missed spots or uneven coverage before proceeding to color application.
Gel Polish Layers
- Select your pastel shade for each nail, alternating colors or keeping them uniform based on preference.
- Apply the first thin coat of pastel gel polish using three-stroke method: center, left, right.
- Cure the first color coat for the recommended time, usually 60 seconds under LED light.
- Apply a second thin coat for full opacity, ensuring even coverage without flooding cuticles.
- Cure the second color coat completely before beginning any nail art application.
- Cleanse the tacky layer with a lint-free wipe if your polish requires this step before art.
Daisy Design Application
- Dip your thin nail art brush into white gel polish, removing excess on the bottle rim.
- Paint five small oval petals in a circular pattern, leaving space in the center for the flower core.
- Keep petals uniform in size for a balanced daisy appearance, spacing them evenly around the center point.
- Add additional daisies to accent nails or scatter them across multiple nails as desired.
- Cure the white petal layer for 60 seconds to set the design before adding centers.
- Use a small dotting tool dipped in yellow gel polish to create the flower centers.
- Place the yellow dot precisely in the middle of each daisy, slightly overlapping petal bases.
- Cure the yellow center layer for another 60 seconds to completely set the design.
- Add tiny white dots or details with a thin brush if desired for additional dimension.
Curing Process
- Ensure each nail is fully cured between layers to prevent smudging or mixing of colors.
- Position your hand correctly in the lamp with all nails exposed to the light evenly.
- Use the timer function on your lamp to maintain consistent curing times throughout the service.
- Check that the gel feels firm and not tacky on the surface after each cure cycle.
Finishing and Top Coat
- Apply a thin layer of gel top coat over the entire nail, encapsulating all design elements.
- Cap the free edge thoroughly with top coat to seal and prevent premature chipping.
- Cure the top coat layer for the full recommended time, typically 60-90 seconds for LED lamps.
- Cleanse any remaining tacky layer with rubbing alcohol on a lint-free wipe if using a traditional top coat.
- Apply cuticle oil generously around each nail and massage into the surrounding skin for hydration.
- Allow nails to cool for two to three minutes before exposing them to water or pressure.
Pro Nail Technician Tips for Pastel Daisy Easter Nails
- Apply gel polish in thin layers rather than thick coats to prevent wrinkling, shrinking, or improper curing that leads to premature peeling.
- Practice daisy designs on a practice wheel or paper before attempting them on natural nails to build muscle memory and consistency.
- Use a no-wipe top coat as your final layer to eliminate the tacky residue step and create instant shine without additional cleansing.
- Place daisies strategically near the cuticle area or tip rather than dead center for a more modern, professional aesthetic.
- Mix pastel shades with a tiny amount of white gel to customize opacity and create unique spring colors.
- Keep your brush slightly damp with gel when painting petals to maintain smooth, even strokes without dragging or skipping.
- Cure each element of complex nail art separately rather than painting multiple colors before curing to prevent accidental smudging.
- Apply cuticle oil daily after completing the manicure to maintain flexibility and prevent lifting at the cuticle line.
Learn more advanced gel nail techniques at Gel Nails by Lina where professional nail artists share industry secrets.
Common Gel Nail Mistakes with Pastel Daisy Easter Nails
| Mistake | Why it Happens | How to Fix |
|---|---|---|
| Thick Gel Layers | Applying too much product at once to speed up the process | Use thin coats and build opacity gradually with multiple layers |
| Improper Curing | Using low-wattage lamps or incorrect cure times | Invest in a 48W or higher LED lamp and follow manufacturer cure times |
| Skipping Nail Prep | Rushing through dehydration and surface preparation steps | Always cleanse, buff, and dehydrate nails thoroughly before base coat |
| Flooding the Cuticle | Applying polish too close to the cuticle area | Leave a small margin and use a clean brush to remove excess immediately |
| Uneven Daisy Petals | Inconsistent pressure or brush angle while painting | Practice petal strokes and maintain steady hand positioning throughout |
| Tacky Layer Contamination | Touching or filing nails before cleansing the tacky layer | Cleanse with alcohol immediately after final cure before any touching |
Nail Design Variations for Pastel Daisy Easter Nails
| Style | Description | Best Occasion |
|---|---|---|
| French Tip Daisies | Pastel French tips with tiny daisies along the smile line | Weddings, formal spring events |
| Ombre Daisy Nails | Gradient pastel background with daisies concentrated at tips | Easter brunch, garden parties |
| Minimalist Single Daisy | One accent nail with a single large daisy on nude or clear base | Professional settings, everyday wear |
| Daisy Field Design | Multiple small daisies scattered across pastel bases | Spring festivals, casual outings |
| 3D Daisy Accent | Sculpted gel daisies with raised petals on pastel background | Special occasions, photo shoots |
| Glitter Daisy Centers | Traditional daisies with gold or iridescent glitter centers | Evening events, celebrations |
| Negative Space Daisies | Daisies outlined on natural nail with pastel accents | Trendy nail art enthusiasts, modern looks |
Nail Care and Maintenance for Long-Lasting Results
Proper maintenance extends the life of your Pastel Daisy Easter Nails significantly beyond the typical two-week mark. Apply cuticle oil twice daily, focusing on the area where the gel meets your natural nail growth. This hydration prevents the gel from becoming brittle and lifting at the edges where new nail growth emerges. The oils also keep your cuticles soft and healthy, preventing painful hangnails that can catch on clothing and compromise your manicure.
Wear protective gloves during household cleaning tasks, dishwashing, or gardening to shield your gel nails from harsh chemicals and excessive moisture exposure. Water exposure causes natural nails to expand and contract, which can lead to gel separation and premature lifting. Extended soaking weakens the bond between the gel layers and your natural nail plate, reducing wear time significantly and potentially allowing bacteria to enter lifted areas.
Avoid using your nails as tools to open packages, scrape labels, or pry objects apart. This mechanical stress concentrates force at the free edge and can cause the entire gel layer to pop off or crack. Instead, use appropriate tools for these tasks and treat your manicure as the delicate artwork it represents. When gel nails experience trauma, they often lift or break in ways that require complete removal rather than simple repair.
Schedule fill appointments or removal sessions every two to three weeks to maintain nail health and prevent damage from overgrown gel. As your natural nail grows, the gel remains stationary, creating leverage points that can cause painful tears or breaks in the natural nail if left too long. Professional nail technicians at facilities like Gel Nails by Lina can assess your nail health and recommend appropriate maintenance schedules based on your individual growth rate and lifestyle.
How to Remove Gel Nails Safely
Safe gel nail removal preserves the integrity of your natural nails and prevents damage that can take months to repair. Begin by gently filing the shiny top coat layer with a 180-grit file to break the seal and allow acetone penetration. Avoid aggressive filing that reaches the natural nail, as this thins the nail plate and causes weakness. Focus only on removing the glossy surface layer that prevents acetone absorption.
Soak cotton pads in pure acetone and place them directly on each nail, then wrap fingertips securely with aluminum foil strips. This creates a sealed environment that traps heat and accelerates the gel breakdown process. Allow nails to soak for 10 to 15 minutes without peeking, as premature removal attempts can damage the nail surface. The acetone needs adequate time to dissolve the gel polymers completely for gentle removal.
After soaking, gently push softened gel off the nail using a wooden cuticle stick or orange wood stick, working from cuticle to free edge. Never force or scrape gel that resists removal, as this indicates incomplete breakdown. If gel remains firmly attached, rewrap nails and soak for an additional five minutes rather than risking nail plate damage through forceful scraping. Patience during removal protects your natural nails from lasting harm.
Nail Health and Safety Considerations
Maintaining nail health while enjoying Pastel Daisy Easter Nails requires attention to proper application techniques and recognition of potential warning signs. Over-filing the natural nail plate during preparation removes protective layers and creates weak spots prone to breaking and peeling. The nail plate should only be lightly buffed to create texture for adhesion, never filed aggressively until thin or sensitive. Excessive filing also increases the risk of infection by compromising the nail’s natural barrier function.
Watch for signs of allergic reactions to gel products, including redness, swelling, itching, or burning sensations around the nail area. Some individuals develop sensitivities to the photoinitiators or acrylates in gel polish formulations over time. If you experience these symptoms, remove the gel immediately and consult a dermatologist before continuing gel manicures. Continued exposure to allergens can worsen reactions and lead to contact dermatitis requiring medical treatment.
Proper sanitation prevents bacterial and fungal infections that can develop under lifted gel nails. Ensure all tools are properly cleaned and disinfected between uses, and never share nail implements with others. If you notice green discoloration, unusual odors, or pain around the nail bed, remove the gel and seek medical attention. These symptoms indicate possible infection requiring professional treatment beyond cosmetic nail care.
Frequently Asked Questions
How long do Pastel Daisy Easter Nails last?
How do you remove gel nails safely at home?
What is the difference between gel nails and acrylic nails?
Why do my gel nails peel after a few days?
How can I make my Pastel Daisy Easter Nails last longer?
Conclusion
Pastel Daisy Easter Nails offer the perfect combination of seasonal charm and sophisticated nail artistry for spring celebrations. This versatile design works beautifully for Easter events while remaining appropriate for everyday wear throughout the entire spring season. With proper application techniques, quality products, and consistent maintenance, these delightful floral nails provide weeks of chip-free beauty. Embrace the soft colors and cheerful daisy motifs to celebrate spring renewal while showcasing your personal style and nail art skills.