
Picture this: you’re at the farmers’ market, one hand holding a coffee, the other digging through a bottomless tote for your phone. Keys? Somewhere at the bottom. Sunglasses? Under the bread. We’ve all been there.
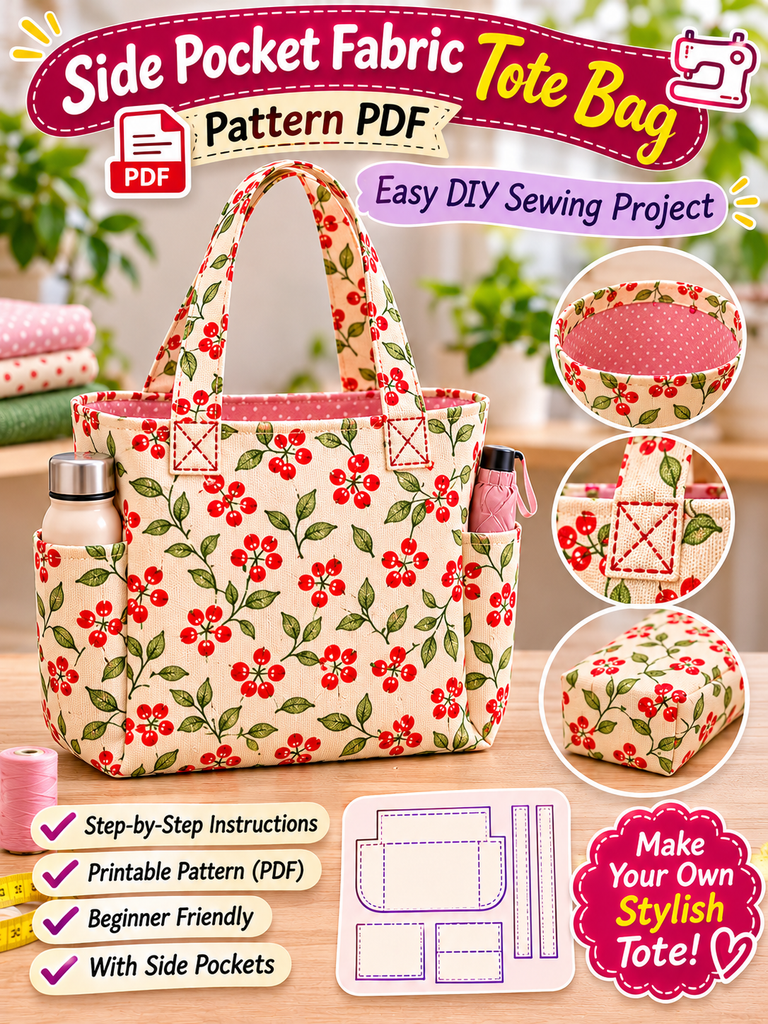
That exact moment is why I fell in love with this side pocket fabric tote bag pattern. It’s a simple, boxy tote with two handy outer pockets on the short ends one for your phone, one for your water bottle or keys. No digging. No drama. And honestly? It’s one of the most satisfying beginner projects I’ve sewn in a long time.
Even better, the pattern works on a clever little trick: every piece is based on one single measurement called “X.” Change X, and you change the whole bag. Let me show you how it works.
Table of Contents
Key Takeaways
- The whole tote is built from one measurement, X — pick your X and every piece scales automatically.
- You’ll cut just six kinds of pieces: front, back, bottom, two straps, two facings and a side pocket.
- The side pockets are measured as X + 1″, so they fit the side panels snugly with room for seams.
- It’s beginner-friendly: straight seams only, no zippers, no tricky curves.
- With interfacing and a facing at the top, the bag stands up on its own and looks store-bought.
Why This Tote Bag Pattern Is Different
Most free tote patterns give you one fixed size. Want it bigger? Good luck redrawing everything.
This one is proportional. Think of X like the “serving size” in a recipe. Double it, and every ingredient doubles with it. Use a small X and you get a cute lunch tote. Use a bigger X and you’ve got a weekend market bag that swallows a baguette whole.
What I find really smart about it is that the proportions are already tested. The bag always ends up nicely balanced — wide at the front, with a sturdy flat bottom and side panels deep enough to hold a pocket. You don’t have to be a pattern designer to get a good shape.
Download the free printable Side Pocket Tote Bag Pattern PDF, with a cutting layout, size charts and a full-size pocket template, and start sewing today!
The Pattern Pieces (And What Each One Does)
Here’s everything on the pattern sheet, translated into plain English:
- Front — cut 1: 3X wide × 3X tall. The dashed lines near each side mark where the bag folds into its side panels.
- Back — cut 1: 3X wide × 3X tall, same as the front.
- Bottom — cut 1: 2X wide × X deep. This is what makes the bag stand flat instead of slumping.
- Strap — cut 2: ½X wide × 7X long.
- Facing — cut 2: 3X wide × ¼X tall. A neat band that finishes the top edge.
- Pocket — cut 1: (X + 1″) wide × (X + 1″) tall, with dashed fold lines for the hem.
Quick tip: the sheet says to cut one pocket, but the finished bag in the photo has a pocket on both short sides. If you want the same look (and trust me, you do), cut two.
Notice how it all fits together? The front is 3X wide, and the side sections marked by the dashed lines are each about ½X. Front and back side sections meet to create a side panel that’s X deep — exactly matching the X depth of the bottom piece. And the pocket at X + 1″ lands right on that side panel with a little extra for seams. It’s honestly kind of beautiful when you see the math click.
Choosing Your X: Two Ready-Made Sizes
You might be wondering, “Okay, but what number do I actually use?” Here are two sizes I’d recommend. These are finished proportions — add your seam allowance (more on that below).
| Piece | X = 4″ (everyday tote) | X = 5″ (market bag) |
|---|---|---|
| Front / Back | 12″ × 12″ | 15″ × 15″ |
| Bottom | 8″ × 4″ | 10″ × 5″ |
| Strap (×2) | 2″ × 28″ | 2½” × 35″ |
| Facing (×2) | 12″ × 1″ | 15″ × 1¼” |
| 5″ × 5″ | 6″ × 6″ |
Not sure? Grab the bag you use most, measure its depth (side to side on the short end), and use that as your X. Simple.
What You’ll Need
- Outer fabric — quilting cotton, canvas, or a light home décor fabric
- Lining fabric (optional but highly recommended)
- Medium-weight fusible interfacing or fusible fleece
- Matching thread, pins or clips, scissors or rotary cutter
- Ruler, fabric marker and an iron
Here’s the thing: the yellow floral bag in the pattern photo looks crisp and structured because the fabric has body. If you’re using thin cotton, interfacing is not optional. It’s the difference between “homemade” and “where did you buy that?”
How to Sew Your Side Pocket Tote, Step by Step
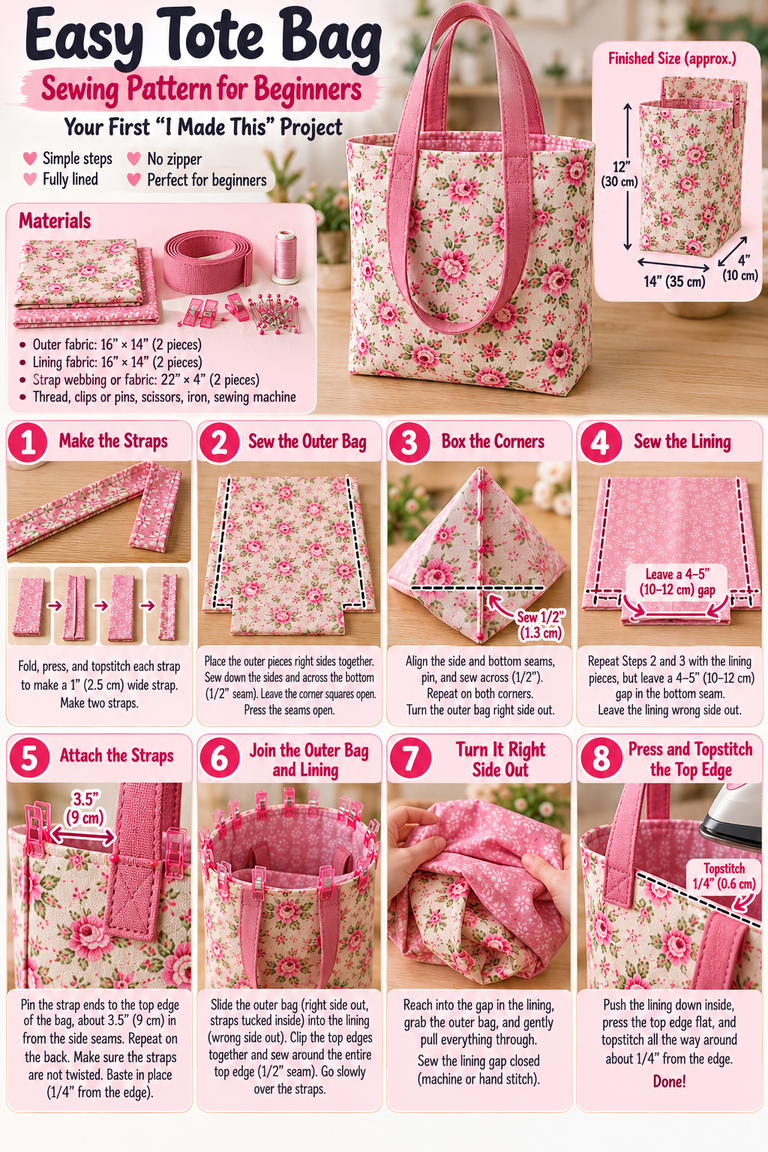
1. Calculate and cut
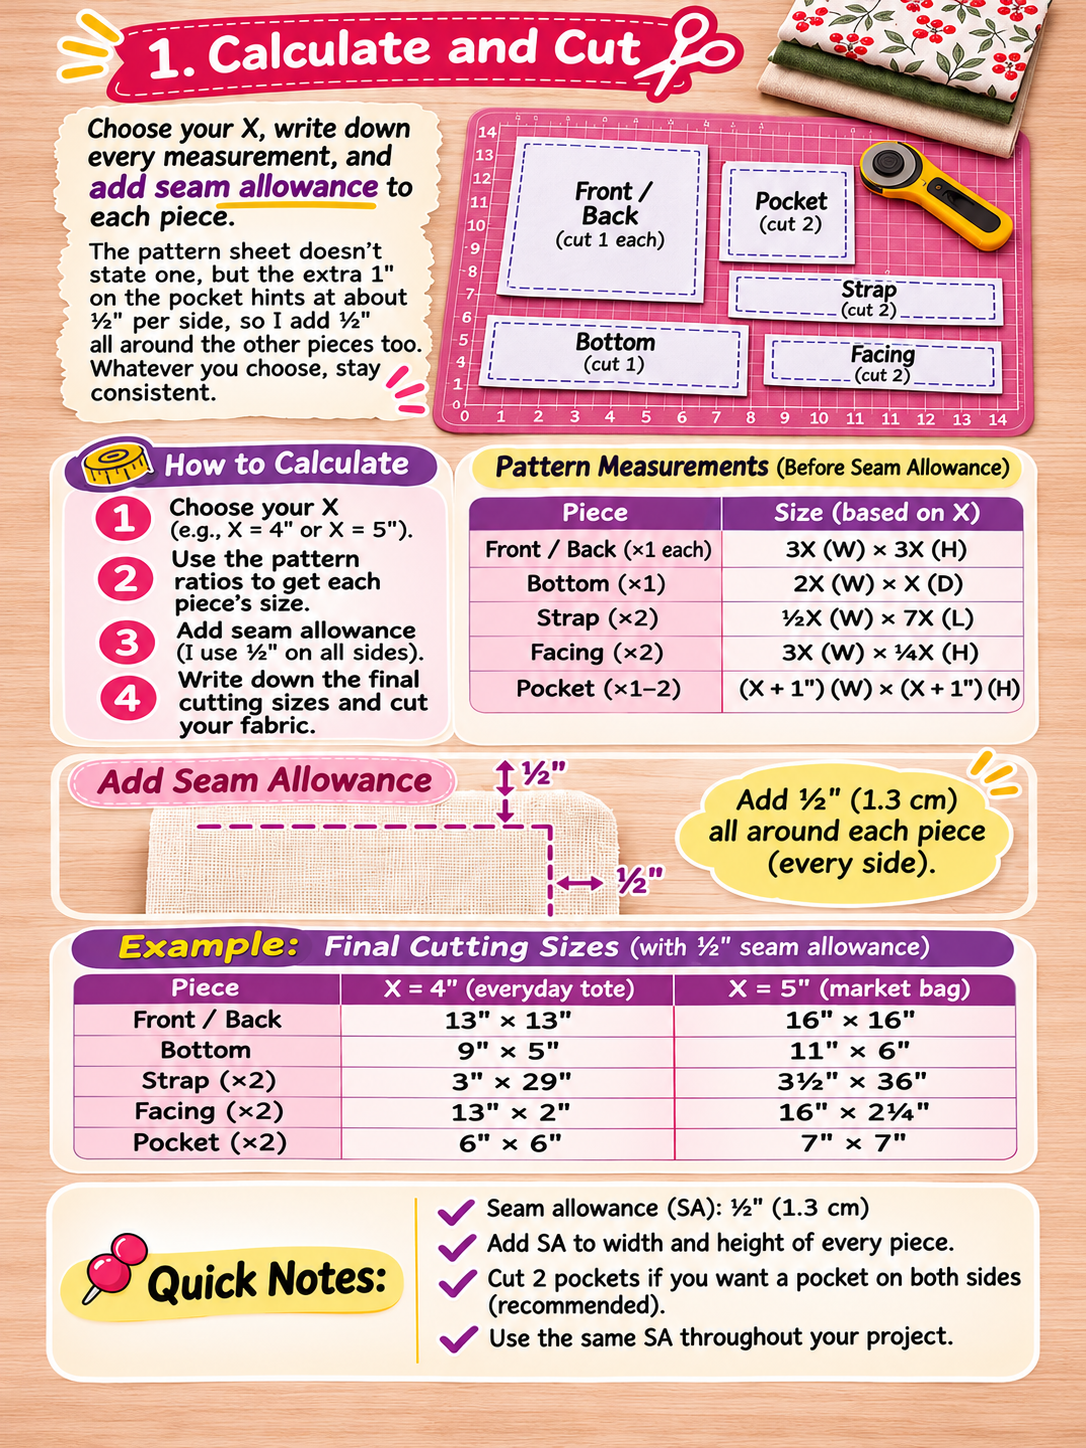
Choose your X, write down every measurement, and add seam allowance to each piece. The pattern sheet doesn’t state one, but the extra 1″ on the pocket hints at about ½” per side, so I add ½” all around the other pieces too. Whatever you choose, stay consistent.
2. Interface the outer pieces
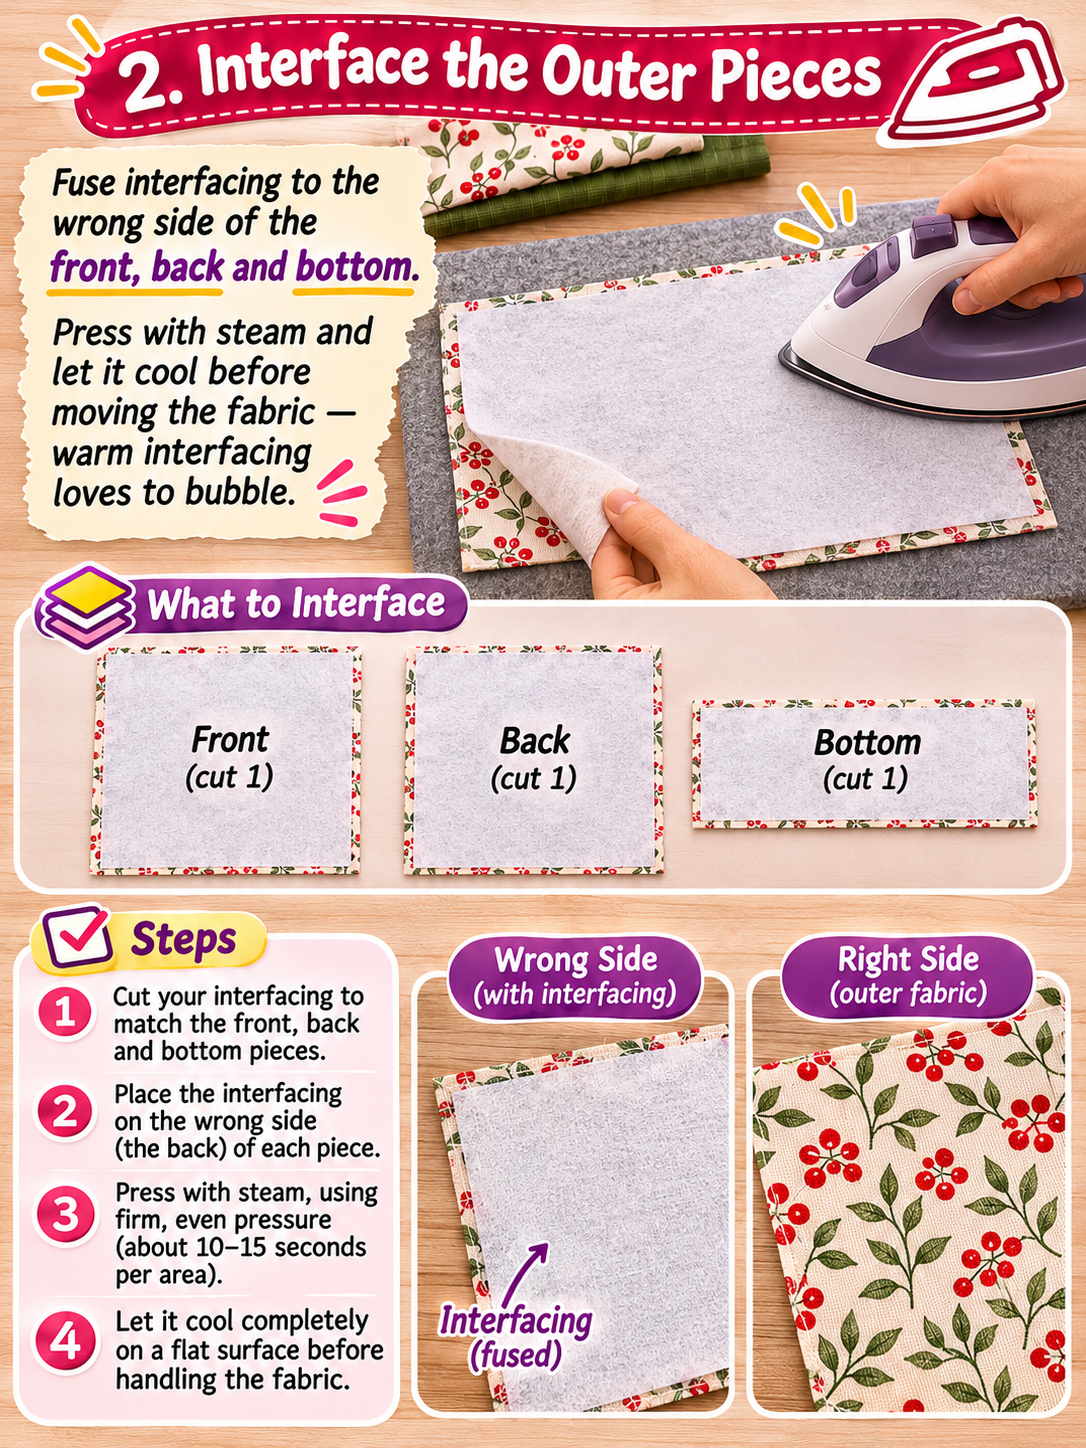
Fuse interfacing to the wrong side of the front, back and bottom. Press with steam and let it cool before moving the fabric — warm interfacing loves to bubble.
3. Make the straps
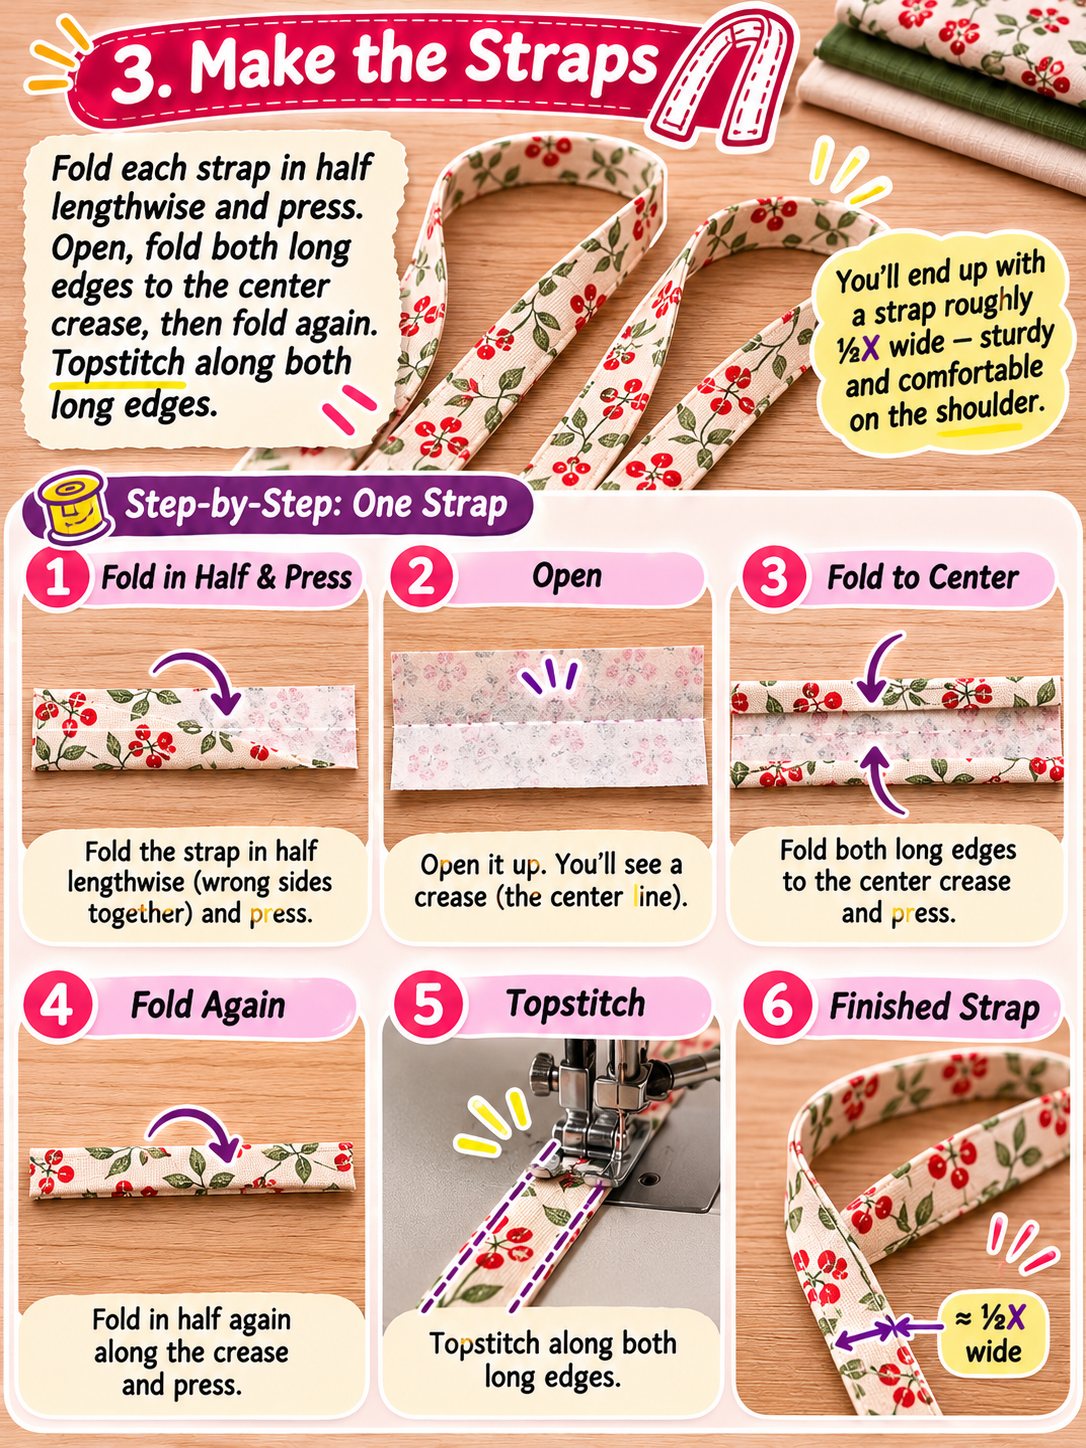
Fold each strap in half lengthwise and press. Open, fold both long edges to the center crease, then fold again. Topstitch along both long edges. You’ll end up with a strap roughly ⅛X wide — sturdy and comfortable on the shoulder.
4. Prepare the side pockets
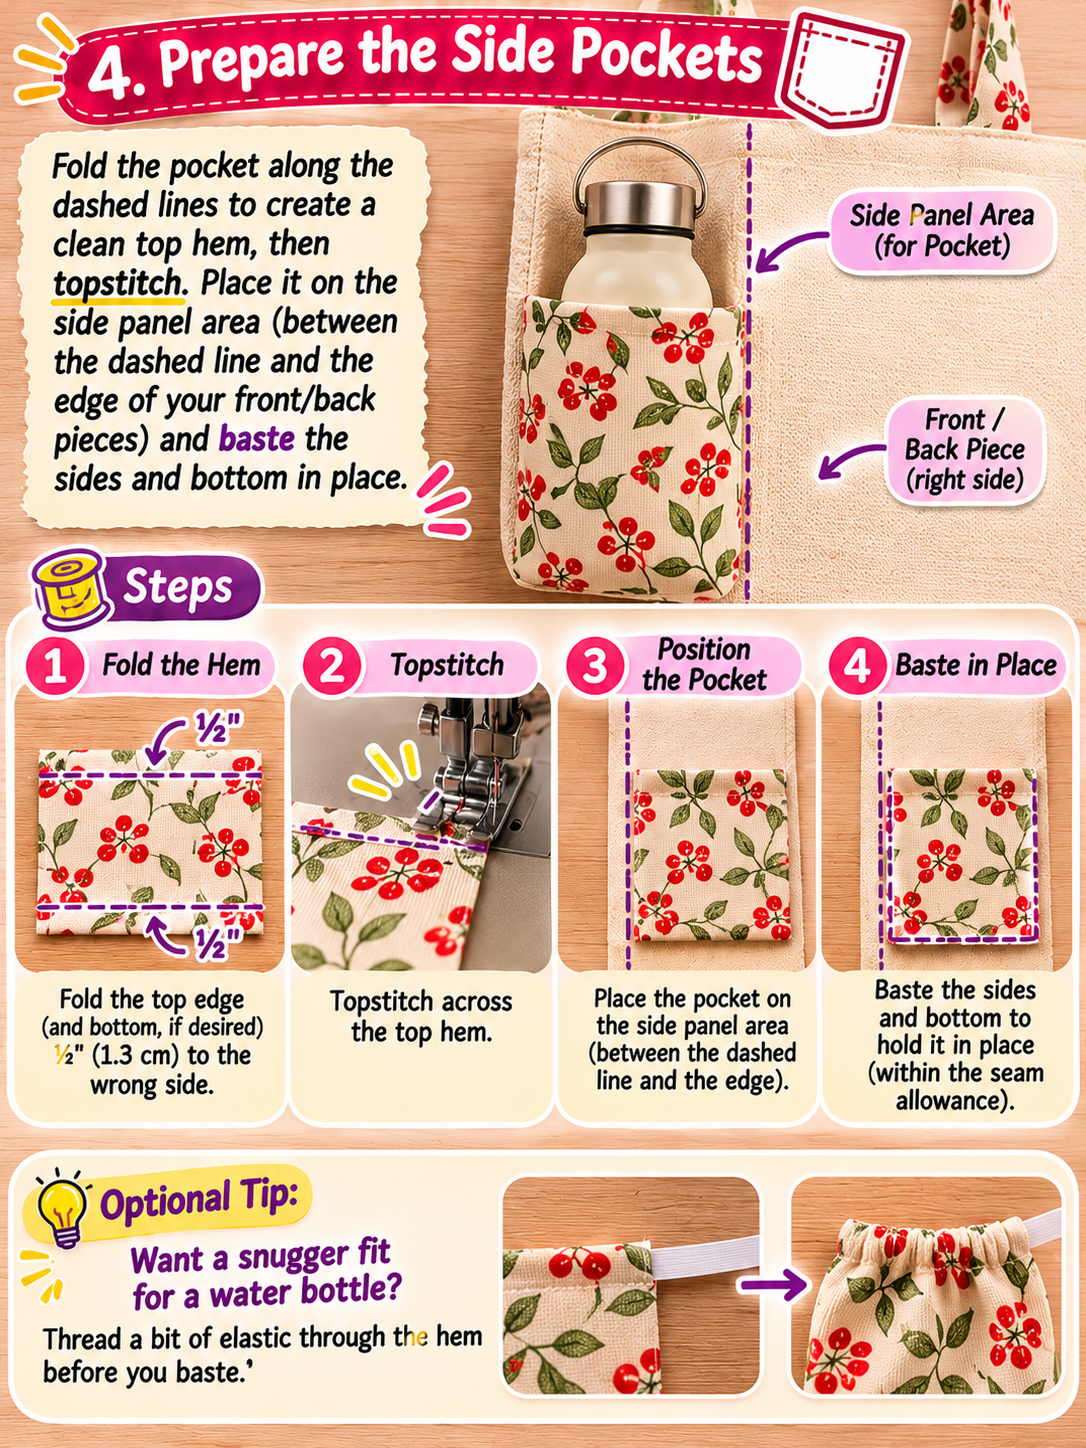
Fold the pocket along the dashed lines to create a clean top hem, then topstitch. Place it on the side panel area (between the dashed line and the edge of your front/back pieces) and baste the sides and bottom in place. Want a snugger fit for a water bottle? Thread a bit of elastic through the hem before you baste.
5. Sew the side seams
Place front and back right sides together and sew the side seams, catching the pocket edges inside. Press the seams open.
6. Add the bottom
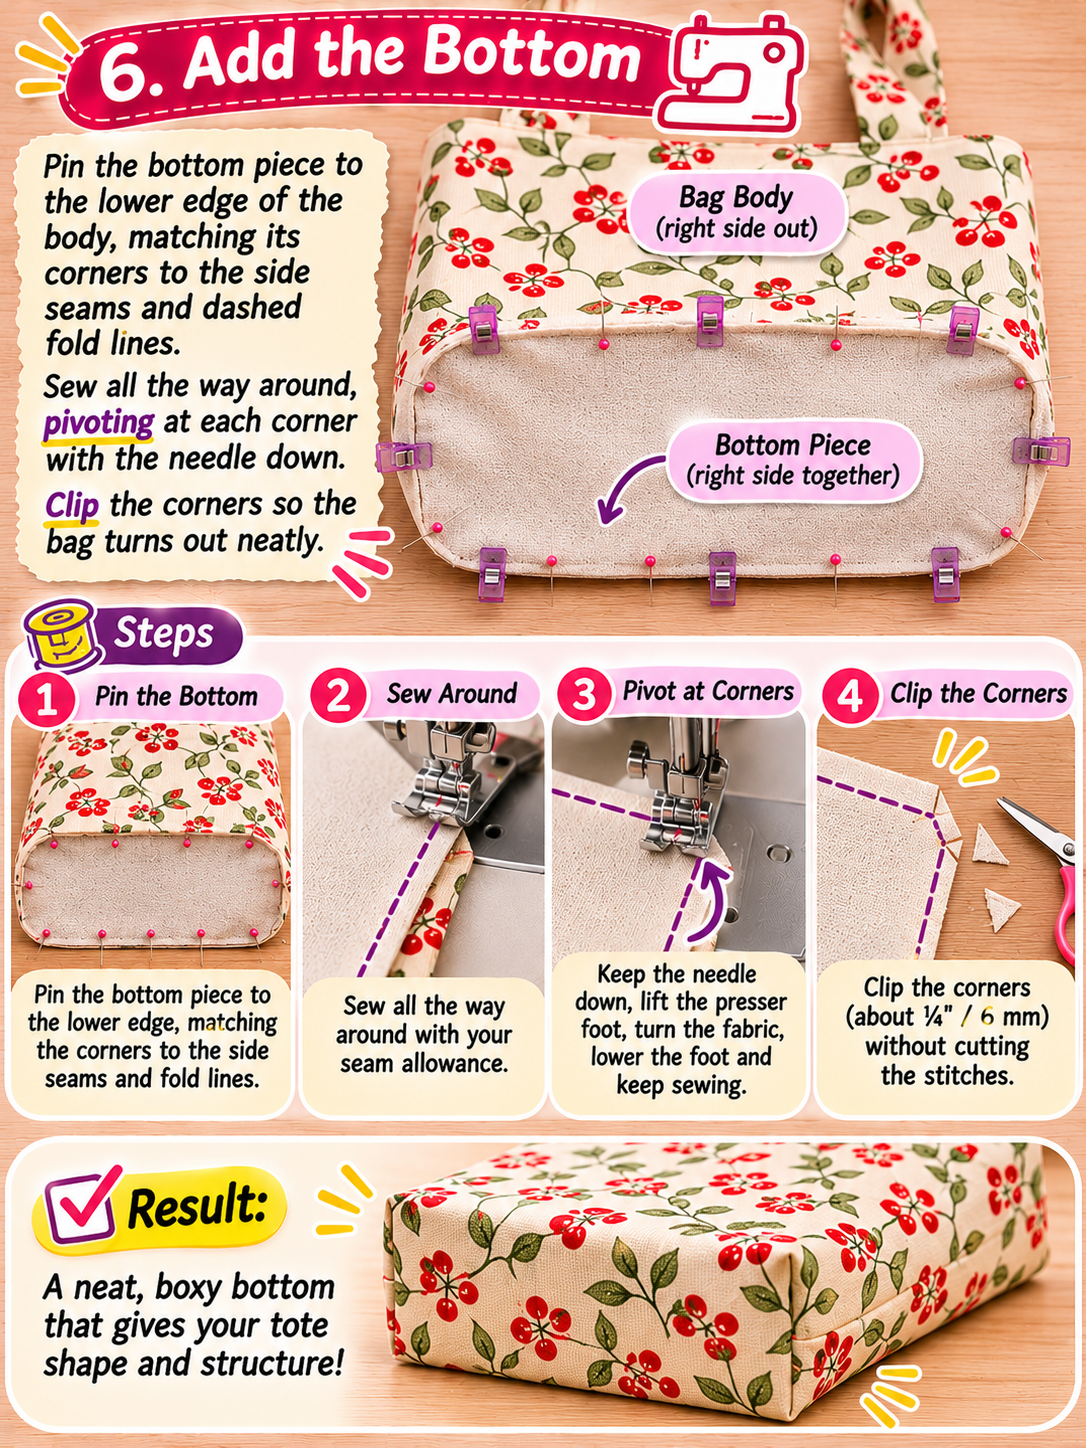
Pin the bottom piece to the lower edge of the body, matching its corners to the side seams and dashed fold lines. Sew all the way around, pivoting at each corner with the needle down. Clip the corners so the bag turns out neatly.
7. Lining and facing
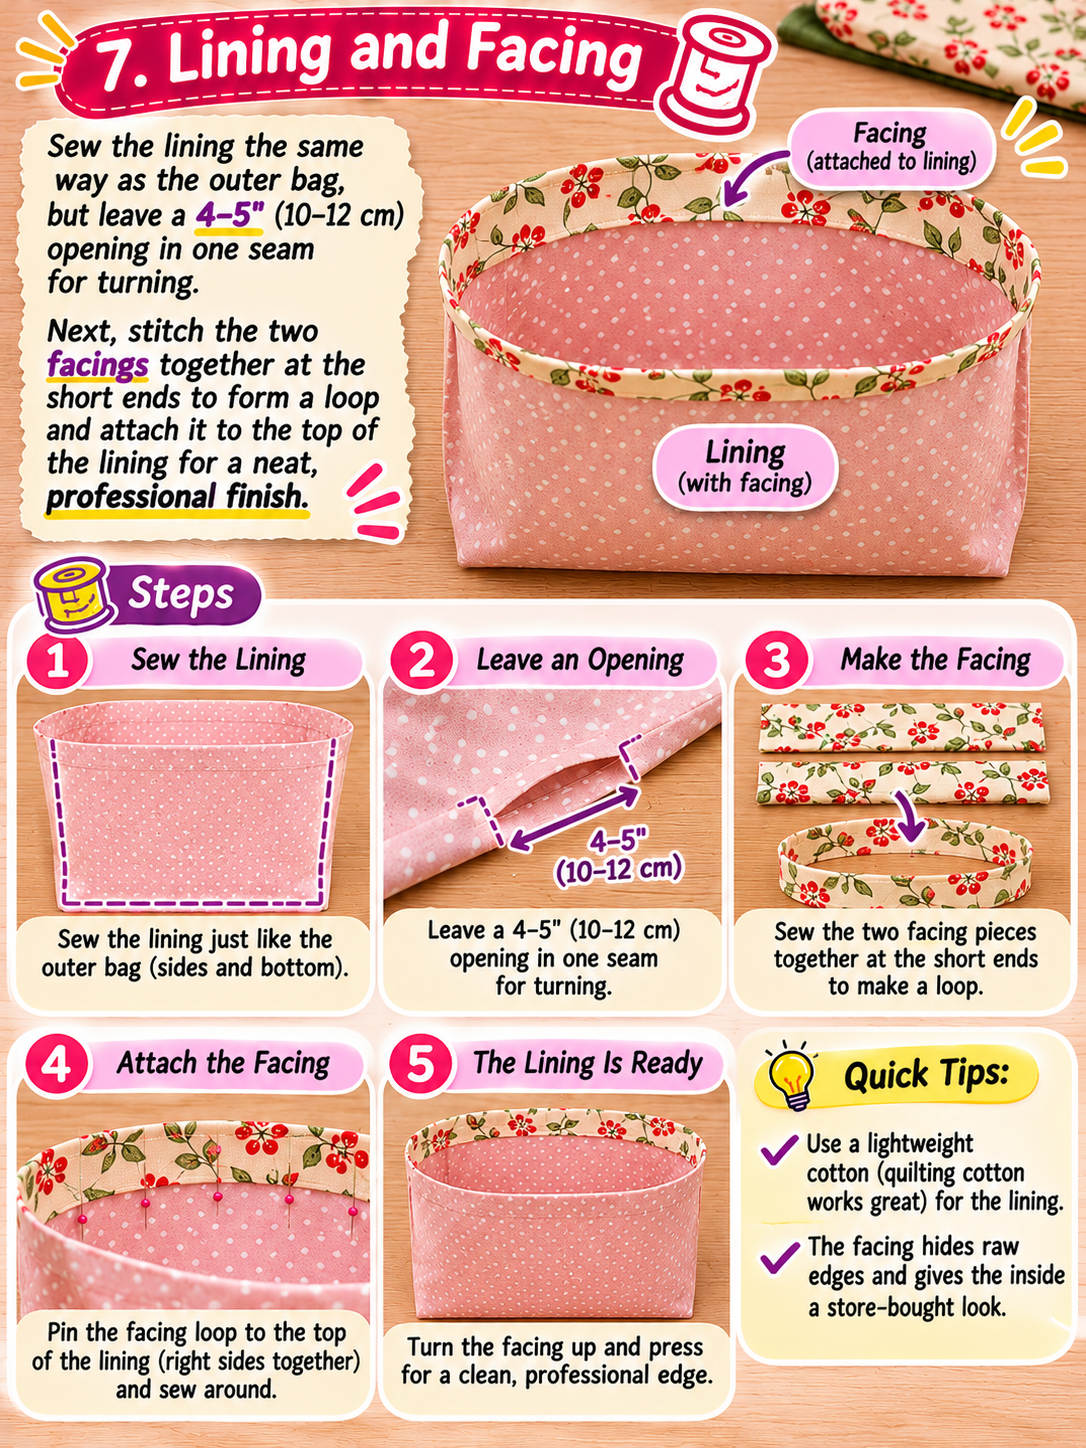
Sew the lining the same way (leave a 4–5″ opening in one seam for turning). Stitch the two facings together at the short ends to form a loop and attach it to the top of the lining — it gives the inside a polished, professional edge.
8. Attach straps and finish
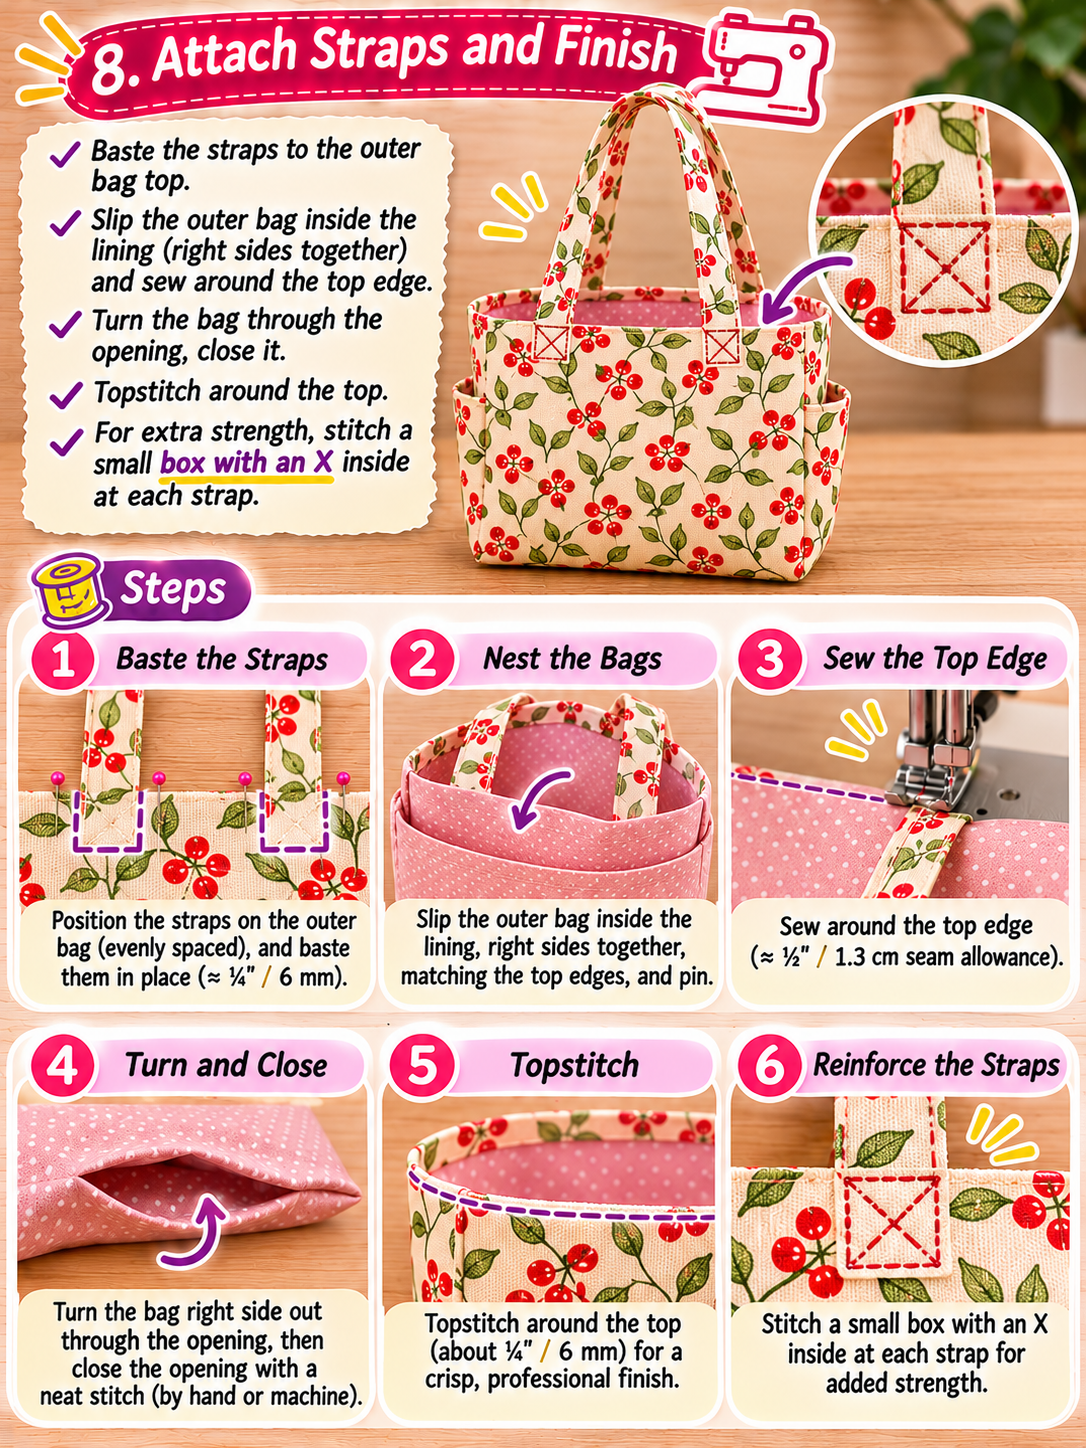
Baste the straps to the outer bag top, slip the outer bag inside the lining (right sides together), and sew around the top edge. Turn the bag through the opening, close it, and topstitch around the top. For extra strength, do what the sample bag does: stitch a small box with an X inside where each strap meets the bag.
Common Beginner Mistakes (And How to Dodge Them)
Forgetting the seam allowance. If you cut exact X measurements, your bag comes out smaller than planned and the pocket won’t line up. Add it before you cut, not after.
Skipping the press. I know, ironing is boring. But pressing each seam is what makes the corners sharp and the bag stand up straight.
Rushing the bottom corners. This is the only “slow down” moment in the whole project. Pivot carefully and the box shape takes care of itself.
Choosing too-flimsy fabric with no interfacing. The bag will still work, but it’ll slouch. Totally fine if you like a soft bag — just make it on purpose.
Ways to Make It Your Own
- Use a contrasting fabric for the pockets and straps — mustard with navy is gorgeous.
- Add a magnetic snap or a short zipper panel at the top for security.
- Sew a slip pocket inside the lining for cards and lip balm.
- Make three sizes with three different X values: a nesting set makes a lovely handmade gift.
Frequently Asked Questions
Is this tote bag pattern good for beginners?
Yes. It uses only rectangles and straight seams. If you can sew a straight line and turn a corner, you can sew this bag.
How much fabric do I need?
For X = 4″, about ¾ yard of outer fabric and ¾ yard of lining is comfortable, with some left over. Larger X values will need a bit more — lay out your pieces on paper first to check.
Can I make it without a lining?
You can, using French seams or finished edges inside. A lining just makes the bag stronger and nicer to look into.
Can I sell bags made from this pattern?
Check the terms that come with the PDF pattern from the designer before selling finished items.
Final Thoughts: One Measurement, Endless Totes
Remember that farmers’ market moment — coffee in one hand, digging for your phone with the other? This bag fixes it with two little pockets and one smart number. That’s what I love about it. It’s practical, it’s quick to sew, and once you understand X, you’ll never need another tote pattern again.
Start with a fabric you love, cut your pieces, and give yourself an afternoon. By evening you’ll have a bag you’ll actually reach for every day.
Your Turn!
Which X are you going to try first — the 4″ everyday tote or the 5″ market bag? Tell me in the comments, and if you sew one, I’d love to see your fabric choice!